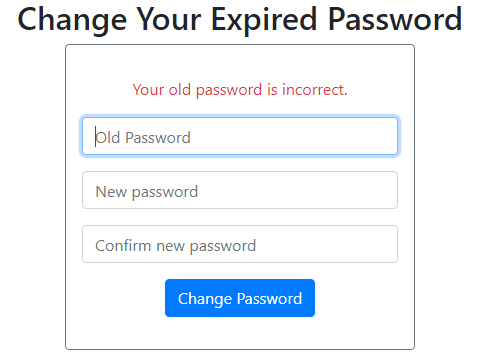
在这个Spring Security教程中,我很乐意与你们分享如何基于Spring Data JPA,Spring Security,Thymeleaf和MySQL数据库等标准技术为现有的Spring Boot应用程序实现密码过期功能。假设您有一个已经实现身份验证的现有 Spring Boot 应用程序,现在需要对其进行更新以实现密码过期功能,具有以下要求:- 用户必须在上次更新密码后的 30 天后更改密码。 - 应用程序将要求用户在发现密码过期时更改其密码, 在他使用网站期间(包括成功登录后)。系统将要求用户以以下形式更改过期的密码:现在,让我们看看如何详细编写代码。
1. 更新数据库表和实体类
假设用户信息存储在名为 customers 的表中,因此您需要更改该表以添加名为password_changed_time 的新列,如下所示:
|
1
2
3
4
5
6
7
8
9
10
11
12
13
14
15
16
17
18
19
20
|
@Entity
@Table(name = "customers")
public class Customer {
private static final long PASSWORD_EXPIRATION_TIME
= 30L * 24L * 60L * 60L * 1000L; // 30 days
@Column(name = "password_changed_time")
private Date passwordChangedTime;
public boolean isPasswordExpired() {
if (this.passwordChangedTime == null) return false;
long currentTime = System.currentTimeMillis();
long lastChangedTime = this.passwordChangedTime.getTime();
return currentTime > lastChangedTime + PASSWORD_EXPIRATION_TIME;
}
// other fields, getters and setters are not shown
}
|
2. 更新用户服务类
接下来,更新用户业务类(在我的例子中是客户服务)以实现更新客户密码的方法,如下所示:当用户更改其密码时,控制器将使用changePassword() 方法。正如您注意到的,密码更改时间值设置为当前日期时间,因此用户将有接下来的 30 天时间,直到新更改的密码过期。
|
1
2
3
4
5
6
7
8
9
10
11
12
13
14
15
16
|
@Service
@Transactional
public class CustomerServices {
@Autowired CustomerRepository customerRepo;
@Autowired PasswordEncoder passwordEncoder;
public void changePassword(Customer customer, String newPassword) {
String encodedPassword = passwordEncoder.encode(newPassword);
customer.setPassword(encodedPassword);
customer.setPasswordChangedTime(new Date());
customerRepo.save(customer);
}
}
|
3. 代码密码过期过滤器
接下来,我们需要编写一个 filter 类来拦截来自应用程序的所有请求,以检查当前登录的用户的密码是否已过期,如下所示:这是确定当前请求是否用于静态资源(images、CSS、JS...)的方法的代码:如果请求用于获取静态资源, 应用程序将继续过滤器链 - 不再处理。下面是返回表示经过身份验证的用户的UserDetails对象的方法的代码:在这里,CustomerDetails是一个实现Spring Security定义的UserDetails接口的类。项目中应该有类似的类。此筛选器类中的最后一种方法是在用户的密码过期时将用户重定向到更改密码页面,如下所示:因此,您可以注意到更改密码页面的相对 URL 是/change_password – 我们将在下一节中编写一个处理此 URL 的控制器类。
|
1
2
3
4
5
6
7
8
9
10
11
12
13
14
15
16
17
18
19
20
21
22
23
24
25
26
|
@Component
public class PasswordExpirationFilter implements Filter {
@Override
public void doFilter(ServletRequest request, ServletResponse response,
FilterChain chain) throws IOException, ServletException {
HttpServletRequest httpRequest = (HttpServletRequest) request;
if (isUrlExcluded(httpRequest)) {
chain.doFilter(request, response);
return;
}
System.out.println("PasswordExpirationFilter");
Customer customer = getLoggedInCustomer();
if (customer != null && customer.isPasswordExpired()) {
showChangePasswordPage(response, httpRequest, customer);
} else {
chain.doFilter(httpRequest, response);
}
}
}
|
|
1
2
3
4
5
6
7
8
9
10
11
|
private boolean isUrlExcluded(HttpServletRequest httpRequest)
throws IOException, ServletException {
String url = httpRequest.getRequestURL().toString();
if (url.endsWith(".css") || url.endsWith(".png") || url.endsWith(".js")
|| url.endsWith("/change_password")) {
return true;
}
return false;
}
|
|
1
2
3
4
5
6
7
8
9
10
11
12
13
14
15
16
|
private Customer getLoggedInCustomer() {
Authentication authentication
= SecurityContextHolder.getContext().getAuthentication();
Object principal = null;
if (authentication != null) {
principal = authentication.getPrincipal();
}
if (principal != null && principal instanceof CustomerUserDetails) {
CustomerUserDetails userDetails = (CustomerUserDetails) principal;
return userDetails.getCustomer();
}
return null;
}
|
|
1
2
3
4
5
6
7
8
9
10
|
private void showChangePasswordPage(ServletResponse response,
HttpServletRequest httpRequest, Customer customer) throws IOException {
System.out.println("Customer: " + customer.getFullName() + " - Password Expired:");
System.out.println("Last time password changed: " + customer.getPasswordChangedTime());
System.out.println("Current time: " + new Date());
HttpServletResponse httpResponse = (HttpServletResponse) response;
String redirectURL = httpRequest.getContextPath() + "/change_password";
httpResponse.sendRedirect(redirectURL);
}
|
4. 代码密码控制器类
接下来,创建一个新的Spring MVC控制器类来显示更改密码页面以及处理密码更改,一些初始代码如下:如您所见,第一个处理程序方法仅返回逻辑视图名称change_password该名称将被解析为相应的HTML页面,这将在下面描述。
|
1
2
3
4
5
6
7
8
9
10
11
12
13
14
15
16
17
18
19
20
21
22
|
@Controller
public class PasswordController {
@Autowired
private CustomerServices customerService;
@Autowired
private PasswordEncoder passwordEncoder;
@GetMapping("/change_password")
public String showChangePasswordForm(Model model) {
model.addAttribute("pageTitle", "Change Expired Password");
return "change_password";
}
@PostMapping("/change_password")
public String processChangePassword() {
// implement later...
}
}
|
5. 代码更改密码页面
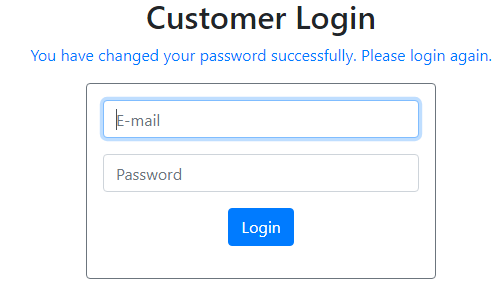
接下来,在文档正文中使用以下代码创建change_password.html页面:这将显示包含 3 个密码字段的更改密码表单:旧密码、新密码和确认新密码。还要放下面的Javascript代码来验证两个新密码字段的匹配:你也可以注意到我使用了HTML 5,Thymeleaf,Bootstrap和jQuery。并实现第二个处理程序方法,用于在提交更改密码页面时更新用户的密码,如下所示:在这里,它获取一个表示经过身份验证的用户的UserDetails对象。然后,它会检查以确保新密码与旧密码不同,并且旧密码正确。如果同时满足这两个条件,它将使用新密码更新用户的密码并将用户注销 - 然后显示登录页面。接下来,我们已准备好测试密码过期功能。
|
1
2
3
4
5
6
7
8
9
10
11
12
13
14
15
16
17
18
19
20
21
22
23
24
25
26
27
28
|
<div>
<h2>Change Your Expired Password</h2>
</div>
<form th:action="@{/change_password}" method="post" style="max-width: 350px; margin: 0 auto;">
<div class="border border-secondary rounded p-3">
<div th:if="${message != null}" class="m-3">
<p class="text-danger">[[${message}]]</p>
</div>
<div>
<p>
<input type="password" name="oldPassword" class="form-control"
placeholder="Old Password" required autofocus />
</p>
<p>
<input type="password" name="newPassword" id="newPassword" class="form-control"
placeholder="New password" required />
</p>
<p>
<input type="password" class="form-control" placeholder="Confirm new password"
required oninput="checkPasswordMatch(this);" />
</p>
<p class="text-center">
<input type="submit" value="Change Password" class="btn btn-primary" />
</p>
</div>
</div>
</form>
|
|
1
2
3
4
5
6
7
|
function checkPasswordMatch(fieldConfirmPassword) {
if (fieldConfirmPassword.value != $("#newPassword").val()) {
fieldConfirmPassword.setCustomValidity("Passwords do not match!");
} else {
fieldConfirmPassword.setCustomValidity("");
}
}
|
|
1
2
3
4
5
6
7
8
9
10
11
12
13
14
15
16
17
18
19
20
21
22
23
24
25
26
27
28
29
30
31
32
|
@PostMapping("/change_password")
public String processChangePassword(HttpServletRequest request, HttpServletResponse response,
Model model, RedirectAttributes ra,
@AuthenticationPrincipal Authentication authentication) throws ServletException {
CustomerUserDetails userDetails = (CustomerUserDetails) authentication.getPrincipal();
Customer customer = userDetails.getCustomer();
String oldPassword = request.getParameter("oldPassword");
String newPassword = request.getParameter("newPassword");
model.addAttribute("pageTitle", "Change Expired Password");
if (oldPassword.equals(newPassword)) {
model.addAttribute("message", "Your new password must be different than the old one.");
return "change_password";
}
if (!passwordEncoder.matches(oldPassword, customer.getPassword())) {
model.addAttribute("message", "Your old password is incorrect.");
return "change_password";
} else {
customerService.changePassword(customer, newPassword);
request.logout();
ra.addFlashAttribute("message", "You have changed your password successfully. "
+ "Please login again.");
return "redirect:/login";
}
}
|
6. 测试密码过期功能
使用像MySQL Workbench这样的数据库工具将用户的更改密码时间更新为从当前日期起超过30天的值。然后尝试使用该用户的电子邮件登录,您应该看到应用程序要求更改密码,如下所示:尝试为 2 个新密码字段输入不同的值,然后单击更改密码按钮,浏览器应立即捕获错误:接下来,尝试输入错误的旧密码但相同的新密码并单击按钮, 您将看到以下错误:现在,使用正确的旧密码和两个相同的新密码提交表单,您应该看到以下屏幕:现在输入新密码登录,您应该能够登录应用程序。还要检查数据库以确保密码更改时间列的值设置为新值,即当前日期和时间。恭喜,您已成功为现有的 Spring 引导应用程序实现密码过期功能。要了解实际编码,我建议您观看以下视频:


