在之前的一篇文章《PointNet:3D点集分类与分割深度学习模型》中分析了PointNet网络是如何进行3D点云数据分类与分割的。但是PointNet存在的一个缺点是无法获得局部特征,这使得它很难对复杂场景进行分析。在PointNet++中,作者通过两个主要的方法进行了改进,使得网络能更好的提取局部特征。第一,利用空间距离(metric space distances),使用PointNet对点集局部区域进行特征迭代提取,使其能够学到局部尺度越来越大的特征。第二,由于点集分布很多时候是不均匀的,如果默认是均匀的,会使得网络性能变差,所以作者提出了一种自适应密度的特征提取方法。通过以上两种方法,能够更高效的学习特征,也更有鲁棒性。
(2021-1-27日补充):这是PointNet作者2021年分享的报告《3D物体检测发展与未来》,对3D物体检测感兴趣的朋友可以看看。
【PointNet作者亲述】90分钟带你了解3D物体检测算法和未来方向!
补充:下面的视频是PointNet++作者分享的报告《点云上的深度学习及其在三维场景理解中的应用》,里面有详细介绍PointNet++(将门创投 | 斯坦福大学在读博士生祁芮中台:点云上的深度学习及其在三维场景理解中的应用_哔哩哔哩_bilibili)。
将门创投 | 斯坦福大学在读博士生祁芮中台:点云上的深度学习及其在三维场景理解中的应用
目录
2.5 Point Feature Propagation for Set Segmentation
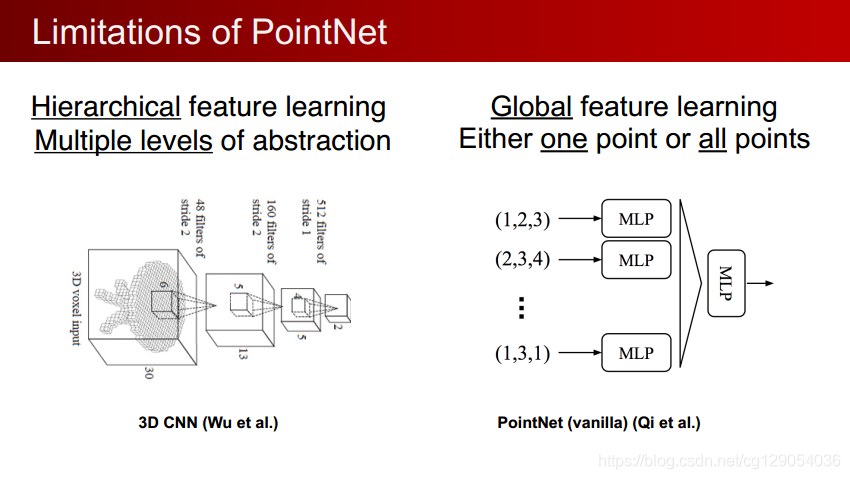
1.PointNet不足之处
在卷积神经网络中,3D CNN和2D CNN很像,也可以通过多级学习不断进行提取,同时也具有着卷积的平移不变性。
而在PointNet中 网络对每一个点做低维到高维的映射进行特征学习,然后把所有点映射到高维的特征通过最大池化最终表示全局特征。从本质上来说,要么对一个点做操作,要么对所有点做操作,实际上没有局部的概念(loal context) 。同时也缺少local context 在平移不变性上也有局限性。(世界坐标系和局部坐标系)。对点云数据做平移操作后,所有的数据都将发生变化,导致所有的特征,全局特征都不一样了。对于单个的物体还好,可以将其平移到坐标系的中心,把他的大小归一化到一个球中,但是在一个场景中有多个物体时则不好办,需要对哪个物体做归一化呢?
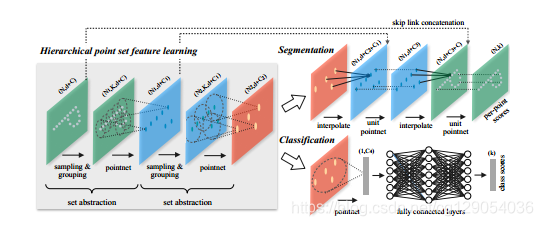
在PointNet++中,作者利用所在空间的距离度量将点集划分(partition)为有重叠的局部区域。在此基础上,首先在小范围中从几何结构中提取局部特征(浅层特征),然后扩大范围,在这些局部特征的基础上提取更高层次的特征,直到提取到整个点集的全局特征。可以发现,这个过程和CNN网络的特征提取过程类似,首先提取低级别的特征,随着感受野的增大,提取的特征level越来越高。
PointNet++需要解决两个关键的问题:第一,如何将点集划分为不同的区域;第二,如何利用特征提取器获取不同区域的局部特征。这两个问题实际上是相关的,要想通过特征提取器来对不同的区域进行特征提取,需要每个分区具有相同的结构。这里同样可以类比CNN来理解,在CNN中,卷积块作为基本的特征提取器,对应的区域都是(n, n)的像素区域。而在3D点集当中,同样需要找到结构相同的子区域,和对应的区域特征提取器。
在本文中,作者使用了PointNet作为特征提取器,另外一个问题就是如何来划分点集从而产生结构相同的区域。作者使用邻域球来定义分区,每个区域可以通过中心坐标和半径来确定。中心坐标的选取,作者使用了最远点采样算法算法来实现(farthest point sampling (FPS) algorithm)。
2. PointNet++网络结构
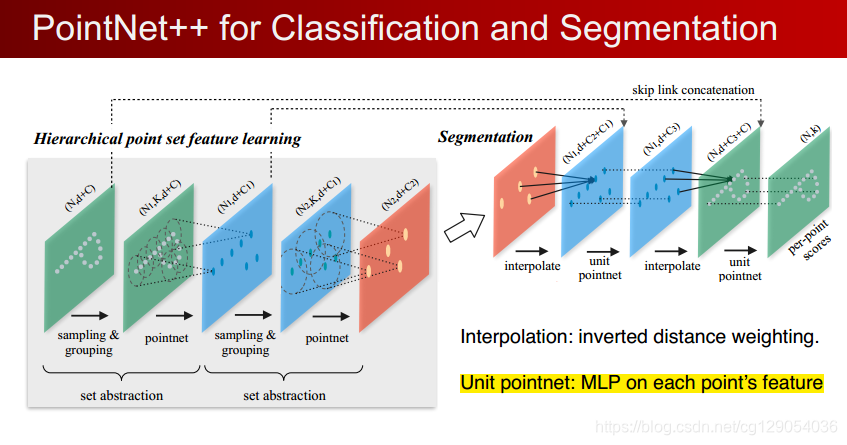
PointNet++是PointNet的延伸,在PointNet的基础上加入了多层次结构(hierarchical structure),使得网络能够在越来越大的区域上提供更高级别的特征。
网络的每一组set abstraction layers主要包括3个部分:Sampling layer, Grouping layer and PointNet layer。
· Sample layer:主要是对输入点进行采样,在这些点中选出若干个中心点;
· Grouping layer:是利用上一步得到的中心点将点集划分成若干个区域;
· PointNet layer:是对上述得到的每个区域进行编码,变成特征向量。
每一组提取层的输入是

2.1 Sample layer
使用farthest point sampling(FPS)选择N'个点,至于为什么选择使用这种方法选择点,文中提到相比于随机采样,这种方法能更好的的覆盖整个点集。具体选择多少个中心点,数量怎么确定,可以看做是超参数视数据规模来定。
FPS算法原理为:
- 从点云中选取第一个点A作为查询点,从剩余点中,选取一个距离最远的点B;
- 以取出来的点A,B作为查询点,从剩余点中,取距离最远的点C。此时,由于已经取出来的点的个数超过1,需要同时考虑所有查询点(A,B)。方法如下:
- 对于剩余点中的任意一个点P,计算该点P到已经选中的点集中所有点(A, B)的距离;取与点A和B的距离最小值作为该点到已选点集的距离d;
- 计算出每个剩余点到点集的距离后,选取距离最大的那个点,即为点C。
- 重复第2步,一直采样到N'个点为止。
其Python实现代码为:
def farthest_point_sample(xyz, npoint):

    """
    Input:
        xyz: pointcloud data, [B, N, 3]
        npoint: number of samples
    Return:
        centroids: sampled pointcloud index, [B, npoint, 3]
    """

    device = xyz.device
    B, N, C = xyz.shape

    centroids = torch.zeros(B, npoint, dtype=torch.long).to(device) # 采样点矩阵(B, npoint)
    distance = torch.ones(B, N).to(device) * 1e10                   # 采样点到所有点距离(B, N)
    farthest = torch.randint(0, N, (B,), dtype=torch.long).to(device) # 最远点,初试时随机选择一点点
    batch_indices = torch.arange(B, dtype=torch.long).to(device)    # batch_size 数组

    for i in range(npoint):
        centroids[:, i] = farthest        # 更新第i个最远点
        centroid = xyz[batch_indices, farthest, :].view(B, 1, 3) # 取出这个最远点的xyz坐标
        dist = torch.sum((xyz - centroid) ** 2, -1) # 计算点集中的所有点到这个最远点的欧式距离
        mask = dist < distance
        distance[mask] = dist[mask]  # 更新distances,记录样本中每个点距离所有已出现的采样点的最小距离
        farthest = torch.max(distance, -1)[1] # 返回最远点索引

    return centroids
2.2 Grouping layer
这一层使用Ball query方法对sample layers采样的点生成
代码为:
def square_distance(src, dst):

    """
    Calculate Euclid distance between each two points.
    src^T * dst = xn * xm + yn * ym + zn * zm;
    sum(src^2, dim=-1) = xn*xn + yn*yn + zn*zn;
    sum(dst^2, dim=-1) = xm*xm + ym*ym + zm*zm;
    dist = (xn - xm)^2 + (yn - ym)^2 + (zn - zm)^2
         = sum(src**2,dim=-1)+sum(dst**2,dim=-1)-2*src^T*dst
    Input:
        src: source points, [B, N, C]
        dst: target points, [B, M, C]
    Output:
        dist: per-point square distance, [B, N, M]
    """

    B, N, _ = src.shape
    _, M, _ = dst.shape
    dist = -2 * torch.matmul(src, dst.permute(0, 2, 1))
    dist += torch.sum(src ** 2, -1).view(B, N, 1)
    dist += torch.sum(dst ** 2, -1).view(B, 1, M)

    return dist

def query_ball_point(radius, nsample, xyz, new_xyz):

    """
    Input:
        radius: local region radius
        nsample: max sample number in local region
        xyz: all points, [B, N, 3]
        new_xyz: query points, [B, S, 3]
    Return:
        group_idx: grouped points index, [B, S, nsample]
    """

    device = xyz.device
    B, N, C = xyz.shape
    _, S, _ = new_xyz.shape

    group_idx = torch.arange(N, dtype=torch.long).to(device).view(1, 1, N).repeat([B, S, 1])
    sqrdists = square_distance(new_xyz, xyz)
    group_idx[sqrdists > radius ** 2] = N
    group_idx = group_idx.sort(dim=-1)[0][:, :, :nsample]
    group_first = group_idx[:, :, 0].view(B, S, 1).repeat([1, 1, nsample])
    mask = group_idx == N
    group_idx[mask] = group_first[mask]

    return group_idx
2.3 PointNet layer
这一层是PointNet网络,输入为局部区域:

class PointNetSetAbstraction(nn.Module):
    def __init__(self, npoint, radius, nsample, in_channel, mlp, group_all):
        super(PointNetSetAbstraction, self).__init__()
        self.npoint = npoint
        self.radius = radius
        self.nsample = nsample
        self.mlp_convs = nn.ModuleList()
        self.mlp_bns = nn.ModuleList()
        last_channel = in_channel
        for out_channel in mlp:
            self.mlp_convs.append(nn.Conv2d(last_channel, out_channel, 1))
            self.mlp_bns.append(nn.BatchNorm2d(out_channel))
            last_channel = out_channel
        self.group_all = group_all

    def forward(self, xyz, points):

        """
        Input:
            xyz: input points position data, [B, C, N]
            points: input points data, [B, D, N]
        Return:
            new_xyz: sampled points position data, [B, C, S]
            new_points_concat: sample points feature data, [B, D', S]
        """

        xyz = xyz.permute(0, 2, 1)
        if points is not None:
            points = points.permute(0, 2, 1)

        if self.group_all:
            new_xyz, new_points = sample_and_group_all(xyz, points)
        else:
            new_xyz, new_points = sample_and_group(self.npoint, self.radius, self.nsample, xyz, points)
        # new_xyz: sampled points position data, [B, npoint, C]
        # new_points: sampled points data, [B, npoint, nsample, C+D]
        new_points = new_points.permute(0, 3, 2, 1) # [B, C+D, nsample,npoint]
        for i, conv in enumerate(self.mlp_convs):
            bn = self.mlp_bns[i]
            new_points =  F.relu(bn(conv(new_points)))

        new_points = torch.max(new_points, 2)[0]
        new_xyz = new_xyz.permute(0, 2, 1)

        return new_xyz, new_points
2.4 点云分布不一致的处理方法
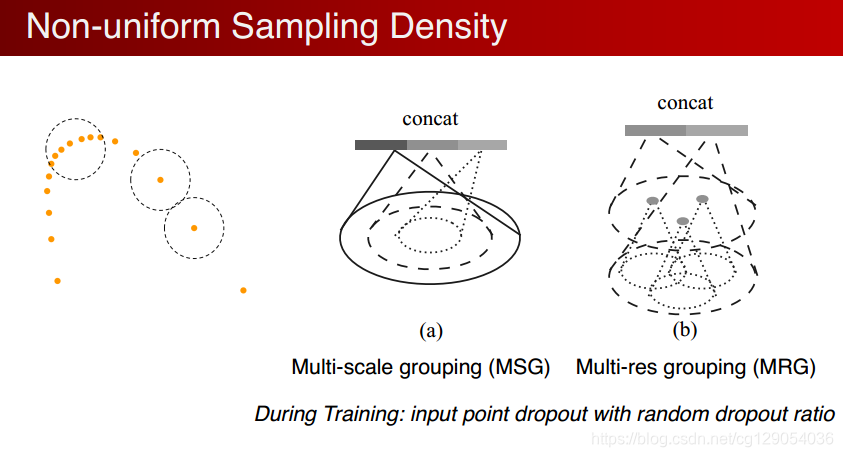
点云分布不一致时,每个子区域中如果在生成的时候使用相同的半径r,会导致有些区域采样点过少。
作者提到这个问题需要解决,并且提出了两个方法:Multi-scale grouping (MSG) and Multi-resolution grouping (MRG)。下面是论文当中的示意图。
下面分别介绍一下这两种方法。
第一种多尺度分组(MSG),对于同一个中心点,如果使用3个不同尺度的话,就分别找围绕每个中心点画3个区域,每个区域的半径及里面的点的个数不同。对于同一个中心点来说,不同尺度的区域送入不同的PointNet进行特征提取,之后concat,作为这个中心点的特征。也就是说MSG实际上相当于并联了多个hierarchical structure,每个结构中心点不变,但是区域范围不同。PointNet的输入和输出尺寸也不同,然后几个不同尺度的结构在PointNet有一个Concat。代码是:
class PointNetSetAbstractionMsg(nn.Module):
    def __init__(self, npoint, radius_list, nsample_list, in_channel, mlp_list):
        super(PointNetSetAbstractionMsg, self).__init__()
        self.npoint = npoint
        self.radius_list = radius_list
        self.nsample_list = nsample_list
        self.conv_blocks = nn.ModuleList()
        self.bn_blocks = nn.ModuleList()

        for i in range(len(mlp_list)):
            convs = nn.ModuleList()
            bns = nn.ModuleList()
            last_channel = in_channel + 3
            for out_channel in mlp_list[i]:
                convs.append(nn.Conv2d(last_channel, out_channel, 1))
                bns.append(nn.BatchNorm2d(out_channel))
                last_channel = out_channel
            self.conv_blocks.append(convs)
            self.bn_blocks.append(bns)

    def forward(self, xyz, points):
        """
        Input:
            xyz: input points position data, [B, C, N]
            points: input points data, [B, D, N]
        Return:
            new_xyz: sampled points position data, [B, C, S]
            new_points_concat: sample points feature data, [B, D', S]
        """
        xyz = xyz.permute(0, 2, 1)
        if points is not None:
            points = points.permute(0, 2, 1)

        B, N, C = xyz.shape
        S = self.npoint
        new_xyz = index_points(xyz, farthest_point_sample(xyz, S))
        new_points_list = []

        for i, radius in enumerate(self.radius_list):
            K = self.nsample_list[i]
            group_idx = query_ball_point(radius, K, xyz, new_xyz)
            grouped_xyz = index_points(xyz, group_idx)
            grouped_xyz -= new_xyz.view(B, S, 1, C)
            if points is not None:
                grouped_points = index_points(points, group_idx)
                grouped_points = torch.cat([grouped_points, grouped_xyz], dim=-1)
            else:
                grouped_points = grouped_xyz

            grouped_points = grouped_points.permute(0, 3, 2, 1)  # [B, D, K, S]
            for j in range(len(self.conv_blocks[i])):
                conv = self.conv_blocks[i][j]
                bn = self.bn_blocks[i][j]
                grouped_points =  F.relu(bn(conv(grouped_points)))
            new_points = torch.max(grouped_points, 2)[0]  # [B, D', S]
            new_points_list.append(new_points)

        new_xyz = new_xyz.permute(0, 2, 1)
        new_points_concat = torch.cat(new_points_list, dim=1)

        return new_xyz, new_points_concat
另一种是多分辨率分组(MRG)。MSG很明显会影响降低运算速度,所以提出了MRG,这种方法应该是对不同level的grouping做了一个concat,但是由于尺度不同,对于low level的先放入一个pointnet进行处理再和high level的进行concat。感觉和ResNet中的跳跃连接有点类似。
在这部分,作者还提到了一种random input dropout(DP)的方法,就是在输入到点云之前,对点集进行随机的Dropout, 比例为95%,也就是说进行95%的比例采样。
2.5 Point Feature Propagation for Set Segmentation
对于点云分割任务,我们还需要将点集上采样回原始点集数量,这里使用了分层的差值方法。代码为:
class PointNetFeaturePropagation(nn.Module):
    def __init__(self, in_channel, mlp):
        super(PointNetFeaturePropagation, self).__init__()
        self.mlp_convs = nn.ModuleList()
        self.mlp_bns = nn.ModuleList()
        last_channel = in_channel
        for out_channel in mlp:
            self.mlp_convs.append(nn.Conv1d(last_channel, out_channel, 1))
            self.mlp_bns.append(nn.BatchNorm1d(out_channel))
            last_channel = out_channel

    def forward(self, xyz1, xyz2, points1, points2):
        """
        Input:
            xyz1: input points position data, [B, C, N]
            xyz2: sampled input points position data, [B, C, S]
            points1: input points data, [B, D, N]
            points2: input points data, [B, D, S]
        Return:
            new_points: upsampled points data, [B, D', N]
        """
        xyz1 = xyz1.permute(0, 2, 1)
        xyz2 = xyz2.permute(0, 2, 1)

        points2 = points2.permute(0, 2, 1)
        B, N, C = xyz1.shape
        _, S, _ = xyz2.shape

        if S == 1:
            interpolated_points = points2.repeat(1, N, 1)
        else:
            dists = square_distance(xyz1, xyz2)
            dists, idx = dists.sort(dim=-1)
            dists, idx = dists[:, :, :3], idx[:, :, :3]  # [B, N, 3]
            dists[dists < 1e-10] = 1e-10
            weight = 1.0 / dists  # [B, N, 3]
            weight = weight / torch.sum(weight, dim=-1).view(B, N, 1)  # [B, N, 3]
            interpolated_points = torch.sum(index_points(points2, idx) * weight.view(B, N, 3, 1), dim=2)

        if points1 is not None:
            points1 = points1.permute(0, 2, 1)
            new_points = torch.cat([points1, interpolated_points], dim=-1)
        else:
            new_points = interpolated_points

        new_points = new_points.permute(0, 2, 1)
        for i, conv in enumerate(self.mlp_convs):
            bn = self.mlp_bns[i]
            new_points =  F.relu(bn(conv(new_points)))
        return new_points
2.6 Classification
class PointNet2ClsMsg(nn.Module):
    def __init__(self):
        super(PointNet2ClsMsg, self).__init__()
        self.sa1 = PointNetSetAbstractionMsg(512, [0.1, 0.2, 0.4], [16, 32, 128], 0, [[32, 32, 64], [64, 64, 128], [64, 96, 128]])
        self.sa2 = PointNetSetAbstractionMsg(128, [0.2, 0.4, 0.8], [32, 64, 128], 320, [[64, 64, 128], [128, 128, 256], [128, 128, 256]])
        self.sa3 = PointNetSetAbstraction(None, None, None, 640 + 3, [256, 512, 1024], True)
        self.fc1 = nn.Linear(1024, 512)
        self.bn1 = nn.BatchNorm1d(512)
        self.drop1 = nn.Dropout(0.4)
        self.fc2 = nn.Linear(512, 256)
        self.bn2 = nn.BatchNorm1d(256)
        self.drop2 = nn.Dropout(0.4)
        self.fc3 = nn.Linear(256, 40)

    def forward(self, xyz):
        B, _, _ = xyz.shape
        l1_xyz, l1_points = self.sa1(xyz, None)
        l2_xyz, l2_points = self.sa2(l1_xyz, l1_points)
        l3_xyz, l3_points = self.sa3(l2_xyz, l2_points)
        x = l3_points.view(B, 1024)
        x = self.drop1(F.relu(self.bn1(self.fc1(x))))
        x = self.drop2(F.relu(self.bn2(self.fc2(x))))
        x = self.fc3(x)
        x = F.log_softmax(x, -1)
        return x
2.7 Part Segmentation
class PointNet2PartSeg(nn.Module):
    def __init__(self, num_classes):
        super(PointNet2PartSeg, self).__init__()
        self.sa1 = PointNetSetAbstraction(npoint=512, radius=0.2, nsample=64, in_channel=3, mlp=[64, 64, 128], group_all=False)
        self.sa2 = PointNetSetAbstraction(npoint=128, radius=0.4, nsample=64, in_channel=128 + 3, mlp=[128, 128, 256], group_all=False)
        self.sa3 = PointNetSetAbstraction(npoint=None, radius=None, nsample=None, in_channel=256 + 3, mlp=[256, 512, 1024], group_all=True)
        self.fp3 = PointNetFeaturePropagation(in_channel=1280, mlp=[256, 256])
        self.fp2 = PointNetFeaturePropagation(in_channel=384, mlp=[256, 128])
        self.fp1 = PointNetFeaturePropagation(in_channel=128, mlp=[128, 128, 128])
        self.conv1 = nn.Conv1d(128, 128, 1)
        self.bn1 = nn.BatchNorm1d(128)
        self.drop1 = nn.Dropout(0.5)
        self.conv2 = nn.Conv1d(128, num_classes, 1)

    def forward(self, xyz):
        # Set Abstraction layers
        l1_xyz, l1_points = self.sa1(xyz, None)
        l2_xyz, l2_points = self.sa2(l1_xyz, l1_points)
        l3_xyz, l3_points = self.sa3(l2_xyz, l2_points)
        # Feature Propagation layers
        l2_points = self.fp3(l2_xyz, l3_xyz, l2_points, l3_points)
        l1_points = self.fp2(l1_xyz, l2_xyz, l1_points, l2_points)
        l0_points = self.fp1(xyz, l1_xyz, None, l1_points)
        # FC layers
        feat =  F.relu(self.bn1(self.conv1(l0_points)))
        x = self.drop1(feat)
        x = self.conv2(x)
        x = F.log_softmax(x, dim=1)
        x = x.permute(0, 2, 1)
        return x, feat
2.8 Scene Segmentation
class PointNet2SemSeg(nn.Module):
    def __init__(self, num_classes):
        super(PointNet2SemSeg, self).__init__()
        self.sa1 = PointNetSetAbstraction(1024, 0.1, 32, 3, [32, 32, 64], False)
        self.sa2 = PointNetSetAbstraction(256, 0.2, 32, 64 + 3, [64, 64, 128], False)
        self.sa3 = PointNetSetAbstraction(64, 0.4, 32, 128 + 3, [128, 128, 256], False)
        self.sa4 = PointNetSetAbstraction(16, 0.8, 32, 256 + 3, [256, 256, 512], False)
        self.fp4 = PointNetFeaturePropagation(768, [256, 256])
        self.fp3 = PointNetFeaturePropagation(384, [256, 256])
        self.fp2 = PointNetFeaturePropagation(320, [256, 128])
        self.fp1 = PointNetFeaturePropagation(128, [128, 128, 128])
        self.conv1 = nn.Conv1d(128, 128, 1)
        self.bn1 = nn.BatchNorm1d(128)
        self.drop1 = nn.Dropout(0.5)
        self.conv2 = nn.Conv1d(128, num_classes, 1)

    def forward(self, xyz):
        l1_xyz, l1_points = self.sa1(xyz, None)
        l2_xyz, l2_points = self.sa2(l1_xyz, l1_points)
        l3_xyz, l3_points = self.sa3(l2_xyz, l2_points)
        l4_xyz, l4_points = self.sa4(l3_xyz, l3_points)

        l3_points = self.fp4(l3_xyz, l4_xyz, l3_points, l4_points)
        l2_points = self.fp3(l2_xyz, l3_xyz, l2_points, l3_points)
        l1_points = self.fp2(l1_xyz, l2_xyz, l1_points, l2_points)
        l0_points = self.fp1(xyz, l1_xyz, None, l1_points)

        x = self.drop1(F.relu(self.bn1(self.conv1(l0_points))))
        x = self.conv2(x)
        x = F.log_softmax(x, dim=1)
        return x
3. 参考资料
PointNet++作者分享报告:将门创投 | 斯坦福大学在读博士生祁芮中台:点云上的深度学习及其在三维场景理解中的应用_哔哩哔哩_bilibili
PointNet++官网链接:PointNet++
PointNet++代码:https://github.com/yanx27/Pointnet_Pointnet2_pytorch
PointNet++作者视频讲解文字版:PointNet++作者的视频讲解文字版 - 一杯明月 - 博客园


