一、Spring IoC使用-基于XML
1 IoC使用-基于XML
使用SpringIoC组件创建并管理对象
1.1 创建实体类
package com.feng.ioc.bean;

import java.util.Date;

/**
 * @program: spring-ioc-demo1
 * @description: 学生实体类
 * @author: FF
 * @create: 2024-12-04 18:53
 **/
public class Student {
    private String stuNum;
    private String stuName;
    private int stuAge;
    private Date enterenceTime;//学生的入学日期

    public String getStuNum() {
        return stuNum;
    }

    public String getStuName() {
        return stuName;
    }

    public int getStuAge() {
        return stuAge;
    }

    public Date getEnterenceTime() {
        return enterenceTime;
    }

    public void setStuNum(String stuNum) {
        this.stuNum = stuNum;
    }

    public void setStuName(String stuName) {
        this.stuName = stuName;
    }

    public void setStuAge(int stuAge) {
        this.stuAge = stuAge;
    }

    public void setEnterenceTime(Date enterenceTime) {
        this.enterenceTime = enterenceTime;
    }

    @Override
    public String toString() {
        return "Student{" +
                "stuNum='" + stuNum + '\'' +
                ", stuName='" + stuName + '\'' +
                ", stuAge=" + stuAge +
                ", enterenceTime='" + enterenceTime + '\'' +
                '}';
    }
}
1.2 在Spring配置文件中配置实体类
<?xml version="1.0" encoding="UTF-8"?>
<beans xmlns="http://www.springframework.org/schema/beans"
       xmlns:xsi="http://www.w3.org/2001/XMLSchema-instance"
       xsi:schemaLocation="http://www.springframework.org/schema/beans
                           http://www.springframework.org/schema/beans/spring-beans.xsd">
<!-- 对于一个xml文件如果作为框架的配置文件,需要遵守框架的配置规则 -->
    <!-- 通常一个框架为了让开发者能够正确的配置,都会提供xml规范文件 (dtd\xsd)-->
    <!--通过bean标签将实体类配置给Spring进行管理.id表示实体类的唯一标识-->
    <bean id="student" class="com.feng.ioc.bean.Student">
        <property name="stuNum" value="2"/>
        <property name="stuName" value="小帅"/>
        <property name="stuAge" value="20"/>
    </bean>

</beans>
1.3 初始化Spring对象工厂,获取对象
-
ClassPathXmlApplicationContext
package com.feng.ioc.test;

import com.feng.ioc.bean.Student;
import org.springframework.context.support.ClassPathXmlApplicationContext;

/**
 * @program: spring-ioc-demo1
 * @description: 测试类
 * @author: FF
 * @create: 2024-12-04 19:03
 **/
public class Test2 {
    public static void main(String[] args) {
        // 通过Spring容器创建Student对象
        //1.初始化Spring容器
        ClassPathXmlApplicationContext classPathXmlApplicationContext = new ClassPathXmlApplicationContext("applicationContext.xml");
        //2.通过Spring容器,获取Student对象
        Student student = (Student) classPathXmlApplicationContext.getBean("student");
        System.out.println(student);
    }
}
2 IoC和DI
- IoC控制反转,通过Spring工厂完成对象的创建
- DI 依赖注入,在Spring完成对象创建的同时,依赖Spring容器完成对象属性的赋值
2.1 IoC
当我们需要Spring对象工厂创建某个类的实例时,需要将这个类交给Spring管理–通过bean标签配置
<bean id="date" class="java.util.Date"/>
<bean id="student" class="com.feng.ioc.bean.Student">

</bean>
2.2 DI
通过Spring容器给创建的对象属性赋值
<bean id="date" class="java.util.Date"/>
<bean id="student" class="com.feng.ioc.bean.Student">
    <property name="stuNum" value="2"/>
    <property name="stuName" value="小帅"/>
    <property name="stuAge" value="20"/>
    <property name="enterenceTime" ref="date"/>
</bean>
3 DI依赖注入
3.1 依赖注入的三种方式
Spring容器加载配置文件后,通过反射创建类的对象,并给属性赋值。
Spring容器通过反射实现属性注入有两种方式:
- set方法注入
- 构造器注入
- 接口注入
3.2 set方法注入
bean标签中的通过配置标签给属性赋值,也就是通过反射的set方法注入
简单类型及字符串类型
直接通过property标签的value属性赋值
<bean id="student" class="com.feng.ioc.bean.Student">
        <property name="stuNum" value="2"/>
        <property name="stuName" value="小帅"/>
        <property name="stuAge" value="20"/>
        <property name="weight" value="20"/>
    </bean>
日期对象
- 方式一:在property标签中通过ref引用Spring容器中的一个对象
   	<bean id="date" class="java.util.Date"/>

    <bean id="student" class="com.feng.ioc.bean.Student">
        <!--日期类型赋值-->
        <property name="enterenceTime" ref="date"/>
    </bean>
- 方式二:在property标签中添加子标签bean来指定对象
    <bean id="student" class="com.feng.ioc.bean.Student">
        <!--日期类型赋值-->
        <!--<property name="enterenceTime" ref="date"/>-->
        <property name="enterenceTime">
            <bean class="java.util.Date"/>
        </property>
	</bean>
自定义对象类型
- 方式一:在property标签中通过ref引用Spring容器中的一个对象
<bean id="clazz" class="com.feng.ioc.bean.Clazz">
    <property name="cid" value="1"/>
    <property name="cname" value="计算机应用01班"/>
</bean>
<bean id="student" class="com.feng.ioc.bean.Student">
    <property name="clazz" ref="clazz"/>
</bean>
方式二:在property标签中添加子标签bean来指定对象
<bean id="student" class="com.feng.ioc.bean.Student">
    <property name="clazz" >
        <bean class="com.feng.ioc.bean.Clazz">
            <property name="cid" value="01"/>
            <property name="cname"  value="计算机"/>
        </bean>
    </property>
</bean>
集合类型
-
list:
-
List:List中是字符串或简单类型的封装
<property name="hobbies" value="吃饭,喝酒"/> -
List:List中的元素是对象类型
		<property name="clazzes">
            <list>
                <bean class="com.feng.ioc.bean.Clazz">
                    <property name="cid" value="1"/>
                    <property name="cname" value="计算机"/>
                </bean>
                <bean class="com.feng.ioc.bean.Clazz">
                    <property name="cid" value="2"/>
                    <property name="cname" value="计算机2"/>
                </bean>
            </list>
        </property>
-
-
Set:与List方式相同,将标签改为标签
<property name="clazzes">
        <set>
            <bean class="com.feng.ioc.bean.Clazz">
                <property name="cid" value="1"/>
                <property name="cname" value="计算机"/>
            </bean>
            <bean class="com.feng.ioc.bean.Clazz">
                <property name="cid" value="2"/>
                <property name="cname" value="计算机2"/>
            </bean>
        </set>
    </property>
- Map:—
		<property name="map">
            <map>
                <entry key="1" value="map1"/>
                <entry key="2" value="map2"/>
            </map>
        </property>
- Properties
		<property name="properties">
            <props>
                <prop key="1">value1</prop>
                <prop key="2">value2</prop>
            </props>
        </property>
3.3 构造器注入
简单类型、字符串、对象
<bean id="date" class="java.util.Date"/>
    <bean id="clazz" class="com.feng.ioc.bean.Clazz">
        <property name="cid" value="1"/>
        <property name="cname" value="计算机应用01班"/>
    </bean>
    <!--构造器注入-->
    <bean id="student" class="com.feng.ioc.bean.Student">
        <constructor-arg value="1001"/>
        <constructor-arg value="小明"/>
        <constructor-arg value="18"/>
        <constructor-arg value="55.5"/>
        <constructor-arg ref="date"/>
        <constructor-arg ref="clazz"/>
    </bean>
集合类型
<!--构造器注入-->
    <bean id="student" class="com.feng.ioc.bean.Student">
        <constructor-arg>
            <list>
                <value>吃饭</value>
                <value>喝酒</value>
            </list>
        </constructor-arg>
        <constructor-arg>
            <list>
                <bean class="com.feng.ioc.bean.Clazz">
                    <property name="cid" value="101"/>
                    <property name="cname" value="计算机"/>
                </bean>
            </list>
        </constructor-arg>
        <constructor-arg>
            <set>
                <value>抽烟</value>
                <value>烫头</value>
            </set>
        </constructor-arg>
        <constructor-arg>
            <map>
                <entry key="1" value="map1"/>
                <entry key="2" value="map2"/>
            </map>
        </constructor-arg>
        <constructor-arg>
            <props>
                <prop key="3">prop3</prop>
                <prop key="4">prop4</prop>
            </props>
        </constructor-arg>
    </bean>
4 Bean的作用域
在bean标签中,可以通过scope属性,指定对象的作用域
- scope = singleton 单例模式(默认饿汉模式,Spring容器初始化阶段会完成此对象创建)
- lazy-init = true — 懒汉模式
- scope = prototype 多例模式
5 Bean的生命周期
在bean标签中通过init-method属性,指定当前bean的初始化方法,初始化方法在构造器执行之后执行
通过destroy-method属性,指定当前bean的销毁方法,销毁方法在对象销毁之前执行
6 自动装配
自动装配(autowire):Spring在实例化当前bean时,从容器中找到匹配的实例,赋值给当前bean的属性
autowire=“byName”:根据bean属性名
autowire=“byType”:根据bean属性类型
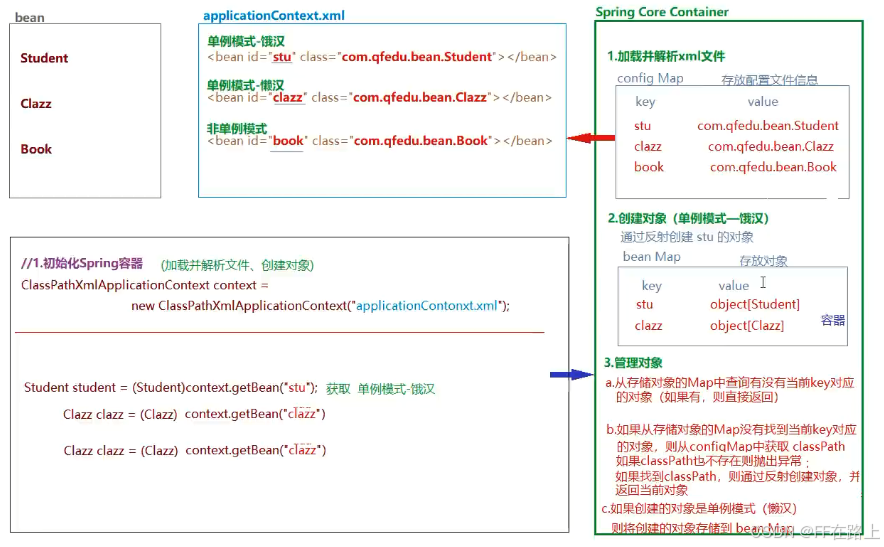
7 Spring IoC工作原理
- 当初始化Spring容器时:
- Spring会加载并解析xml文件,并将解析结果存放到config Map中。
- 单例模式-饿汉,则会通过配置ID,从config Map取出key对应的value(类的全路径地址)
- 通过反射机制,创建对象,并将对象存放到bean Map中。
- 当业务代码通过context.getBean(“”)创建对象时:
- 单例模式-饿汉:直接通过参数id从bean Map中取出对象;
- 单例模式-懒汉:先通过参数id从bean Map中寻找对象是否存在?存在则直接使用,不存在,则去config Map中找到classPath,通过反射创建对象并返回,同时将创建的对象
保存到bean Map,以供下次实例创建时调用;(如果configMap中没有找到对应classPath,则抛出异常)- 多例模式:通过参数id从bean Map中寻找是否存在?存在即直接使用,不存在则去config Map中找到classPath,通过反射创建对象并返回,但是
不保存bean Map,因为下次创建新对象的时候,需要重新调用反射创建。
二、Spring IoC – 基于注解
Spring IoC的使用,需要我们通过XML将类声明给Spring容器进行管理,从而通过Spring工厂完成对象的创建及属性值注入。
Spring除了提供基于xml的配置方法,同时提供了基于注解的配置:直接在实体类中添加注解声明给Spring容器管理,以简化开发步骤。
2.1 框架部署
-
创建maven工程
-
添加Spring依赖
-
	<dependencies>
        <dependency>
            <groupId>org.springframework</groupId>
            <artifactId>spring-context</artifactId>
            <version>5.2.25.RELEASE</version>
        </dependency>
    </dependencies>
-
-
创建Spring配置文件
Spring容器初始化时,只会加载applicationContext.xml,那么我们实体类中添加的注解就不会被Spring扫描,所以我们需要在application Context.xml声明Spring的扫描范围,以达到Spring初始化时扫描带有注解的实体类并完成初始化工作。
<?xml version="1.0" encoding="UTF-8"?>
<beans xmlns="http://www.springframework.org/schema/beans"
       xmlns:xsi="http://www.w3.org/2001/XMLSchema-instance"
       xmlns:context="http://www.springframework.org/schema/context"
       xsi:schemaLocation="http://www.springframework.org/schema/beans
                           http://www.springframework.org/schema/beans/spring-beans.xsd
                           http://www.springframework.org/schema/context
                           http://www.springframework.org/schema/context/spring-context.xsd">
    <!--声明使用注解配置-->
    <context:annotation-config/>
    <!--声明Spring工厂注解的扫描范围-->
    <context:component-scan base-package="com.feng.bean"/>
</beans>
2.2 IoC常用注解
2.2.1 @Component
- 类注解:声明此类被容器管理,相当于bean标签作用
- @Component(value=“stu”) value 属性用于指定当前bean的id,相当于bean标签的id属性;value属性也可以省略,如果省略当前类的id默认类名首字母改小写;
- @Service @Controller @Repository 这三个注解也可以将类声明给Spring管理,他们主要是语义上的区别
- @Controller 注解主要声明将控制器类配置给Spring管理,例如Servlet
- @Service 注解主要声明业务处理类配置给Spring管理,例如Service接口的实现类
- @Repository 注解主要声明持久化类配置给Spring管理,例如DAO接口
- @Component 除了控制器、service和DAO之外的类,一律使用此注解声明
2.2.2 @Scope
- 类注解,用于声明当前类是单例模式还是多例模式,相当于bean标签的scope属性
- @Scope(“prototype”) 表示声明当前类为非单例模式(默认是单例模式)
2.2.3 @Lazy(value = false)
类注解,用于声明一个单例模式的bean是否为懒汉模式
@Lazy(value = true) 表示为懒汉模式。
2.2.4 @PostConstruct
- 方法注解:声明一个方法为当前类的初始化方法(在构造器之后),相当于bean标签的init-method属性
2.2.5 @PreDestroy
- 方法注解:声明一个方法为当前类的销毁方法(在对象从容器中释放之前执行),相当于bean标签的destory-method属性
2.2.6 @Autowired
- 属性注解、方法注解(set方法):自动装配,默认 byType
- @Autowired(required = false) 通过requried属性,设置当前自动装配是否为必须(默认true必须,如果没有找到类型与属性类型匹配的bean则抛出异常)
- byType
- ref引用 @Qualifier(“”)
private Clazz clazz;
    @Autowired(required = false)
    public void setClazz(@Qualifier("clazz")Clazz clazz) {
        this.clazz = clazz;
    }
2.2.7 @Resource
-
属性注解,用于声明属性自动装配
-
默认装配方式为 byName,如果根据byName没有找到对用的bean,则继续根据byType继续寻找,根据byType依然没有找到bean,或者找到不止一个类型匹配的bean,则抛出异常。
3.3.5 @PreDestroy -
方法注解:声明一个方法为当前类的销毁方法(在对象从容器中释放之前执行),相当于bean标签的destory-method属性
2.2.8 @Autowired
- 属性注解、方法注解(set方法):自动装配,默认 byType
- @Autowired(required = false) 通过requried属性,设置当前自动装配是否为必须(默认true必须,如果没有找到类型与属性类型匹配的bean则抛出异常)
- byType
- ref引用 @Qualifier(“”)
private Clazz clazz;
    @Autowired(required = false)
    public void setClazz(@Qualifier("clazz")Clazz clazz) {
        this.clazz = clazz;
    }
2.2.9 @Resource
- 属性注解,用于声明属性自动装配
- 默认装配方式为 byName,如果根据byName没有找到对用的bean,则继续根据byType继续寻找,根据byType依然没有找到bean,或者找到不止一个类型匹配的bean,则抛出异常。
