PaaS
一、虚拟化分类
-
虚拟化资源提供者
-
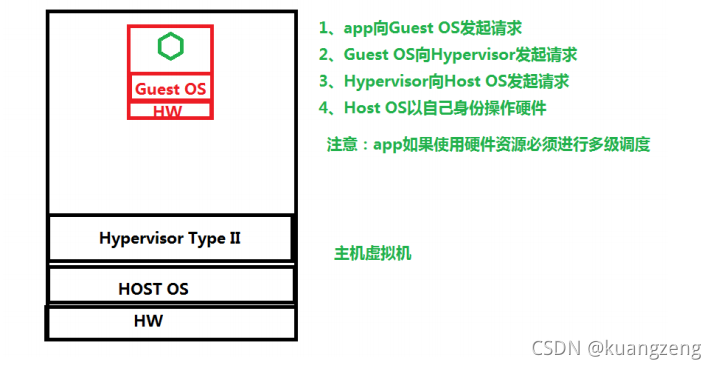
硬件平台虚拟化
-
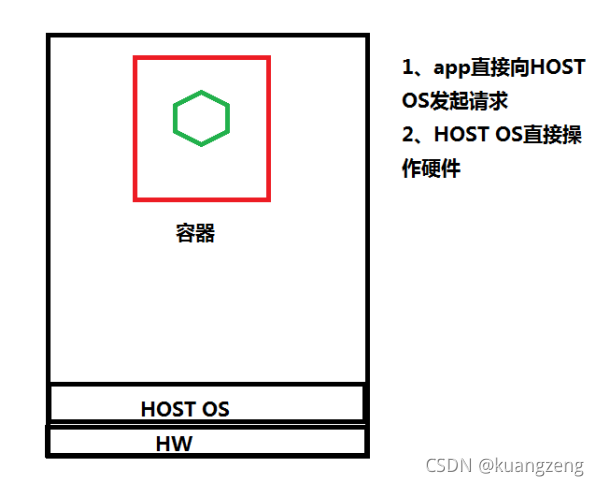
操作系统虚拟化
-
-
虚拟化实现方式
-
Type I 半虚拟化
-
Type II 硬件辅助全虚拟化
-
Type III
-
软件全虚拟化
-
操作系统虚拟化
-
-
-
回顾硬件平台虚拟化与操作系统虚拟化区别
-
主机虚拟化与容器虚拟化的优缺点
-
主机虚拟化
-
应用程序运行环境强隔离
-
虚拟机操作系统与底层操作系统无关化
-
虚拟机内部操作不会影响到物理机
-
拥有操作系统会占用部署资源及存储
-
网络传输效率低
-
当应用程序需要调用硬件响应用户访问时间延迟大
-
-
容器虚拟化
-
可以实现应用程序的隔离
-
直接使用物理机的操作系统可以快速响应用户请求
-
不占用部署时间
-
占用少量磁盘空间
-
缺点:学习成本增加、操作控制麻烦、网络控制与主机虚拟化有所区别、服务治理。
-
-
二、云平台的技术实现
-
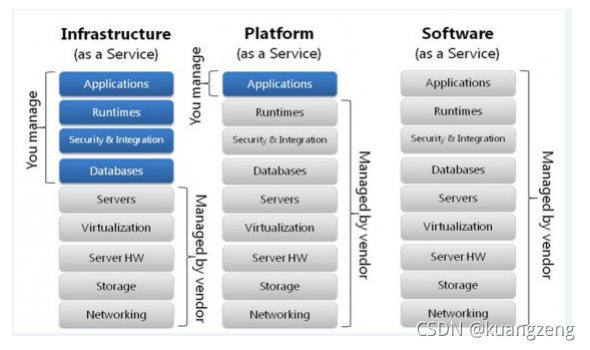
IaaS 虚拟机
-
阿里云 ECS
-
OpenStack VM实例
-
-
PaaS 容器(CaaS)
-
LXC
-
Docker
-
OpenShift
-
Rancher
-
-
SaaS 应用程序
- 互联网中应用都是
三、容器所涉及内核技术
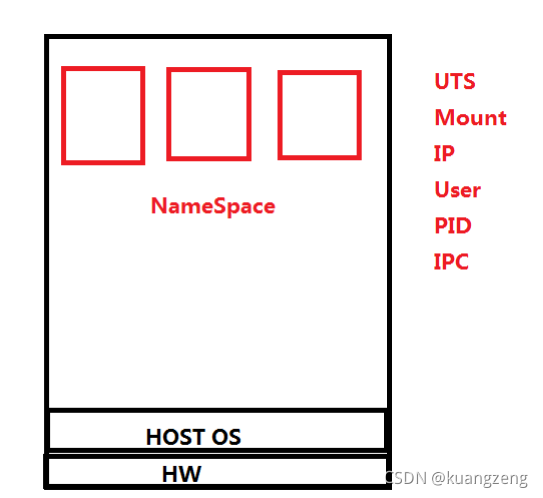
- NameSpce
UTS:每一个NameSpace都拥有独立的主机或域名,可以把每个NameSpace认为一个独立主机。
IPC:每个容器依旧使用linux内核中进程交互的方法,实现进程间通信
Mount:每个容器的文件系统是独立的
Net:每个容器的网络是隔离
User:每个容器的用户和组ID是隔离,每个容器都拥有root用户
PID:每个容器都拥有独立的进程树,由容器是物理机中的一个进程,所以容器中的进程是物理机的线程
总结:
容器使用的命名空间有哪些?
应用程序运行环境隔离的空间,就是一个容器,每一个容器都将拥有UTS,IPC,Mount,Net,User,PID。
-
CGroups
-
控制组
-
作用:用于实现容器的资源隔离
-
可对进程做资源隔离
-
9 大子系统
-
把资源定义为子系统,可以通过子系统对资源进行限制
-
CPU 可以让进程使用CPU的比例
-
memory 限制内存使用,例如50Mi,150Mi
-
blkio 限制块设备的IO
-
cpuacct 生成Cgroup使用CPU的资源报告
-
cpuset 用于多CPU执行Cgroup时,对进程进行CPU分组
-
devices 允许或拒绝设备的访问
-
freezer 暂停或恢复Cgroup运行
-
net_cls
-
ns
-
-
应用案例
-
通过Cgroup限制进程对CPU的使用
步骤
部署Cgroup
[root@bogon ~]# yum -y install libcgroup*

[root@bogon ~]# systemctl status cgconfig
● cgconfig.service - Control Group configuration service
	Loaded: loaded (/usr/lib/systemd/system/cgconfig.service;
disabled; vendor preset: disabled)
	Active: inactive (dead)
[root@bogon ~]# systemctl enable cgconfig
Created symlink from
/etc/systemd/system/sysinit.target.wants/cgconfig.service to
/usr/lib/systemd/system/cgconfig.service.
[root@bogon ~]# systemctl start cgconfig
[root@bogon ~]# systemctl status cgconfig
● cgconfig.service - Control Group configuration service
	Loaded: loaded (/usr/lib/systemd/system/cgconfig.service; enabled;
vendor preset: disabled)
	Active: active (exited) since 四 2019 -04-25 16 :30:03 CST; 7s ago
	Process: 17061 ExecStart=/usr/sbin/cgconfigparser -l
/etc/cgconfig.conf -L /etc/cgconfig.d -s 1664 (code=exited,
status= 0 /SUCCESS)
	Main PID: 17061 (code=exited, status=0/SUCCESS)

4 月 25 16 :30:03 bogon systemd[1]: Starting Control Group configuration ser.....
4 月 25 16 :30:03 bogon systemd[1]: Started Control Group configuration service.
Hint: Some lines were ellipsized, use -l to show in full.
Cgroup限制对CPU使用的步骤
第一步:创建Cgroup组
第二步:把进程添加到Cgroup
案例
#使用cpu子系统创建 2 个cgroup
[root@bogon ~]# vim /etc/cgconfig.conf
group lesscpu {
	cpu {
		cpu.shares=200;
	}
}
group morecpu {
	cpu {
		cpu.shares=800;
	}

}

[root@bogon ~]# systemctl restart cgconfig
[root@bogon ~]# cgexec -g cpu:lesscpu md5sum /dev/zero
#终端 1

[root@bogon ~]# cgexec -g cpu:morecpu sha1sum /dev/zero
#终端 2

[root@bogon ~]# top
#终端 3
案例 2 :限制内存使用
错误内存限制
[root@bogon ~]# vim /etc/cgconfig.conf
group lessmem {
memory {
memory.limit_in_bytes=268435465;
}
}

[root@bogon ~]# systemctl restart cgconfig

[root@bogon ~]# mkdir /mnt/mem_test
[root@bogon ~]# df -h
文件系统 容量 已用 可用 已用% 挂载点
/dev/mapper/centos-root 17G 1.5G 16G 9 % /
devtmpfs 2.0G 0  2.0G 0% /dev
tmpfs 2.0G 0  2.0G 0% /dev/shm
tmpfs 2.0G 8.7M 2.0G 1% /run
tmpfs 2.0G 0  2.0G 0% /sys/fs/cgroup
/dev/vda1 1014M 163M 852M 17 % /boot
tmpfs 336M 0 336M 0 % /run/user/

[root@bogon ~]# mount -t tmpfs /dev/shm /mnt/mem_test
[root@bogon ~]# df -h
文件系统 容量 已用 可用 已用% 挂载点
/dev/mapper/centos-root 17G 1.5G 16G 9 % /
devtmpfs 2.0G 0  2.0G 0% /dev
tmpfs 2.0G 0  2.0G 0% /dev/shm
tmpfs 2.0G 8.7M 2.0G 1% /run
tmpfs 2.0G 0  2.0G 0% /sys/fs/cgroup
/dev/vda1 1014M 163M 852M 17% /boot
tmpfs 336M 0 336M 0% /run/user/
/dev/shm 952M 0 952M 0% /mnt/mem_test

[root@bogon ~]# cgexec -g memory:lessmem dd if=/dev/zero of=/mnt/mem_test/file1 bs=1M count=200
记录了 200 + 0 的读入
记录了 200 + 0 的写出
209715200 字节(210 MB)已复制,0.100733 秒,2.1 GB/秒
[root@bogon ~]# ls /mnt/mem_test/
file1
[root@bogon ~]# rm -rf /mnt/mem_test/file1
[root@bogon ~]# cgexec -g memory:lessmem dd if=/dev/zero of=/mnt/mem_test/file1 bs=1M count=500
记录了 500 + 0 的读入
记录了 500 + 0 的写出
524288000 字节(524 MB)已复制,0.353956 秒,1.5 GB/秒
正确的内存限制
[root@bogon ~]# vim /etc/cgconfig.conf
group lessmem {
	memory {
		memory.limit_in_bytes=268435465;
		memory.memsw.limit_in_bytes=268435465;
	}
}

[root@bogon ~]# systemctl restart cgconfig

[root@bogon ~]# mount -t tmpfs /dev/shm /mnt/mem_test
[root@bogon ~]# df -h
文件系统 容量 已用 可用 已用% 挂载点
/dev/mapper/centos-root 17G 1 .5G 16G 9% /
devtmpfs 2.0G 0  2.0G 0% /dev
tmpfs 2.0G 0  2.0G 0% /dev/shm
tmpfs 2.0G 8.7M 2.0G 1% /run
tmpfs 2.0G 0  2.0G 0% /sys/fs/cgroup
/dev/vda1 1014M 163M 852M 17% /boot
tmpfs 336M 0 336M 0% /run/user/0
/dev/shm 952M 0 952M 0% /mnt/mem_test

[root@bogon ~]# cgexec -g memory:lessmem dd if=/dev/zero of=/mnt/mem_test/file1 bs=1M count=200
记录了 200 + 0 的读入
记录了 200 + 0 的写出
209715200 字节(210 MB)已复制,0.105744 秒,2.0 GB/秒

[root@bogon ~]# rm -rf /mnt/mem_test/file
[root@bogon ~]# cgexec -g memory:lessmem dd if=/dev/zero of=/mnt/mem_test/file1 bs=1M count=500
已杀死
扩展
-
主机虚拟化实现资源隔离的方式
- 使用Hypervisor中的VMM实现资源隔离
-
PAM
-
用户认证
-
资源限制
-
ulimit
-
仅对用户做资源限制
-
-
四、容器管理工具介绍
-
LXC
-
2008
-
是第一套完整的容器管理解决方案
-
不需要任何补丁直接运行在linux内核之上管理容器
-
创建容器慢,不方便移置
-
-
Docker
-
2013
-
dotcloud
-
是在LXC基础上发展起来的
-
拥有一套容器管理生态系统
-
生态系统包含:容器镜像、注册表、RESTFul API及命令行操作界面
-
属于容器管理系统
-
-
Docker版本介绍
-
2017 之前版本
- 1.7 ,1.8,1.9,1.10,1.11,1.12,1.13
-
2017 年 3 月 1 日后
-
把docker做商业开源
-
docker-ce
-
docker-ee
-
-
17-03-ce
-
17-06-ce
-
18-03-ce
-
18-06-ce
-
18-09-ce
-
五、容器管理工具Docker安装
5.1 部署docker
用于管理容器
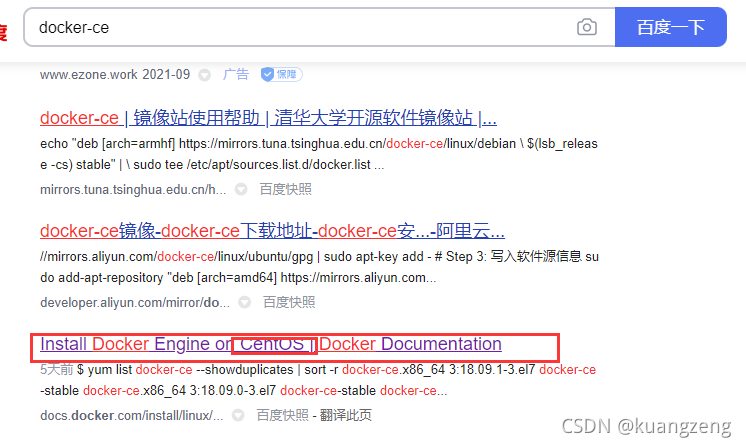
5.2 YUM源
5.2.1 官方网址
5.2.2 docker所使用开发语言
- golang
5.2.3 YUM获取
- 卸载旧版本
[root@bogon ~] yum remove docker \
                  docker-client \
                  docker-client-latest \
                  docker-common \
                  docker-latest \
                  docker-latest-logrotate \
                  docker-logrotate \
                  docker-engine
- 安装yum-utils获取yum-config-manager
[root@bogon ~]yum install -y yum-utils
- 通过yum-config-manager获取docker-ce.repo
[root@bogon ~]# yum-config-manager --add-repo https://download.docker.com/linux/centos/docker-ce.repo

[root@bogon ~]# ls /etc/yum.repos.d/
CentOS-Base.repo CentOS-Media.repo epel.repo
CentOS-CR.repo CentOS-Sources.repo epel-testing.repo
CentOS-Debuginfo.repo CentOS-Vault.repo
CentOS-fasttrack.repo docker-ce.repo
5.3 安装docker-ce
[root@bogon ~]# yum repolist
已加载插件:fastestmirror
Loading mirror speeds from cached hostfile
* base: mirrors.huaweicloud.com
* epel: fedora.cs.nctu.edu.tw
* extras: mirrors.163.com
* updates: mirrors.neusoft.edu.cn
docker-ce-stable | 3.5 kB 00:00
(1/2): docker-ce-stable/x86_64/primary_db | 27 kB 00:01
(2/2): docker-ce-stable/x86_64/updateinfo | 55 B 00:01
源标识 源名称 状态
base/7/x86_64 CentOS-7 - Base 10,019
docker-ce-stable/x86_64 Docker CE Stable - x86_64 41
*epel/x86_64 Extra Packages for Enterprise Linux 7 - x86_64 13,082
extras/7/x86_64 CentOS-7 - Extras 386
updates/7/x86_64 CentOS-7 - Updates 1,580
repolist: 25,108

[root@bogon ~]# yum list | grep docker-ce
containerd.io.x86_64 1 .2.5-3.1.el7 docker-c -stable
docker-ce.x86_64 3 :18.09.5-3.el7 docker-c -stable
docker-ce-cli.x86_64 1 :18.09.5-3.el7 docker-c -stable
docker-ce-selinux.noarch 17 .03.3.ce-1.el7 docker-c -stable
[root@bogon ~]# yum -y install docker-ce
[root@bogon ~]# systemctl enable docker
Created symlink from /etc/systemd/system/multi-user.target.wants/docker.service to /usr/lib/systemd/system/docker.service.
[root@bogon ~]# systemctl start docker
[root@bogon ~]# docker version
Client:
Version: 18.09.5
API version: 1.139
Go version: go1.10.8
Git commit: e8ff
Built: Thu Apr 11 04:43:34 2019
OS/Arch: linux/amd
Experimental:  false

Server: Docker Engine - Community
Engine:
Version: 18.09.5
API version: 1.39 (minimum version 1.12)
Go version: go1.10.8
Git commit: e8ff
Built: Thu Apr 11 04:13:40 2019
OS/Arch: linux/amd
Experimental: false
[root@bogon ~]# docker version
Client:
Version: 		18.09.5
API version: 	1.39
Go version:	 	go1.10.8
Git commit:		e8ff056
Built: 			Thu Apr 11 04:43:34 2019
OS/Arch: 		linux/amd
Experimental:  false
Cannot connect to the Docker daemon at unix:///var/run/docker.sock. Is the docker daemon running?
#如果出现如上提示,请启动docker服务。
六、使用docker管理容器
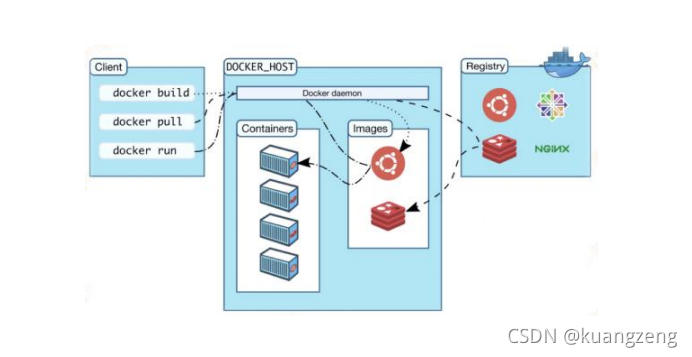
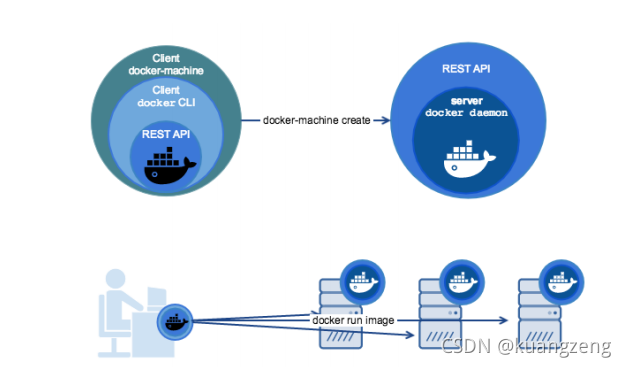
6.1 容器&镜像&仓库&daemon&client之间的关系
6.2 启动容器
验证是否有镜像在本地
[root@bogon ~]# docker images
REPOSITORY 	TAG 	IMAGE 	ID 	CREATED 	SIZE
本地没有镜像,需要去search镜像
仓库:dockerhub
[root@bogon ~]# docker search centos
NAME DESCRIPTION
STARS OFFICIAL AUTOMATED
centos The official build of CentOS. 		5315			[OK]
本地没有镜像,需要下载镜像到本地
[root@bogon ~]# docker pull centos
Using default tag: latest
latest: Pulling from library/centos
8ba884070f61: Pull complete
Digest: sha256:8d487d68857f5bc9595793279b33d082b03713341ddec91054382641d14db861
Status: Downloaded newer image for centos:latest

[root@bogon ~]# docker images
REPOSITORY 	TAG 	IMAGE ID		CREATED 		SIZE
centos		latest 	9f38484d220f 	5 weeks ago 	202MB
运行容器
[root@bogon ~]# docker run -it --name=c1 centos:latest /bin/bash
[root@333dce61a32d /]#
6.3 docker daemon管理
-
远程管理docker daemon充分条件
-
可以把 docker client与docker daemon分开部署
-
可以通过第三方软件管理docker daemon创建的容器
-
-
第一步:关闭docker daemon
修改docker配置文件前,请先关闭docker守护进程
1 [root@localhost ~]#systemctl stop docker
- 第二步:修改docker daemon配置文件
如果想使用/etc/docker/daemon.json管理docker daemon,默认情况下,/etc/docker目录中并没有daemon.json文件,添加后会导致docker daemon无法启动,在添加daemon.json文件之前,请先修改如下文件内容:
修改前:
[root@localhost ~]#vim /usr/lib/systemd/system/docker.service
[Service]
Type=notify
# the default is not to use systemd for cgroups because the delegate issues still
# exists and systemd currently does not support the cgroup feature set required
# for containers run by docker
ExecStart=/usr/bin/dockerd -H unix:// #删除-H(含)后面所有内容

修改后:

[root@localhost ~]#vim /usr/lib/systemd/system/docker.service
[Service]
Type=notify
# the default is not to use systemd for cgroups because the delegate issues still
# exists and systemd currently does not support the cgroup feature set required
# for containers run by docker
ExecStart=/usr/bin/dockerd
- 第三步:加载配置文件
修改完成后,一定要加载此配置文件
1 [root@localhost ~]# systemctl daemon-reload
- 第四步:重新开启docker守护进程
1 [root@localhost ~]# systemctl start docker
- 第五步:添加配置文件对docker daemon配置
通过/etc/docker/daemon.json文件对docker守护进程文件进行配置
[root@localhost ~]#cd /etc/docker
[root@localhost docker]#vim daemon.json
{
	"hosts": ["tcp://0.0.0.0:2375","unix:///var/run/docker.sock"]
}
[root@localhost ~]#ss -anput | grep ":2375"
[root@localhost ~]#ls /var/run
docker.sock

[root@localhost ~]# systemctl restart docker
docker daemon默认侦听使用的是unix格式,侦听文件:UNIX:///run/docker.sock,添加tcp://0.0.0.0:2375可实现远程管理。
- 第六步:实例远程连接方法
1 [root@localhost ~]# docker -H 远程容器主机 version
不要在命令行后面添加端口
6.4 docker 命令行命令介绍
[root@bogon ~]# docker --help

Usage: docker [OPTIONS] COMMAND

A self-sufficient runtime for containers

Options:
		--config string Location of client config files (default "/root/.docker")
	-D, --debug Enable debug mode
	-H, --host list Daemon socket(s) to connect to
	-l, --log-level string Set the logging level
							("debug"|"info"|"warn"|"error"|"fatal")
							(default "info")
		--tls Use TLS; implied by --tlsverify
		--tlscacert string Trust certs signed only by this CA (default "/root/.docker/ca.pem")
		--tlscert string Path to TLS certificate file (default "/root/.docker/cert.pem")
		--tlskey string Path to TLS key file (default "/root/.docker/key.pem")
		--tlsverify Use TLS and verify the remote
	-v, --version Print version information and quit

Management Commands: #管理类
builder 		Manage builds
config			Manage Docker configs
container 		Manage containers
engine 			Manage the docker engine
image 			Manage images
network 		Manage networks
node 			Manage Swarm nodes
plugin 			Manage plugins
secret 			Manage Docker secrets
service 		Manage services
stack 			Manage Docker stacks
swarm 			Manage Swarm
system 			Manage Docker
trust 			Manage trust on Docker images
volume 			Manage volumes

Commands: #普通命令
attach 		Attach local standard input, output, and error streams to a running
container
build		 Build an image from a Dockerfile
commit 		Create a new image from a container is changes
cp 			Copy files/folders between a container and the local filesystem
create 		Create a new container
diff 		Inspect changes to files or directories on a container is filesystem
events 		Get real time events from the server
exec 		Run a command in a running container
export 		Export a container is filesystem as a tar archive
history 	Show the history of an image
images 		List images
import 		Import the contents from a tarball to create a filesystem image
info		Display system-wide information
inspect 	Return low-level information on Docker objects
kill 		Kill one or more running containers
load 		Load an image from a tar archive or STDIN
login 		Log in to a Docker registry
logout 		Log out from a Docker registry
logs 		Fetch the logs of a container
pause 		Pause all processes within one or more containers
port 		List port mappings or a specific mapping for the container
ps 			List containers
pull 		Pull an image or a repository from a registry
push 		Push an image or a repository to a registry
rename 		Rename a container
restart 	Restart one or more containers
rm 			Remove one or more containers
rmi 		Remove one or more images
run 		Run a command in a new container
save 		Save one or more images to a tar archive (streamed to STDOUT by default)
search 		Search the Docker Hub for images
start 		Start one or more stopped containers
stats 		Display a live stream of container(s) resource usage statistics
stop 		Stop one or more running containers
tag			Create a tag TARGET_IMAGE that refers to SOURCE_IMAGE
top 		Display the running processes of a container
unpause 	Unpause all processes within one or more containers
update 		Update configuration of one or more containers
version 	Show the Docker version information
wait 		Block until one or more containers stop, then print their exit codes

Run 'docker COMMAND --help' for more information on a command.
6.5 docker命令行实现容器管理
6.5.1 容器镜像获取
6.5.1.1 容器镜像分类
-
系统镜像
-
应用镜像
6.5.1.2 搜索镜像(dockerhub)
普通命令
1 [root@bogon ~]# docker search centos
管理类命令
无
6.5.1.3 获取镜像(pull)
普通命令
[root@bogon ~]# docker pull centos
Using default tag: latest
latest: Pulling from library/centos
Digest: sha256:8d487d68857f5bc9595793279b33d082b03713341ddec91054382641d14db
Status: Image is up to date for centos:latest
管理命令
[root@bogon ~]# docker image pull centos
Using default tag: latest
latest: Pulling from library/centos
Digest: sha256:8d487d68857f5bc9595793279b33d082b03713341ddec91054382641d14db
Status: Image is up to date for centos:latest
6.5.2 容器镜像传输
- 为了方便使用容器镜像启动多服务
6.5.2.1 如何获取本地容器镜像打包
[root@bogon ~]# docker save --help

Usage: docker save [OPTIONS] IMAGE [IMAGE...]

Save one or more images to a tar archive (streamed to STDOUT by default)

Options:
-o, --output string Write to a file, instead of STDOUT

#以下为镜像打包
[root@bogon ~]# docker save -o centos.tar centos:latest
[root@bogon ~]# ls
centos.tar
6.5.2.2 传输
[root@bogon ~]# scp centos.tar 192.168.145.251:/root
The authenticity of host '192.168.145.251 (192.168.145.251)' can it be established.
ECDSA key fingerprint is SHA256:Fh82qGEdFfkS+Zpy+fX1B7aEUCwHwYYcNwYtbH7hmoo.
ECDSA key fingerprint is MD5:fd:56:b3:45:56:17:77:47:8c:79:b9:0f:9f:17:27:9c.
Are you sure you want to continue connecting (yes/no)? yes
Warning: Permanently added '192.168.145.251' (ECDSA) to the list of known hosts.
[email protected]'s password:
centos.tar 					100 % 							200MB
 99 .9MB/s 00 :02
6.5.2.3 导入到本地目录
[root@bogon ~]# docker load --help

Usage: docker load [OPTIONS]

Load an image from a tar archive or STDIN

Options:
	-i, --input string Read from tar archive file, instead of STDIN
	-q, --quiet Suppress the load output
[root@bogon ~]# docker load -i centos.tar
d69483a6face: Loading layer 209.5MB/209.5MB
Loaded image: centos:latest
[root@bogon ~]# docker images
REPOSITORY TAG IMAGE ID CREATED SIZE
centos latest 9f38484d220f 6 weeks ago 202MB
6.5.3 启动容器
6.5.3.1 启动一个运行bash命令的容器
[root@bogon ~]# docker run -it --name=c1 centos:latest /bin/bash
或
[root@bogon ~]# docker container run -it --name=c2 centos:latest /bin/bash
6.5.3.2 启动一个运行httpd服务的容器
启动一个容器
1 [root@bogon ~]# docker run -it --name=c1 centos:latest /bin/bash
在容器中安装httpd
[root@b8f1c4b45e37 /]# yum -y install httpd
[root@b8f1c4b45e37 /]# /usr/sbin/httpd -k start
AH00558: httpd: Could not reliably determine the server's fully qualified domain name,
using 172.17.0.3. Set the 'ServerName' directive globally to suppress this message
[root@b8f1c4b45e37 /]# curl http://localhost
container webpage
6.5.4 基于容器生成文件导入为容器镜像
[root@bogon ~]# docker export --help

Usage: docker export [OPTIONS] CONTAINER

Export a container is filesystem as a tar archive

Options:
	-o, --output string Write to a file, instead of STDOUT
[root@bogon ~]# docker export -o centos-httpd.tar c1
[root@bogon ~]# ls
 centos-httpd.tar

[root@bogon ~]# docker import --help

Usage: docker import [OPTIONS] file|URL|- [REPOSITORY[:TAG]]

Import the contents from a tarball to create a filesystem image

Options:
	-c, --change list Apply Dockerfile instruction to the created image
	-m, --message string Set commit message for imported image
[root@bogon ~]# docker import -m httpd centos-httpd.tar centos-httpd:v1
sha256:da4dfb859952ecc9b0499f43b9be7d712db0e21e699120c9ae78581b15fa6d1e

[root@bogon ~]# docker images
REPOSITORY TAG IMAGE ID CREATED SIZE
centos-httpd v1 da4dfb859952 26 seconds ago 295MB

[root@bogon ~]# docker history centos-httpd:v1
IMAGE CREATED CREATED BY SIZE COMMENT
da4dfb859952 About a minute ago 295MB httpd
#这就是注释

[root@bogon ~]# docker run -it --name c4 centos-httpd:v1 /bin/bash
[root@b175010389d2 /]# httpd -k start
AH00558: httpd: Could not reliably determine the server's fully qualified domain name,using 172.17.0.4. Set the 'ServerName' directive globally to suppress this message
[root@b175010389d2 /]# curl http://localhost
container webpage
6.5.5 查看容器IP地址
[root@bogon ~]# ip a s

3 : docker0: <NO-CARRIER,BROADCAST,MULTICAST,UP> mtu 1500 qdisc noqueue state DOWN group
default
	link/ether 02:42:51:3d:45:08 brd ff:ff:ff:ff:ff:ff
	inet 172.17.0.1/16 brd 172.17.255.255 scope global docker0
		valid_lft forever preferred_lft forever
	inet6 fe80::42:51ff:fe3d:4508/64 scope link
		valid_lft forever preferred_lft forever
#容器默认连接的网桥
方法一:
[root@bogon ~]# docker run -it --name c2 centos /bin/bash
[root@d56146c41f3a /]# ip a s
bash: ip: command not found #没有此命令,需要安装

[root@d56146c41f3a /]# yum -y install iproute

[root@d56146c41f3a /]# ip a s
1:lo: <LOOPBACK,UP,LOWER_UP> mtu 65536 qdisc noqueue state UNKNOWN group default qlenn 1000
	link/loopback 00 :00:00:00:00:00 brd 00 :00:00:00:00:00
	inet 127 .0.0.1/8 scope host lo
		valid_lft forever preferred_lft forever
6:eth0@if7: <BROADCAST,MULTICAST,UP,LOWER_UP> mtu 1500 qdisc noqueue state UP group default
	link/ether 02 :42:ac:11:00:02 brd ff:ff:ff:ff:ff:ff link-netnsid 0
	inet 172.17.0.2/16 brd 172.17.255.255 scope global eth0
	valid_lft forever preferred_lft forever
#由docker0网桥分配
方法二:
[root@bogon ~]# docker inspect c2
#查看容器详细信息
方法三:
[root@bogon ~]# docker exec c2 ip a s
1:lo: <LOOPBACK,UP,LOWER_UP> mtu 65536 qdisc noqueue state UNKNOWN group default qlen 1000
	link/loopback 00:00:00:00:00:00 brd 00 :00:00:00:00:00
	inet 127.0.0.1/8 scope host lo
		valid_lft forever preferred_lft forever
6:eth0@if7: <BROADCAST,MULTICAST,UP,LOWER_UP> mtu 1500 qdisc noqueue state UP group default
	link/ether 02 :42:ac:11:00:02 brd ff:ff:ff:ff:ff:ff link-netnsid 0
	inet 172 .17.0.2/16 brd 172 .17.255.255 scope global eth0
		valid_lft forever preferred_lft forever
#在容器外执行容器内命令
6.5.6 停止运行中的容器
[root@bogon ~]# docker ps #查看正在运行的容器
CONTAINER ID IMAGE COMMAND CREATED STATUS
PORTS NAMES
d56146c41f3a centos  "/bin/bash" 12 minutes ago Up 11
minutes c2

[root@bogon ~]# docker stop d #停止一个正在运行的容器,d是容器ID简写,也可以写容器名称,但是ID要能够唯一识别
d
[root@bogon ~]# docker ps
CONTAINER ID IMAGE COMMAND CREATED STATUS
PORTS NAMES

[root@bogon ~]# docker ps --all
CONTAINER ID IMAGE COMMAND CREATED STATUS
PORTS NAMES
d56146c41f3a centos  "/bin/bash" 13 minutes ago Exited
(137) 14 seconds ago c2
9e44437412ab centos:latest "/bin/bash" 2 hours ago Exited
(0) 18 minutes ago c1

#关闭多个正在运行的容器
[root@bogon ~]# docker start c1 c2
c1
c2
[root@bogon ~]# docker ps
CONTAINER ID IMAGE COMMAND CREATED STATUS
PORTS NAMES
d56146c41f3a centos  "/bin/bash" 16 minutes ago Up 7
seconds c2
9e44437412ab centos:latest "/bin/bash" 2 hours ago Up 7
seconds c1
[root@bogon ~]# docker stop c1 c2
6.5.7 开启已停止的容器
启动
[root@bogon ~]# docker start c1
c1
进入
[root@bogon ~]# docker attach --help

Usage: docker attach [OPTIONS] CONTAINER

Attach local standard input, output, and error streams to a running container

Options:
		--detach-keys 		string Override the key sequence for detaching a container
		--no-stdin 			Do not attach STDIN
		--sig-proxy 		Proxy all received signals to the process (default true)
[root@bogon ~]# docker attach c1
[root@9e44437412ab /]#
6.5.8 删除已停止容器
[root@bogon ~]# docker ps
CONTAINER ID IMAGE COMMAND CREATED STATUS
PORTS NAMES
9e44437412ab centos:latest "/bin/bash" 2 hours ago Up 2
seconds c1
[root@bogon ~]# docker rm c1
Error response from daemon: You cannot remove a running container
9e44437412abc3b76263855df597b523ee8a4ad617f9529d2c1afd7eb551f2ec. Stop the container
before attempting removal or force remove
[root@bogon ~]# docker stop c1
c1
[root@bogon ~]# docker rm c1
c1
[root@bogon ~]# docker ps --all
CONTAINER ID IMAGE COMMAND CREATED STATUS
PORTS NAMES
d56146c41f3a centos  "/bin/bash" 23 minutes ago Exited
(137) 6 minutes ago c2
6.5.9 容器端口映射
[root@bogon ~]# docker run -it -p 80:80 --name c101 centos:latest /bin/bash

[root@991dbf27676e /]# yum -y install httpd iproute

[root@991dbf27676e /]# echo "197-0.2-webpage" >> /var/www/html/index.html
[root@991dbf27676e /]# httpd -k start

[root@991dbf27676e /]# curl http://172.17.0.2
197-0.2-webpage

#在容器主机上访问容器IP
[root@bogon ~]# curl http://172.17.0.2
197-0.2-webpage

#在容器主机上访问容器主机的 80 端口
[root@bogon ~]# curl http://192.168.122.197
197-0.2-webpage

#在192.168.122.185主机访问192.168.122.197,最终成功访问192.168.122.197容器主机中的容器所提供的
http服务。
[root@bogon ~]# curl http://192.168.122.197
197-0.2-webpage

#192.168.122.197容器主机上查看容器的状态
[root@bogon ~]# docker ps
CONTAINER ID IMAGE COMMAND CREATED STATUS
PORTS NAMES
991dbf27676e centos:latest "/bin/bash" 8 minutes ago Up 8 minutes 0 .0.0.0:80->80/tcp c101

#请大家思考:如果容器主机上同时运行多个http服务的容器,请问端口怎么映射?
#TCP 1-65535
#UDP 1-65535
#端口是稀缺资源

#如果仅定义了容器的端口,那么容器主机会随机添加映射端口到容器 80 端口,随机端口大于或等于 32768
[root@bogon ~]# docker run -it -p 80 --name c101 centos:latest /bin/bash
[root@2aae7d6217ff /]# [root@bogon ~]#
[root@bogon ~]#
[root@bogon ~]# docker ps
CONTAINER ID IMAGE COMMAND CREATED STATUS
PORTS NAMES
2aae7d6217ff centos:latest "/bin/bash" 6 seconds ago Up 5
seconds 0 .0.0.0:32768->80/tcp c101

#使用容器主机的某一IP地址上的端口做随机映射
[root@bogon ~]# docker run -it -p 192.168.122.197::80 --name c101 centos /bin/bash

[root@bogon ~]# docker ps
CONTAINER ID IMAGE COMMAND CREATED STATUS
PORTS NAMES
b33b384c0b8a centos  "/bin/bash" 7 seconds ago Up 7
seconds 192.168.122.197:32768->80/tcp c101
6.5.10 容器使用Docker Host存储数据
第一步:在Docker Host创建用于存储目录
[root@bogon ~]# mkdir /opt/cvolume
第二步:运行容器并挂载上述目录
[root@bogon ~]# docker run -it -v /opt/cvloume:/data --name c103 centos:latest /bin/bash
[root@fcfb623370b6 /]# ls /
anaconda-post.log data(#新创建的目录) etc lib media opt root sbin sys usr
bin dev home lib64 mnt proc run srv tmp var
案例:运行在容器中的http服务,使用docker host的/web目录中的网页文件,并能够在doker host上进行修改,修改后立即生效。
第一步:创建/web并添加网页文件
[root@bogon ~]# mkdir /web
[root@bogon ~]# echo "web" >> /web/index.html
第二步:启动容器对/web目录进行挂载
[root@bogon ~]# docker run -it -p 8080:80/tcp -v /web:/var/www/html --name c200 centos:latest /bin/bash
[root@d96b5914ac99 /]# ls /var/www/html
index.html
第三步:访问http(在192.168.122.185)
[root@bogon ~]# curl http://192.168.122.197:8080
web
额外配置案例:同步容器与docker host时间
[root@bogon ~]# docker run -it -v /etc/localtime:/etc/localtime centos:latest /bin/bash
[root@af986201c67e /]# date
Fri Apr 26 16 :20:18 CST 2019
6.5.11 在容器外执行容器内命令
[root@bogon ~]# docker exec c101 ls /
anaconda-post.log
bin
dev
etc
home
lib
lib64
media
mnt
opt
proc
root
run
sbin
srv
sys
tmp
usr
var
6.5.12 容器间互联(–link)
第一步:创建被依赖容器
[root@bogon ~]# docker run -it --name c202 centos:latest /bin/bash
第二步:创建依赖于源容器的容器
[root@bogon ~]# docker run --link c202:mysqldb -it --name c203 centos:latest /bin/bash

[root@759f83e2ab39 /]# ping mysqldb
PING mysqldb (172.17.0.6) 56 (84) bytes of data.
64 bytes from mysqldb (172.17.0.6): icmp_seq=1 ttl=64 time=0.158 ms
64 bytes from mysqldb (172.17.0.6): icmp_seq=2 ttl=64 time=0.110 ms
^C
--- mysqldb ping statistics ---
2 packets transmitted, 2 received, 0 % packet loss, time 999ms
rtt min/avg/max/mdev = 0 .110/0.134/0.158/0.024 ms
[root@759f83e2ab39 /]# cat /etc/hosts
127.0.0.1 localhost
::1 localhost ip6-localhost ip6-loopback
fe00::0 ip6-localnet
ff00::0 ip6-mcastprefix
ff02::1 ip6-allnodes
ff02::2 ip6-allrouters
172.17.0.6 mysqldb e23172d55390 c202
172.17.0.7 759f83e2ab39
第三步:验证
关闭容器
[root@bogon ~]# docker stop c202 c203
添加一个新的容器,用于抢占c202的IP
[root@bogon ~]# docker run -it centos /bin/bash
启动c202及c203
[root@bogon ~]# docker start c202
c202
[root@bogon ~]# docker start c203
c203
[root@bogon ~]# docker exec c203 cat /etc/hosts
127.0.0.1 localhost
::1 localhost ip6-localhost ip6-loopback
fe00::0 ip6-localnet
ff00::0 ip6-mcastprefix
ff02::1 ip6-allnodes
ff02::2 ip6-allrouters
172.17.0.7 mysqldb e23172d55390 c202
172.17.0.8 759f83e2ab39
七、docker容器镜像
容器与镜像之间的关系:
-
docker client 向docker daemon发起创建容器的请求
-
docker daemon查找有无客户端需要的镜像
-
如无,则到容器的镜像仓库中下载需要的镜像
-
拿到容器镜像后,启动容器
7.1 容器镜像介绍
Docker 镜像就是一组只读的目录,或者叫只读的 Docker 容器模板,镜像中含有一个Docker 容器运行所需要的文件系统,所以我们说Docker 镜像是启动一个Docker 容器的基础。
可以将Docker 镜像看成是Docker 容器的静态时,也可将Docker 容器看成是Docker镜像的运行时。
从Docker 的官方文档来看,Docker 容器的定义和 Docker 镜像的定义几乎是相同,Docker 容器和Docker 镜像的区别主要在于docker 容器多出了一个可写层。
容器中的进程就运行在这个可写层,这个可写层有两个状态,即运行态和退出态。当我们docker run 运行容器后,docker 容器就进入了运行态,当我们停止正在运行中的容器时,docker 容器就进入了退出态。
我们将容器从运行态转为退出态时,期间发生的变更都会写入到容器的文件系统中(需要注意的是,此处不是写入到了docker 镜像中)。
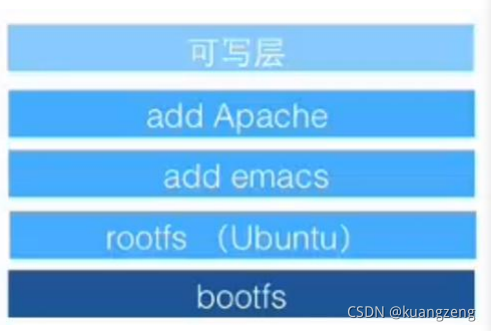
联合文件系统(UnionFS)是一种轻量级的高性能分层文件系统,它支持将文件系统中的修改信息作为一次提交,并层层叠加,同时可以将不同目录挂载到同一个虚拟文件系统下,应用看到的是挂载的最终结果。联合文件系统是实现Docker镜像的技术基础。Docker镜像可以通过分层来进行继承。例如,用户基于基础镜像(用来生成其他镜像的基础,往往没有父镜像)来制作各种不同的应用镜像。这些镜像共享同一个基础镜像层,提高了存储效率。此外,当用户改变了一个Docker镜像(比如升级程序到新的版本),则会创建一个新的层(layer)。因此,用户不用替换整个原镜像或者重新建立,只需要添加新层即可。用户分发镜像的时候,也只需要分发被改动的新层内容(增量部分)。这让Docker的镜像管理变得十分轻量级和快速。
7.1.1 制作基础镜像
7.1.1.1 安装一个最小化的操作系统主机
7.1.1.2 打包操作系统的根目录
- 排除/proc及/sys
1 [root@bogon ~]# tar --numeric-owner --exclude=/proc --exclude=/sys -cvf centos7u6.tar /
7.1.1.3 把获取的根打包文件导入Docker Host中
[root@bogon ~]# docker import centos7u6.tar centos7u6:latest
[root@bogon ~]# docker image ls
REPOSITORY TAG IMAGE ID CREATED SIZE
centos7u6 latest 9223c5786c4c 15 seconds ago 1.5GB
7.1.1.4 使用基础镜像启动容器
[root@bogon ~]# docker run -it --name c1000 centos7u6:latest /bin/bash
[root@f56add98265c /]# ls /proc
1 cpuinfo fs kmsg mounts slabinfo tty
22 crypto interrupts kpagecount mtrr softirqs uptime
acpi devices iomem kpageflags net stat version
asound diskstats ioports loadavg pagetypeinfo swaps
vmallocinfo
buddyinfo dma irq locks partitions sys vmstat
bus driver kallsyms mdstat sched_debug sysrq-trigger zoneinfo
cgroups execdomains kcore meminfo schedstat sysvipc
cmdline fb keys misc scsi timer_list
consoles filesystems key-users modules self timer_stats
[root@f56add98265c /]# ip a s
1 : lo: <LOOPBACK,UP,LOWER_UP> mtu 65536 qdisc noqueue state UNKNOWN group default qlen
1000
link/loopback 00:00:00:00:00:00 brd 00:00:00:00:00:00
inet 127.0.0.1/8 scope host lo
valid_lft forever preferred_lft forever
38 : eth0@if39: <BROADCAST,MULTICAST,UP,LOWER_UP> mtu 1500 qdisc noqueue state UP group
default
link/ether 02:42:ac:11:00:09 brd ff:ff:ff:ff:ff:ff link-netnsid 0
inet 172.17.0.9/16 brd 172.17.255.255 scope global eth0
valid_lft forever preferred_lft forever
7.1.2 应用镜像制作
- 指应用程序运行的环境
7.1.2.1 使用commit提交镜像
在基础镜像运行的容器中安装应用,此例使用httpd
1 [root@f56add98265c /]# yum -y install httpd
使用commit命令对正在运行的容器提交为一个应用镜像
[root@bogon ~]# docker commit --help

Usage: docker commit [OPTIONS] CONTAINER [REPOSITORY[:TAG]]

Create a new image from a container's changes

Options:
-a, --author string Author (e.g., "John Hannibal Smith <[email protected]>")
-c, --change list Apply Dockerfile instruction to the created image
-m, --message string Commit message
-p, --pause Pause container during commit (default true)
[root@bogon ~]# docker commit c1000 centos7u6-httpd:v1
sha256:7bc399ab72aa3335e383e58d709770fa5c3bfeee66cccf7976776e22fe5fedc7
[root@bogon ~]# docker images
REPOSITORY TAG IMAGE ID CREATED SIZE
centos7u6-httpd v1 7bc399ab72aa 5 seconds ago 1.67GB
使用应用镜像
[root@bogon ~]# docker run -it centos7u6-httpd:v1 /bin/bash
[root@1abdebd392db /]# echo "ttt" >> /var/www/html/index.html
[root@1abdebd392db /]# httpd -k start
AH00558: httpd: Could not reliably determine the server's fully qualified domain name,
using 172.17.0.10. Set the 'ServerName' directive globally to suppress this message
[root@1abdebd392db /]# curl http://localhost
ttt
7.1.2.2 使用Dockerfile创建应用镜像
7.1.2.2.1 使用docker build命令
7.1.2.2.2 基于Dockerfile
7.1.2.2.3 Dockfile原理
在Dockerfile定义所要执行的命令,使用docker build创建镜像,过程中会按照Dockerfile所定义的内容打开临时性容器(使用docker commit进行提交),把Dockerfile文件中的命令全部执行完成,就得到了一个容器应用镜像。
- 执行命令越多,最终得到的容器应用镜像越大,所以要做优化
7.1.2.2.4 Dockerfile关键字
-
FROM(指定基础image)
-
MAINTAINER(用来指定镜像创建者信息)
-
RUN (运行命令)
-
CMD(设置container启动时执行的操作)
- 如果容器镜像中有此命令,启动容器时,不要手动让容器执行其它命令
-
ENTRYPOINT(设置container启动时执行的操作)
-
USER(设置container容器的用户)
-
EXPOSE(指定容器需要映射到宿主机器的端口)
-
ENV(用于设置环境变量)
-
ADD(从src复制文件到container的dest路径)
-
VOLUME(指定挂载点)
-
WORKDIR(切换目录)
7.1.2.2.5 Dockerfile应用案例
目的:通过Dockerfile创建一个可以在启动容器时就直接启动httpd应用的镜像
步骤:
-
创建一个目录,用于存储Dockerfile所使用的文件
-
在此目录中创建Dockerfile文件及制作镜像所使用到的文件
-
在此此目录中使用docker build创建镜像(读取Dockerfile文件)
-
使用创建的镜像启动容器
思考:
-
基础镜像是谁?centos7u6
-
安装httpd
-
yum -y install httpd
-
安装完成后如何启动httpd? 编写一个把httpd启动的脚本文件
-
把httpd放在前端执行还是后端执行?前端
-
暴露端口?tcp80
-
添加一个测试文件,用于验证httpd是否可用?
过程:
创建目录
1 [root@bogon ~]# mkdir test
进入目录并创建用于启动httpd的脚本文件
[root@bogon ~]# cd test

[root@bogon test]# cat run-httpd.sh
#!/bin/bash
rm -rf /run/httpd/*
exec /sbin/httpd -D FOREGROUND
创建用于测试httpd是否可用的index.html
[root@bogon test]# cat index.html
It's work!!!
创建Dockerfile
[root@bogon test]# cat Dockerfile
FROM centos7u6:latest

MAINTAINER "smartdocker@[email protected]"

RUN yum clean all

RUN rpm --rebuilddb && yum -y install httpd

ADD run-httpd.sh /run-httpd.sh

RUN chmod -v +x /run-httpd.sh

ADD index.html /var/www/html/

EXPOSE 80

WORKDIR /

CMD ["/bin/bash","/run-httpd.sh"]
使用docker build创建镜像,注意命令最后有一个点,点表示当前目录
[root@bogon test]# docker build -t centos7u6-base-httpd:v1 .
使用上述创建的应用容器启动容器
[root@bogon test]# docker run -d centos7u6-base-httpd:v1
验证容器及httpd是否可用
[root@bogon test]# docker inspect 31d #查看容器IP地址
[root@bogon test]# curl http://172.17.0.11
It's work!!!
替代原网站内容案例
[root@bogon test]# mkdir /wwwroot
[root@bogon test]# echo "wwwroot" >> /wwwroot/index.html
[root@bogon test]# docker run -d -v /wwwroot:/var/www/html centos7u6-base-httpd:v1
415e82ad0041aa18bcb92bc8edbdf9bd758915a8345c71266f51937de3a20a26

[root@bogon test]# docker inspect 415

[root@bogon test]# curl http://172.17.0.12
wwwroot
如果遇到Rpmdb错误,可以考虑安装:yum-plugin-ovl软件包。
案例:把nginx应用容器化
要求:
1 、通过基础镜像做nginx应用镜像
2 、使用nginx应用镜像启动容器时,nginx要求启动
3 、验证nginx服务是否启动
步骤:
1 、使用哪一个基础 centos:latest
2 、需要使用epel YUM源
3 、安装nginx
4 、修改nginx配置文件,主要用于关闭daemon后台运行
5 、验证使用的测试页面
创建目录
[root@localhost ~]# mkdir nginxtest
[root@localhost ~]# cd nginxtest/
[root@localhost nginxtest]#
创建测试文件
[root@localhost nginxtest]# echo 'nginx s running!!!' >> index.html
[root@localhost nginxtest]# ls
index.html
创建Dockerfile
[root@localhost nginxtest]# cat Dockerfile
FROM centos:latest

MAINTAINER "smartaiops<[email protected]>"

RUN yum clean all && yum -y install yum-plugin-ovl && yum -y install epel-release
RUN yum -y install nginx

ADD index.html /usr/share/nginx/html/

RUN echo "daemon off;" >> /etc/nginx/nginx.conf  #取消nginx以daemon身份运行

EXPOSE 80

CMD /usr/sbin/nginx
使用docker build创建nginx应用镜像
[root@localhost nginxtest]# docker build -t centos-nginx:v1 .
启动容器验证nginx服务是否自动开启
[root@localhost nginxtest]# docker images
REPOSITORY TAG IMAGE ID CREATED SIZE
centos-nginx v1 cf23c20ff2cd 20 seconds ago 466MB

[root@localhost nginxtest]# docker run -d centos-nginx:v1
5b1d6dae77d24d9c8dc136a5bf971ebe296e1463838bda46e586d07d6f572f6d
[root@localhost nginxtest]# docker ps
CONTAINER ID IMAGE COMMAND CREATED
STATUS PORTS NAMES
5b1d6dae77d2 centos-nginx:v1 "/bin/sh -c /usr/sbi..." 9 seconds ago
Up 8 seconds 80 /tcp upbeat_khayyam

[root@localhost nginxtest]# docker inspect 5b1d

[root@localhost nginxtest]# curl http://172.17.0.3
nginx s running!!!
7.2 容器镜像在docker host存储位置
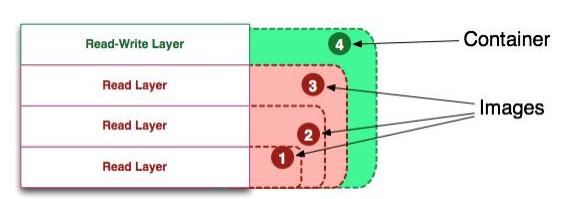
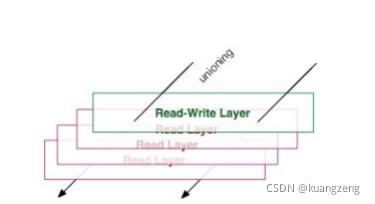
从图中可以看出除了最上面的一层为读写层之外,下面的其他的层都是只读的镜像层,并且除了最下面的一层外,其他的层都有会有一个指针指向自己下面的一层镜像。
虽然统一文件系统(union file system)技术将不同的镜像层整合成一个统一的文件系统,为构成一个完整容器镜像的 层提供了一个统一的视角,隐藏了多个层的复杂性,对用户来说只存在一个文件系统,但图中的这些层并不是不能看到的,如果需要查看的话可以进入运行Docker的机器上进行查看,从这些层中可以看到Docker 内部实现的一些细节。
Docker 的容器镜像和容器本身的数据都存放在服务器的 /var/lib/docker/ 这个路径下。不过不同的linux发行版存储方式上有差别,比如,在ubuntu发行版上存储方式为AUFS,CentOS发行版上的存储方式为Overlay或Overlay2。
centos系统docker默认使用存储驱动是devicemapper,而这种存储驱动有两种模式loop-lvm和direct-lvm,不巧默认又使用了比较低效的loop-lvm。
OverlayFS是一个类似于AUFS 的现代联合文件系统,更快实现简单。
OverlayFS是内核提供的文件系统,overlay和overlay2是docker的存储驱动
7.2.1 Overlay及Overlay2原理
OverlayFS将单个Linux主机上的两个目录合并成一个目录。这些目录被称为层,统一过程被称为联合挂载。
OverlayFS底层目录称为lowerdir, 高层目录称为upperdir。合并统一视图称为merged。当需要修改一个文件时,使用CoW将文件从只读的Lower复制到可写的Upper进行修改,结果也保存在Upper层。在Docker中,底下的只读层就是image,可写层就是Container。
overlay2是overlay的改进版,只支持4.0以上内核添加了Multiple lower layers in overlayfs的特性,所以overlay2可以直接造成muitiple lower layers不用像overlay一样要通过硬链接的方式(最大 128 层) centos的话支持3.10.0-514及以上内核版本也有此特性,所以消耗更少的inode
本质区别是镜像层之间共享数据的方法不同
-
overlay共享数据方式是通过硬连接,只挂载一层,其他层通过最高层通过硬连接形式共享(增加了磁盘inode的负担)
-
而overlay2是通过每层的 lower文件
如果upperdir和lowerdir有同名文件时会用upperdir的文件
查看docker默认使用的存储驱动方法
[root@bogon overlay2]# docker info
Containers: 1
Running: 1
Paused: 0
Stopped: 0
Images: 1
Server Version: 18 .09.5
Storage Driver: overlay2 #注意此处
Backing Filesystem: xfs
Supports d_type: true
Native Overlay Diff: true
Logging Driver: json-file
Cgroup Driver: cgroupfs
Plugins:
Volume: local
Network: bridge host macvlan null overlay
Log: awslogs fluentd gcplogs gelf journald json-file local logentries splunk syslog
Swarm: inactive
Runtimes: runc
Default Runtime: runc
Init Binary: docker-init
containerd version: bb71b10fd8f58240ca47fbb579b9d1028eea7c84
runc version: 2b18fe1d885ee5083ef9f0838fee39b62d653e30
init version: fec3683
Security Options:
seccomp
Profile: default
Kernel Version: 3 .10.0-957.el7.x86_64
Operating System: CentOS Linux 7 (Core)
OSType: linux
Architecture: x86_64
CPUs: 1
Total Memory: 3 .858GiB
Name: bogon
ID: CMTC:4W3A:NS5L:GZ73:RXOE:6ZTH:4QEM:B265:GP3T:JM7K:VCKB:GKAW
Docker Root Dir: /var/lib/docker
Debug Mode (client): false
Debug Mode (server): false
Registry: https://index.docker.io/v1/
Labels:
Experimental: false
Insecure Registries:
127.0.0.0/8
Live Restore Enabled: false
Product License: Community Engine
7.2.2 docker运行前
/var/lib/docker/overlay2 路径下的信息在不同的阶段会有变化,了解这几个阶段中新增的数据以及容器与镜像的存储结构的变化非常有利于我们对Docker容器以及Docker镜像的理解。
Docker运行前、Docker运行后、下载镜像后、运行容器后四个阶段中Docker 存储的变化
7.2.2.1 运行前
没有启动docker daemon之间不会在/var/lib/目录中添加docker目录
7.2.2.2 启动后
[root@bogon ~]# systemctl start docker
[root@bogon ~]# tree /var/lib/docker
/var/lib/docker
├── builder
│   └── fscache.db
├── buildkit
│   ├── cache.db
│   ├── content
│   │   └── ingest
│   ├── executor
│   ├── metadata.db
│   └── snapshots.db
├── containers
├── image
│   └── overlay2
│   ├── distribution
│   ├── imagedb
│   │   ├── content
│   │   │   └── sha256
│   │   └── metadata
│   │   └── sha256
│   ├── layerdb
│   └── repositories.json
├── network
│   └── files
│   └── local-kv.db
├── overlay2 #下载镜像后,存储在此目录中
│   ├── backingFsBlockDev
│   └── l
├── plugins
│   ├── storage
│   │   └── blobs
│   │   └── tmp
│   └── tmp
├── runtimes
├── swarm
├── tmp
├── trust
└── volumes
└── metadata.db

29 directories, 8 files
7.2.2.3 下载镜像后
[root@bogon overlay2]# pwd
/var/lib/docker/overlay2
[root@bogon overlay2]# ls
2d297a77c653f510dce69815627fdb485462b1b2fc9e0078a9ecc5ca2d222c8d backingFsBlockDev l
[root@bogon overlay2]# ls
2d297a77c653f510dce69815627fdb485462b1b2fc9e0078a9ecc5ca2d222c8d/
diff link
[root@bogon overlay2]# ls
2d297a77c653f510dce69815627fdb485462b1b2fc9e0078a9ecc5ca2d222c8d/diff/
anaconda-post.log dev home lib64 mnt proc run srv tmp var
bin etc lib media opt root sbin sys usr
centos镜像只有一层
[root@bogon overlay2]# pwd
/var/lib/docker/overlay2
[root@bogon overlay2]# ls
2d297a77c653f510dce69815627fdb485462b1b2fc9e0078a9ecc5ca2d222c8d backingFsBlockDev l

[root@bogon overlay2]# ll l
总用量 0
lrwxrwxrwx 1 root root 72 4 月  26 12 :58 MBRXMBFE2MYZYMO5RZLRLTMRGJ ->
../2d297a77c653f510dce69815627fdb485462b1b2fc9e0078a9ecc5ca2d222c8d/diff
l目录中包含了很多多软链接,使用短名称指向了其他层,短名称用于避免mount参数时达到页面大小的限制
7.2.2.4 运行容器后
Overlay2容器结构
 #运行容器前
[root@bogon overlay2]# ls
2d297a77c653f510dce69815627fdb485462b1b2fc9e0078a9ecc5ca2d222c8d backingFsBlockDev l

#运行容器后
[root@bogon overlay2]# ls
00bd7dcc4c91f9a1a1257b8c0683fdd0b6dfe18af26597457e92b4d15c20cda0
backingFsBlockDev
00bd7dcc4c91f9a1a1257b8c0683fdd0b6dfe18af26597457e92b4d15c20cda0-init l
2d297a77c653f510dce69815627fdb485462b1b2fc9e0078a9ecc5ca2d222c8d

[root@bogon overlay2]# ll
00bd7dcc4c91f9a1a1257b8c0683fdd0b6dfe18af26597457e92b4d15c20cda0
总用量 8
drwxr-xr-x 2 root root 6 4月  26 13:15 diff
-rw-r--r-- 1 root root 26 4月  26 13:15 link
-rw-r--r-- 1 root root 57 4月  26 13:15 lower
drwxr-xr-x 1 root root 6 4月  26 13:15 merged
drwx------ 3 root root 18 4月  26 13:15 work
启动一个容器,也是载/var/lib/docker/overlay2目录下生成一层容器层,目录包括diff,link,lower, merged,work。
diff记录每一层自己内容的数据;link记录该层链接目录(实际是l目录下到层的链接),比如在容器中创建目录
或在diff新增该目录;创建容器时将lower-id指向的镜像层目录以及upper目录联合挂载到merged目录;work用来完成如copy-on_write的操作。
启动容器后,可以在docker host查看mount情况
[root@bogon overlay2]# mount | grep overlay
overlay on
/var/lib/docker/overlay2/00bd7dcc4c91f9a1a1257b8c0683fdd0b6dfe18af26597457e92b4d15c20cd
a0/merged type overlay
(rw,relatime,lowerdir=/var/lib/docker/overlay2/l/4GXMF7JGUPRUBLW5SM4X4FY5R2:/var/lib/do
cker/overlay2/l/MBRXMBFE2MYZYMO5RZLRLTMRGJ,upperdir=/var/lib/docker/overlay2/00bd7dcc4c
91f9a1a1257b8c0683fdd0b6dfe18af26597457e92b4d15c20cda0/diff,workdir=/var/lib/docker/ove
rlay2/00bd7dcc4c91f9a1a1257b8c0683fdd0b6dfe18af26597457e92b4d15c20cda0/work)
7.3 官方镜像仓库介绍
7.3.1 镜像仓库分类
-
公有仓库
-
私有仓库
7.3.2 官方镜像仓库
-
属于公有仓库
-
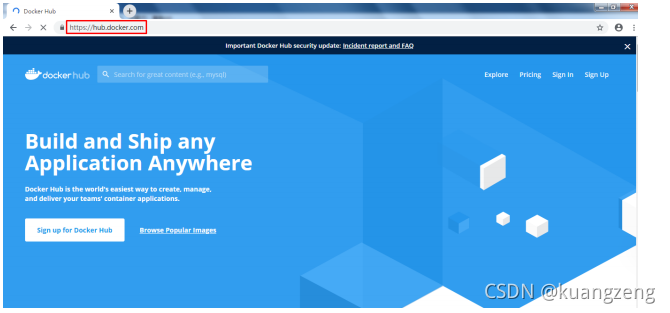
网址:hub.docker.com 网站名称: dockerhub
-
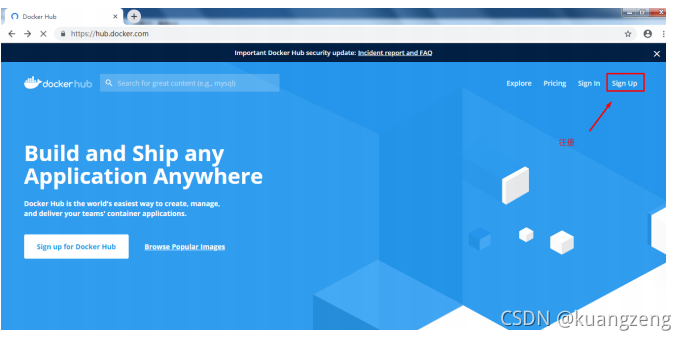
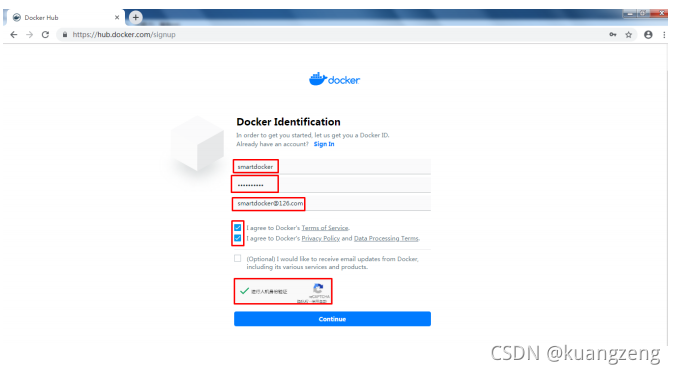
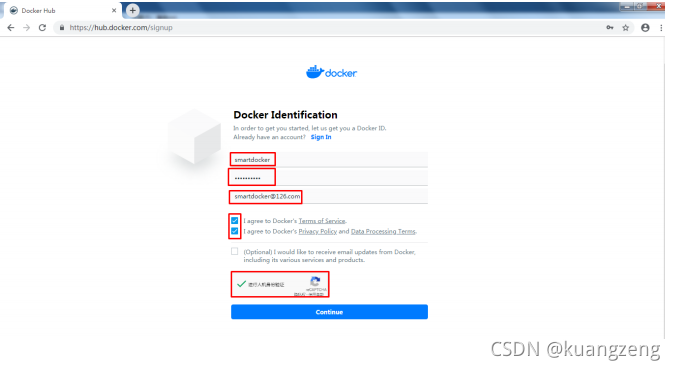
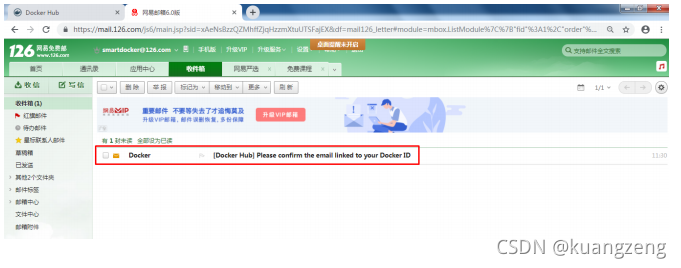
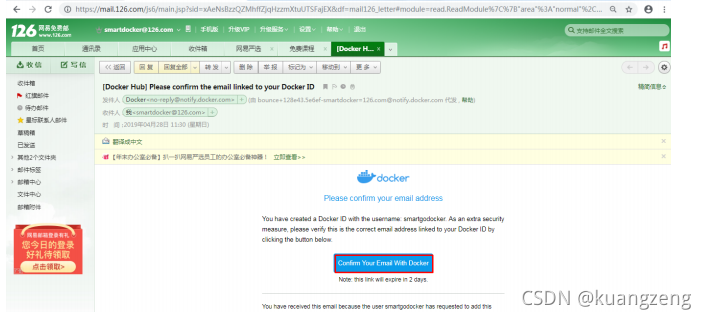
注册
- 邮箱
- 邮箱
-
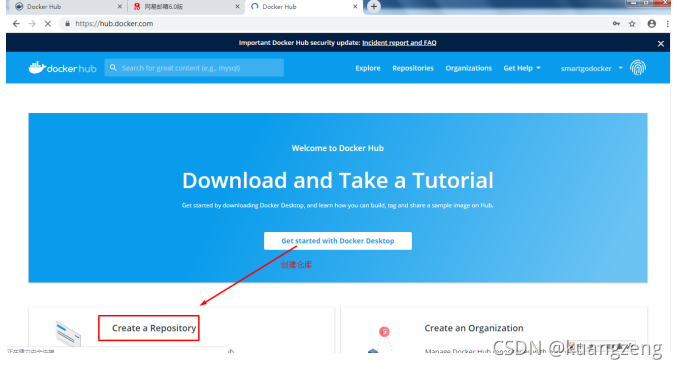
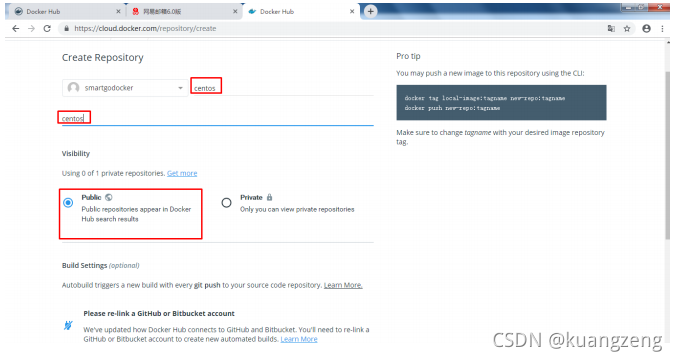
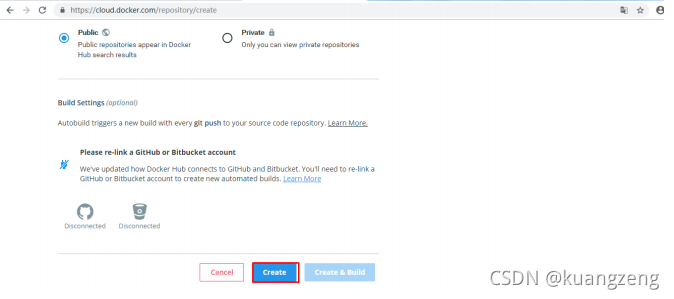
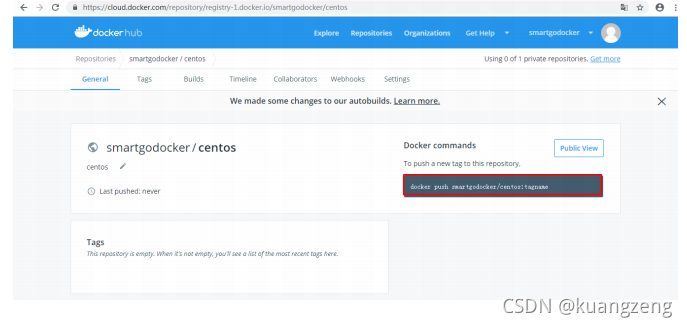
创建仓库
- 创建自己的仓库
-
登录仓库
-
web界面登录
-
linux命令行登录
-
[root@bogon ~]# docker --help
[root@bogon ~]# docker login hub.docker.com
[root@bogon ~]# docker login
Login with your Docker ID to push and pull images from Docker Hub. If you don't have a
Docker ID, head over to https://hub.docker.com to create one.
Username: smartgodocker
Password:
WARNING! Your password will be stored unencrypted in /root/.docker/config.json.
Configure a credential helper to remove this warning. See
https://docs.docker.com/engine/reference/commandline/login/#credentials-store

Login Succeeded
1 、上传时需要登录
2 、当有私有镜像仓库使用时需要登录
登录
[root@bogon ~]# docker logout
Removing login credentials for https://index.docker.io/v1/
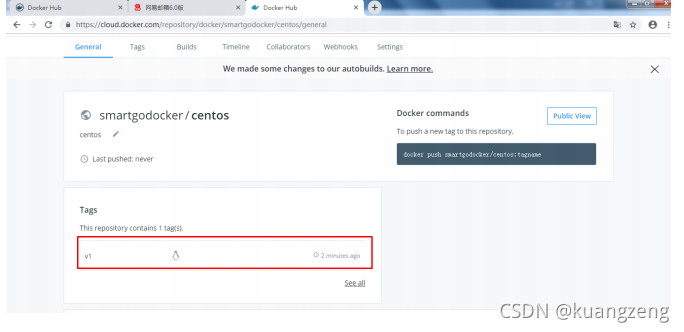
7.4 dockerhub镜像上传、下载
7.4.1 镜像上传
7.4.1.1 给需要上传到公有仓库的容器镜像打标记
[root@bogon ~]# docker images
REPOSITORY TAG IMAGE ID CREATED SIZE
centos latest 9f38484d220f 6 weeks ago 202MB
[root@bogon ~]# docker tag centos:latest smartgodocker/centos:v1
[root@bogon ~]# docker images
REPOSITORY TAG IMAGE ID CREATED SIZE
centos latest 9f38484d220f 6 weeks ago
202MB
smartgodocker/centos v1 9f38484d220f 6 weeks ago
202MB
7.4.1.2 把已打标记的容器镜像上传到公有仓库
[root@bogon ~]# docker login
Login with your Docker ID to push and pull images from Docker Hub. If you don't have a
Docker ID, head over to https://hub.docker.com to create one.
Username: smartgodocker
Password:
WARNING! Your password will be stored unencrypted in /root/.docker/config.json.
Configure a credential helper to remove this warning. See
https://docs.docker.com/engine/reference/commandline/login/#credentials-store

Login Succeeded
[root@bogon ~]# docker push smartgodocker/centos:v1
The push refers to repository [docker.io/smartgodocker/centos]
d69483a6face: Mounted from library/centos
v1: digest: sha256:ca58fe458b8d94bc6e3072f1cfbd334855858e05e1fd633aa07cf7f82b048e66
size: 529
7.4.2 镜像下载
[root@bogon ~]# docker images
REPOSITORY TAG IMAGE ID CREATED
SIZE
centos latest 9f38484d220f 6 weeks ago
202MB
smartgodocker/centos v1 9f38484d220f 6 weeks ago
202MB
您在 /var/spool/mail/root 中有新邮件
[root@bogon ~]# docker logout
Removing login credentials for https://index.docker.io/v1/

[root@bogon ~]# docker pull smartgodocker/centos-nginx:v1
v1: Pulling from smartgodocker/centos-nginx
8ba884070f61: Already exists
b49e39a48ce9: Pull complete
ee8f9e32e5d1: Pull complete
76444f96007d: Pull complete
3a3e79f9d90d: Pull complete
Digest: sha256:b51c09890e5dca970a846012c05123b8eeab9e55a3ea7b94408ae42c718389d9
Status: Downloaded newer image for smartgodocker/centos-nginx:v1
[root@bogon ~]# docker images
REPOSITORY TAG IMAGE ID CREATED
SIZE
smartgodocker/centos-nginx v1 cf23c20ff2cd 2 hours ago
466MB
centos latest 9f38484d220f 6 weeks ago
202MB
smartgodocker/centos v1 9f38484d220f 6 weeks ago
202MB
7.5 镜像加速器
镜像加速器主要目的在于加快用户下载容器镜像速度
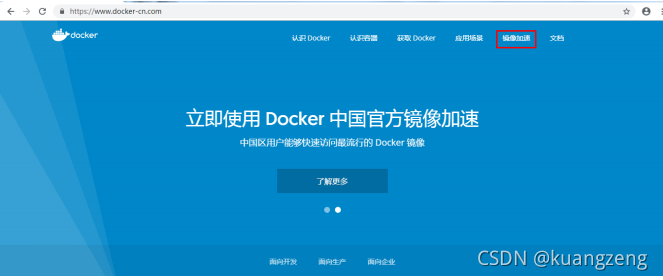
7.5.1 docker中国
7.5.1.1 网址
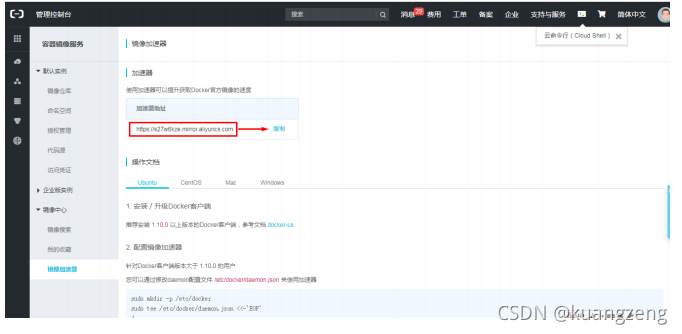
7.5.1.2 镜像加速器
永久配置方法
第一步:修改/usr/lib/systemd/system/docker.service
ExecStart=/usr/bin/dockerd -H fd:// --containerd=/run/containerd/containerd.sock

#把上述行时行修改,修改如下:
ExecStart=/usr/bin/dockerd
第二步:在/etc/docker/daemon.json
[root@bogon ~]# cat /etc/docker/daemon.json
{
	"registry-mirrors": ["https://registry.docker-cn.com"]
}
第三步:重启docker daemon
[root@bogon ~]# systemctl daemon-reload
[root@bogon ~]# systemctl restart docker
第四步:验证加速器是否可用
[root@bogon ~]# docker pull ansible/centos7-ansible:latest
latest: Pulling from ansible/centos7-ansible
45a2e645736c: Downloading 29 .48MB/70.39MB
1c3acf573616: Downloading 30 .1MB/59.73MB
edcb61e55ccc: Download complete
cbae31bad30a: Download complete
aacbdb1e2a62: Download complete
fdeea4fb835c: Downloading 48 .93MB/69.68MB
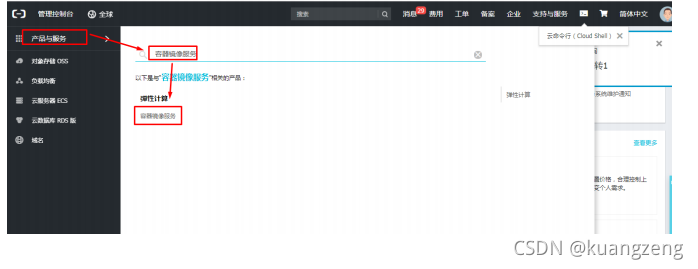
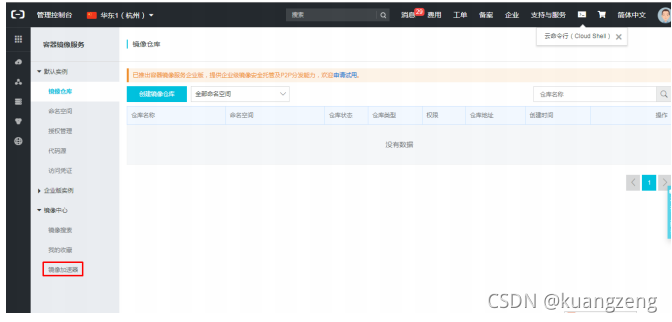
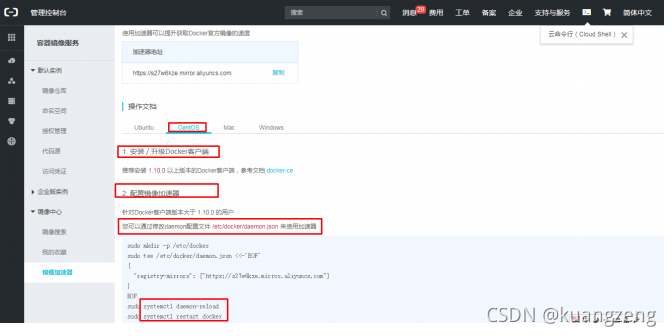
7.5.2 阿里云加速器
修改/etc/docker/daemon.json
[root@bogon ~]# cat /etc/docker/daemon.json
{
		"registry-mirrors":["https://s27w6kze.mirror.aliyuncs.com","https://registry.docker-cn.com"]
}
重启服务
1 [root@bogon ~]# systemctl restart docker
八、docker本地容器镜像仓库
8.1 作用
-
在局域内使用
-
方便与其它系统进行集成
-
上传下载大镜像时
8.2 使用registry容器镜像实现本地非安全镜像仓库
8.2.1 下载registry容器镜像
[root@bogon ~]# docker pull registry
Using default tag: latest
latest: Pulling from library/registry
c87736221ed0: Pull complete
1cc8e0bb44df: Pull complete
54d33bcb37f5: Pull complete
e8afc091c171: Pull complete
b4541f6d3db6: Pull complete
Digest: sha256:3b00e5438ebd8835bcfa7bf5246445a6b57b9a50473e89c02ecc8e575be3ebb5
Status: Downloaded newer image for registry:latest
[root@bogon ~]# docker images
REPOSITORY TAG IMAGE ID CREATED
SIZE
smartgodocker/centos-nginx v1 cf23c20ff2cd 5 hours ago
466MB
centos latest 9f38484d220f 6 weeks ago
202MB
smartgodocker/centos v1 9f38484d220f 6 weeks ago
202MB
registry latest f32a97de94e1 7 weeks ago
25 .8MB
8.2.2 创建用于挂载至registry镜像启动的仓库中,便于容器镜像持久保存
1 [root@bogon ~]# mkdir /opt/dockerregistry
8.2.3 启动容器获取镜像仓库
[root@bogon ~]# docker run -d -p 5000:5000 --restart=always -v
/opt/dockerregistry:/var/lib/registry registry:latest
aa890374e3abdf2aafccd894b2e4e42d633708f06318ea9f954ba2caa52f5b75

[root@bogon ~]# docker ps
CONTAINER ID IMAGE COMMAND CREATED
STATUS PORTS NAMES
aa890374e3ab registry:latest "/entrypoint.sh /etc..." 8 seconds ago Up
7 seconds 0 .0.0.0:5000->5000/tcp optimistic_khayyam
8.2.4 验证是否用可
[root@bogon ~]# curl http://192.168.122.33:5000/v2/_catalog
{"repositories":[]}
[root@bogon ~]# cat /etc/docker/daemon.json
{
		"insecure-registries": ["http://192.168.122.33:5000"],
		"registry-mirrors": ["https://s27w6kze.mirror.aliyuncs.com","https://registry.docker-cn.com"]
}

[root@bogon ~]# systemctl restart docker

[root@bogon ~]# docker images
REPOSITORY TAG IMAGE ID CREATED SIZE
smartgodocker/centos-nginx v1 cf23c20ff2cd 5 hours ago 466MB
centos latest 9f38484d220f 6 weeks ago 202MB
smartgodocker/centos v1 9f38484d220f 6 weeks ago 202MB
registry latest f32a97de94e1 7 weeks ago 25.8MB
[root@bogon ~]# docker tag centos:latest 192.168.122.33:5000/centos:v1
[root@bogon ~]# docker images
REPOSITORY TAG IMAGE ID CREATED SIZE
smartgodocker/centos-nginx v1 cf23c20ff2cd 5 hours ago 466MB
centos latest 9f38484d220f 6 weeks ago 202MB
smartgodocker/centos v1 9f38484d220f 6 weeks ago 202MB
192.168.122.33:5000/centos v1 9f38484d220f 6 weeks ago 202MB
registry latest f32a97de94e1 7 weeks ago 25.8MB

[root@bogon ~]# docker push 192.168.122.33:5000/centos:v1
The push refers to repository [192.168.122.33:5000/centos]
d69483a6face: Pushed
v1: digest: sha256:ca58fe458b8d94bc6e3072f1cfbd334855858e05e1fd633aa07cf7f82b048e66
size: 529

[root@bogon ~]# ls /opt/dockerregistry/
docker
[root@bogon ~]# ls /opt/dockerregistry/docker/
registry
[root@bogon ~]# ls /opt/dockerregistry/docker/registry/
v2
[root@bogon ~]# ls /opt/dockerregistry/docker/registry/v2/
blobs repositories
[root@bogon ~]# ls /opt/dockerregistry/docker/registry/v2/repositories/
centos

#在其它主机中使用此镜像仓库
#第一步修改:/usr/lib/systemd/system/docker.service
#第二步创建:/etc/docker/daemon.json
#添加内容: "insecure-registries": ["http://192.168.122.33:5000"]
#第三步:重启 [root@bogon ~]# systemctl daemon-reload;systemctl restart docker
#第四步:下载容器镜像
[root@bogon ~]# docker pull 192.168.122.33:5000/centos:v1
v1: Pulling from centos
Digest: sha256:ca58fe458b8d94bc6e3072f1cfbd334855858e05e1fd633aa07cf7f82b048e66
Status: Downloaded newer image for 192.168.122.33:5000/centos:v1
8.3 使用registry容器镜像实现本地基于用户名和密码访问的非安
全镜像仓库
8.3.1 添加用户
[root@localhost ~]# mkdir /opt/data/auth/
[root@localhost ~]# docker run --entrypoint htpasswd registry:latest -Bbn tom 123 >> /opt/data/auth/htpasswd
8.3.2 启动仓库
[root@localhost ~]#docker run -d -p 5000:5000 --restart=always \
-v /opt/data/auth/:/auth/    \
-e "REGISTRY_AUTH=htpasswd" \
-e "REGISTRY_AUTH_HTPASSWD_REALM=Registry Realm" \
-e “REGISTRY_AUTH_HTPASSWD_PATH=/auth/htpasswd” \
-v /opt/data/docker/registry:/var/lib/registry/ registry:latest
8.3.3 登录登出
[root@localhost ~]# docker login 私有仓库所在主机IP:5000
Username: tom
Password: 123

[root@localhost ~]#docker logout 私有仓库所在主机IP:5000
8.4 使用Harbor实现本地通过web进行管理的非安全仓库
8.4.1 认识harbor
-
vmware公司开源
-
良好的中文界面
-
web管理界面
-
使用广泛
8.4.2 工具准备
-
使用docker-compose工具进行启动
-
准备安装docker-compose有工具-pip
-
pip类似于yum,用于批量安装python模块及解决python模块依赖
-
pip工具准备
[root@localhost ~]# yum -y install epel-release

[root@localhost ~]# yum -y install python2-pip

[root@bogon ~]# pip install --upgrade pip
docker-compose工具准备
[root@bogon ~]# pip install docker-compose
#centos7.6 reqeuest=2.21.0
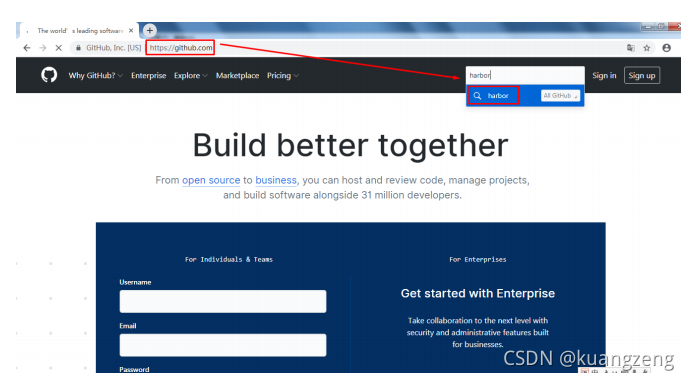
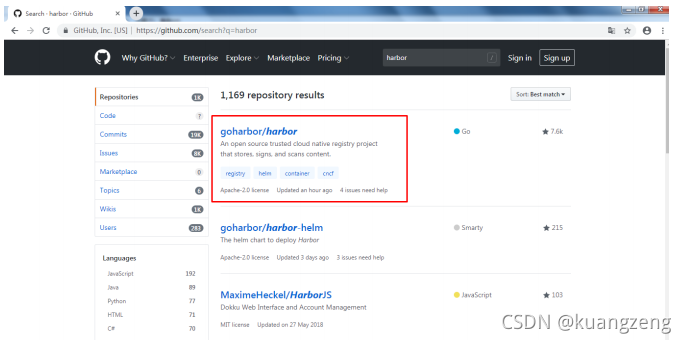
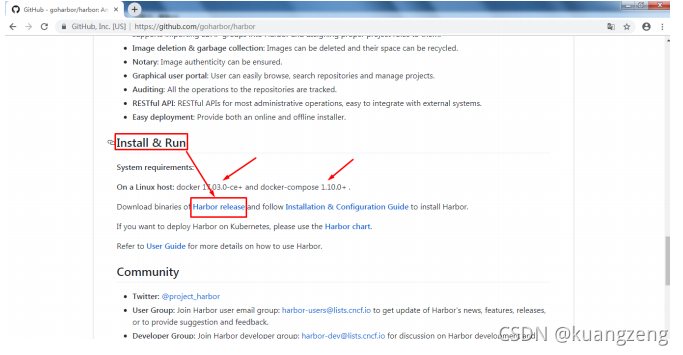
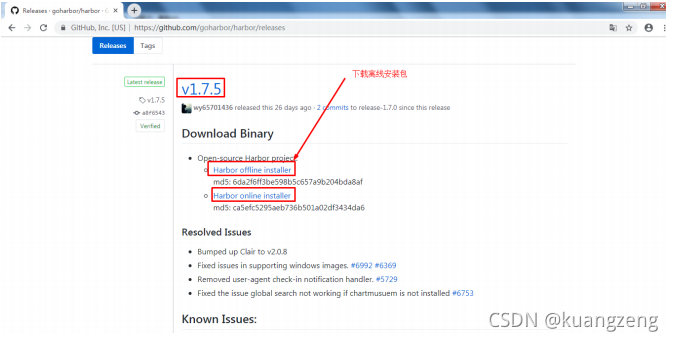
8.4.3 获取harbor
8.4.4 解压
[root@bogon ~]# tar xf harbor-offline-installer-v1.7.5.tgz
8.4.5 配置
[root@bogon ~]# ls
123 .link 123 .txt.link centos7u6.tar harbor-offline-installer-v1.7.5.tgz
123 .txt anaconda-ks.cfg harbor
[root@bogon ~]# cd harbor

[root@bogon harbor]# cat harbor.cfg
## Configuration file of Harbor

#This attribute is for migrator to detect the version of the .cfg file, DO NOT MODIFY!
_version = 1 .7.0
#The IP address or hostname to access admin UI and registry service.
#DO NOT use localhost or 127.0.0.1, because Harbor needs to be accessed by external
clients.
#DO NOT comment out this line, modify the value of "hostname" directly, or the
installation will fail.

hostname = 192.168.122.33 #此为重点
8.4.6 启动
[root@bogon harbor]# ./prepare
Generated and saved secret to file: /data/secretkey
Generated configuration file: ./common/config/nginx/nginx.conf
Generated configuration file: ./common/config/adminserver/env
Generated configuration file: ./common/config/core/env
Generated configuration file: ./common/config/registry/config.yml
Generated configuration file: ./common/config/db/env
Generated configuration file: ./common/config/jobservice/env
Generated configuration file: ./common/config/jobservice/config.yml
Generated configuration file: ./common/config/log/logrotate.conf
Generated configuration file: ./common/config/registryctl/env
Generated configuration file: ./common/config/core/app.conf
Generated certificate, key file: ./common/config/core/private_key.pem, cert file:
./common/config/registry/root.crt
The configuration files are ready, please use docker-compose to start the service.
[root@bogon harbor]# ./install.sh
#安装
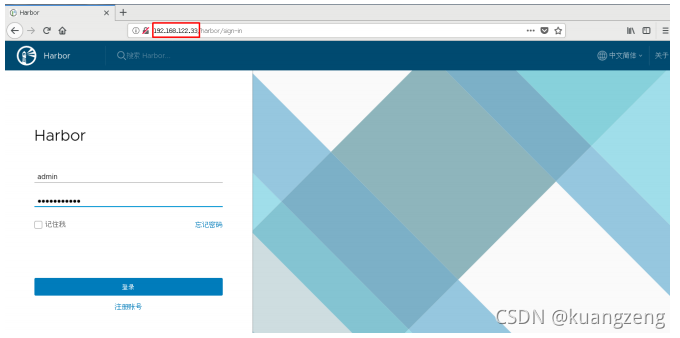
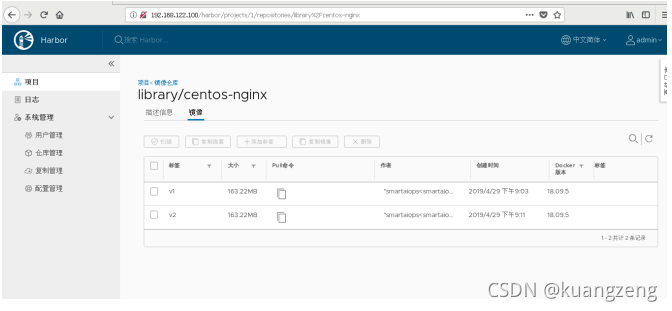
8.4.7 访问
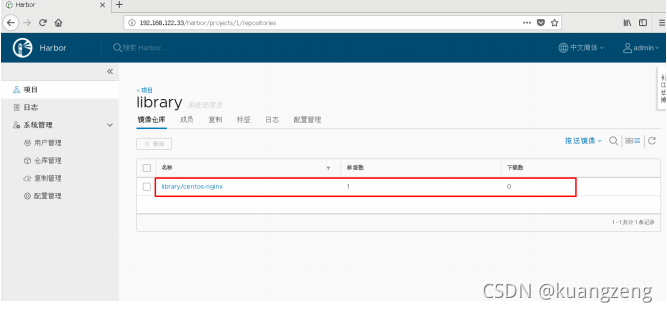
8.4.8 上传镜像到harbor镜像私有仓库
8.4.8.1 在daemon.json中添加此仓库地址
[root@bogon harbor]# cat /etc/docker/daemon.json
{
		"insecure-registries": ["http://192.168.122.33"],
		"registry-mirrors":
["https://s27w6kze.mirror.aliyuncs.com","https://registry.docker-cn.com"]
}

[root@bogon harbor]# systemctl restart docker
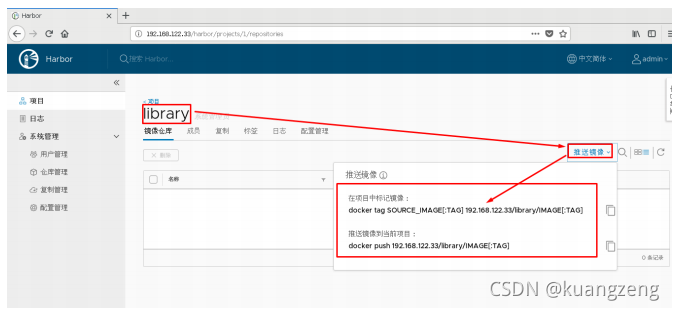
8.4.8.2 给需要上传的镜像打标记
[root@bogon harbor]# docker tag smartgodocker/centos-nginx:v1
192.168.122.33/library/centos-nginx:v1
[root@bogon harbor]# docker images
REPOSITORY TAG IMAGE ID CREATED
SIZE
smartgodocker/centos-nginx v1 cf23c20ff2cd 7 hours
ago 466MB
192 .168.122.33/library/centos-nginx v1 cf23c20ff2cd 7 hours
ago 466MB
8.4.8.3 上传
登录harbor
[root@bogon harbor]# docker login http://192.168.122.33
Username: admin
Password:
WARNING! Your password will be stored unencrypted in /root/.docker/config.json.
Configure a credential helper to remove this warning. See
https://docs.docker.com/engine/reference/commandline/login/#credentials-store

Login Succeeded
上传镜像
[root@bogon harbor]# docker push 192.168.122.33/library/centos-nginx:v1

The push refers to repository [192.168.122.33/library/centos-nginx]
e392868b1aec: Pushed
6a7d23d1440a: Pushed
0c580d4106bc: Pushed
8ef5817e55a0: Pushed
d69483a6face: Pushed
v1: digest: sha256:b51c09890e5dca970a846012c05123b8eeab9e55a3ea7b94408ae42c718389d9
size: 1368
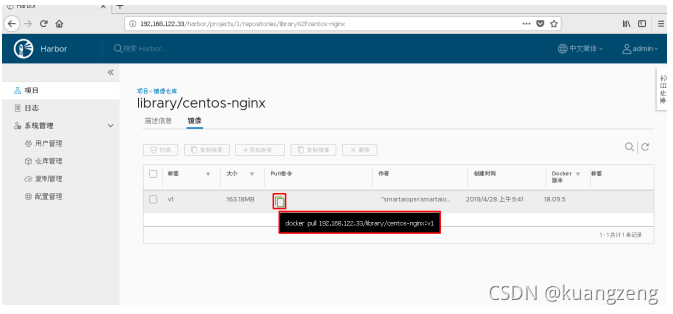
验证是否上传成功
8.4.9 在其它服务器上访问harbor
[root@bogon ~]# cat /etc/docker/daemon.json
{
"insecure-registries": ["http://192.168.122.33"]
}

[root@bogon ~]# systemctl restart docker
[root@bogon ~]# docker pull 192.168.122.33/library/centos-nginx:v1
v1: Pulling from library/centos-nginx
8ba884070f61: Already exists
b49e39a48ce9: Pull complete
ee8f9e32e5d1: Pull complete
76444f96007d: Pull complete
3a3e79f9d90d: Pull complete
Digest: sha256:b51c09890e5dca970a846012c05123b8eeab9e55a3ea7b94408ae42c718389d9
Status: Downloaded newer image for 192 .168.122.33/library/centos-nginx:v1

[root@bogon ~]# docker run -d 192.168.122.33/library/centos-nginx:v1
21cb5b28b3eda91c18df68d613afe8fcb7ee92b75032728fe6204d3e7f4033ea

[root@bogon ~]# curl http://172.17.0.2
nginx s running!!!
九、docker容器网络
9.1 本地网络
9.1.1 bridge
所有容器连接到桥,就可以使用外网,使用NAT让容器可以访问外网
[root@bogon ~]# ip a s

3 : docker0: <NO-CARRIER,BROADCAST,MULTICAST,UP> mtu 1500 qdisc noqueue state DOWN
group default
	link/ether 02 :42:0d:52:fa:0a brd ff:ff:ff:ff:ff:ff
	inet 172 .17.0.1/16 brd 172 .17.255.255 scope global docker0
		valid_lft forever preferred_lft forever
	inet6 fe80::42:dff:fe52:fa0a/64 scope link
		valid_lft forever preferred_lft forever
#所有容器连接到此桥,IP地址都是172.17.0.0/16
#启动docker服务后出现
[root@bogon ~]# brctl show
bridge name bridge id STP enabled interfaces
br-5ca493f64e19 8000.02429cb0e393 no
docker0 8000.02420d52fa0a no

[root@bogon ~]# docker network ls
NETWORK ID NAME DRIVER SCOPE
93283dec7d39 bridge bridge local

#使用--network选择完成对容器网络的选择
[root@bogon ~]# docker run -d --network bridge smartgodocker/centos-nginx:v1
每一台docker host上的docker0所在网段完全一样。
9.1.2 host
所有的容器与docker host在同一网络中,可以让容器访问,甚至可以让外网主机访问容器中的服务
[root@bogon ~]# docker network ls
NETWORK ID NAME DRIVER SCOPE

51ab732381e8 host host local
使用–network选择容器运行的网络
[root@bogon ~]# docker run -it --network host centos:latest /bin/bash
[root@bogon /]# ip a s
bash: ip: command not found
[root@bogon /]# yum -y install iproute
#安装完成后,查看IP地址,发现其使用了docker host地址
#好处在于方便访问
#坏处在多容器同时运行一种服务,端口冲突
#仅在测试环境中使用
9.1.3 none
容器仅与lo网卡,不能与外界连接,在高级应用中会使用到
[root@bogon ~]# docker network ls
NETWORK ID NAME DRIVER SCOPE
93283dec7d39 bridge bridge local
5ca493f64e19 harbor_harbor bridge local
51ab732381e8 host host local
4b7fd7698bec none null local
[root@bogon ~]# docker run -it --network none centos:latest
[root@8159e9d168ab /]# ip a s
#无法验证
9.1.4 容器网络或联盟网络
容器间共享同一个网络命名空间,实现容器间数据传输
9.2 跨主机容器间网络
9.2.1 实现跨主机容器间通信的工具
-
Pipework
-
Flannel
-
Weave
-
Open V Switch OVS
-
Calico
9.2.1 Flannel工作原理
-
是Overlay网络,即覆盖型网络
-
通过etcd保存子网信息及网络分配信息
-
给每台Docker Host分配置一个网段
-
通过UDP传输数据包
9.2.2 配置flannel
9.2.2.1 环境说明
-
node1
- 安装软件 etcd flannel docker
-
node2
- 安装软件 flannel docker
9.2.2.2 主机配置
- 主机名
[root@bogon ~]# hostnamectl set-hostname node1

[root@bogon ~]# hostnamectl set-hostname node2
- 配置/etc/hosts
所有主机
[root@bogon ~]# cat /etc/hosts
127.0.0.1 localhost localhost.localdomain localhost4 localhost4.localdomain4
::1 localhost localhost.localdomain localhost6 localhost6.localdomain6
192.168.122.33 node1
192.168.122.33 etcd
192.168.122.185 node2
- 安全配置
所有主机
[root@bogon ~]# systemctl stop firewalld
[root@bogon ~]# systemctl disable firewalld

[root@bogon ~]# sed -ri 's/SELINUX=enforcing/SELINUX=disabled/' /etc/selinux/config
- 安装软件
node1
1 [root@node1 ~]# yum -y install etcd flannel
node2
1 [root@node2 ~]# yum -y install flannel
- 配置etcd及flannel
node1
etcd配置
[root@node1 ~]# cat /etc/etcd/etcd.conf
#[Member]
#ETCD_CORS=""
ETCD_DATA_DIR="/var/lib/etcd/default.etcd"
#ETCD_WAL_DIR=""
#ETCD_LISTEN_PEER_URLS="http://localhost:2380"
ETCD_LISTEN_CLIENT_URLS="http://0.0.0.0:2379,http://0.0.0.0:4001" #修改
#ETCD_MAX_SNAPSHOTS="5"
#ETCD_MAX_WALS="5"
ETCD_NAME="default"
#ETCD_SNAPSHOT_COUNT="100000"
#ETCD_HEARTBEAT_INTERVAL="100"
#ETCD_ELECTION_TIMEOUT="1000"
#ETCD_QUOTA_BACKEND_BYTES="0"
#ETCD_MAX_REQUEST_BYTES="1572864"
#ETCD_GRPC_KEEPALIVE_MIN_TIME="5s"
#ETCD_GRPC_KEEPALIVE_INTERVAL="2h0m0s"
#ETCD_GRPC_KEEPALIVE_TIMEOUT="20s"
#
#[Clustering]
#ETCD_INITIAL_ADVERTISE_PEER_URLS="http://localhost:2380"
ETCD_ADVERTISE_CLIENT_URLS="http://etcd:2379,http://etcd:4001" #修改
#ETCD_DISCOVERY=""
#ETCD_DISCOVERY_FALLBACK="proxy"
#ETCD_DISCOVERY_PROXY=""
#ETCD_DISCOVERY_SRV=""
#ETCD_INITIAL_CLUSTER="default=http://localhost:2380"
#ETCD_INITIAL_CLUSTER_TOKEN="etcd-cluster"
#ETCD_INITIAL_CLUSTER_STATE="new"
#ETCD_STRICT_RECONFIG_CHECK="true"
#ETCD_ENABLE_V2="true"
#
#[Proxy]
#ETCD_PROXY="off"
#ETCD_PROXY_FAILURE_WAIT="5000"
#ETCD_PROXY_REFRESH_INTERVAL="30000"
#ETCD_PROXY_DIAL_TIMEOUT="1000"
#ETCD_PROXY_WRITE_TIMEOUT="5000"
#ETCD_PROXY_READ_TIMEOUT="0"
#
#[Security]
#ETCD_CERT_FILE=""
#ETCD_KEY_FILE=""
#ETCD_CLIENT_CERT_AUTH="false"
#ETCD_TRUSTED_CA_FILE=""
#ETCD_AUTO_TLS="false"
#ETCD_PEER_CERT_FILE=""
#ETCD_PEER_KEY_FILE=""
#ETCD_PEER_CLIENT_CERT_AUTH="false"
#ETCD_PEER_TRUSTED_CA_FILE=""
#ETCD_PEER_AUTO_TLS="false"
#
#[Logging]
#ETCD_DEBUG="false"
#ETCD_LOG_PACKAGE_LEVELS=""
#ETCD_LOG_OUTPUT="default"
#
#[Unsafe]
#ETCD_FORCE_NEW_CLUSTER="false"
#
#[Version]
#ETCD_VERSION="false"
#ETCD_AUTO_COMPACTION_RETENTION="0"
#
#[Profiling]
#ETCD_ENABLE_PPROF="false"
#ETCD_METRICS="basic"
#
#[Auth]
#ETCD_AUTH_TOKEN="simple"
开启etcd服务
[root@node1 ~]# systemctl enable etcd
Created symlink from /etc/systemd/system/multi-user.target.wants/etcd.service to
/usr/lib/systemd/system/etcd.service.
[root@node1 ~]# systemctl start etcd
[root@node1 ~]# ss -anput | grep ":2379"
tcp ESTAB 0  0  127.0.0.1:49946 127.0.0.1:2379
users:(("etcd",pid=17487 ,fd=11))
tcp LISTEN 0  128 :::2379 :::*
users:(("etcd",pid=17487 ,fd=6))
tcp ESTAB 0  0 ::ffff:127.0.0.1:2379
::ffff:127.0.0.1:49946 users:(("etcd",pid=17487,fd=15))
[root@node1 ~]# ss -anput | grep ":4001"
tcp ESTAB 0  0  127 .0.0.1:34450 127 .0.0.1:4001
users:(("etcd",pid=17487 ,fd=13))
tcp LISTEN 0  128 :::4001 :::*
users:(("etcd",pid=17487 ,fd=7))
tcp ESTAB 0  0 ::ffff:127.0.0.1:4001
::ffff:127.0.0.1:34450 users:(("etcd",pid=17487,fd=14))
验证etcd
#测试etcd是否存取数据
[root@node1 ~]# etcdctl set testdir/testkey0 1000
1000
[root@node1 ~]# etcdctl get testdir/testkey0
1000

#检查集群是否健康
[root@node1 ~]# etcdctl -C http://etcd:4001 cluster-health
member 8e9e05c52164694d is healthy: got healthy result from http://etcd:2379
cluster is healthy
[root@node1 ~]# etcdctl -C http://etcd:2379 cluster-health
member 8e9e05c52164694d is healthy: got healthy result from http://etcd:2379
cluster is healthy
flannel配置
[root@node1 ~]# cat /etc/sysconfig/flanneld
# Flanneld configuration options

# etcd url location. Point this to the server where etcd runs
FLANNEL_ETCD_ENDPOINTS="http://etcd:2379" #注意此处配置

# etcd config key. This is the configuration key that flannel queries
# For address range assignment
FLANNEL_ETCD_PREFIX="/atomic.io/network" #记得默认前缀

# Any additional options that you want to pass
#FLANNEL_OPTIONS=""
在etcd中添加网段
[root@node1 ~]# etcdctl mk /atomic.io/network/config '{ "Network": "172.20.0.0/16" }'
{ "Network": "172.20.0.0/16" }

[root@node1 ~]# etcdctl get /atomic.io/network/config
{ "Network": "172.20.0.0/16" }
启动flannel
[root@node1 ~]# systemctl enable flanneld
Created symlink from /etc/systemd/system/multi-user.target.wants/flanneld.service to
/usr/lib/systemd/system/flanneld.service.
Created symlink from /etc/systemd/system/docker.service.wants/flanneld.service to
/usr/lib/systemd/system/flanneld.service.
[root@node1 ~]# systemctl start flanneld

[root@node1 ~]# ip a s

65 : flannel0: <POINTOPOINT,MULTICAST,NOARP,UP,LOWER_UP> mtu 1472 qdisc pfifo_fast
state UNKNOWN group default qlen 500
link/none
inet 172.20.22.0/16 scope global flannel0
valid_lft forever preferred_lft forever
inet6 fe80::841:71ef:e238:b38b/64 scope link flags 800
valid_lft forever preferred_lft forever
配置flannel与docker结合
第一步:subnet信息
[root@node1 ~]# cat /run/flannel/subnet.env
FLANNEL_NETWORK= 172.20.0.0/16
FLANNEL_SUBNET= 172.20.22.1/24  #使用
FLANNEL_MTU= 1472 #使用
FLANNEL_IPMASQ=false
第二步:配置docker daemon
[root@node1 ~]# cat /etc/docker/daemon.json
{
		"insecure-registries": ["http://192.168.122.33"],
		"registry-mirrors": ["https://s27w6kze.mirror.aliyuncs.com","https://registry.docker-cn.com"],
		"bip": "172.20.22.1/24",
		"mtu": 1472
}
第三步:重启docker
1 [root@node1 ~]# systemctl restart docker
启动容器验证网络
[root@node1 harbor]# ip a s

3 : docker0: <NO-CARRIER,BROADCAST,MULTICAST,UP> mtu 1500 qdisc noqueue state DOWN
group default
	link/ether 02 :42:0d:52:fa:0a brd ff:ff:ff:ff:ff:ff
	inet 172 .20.22.1/24 brd 172 .20.22.255 scope global docker0
		valid_lft forever preferred_lft forever
	inet6 fe80::42:dff:fe52:fa0a/64 scope link
		valid_lft forever preferred_lft forever

65 : flannel0: <POINTOPOINT,MULTICAST,NOARP,UP,LOWER_UP> mtu 1472 qdisc pfifo_fast
state UNKNOWN group default qlen 500
	link/none
	inet 172 .20.22.0/16 scope global flannel0
		valid_lft forever preferred_lft forever
	inet6 fe80::841:71ef:e238:b38b/64 scope link flags 800
		valid_lft forever preferred_lft forever

[root@node1 harbor]# docker run -it centos:latest /bin/bash
[root@2468256e467a /]#

"Networks": {
		"bridge": {
			"IPAMConfig": null,
			"Links": null,
			"Aliases": null,
			"NetworkID":
			"a9ab0cd178d55c2e5e3c963d5791a4ad2659932167da81781cc5d961ea3e9aa0",
			"EndpointID":
			"62de9679127a393344e7caccaaafcf05fe297f67ede24bc1230e5e62cf48958a",
			"Gateway": "172.20.22.1",
			"IPAddress": "172.20.22.2",
			"IPPrefixLen": 24,
			"IPv6Gateway": "",
			"GlobalIPv6Address": "",
			"GlobalIPv6PrefixLen": 0 ,
			"MacAddress": "02:42:ac:14:16:02",
			"DriverOpts": null
node2
配置flannel
[root@node2 ~]# cat /etc/sysconfig/flanneld
# Flanneld configuration options

# etcd url location. Point this to the server where etcd runs
FLANNEL_ETCD_ENDPOINTS="http://etcd:2379"

# etcd config key. This is the configuration key that flannel queries
# For address range assignment
FLANNEL_ETCD_PREFIX="/atomic.io/network"

# Any additional options that you want to pass
#FLANNEL_OPTIONS=""
[root@node2 ~]# systemctl enable flanneld
Created symlink from /etc/systemd/system/multi-user.target.wants/flanneld.service to
/usr/lib/systemd/system/flanneld.service.
Created symlink from /etc/systemd/system/docker.service.wants/flanneld.service to
/usr/lib/systemd/system/flanneld.service.
[root@node2 ~]# systemctl start flanneld
[root@node2 ~]# ip a s

6 : flannel0: <POINTOPOINT,MULTICAST,NOARP,UP,LOWER_UP> mtu 1472 qdisc pfifo_fast state
UNKNOWN group default qlen 500
	link/none
	inet 172.20.13.0/16 scope global flannel0
		valid_lft forever preferred_lft forever
	inet6 fe80::3999:4299:7371:99ba/64 scope link flags 800
		valid_lft forever preferred_lft forever
配置flannel与docker结合
第一步:获取subnet信息
[root@node2 ~]# cat /run/flannel/subnet.env
FLANNEL_NETWORK=172.20.0.0/16
FLANNEL_SUBNET=172.20.13.1/24
FLANNEL_MTU=1472
FLANNEL_IPMASQ=false
第二步:修改docker daemon配置文件
[root@node2 ~]# cat /etc/docker/daemon.json
{
		"insecure-registries": ["http://192.168.122.33"],
		"bip": "172.20.13.1/24",
		"mtu": 1472
}
第三步:重启docker
1 [root@node2 ~]# systemctl restart docker
第四步:开启容器验证
[root@node2 ~]# ip a s

3 : docker0: <NO-CARRIER,BROADCAST,MULTICAST,UP> mtu 1500 qdisc noqueue state DOWN
group default
	link/ether 02 :42:fb:d8:68:65 brd ff:ff:ff:ff:ff:ff
	inet 172 .20.13.1/24 brd 172 .20.13.255 scope global docker0
		valid_lft forever preferred_lft forever
	inet6 fe80::42:fbff:fed8:6865/64 scope link
		valid_lft forever preferred_lft forever
6 : flannel0: <POINTOPOINT,MULTICAST,NOARP,UP,LOWER_UP> mtu 1472 qdisc pfifo_fast state
UNKNOWN group default qlen 500
	link/none
	inet 172 .20.13.0/16 scope global flannel0
		valid_lft forever preferred_lft forever
	inet6 fe80::3999:4299:7371:99ba/64 scope link flags 800
		valid_lft forever preferred_lft forever
[root@node2 ~]# docker run -it centos:latest /bin/bash
[root@4cf2859ec3bf /]#

"Networks": {
		"bridge": {
		"IPAMConfig": null,
		"Links": null,
		"Aliases": null,
		"NetworkID":"ae12e0c00f2108e3192fc6792c45ccc9bf1460c8562806c6bd4d22335fd71659",
		"EndpointID":"8e2d68167b16e1317b86262312f9677acdc2e3c2f47c5601fe5016969029f898",
		"Gateway": "172.20.13.1",
		"IPAddress": "172.20.13.2",
		"IPPrefixLen": 24 ,
		"IPv6Gateway": "",
		"GlobalIPv6Address": "",
		"GlobalIPv6PrefixLen": 0 ,
		"MacAddress": "02:42:ac:14:0d:02",
		"DriverOpts": null
大大的注意项
如发现各容器内分配的ip之间相互ping不通,可能由于防火墙问题引起的,执行下面操作即可:
[root@node1 ~]# iptables -P INPUT ACCEPT
[root@node1 ~]# iptables -P FORWARD ACCEPT
[root@node1 ~]# iptables -F
[root@node1 ~]# iptables -L -n

[root@node2 ~]# iptables -P INPUT ACCEPT
[root@node2 ~]# iptables -P FORWARD ACCEPT
[root@node2 ~]# iptables -F
[root@node2 ~]# iptables -L -n
十、容器编排部署
10.1 编排部署作用
-
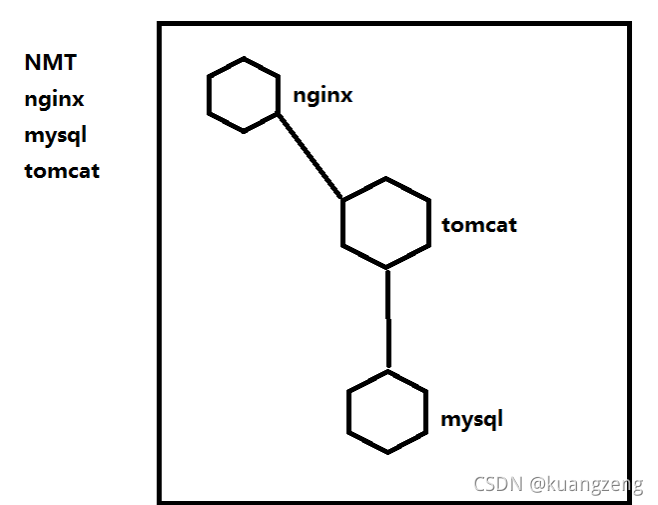
实现复杂容器应用架构之间的互联
-
减少大量容器部署的成本
10.2 编排部署工具
-
docker machine
- 用于准备docker host
- docker compose
通过一个文件定义复杂的容器应用之间的关系
-
docker swarm
-
用于管理docker host
-
把docker host生成一个集群
-
可以使用YAML文件实现复杂容器应用编排
-
-
kubernetes
-
简称 k8s
-
google公司内部使用十几年伯格系统的开源
-
归云原生计算基金会
-
能够实现复杂容器应用的编排部署
-
容器自动装箱功能
-
容器滚动更新及回滚
-
容器水平扩展
-
配置中心
-
密钥和存储管理
-
容器云平台使用kubernetes完成核心功能
-
openshift
-
rancher
-
-
-
mesos + marathon
-
mesos 集群资源管理
-
marathon 容器编排部署
-
10.3 docker-compose
10.3.1 docker compose 作用
在一个文件中定义复杂的容器应用之间的关系,用一个命令即可执行
-
YAML,类似于html,xml
-
YAML格式文件
-
docker-compose 使用yaml文件启动容器
-
start & stop
-
down & up
-
10.3.2 docker compose定义方法
容器分三层:
-
工程 project 一个目录
-
服务 service 用于定义容器资源(镜像、网络、依赖、容器)
-
容器 container 用于运行服务
步骤:
1 、创建一个目录
2 、创建一个docker-compose.yaml文件,定义服务
3 、使用docker-compose命令启动服务
10.3.3 docker-compose工具部署
[root@node2 ~]# yum -y install epel-release
[root@node2 ~]# yum -y install python2-pip
[root@node2 ~]# pip install --upgrade pip

[root@node2 ~]# pip install docker-compose
10.3.4 使用docker-compose部署应用案例
10.3.4.1 案例一
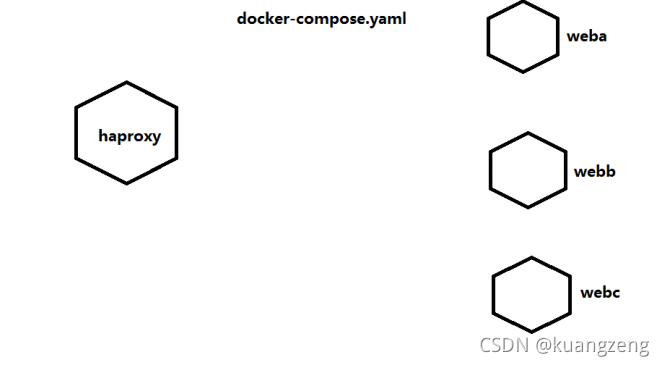
使用haproxy实例web应用发布
步骤:
第一步:创建一个工程
[root@node1 ~]# mkdir docker-haproxy
[root@node1 ~]# cd docker-haproxy/
[root@node1 docker-haproxy]#
第二步:定义web服务
[root@node1 docker-haproxy]# mkdir web
[root@node1 docker-haproxy]# cd web
[root@node1 web]# cat Dockerfile
FROM python:2.7
WORKDIR /code
ADD. /code
EXPOSE 80
CMD python index.py
[root@node1 web]# cat index.py
#!/usr/bin/python
#date:
import sys
import BaseHTTPServer
from SimpleHTTPServer import SimpleHTTPRequestHandler
import socket
import fcntl
import struct
import pickle
from datetime import datetime
from collections import OrderedDict
class HandlerClass(SimpleHTTPRequestHandler):
def get_ip_address(self,ifname):
s = socket.socket(socket.AF_INET, socket.SOCK_DGRAM)
return socket.inet_ntoa(fcntl.ioctl(
s.fileno(),
0x8915, # SIOCGIFADDR
struct.pack('256s', ifname[:15])
)[20:24])
def log_message(self, format, *args):
if len(args) < 3 or "200" not in args[1]:
return
try:
request = pickle.load(open("pickle_data.txt","r"))
except:
request=OrderedDict()
time_now = datetime.now()
ts = time_now.strftime('%Y-%m-%d %H:%M:%S')
server = self.get_ip_address('eth0')
host=self.address_string()
addr_pair = (host,server)
if addr_pair not in request:
request[addr_pair]=[1,ts]
else:
num = request[addr_pair][0]+ 1
del request[addr_pair]
request[addr_pair]=[num,ts]
file=open("index.html", "w")
file.write("<!DOCTYPE html> <html> <body><center><h1><font color=\"blue\"face=\"Georgia,Arial\" size=8><em>HA</em></font> Webpage Visit Results</h1></center>");
for pair in request:
if pair[0] == host:
guest = "LOCAL: "+pair[0]
else:
guest = pair[0]
if (time_now-datetime.strptime(request[pair][1],'%Y-%m-%d %H:%M:%S')).seconds < 3 :
file.write("<p style=\"font-size:150%\" >#"+ str(request[pair][1]) +":<font color=\"red\">"+str(request[pair][0])+ "</font> requests " + "from <<font color=\"blue\">"+guest+"</font>> to WebServer <<font color=\"blue\">"+pair[1]+"</font>></p>")
else:
file.write("<p style=\"font-size:150%\" >#"+ str(request[pair][1]) +":<font color=\"maroon\">"+str(request[pair][0])+ "</font> requests " + "from <<font color=\"navy\">"+guest+"</font>> to WebServer <<font color=\"navy\">"+pair[1]+"</font>></p>")
file.write("</body> </html>");
file.close()
pickle.dump(request,open("pickle_data.txt","w"))
if __name__ == '__main__':
try:
ServerClass = BaseHTTPServer.HTTPServer
Protocol = "HTTP/1.0"
addr = len(sys.argv) < 2 and "0.0.0.0" or sys.argv[1]
port = len(sys.argv) < 3 and 80 or int(sys.argv[2])
HandlerClass.protocol_version = Protocol
httpd = ServerClass((addr, port), HandlerClass)
sa = httpd.socket.getsockname()
print "Serving HTTP on", sa[0], "port", sa[1], "..."
httpd.serve_forever()
except:
exit()
第三步:定义haproxy服务
[root@node1 docker-haproxy]# mkdir haproxy
[root@node1 docker-haproxy]# cd haproxy/
[root@node1 haproxy]# cat haproxy.cfg
global
	log 127.0.0.1 local0
	log 127.0.0.1 local1 notice

defaults
	log global
	mode http
	option httplog
	option dontlognull
	timeout connect 5000ms
	timeout client 50000ms
	timeout server 50000ms

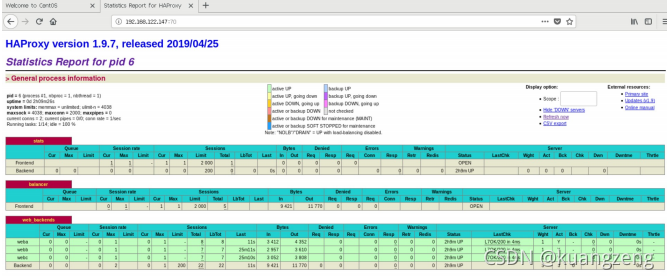
listen stats
	bind *:70
	stats enable
	stats uri /

frontend balancer
	bind 0.0.0.0:80
	mode http
	default_backend web_backends

backend web_backends
	mode http
	option forwardfor
	balance roundrobin
	server weba weba:80 check
	server webb webb:80 check
	server webc webc:80 check
	option httpchk GET /
	http-check expect status 200
第四步:创建docker-compose.yaml文件整合以上服务
[root@node1 docker-haproxy]# cat docker-compose.yaml
weba:
 build: ./web
 expose:
   - 80
webb:
 build: ./web
 expose:
  - 80
webc:
 build: ./web
 expose:
   - 80

haproxy:
 image: haproxy:latest
 volumes:
   - ./haproxy:/haproxy-override
   - ./haproxy/haproxy.cfg:/usr/local/etc/haproxy/haproxy.cfg:ro
 links:
   - weba
   - webb
   - webc
 ports:
   - "80:80"
   - "70:70"
 expose:
   - "80"
   - "70"
第五步:使用docker-compose命令启动工程
[root@node1 docker-haproxy]# pwd
/root/docker-haproxy
[root@node1 docker-haproxy]# docker-compose up
第六步:访问
10.3.4.2 案例二
创建一个python web应用,使用flask,把用户访问的次数写入到redis,通过web首页显示访问次数。
第一步:创建一个工程目录
[root@node1 ~]# mkdir pythondir
[root@node1 ~]# cd pythondir
[root@node1 pythondir]#
第二步:创建一个应用
[root@node1 pythondir]# cat app.py
from flask import Flask
from redis import Redis

app = Flask(__name__)

redis = Redis(host='redis',port= 6379 )

@app.route('/')
def hello():
	redis.incr('hits')
	return 'Hello world! I have been seen %s time.' % redis.get('hits')

if __name__ == "__main__":
	app.run(host="0.0.0.0",debug=True)
创建安装的软件需求列表
[root@node1 pythondir]# cat requirements.txt
flask
redis
第三步:Dockerfile文件
[root@node1 pythondir]# cat Dockerfile
FROM python:2.7
ADD. /code
WORKDIR /code
RUN pip install -r requirements.txt
CMD python app.py
第四步:创建docker-compose.yaml文件
[root@node1 pythondir]# cat docker-compose.yaml
version: '2'
services:
  web:
    build: .
    ports:
    - "5000:5000"
    volumes:
    - .:/code
    depends_on:
    - redis
  redis:
    image: redis:latest
第五步:运行
[root@node1 pythondir]# pwd
/root/pythondir
[root@node1 pythondir]# docker-compose up
第六步:访问
10.3.4.3 案例三
使用容器运行一个wordpress应用
-
语言开发环境
-
数据库
第一步:创建一个工程目录
[root@node1 ~]# mkdir wordpress
[root@node1 ~]# cd wordpress
[root@node1 wordpress]#
第二步:创建一个docker-compose.yaml文件
[root@node1 wordpress]# cat docker-compose.yaml
version: '2'
services:
  db:
  image: mysql:5.7
  volumes:
  - "./.data/db:/var/lib/mysql"
  restart: always
  environment:
    MYSQL_ROOT_PASSWORD: wordpress
    MYSQL_DATABASE: wordpress
    MYSQL_USER: wordpress
    MYSQL_PASSWORD: wordpress

  wordpress:
    depends_on:
    - db
    image: wordpress:latest
    links:
    - db
    ports:
    - "8000:80"
    restart: always
    environment:
      WORDPRESS_DB_HOST: db:3306
      WORDPRESS_DB_PASSWORD: wordpress
第三步:验证
[root@node1 ~]# cd wordpress/
[root@node1 wordpress]# ls -a
. .. .data docker-compose.yaml
[root@node1 wordpress]# ls .data/
db
[root@node1 wordpress]# ls .data/db/
auto.cnf client-key.pem ib_logfile1 private_key.pem sys
ca-key.pem ib_buffer_pool ibtmp1 public_key.pem wordpress
ca.pem ibdata1 mysql server-cert.pem
client-cert.pem ib_logfile0 performance_schema server-key.pem
第四步:访问
10.4 docker swarm
10.4.1 docker swarm介绍
10.4.1.1 是什么
-
是docker host集群管理工具
-
docker官方提供的
-
docker 1.12版本以后
-
用来统一集群管理的,把整个集群资源做统一调度
-
比kubernetes要轻量化
-
实现scaling 规模扩大或缩小
-
实现rolling update 滚动更新或版本回退
-
实现service discovery 服务发现
-
实现load balance 负载均衡
-
实现route mesh 路由网格,服务治理
10.4.1.2 docker swarm架构
-
节点 (node) 就是一台docker host
-
管理节点(manager node) 负责管理集群中的节点并向工作节点分配任务
-
工作节点(worker node) 接收管理节点分配的任务,运行任务
-
-
服务(services),在工作节点运行的,由多个任务共同组成
-
任务(task),运行在工作节点上容器或容器中包含应用,是集群中调度最小管理单元
10.4.2 docker swarm部署环境准备
10.4.2.1 准备主机
-
3 台主机
-
centos7.6
-
cpu、memory、disk不做要求
10.4.2.2 准备ip及主机名
[root@nodeX ~]# hostnamectl set-hostname nodeX
[root@nodeX ~]# cat /etc/sysconfig/network-scripts/ifcfg-eth0
TYPE="Ethernet"
BOOTPROTO="static"
NAME="eth0"
DEVICE="eth0"
ONBOOT="yes"
IPADDR="192.168.122.xxx"
PREFIX="24"
GATEWAY="192.168.122.1"
DNS1="119.29.29.29"
[root@nodeX ~]# cat /etc/hosts
127.0.0.1 localhost localhost.localdomain localhost4 localhost4.localdomain4
::1 localhost localhost.localdomain localhost6 localhost6.localdomain6
192.168.122.100 node1
192.168.122.110 node2
192.168.122.120 node3
10.4.2.3 安全准备
#ntp
[root@nodeX ~]# crontab -e
0 */1 * * * ntpdate time1.aliyun.com

#firewalld
[root@nodeX ~]# systemctl stop firewalld;systemctl disable firewalld

#selinux 需要重启系统
[root@nodeX ~]# sed -ri 's/SELINUX=enforcing/SELINUX=disabled/' /etc/selinux/config
10.4.2.4 准备docker
[root@nodeX ~]# yum install -y yum-utils device-mapper-persistent-data lvm2

[root@nodeX ~]# yum-config-manager --add-repo
https://download.docker.com/linux/centos/docker-ce.repo

[root@nodeX ~]# yum -y install docker-ce

[root@node1 ~]# cat /usr/lib/systemd/system/docker.service

[Service]
Type=notify
# the default is not to use systemd for cgroups because the delegate issues still
# exists and systemd currently does not support the cgroup feature set required
# for containers run by docker
ExecStart=/usr/bin/dockerd #删除-H(含)后面所有内容
ExecReload=/bin/kill -s HUP $MAINPID
TimeoutSec=0
RestartSec=2
Restart=always

[root@nodeX ~]# systemctl enable docker;systemctl start docker
10.4.3 docker swarm集群部署
10.4.3.1 角色划分
| node1 | node2 | node3 |
|---|---|---|
| master (manager node) | worker | worker |
10.4.3.2 集群初始化
[root@node1 ~]# docker swarm init --listen-addr 192.168.122.100:2377
Swarm initialized: current node (5agiwlur6fziotng0y7art7ti) is now a manager.

To add a worker to this swarm, run the following command:

docker swarm join --token SWMTKN-1-
3p19n7axxygdhbg4debkqc5395pdqevll9x6zxm5tqrnrxmmi4-as8fhsxxuiqpr2bzxxuc88m9p
192.168.122.100:2377

To add a manager to this swarm, run 'docker swarm join-token manager' and follow the
instructions.
可以支持多master节点
10.4.3.3 添加工作节点到swarm集群
node2-node3
[root@nodeX ~]# docker swarm join --token SWMTKN-1-3p19n7axxygdhbg4debkqc5395pdqevll9x6zxm5tqrnrxmmi4-as8fhsxxuiqpr2bzxxuc88m9p 192.168.122.100:2377
[root@node1 ~]# docker node ls
ID HOSTNAME STATUS AVAILABILITY
MANAGER STATUS ENGINE VERSION
5agiwlur6fziotng0y7art7ti * node1 Ready Active
Leader 18.09.5
kodqq1taqnn2jyz9zl2vjus1j node2 Ready Active
 18.09.5
x21s1j3hx78nztrrs4v4iuf28 node3 Ready Active
 18.09.5
10.4.4 docker swarm应用
10.4.4.1 镜像准备
v1
[root@node1 nginxtest]# pwd
/root/nginxtest
[root@node1 nginxtest]# cat index.html
nginx is running!!! v1

[root@node1 nginxtest]# cat Dockerfile
FROM centos:latest

MAINTAINER "smartaiops<[email protected]>"

RUN yum -y install yum-plugin-ovl && yum -y install epel-release
RUN yum -y install nginx

ADD index.html /usr/share/nginx/html/

RUN echo "daemon off;" >> /etc/nginx/nginx.conf

EXPOSE 80

CMD /usr/sbin/nginx

[root@node1 nginxtest]# docker build -t 192.168.122.100/library/centos-nginx:v1 .

[root@node1 nginxtest]# docker images
REPOSITORY TAG IMAGE ID CREATED
SIZE
192.168.122.100/library/centos-nginx v1 7bd2f64fcec4 About a
minute ago 466MB

[root@node1 nginxtest]# docker login http://node1
Username: admin
Password:
WARNING! Your password will be stored unencrypted in /root/.docker/config.json.
Configure a credential helper to remove this warning. See
https://docs.docker.com/engine/reference/commandline/login/#credentials-store

Login Succeeded

[root@node1 nginxtest]# docker push 192.168.122.100/library/centos-nginx:v1
v2
[root@node1 nginxtest]# cat index.html
nginx is running!!! v2

[root@node1 nginxtest]# docker build -t 192.168.122.100/library/centos-nginx:v2 .
Sending build context to Docker daemon 3.072kB
Step 1/8 : FROM centos:latest
---> 9f38484d220f
Step 2/8 : MAINTAINER "smartaiops<[email protected]>"
---> Using cache
---> 793dcb13fe22
Step 3/8 : RUN yum -y install yum-plugin-ovl && yum -y install epel-release
---> Using cache
---> 36423e32ea59
Step 4/8 : RUN yum -y install nginx
---> Using cache
---> e960a535ab1d
Step 5/8 : ADD index.html /usr/share/nginx/html/
---> b105fbc8ea0b
Step 6/8 : RUN echo "daemon off;" >> /etc/nginx/nginx.conf
---> Running in 39acb9a6047f
Removing intermediate container 39acb9a6047f
---> 0923f79dcaca
Step 7/8 : EXPOSE 80
---> Running in 3b117cc735f8
Removing intermediate container 3b117cc735f8
---> 5397260f3cec
Step 8/8 : CMD /usr/sbin/nginx
---> Running in 436eff3f5775
Removing intermediate container 436eff3f5775
---> feb45843edff
Successfully built feb45843edff
Successfully tagged 192.168.122.100/library/centos-nginx:v2

[root@node1 nginxtest]# docker push 192.168.122.100/library/centos-nginx:v2
10.4.4.2 发布一个服务
- 在manager node上
[root@node1 ~]# docker service create --replicas 2 --publish 8090:80 --name nginxsvc
192.168.122.100/library/centos-nginx:v1
qu78yi4an2i640kyyhapma8yo
overall progress: 2 out of 2 tasks
1/2: running
2/2: running
verify: Service converged
- 验证
[root@node1 ~]# docker service ls
ID NAME MODE REPLICAS IMAGE
PORTS
qu78yi4an2i6 nginxsvc replicated 2 /2
192.168.122.100/library/centos-nginx:v1 *:8090->80/tcp

[root@node1 ~]# docker service ps nginxsvc
ID NAME IMAGE NODE
DESIRED STATE CURRENT STATE ERROR PORTS
k7cmbni9gezt nginxsvc.1 192.168.122.100/library/centos-nginx:v1
node2 Running Running 2 minutes ago
p25jcebm3tq1 nginxsvc.2 192.168.122.100/library/centos-nginx:v1
node1 Running Running 3 minutes ago
- 扩展或缩小
[root@node1 ~]# docker service scale nginxsvc=3
nginxsvc scaled to 3
overall progress: 3 out of 3 tasks
1/3: running
2/3: running
3/3: running
verify: Service converged

或

[root@node1 ~]# docker service scale nginxsvc=1
nginxsvc scaled to 1
overall progress: 1 out of 1 tasks
1/1: running

verify: Service converged
[root@node1 ~]# docker service ps nginxsvc
ID NAME IMAGE NODE
DESIRED STATE CURRENT STATE ERROR PORTS
k7cmbni9gezt nginxsvc.1 192.168.122.100/library/centos-nginx:v1
node2 Running Running 9 minutes ago
- 滚动更新或版本回退
[root@node1 ~]# docker service update --image 192.168.122.100/library/centos-nginx:v2 nginxsvc
nginxsvc
overall progress: 1 out of 1 tasks
1/1: running
verify: Service converged
间隔更新方法
[root@node1 ~]# docker service update --replicas 3 --image 192.168.122.100/library/centos-nginx:v2 --update-parallelism 1 --update-delay 30s nginxsvc
- 删除
[root@node1 ~]# docker service rm nginxsvc
nginxsvc
[root@node1 ~]# docker service ls
ID NAME MODE REPLICAS IMAGE
PORTS
10.4.5 存储卷应用
- 持久化存储使用
10.4.5.1 本地卷
[root@node1 ~]# docker service create --replicas 1 --mount "type=bind,source=$PWD,target=/abc" --publish 8081:80 --name cnginxsvc 192.168.122.100/library/centos-nginx:v1
eezhdem1fwli0wa58e4vmwoak
overall progress: 1 out of 1 tasks
1 /1: running
verify: Service converged

[root@node1 ~]# docker service ps cnginxsvc
ID NAME IMAGE NODE
DESIRED STATE CURRENT STATE ERROR PORTS
ctk7nswxmzqt cnginxsvc.1 192.168.122.100/library/centos-nginx:v1
node1 Running Running 47 seconds ago

[root@node1 ~]# docker exec cnginxsvc.1.ctk7nswxmzqtuwtl0twstwf9y ls /abc
anaconda-ks.cfg
centos.tar
docker-compose.yaml
harbor
harbor-offline-installer-v1.7.5.tgz
nginx.tar
nginxtest
portainer.tar
visualizer.tar

 #
[root@node1 ~]# docker service scale cnginxsvc=3
cnginxsvc scaled to 3
overall progress: 3 out of 3 tasks
1/3: running
2/3: running
3/3: running
verify: Service converged

[root@node1 ~]# docker service ps cnginxsvc
ID NAME IMAGE NODE
DESIRED STATE CURRENT STATE ERROR
PORTS
ctk7nswxmzqt cnginxsvc.1 192.168.122.100/library/centos-nginx:v1
node1 Running Running 5 minutes ago
9dfxbyl8mieb cnginxsvc.2 192.168.122.100/library/centos-nginx:v1
node2 Running Running about a minute ago
y0xf1xefiurj cnginxsvc.3 192.168.122.100/library/centos-nginx:v1
node3 Running Running about a minute ago

[root@node2 ~]# docker ps
CONTAINER ID IMAGE COMMAND
CREATED STATUS PORTS NAMES
bf3334199443 192.168.122.100/library/centos-nginx:v1 "/bin/sh -c /usr/sbi..."
2 minutes ago Up About a minute 80 /tcp
cnginxsvc.2.9dfxbyl8mieb1cr5bcfezby5h
[root@node2 ~]# docker exec bf333 ls /abc
anaconda-ks.cfg
node2.txt

[root@node3 ~]# touch node3.txt
[root@node3 ~]# docker ps
CONTAINER ID IMAGE COMMAND
CREATED STATUS PORTS NAMES
eef61182c176 192 .168.122.100/library/centos-nginx:v1 "/bin/sh -c /usr/sbi..."
2 minutes ago Up 2 minutes 80 /tcp
cnginxsvc.3.y0xf1xefiurjj6hlxkgmdaj8q
[root@node3 ~]# docker exec eef6 ls /abc
anaconda-ks.cfg
node3.txt
10.4.5.2 网络存储卷
-
实现跨docker host之间容器数据共享
-
持久化保存网络服务器中
第一步:创建nfs服务
node3上完成nfs服务
 #所有节点均安装
[root@nodeX ~]# yum -y install nfs-utils rpcbind

#创建共享目录
[root@node3 ~]# mkdir /opt/dockervolume

#共享
[root@node3 ~]# cat /etc/exports
/opt/dockervolume *(rw,sync,no_root_squash)
#输出共享
[root@node3 ~]# exportfs -rv
exporting *:/opt/dockervolume

[root@node3 ~]# systemctl enable rpcbind nfs-server
Created symlink from /etc/systemd/system/multi-user.target.wants/nfs-server.service to
/usr/lib/systemd/system/nfs-server.service.
[root@node3 ~]# systemctl start rpcbind nfs-server
[root@node3 ~]# systemctl status rpcbind nfs-server

#查看是否共享
[root@node3 ~]# cat /var/lib/nfs/etab
/opt/dockervolume *
(rw,sync,wdelay,hide,nocrossmnt,secure,no_root_squash,no_all_squash,no_subtree_check,s
ecure_locks,acl,no_pnfs,anonuid= 65534 ,anongid= 65534 ,sec=sys,rw,secure,no_root_squash,n
o_all_squash)
第二步:在docker swarm中创建volume
 #查看卷列表
[root@node1 ~]# docker volume ls
DRIVER VOLUME NAME
local 1e43364d8093004c63da5db7620b0173951eb8fc6c9350fd1ae3eec975b89203
local 6d5ab4ce239c8662ef91d920697045087d1725d3292f5af23f5ff649d715333d
local 49e2b7a92e65863eea49f79cfb27821e97032abab87a8665c9e26810be9057fa
local 90b0437f701a74fa5296deac14e31cf560cc235f98b4ec2b585dcf29e4bc46ba
local 586ffd04cf12bfa1774a284247fb8b0347413a5a83c0597595629d0388c8290d
local 633c6fb7a889e30c3791adf9e0db821ed7bd1aca4464d42d7055bb7ef587a758
local 665c7d39ceb6d5b600f1ab6e49a9035def5435d0fd46edbb001dded6686ee2d3
local a06e038abbb7fc766852f138fabfa4aafe8f0bc193bd68d4a96c3541ae755622
local dcf83c973c4574dfec91c611e0eaae59181aa52304ac56a8f90147ff96b5c5ba
local e7802d2eb9f16ce8aa85b0d8c2fc265c4414719ef2f5a0fe90509cd797b8474f

[root@node1 ~]# docker volume create --driver local --opt type=nfs --opt o=addr=192.168.122.120,rw --opt device=:/opt/dockervolume smartgovolume1
smartgovolume1
[root@node1 ~]# docker volume ls
DRIVER VOLUME NAME
local 1e43364d8093004c63da5db7620b0173951eb8fc6c9350fd1ae3eec975b89203
local 6d5ab4ce239c8662ef91d920697045087d1725d3292f5af23f5ff649d715333d
local 49e2b7a92e65863eea49f79cfb27821e97032abab87a8665c9e26810be9057fa
local 90b0437f701a74fa5296deac14e31cf560cc235f98b4ec2b585dcf29e4bc46ba
local 586ffd04cf12bfa1774a284247fb8b0347413a5a83c0597595629d0388c8290d
local 633c6fb7a889e30c3791adf9e0db821ed7bd1aca4464d42d7055bb7ef587a758
local 665c7d39ceb6d5b600f1ab6e49a9035def5435d0fd46edbb001dded6686ee2d3
local a06e038abbb7fc766852f138fabfa4aafe8f0bc193bd68d4a96c3541ae755622
local dcf83c973c4574dfec91c611e0eaae59181aa52304ac56a8f90147ff96b5c5ba
local e7802d2eb9f16ce8aa85b0d8c2fc265c4414719ef2f5a0fe90509cd797b8474f
local smartgovolume1

[root@node1 ~]# docker volume inspect smartgovolume1
[
	{
		"CreatedAt": "2019-04-30T10:36:21+08:00",
		"Driver": "local",
		"Labels": {},
		"Mountpoint": "/var/lib/docker/volumes/smartgovolume1/_data",
		"Name": "smartgovolume1",
		"Options": {
			"device": ":/opt/dockervolume",
			"o": "addr=192.168.122.120,rw",
			"type": "nfs"
		},
		"Scope": "local"
	}
]

[root@node2 ~]# docker volume create --driver local --opt type=nfs --opt o=addr=192.168.122.120,rw --opt device=:/opt/dockervolume smartgovolume1
smartgovolume1

[root@node3 ~]# docker volume create --driver local --opt type=nfs --opt o=addr=192.168.122.120,rw --opt device=:/opt/dockervolume smartgovolume1
smartgovolume1

#手动发布服务时需要在集群中每台主机添加volume
第三步:使用docker service发布服务时使用volume
- 手动启动service时使用volume^
前题条件是nfs服务已经被挂载到本地
创建多副本时需要在每个容器运行的docker hosts上添加volume
[root@node1 ~]# docker service create --replicas 3 --publish 81:80 --mount "type=volume,source=smartgovolume1,target=/usr/share/nginx/html" --name cnginxsvc-volume-test 192.168.122.100/library/centos-nginx:v1
nczb5rj8uggnz0z9jvteuecbm
overall progress: 3 out of 3 tasks
1/3: running
2/3: running
3/3: running
verify: Service converged

[root@node3 ~]# echo "volume test" >> /opt/dockervolume/index.html

[root@node3 ~]# ls /opt/dockervolume/
404.html 50x.html index.html nginx-logo.png poweredby.png

[root@node2 ~]# docker ps
CONTAINER ID IMAGE COMMAND
CREATED STATUS PORTS NAMES
c4c05052354d 192.168.122.100/library/centos-nginx:v1 "/bin/sh -c /usr/sbi..."
33 seconds ago Up 32 seconds 80 /tcp cnginxsvc-volume-
test.3.ohbwdb4hfcnjiogyl5c2et3dw
[root@node2 ~]# docker exec c4c0 cat /usr/share/nginx/html/index.html
nginx is running!!! v1
volume test

[root@node3 ~]# docker ps
CONTAINER ID IMAGE COMMAND
CREATED STATUS PORTS NAMES
27a0eb22ead8 192 .168.122.100/library/centos-nginx:v1 "/bin/sh -c /usr/sbi..."
3 minutes ago Up 3 minutes 80 /tcp cnginxsvc-volume-
test.1.jqt4gl5xwtcy4uxtf0rrv9nm9
[root@node3 ~]# docker exec 27a0 cat /usr/share/nginx/html/index.html
nginx is running!!! v1
volume test
修改nfs服务器上目录内容,再次验证。
1 [root@node3 ~]# echo "AAAA" > /opt/dockervolume/index.html
- 使用编排部署方式使用volume
请清除上一次实验创建的网络存储卷挂载
[root@nodeX ~]# docker volume rm smartgovolume1
smartgovolume1
#所有节点
第一步:编排部署文件
[root@node1 nginx-volume]# cat nginx-volume.yaml
version: '3.3'

services:
  cnginxsvc:
    image: 192 .168.122.100/library/centos-nginx:v1
    deploy:
      mode: replicated
      replicas: 3
      restart_policy:
        condition: on-failure
    ports:
    - "81:80"
    volumes:
    - "smartgovolume1:/usr/share/nginx/html"

volumes:
  smartgovolume1:
    driver: local
    driver_opts:
      type: "nfs"
      o: "addr=192.168.122.120,rw"
      device: ":/opt/dockervolume"
第二步:使用docker stack发布服务
[root@node1 nginx-volume]# docker stack deploy -c nginx-volume.yaml nginx-stack
Creating network nginx-stack_default
Creating service nginx-stack_cnginxsvc
[root@node1 nginx-volume]# docker stack ls
NAME SERVICES ORCHESTRATOR
nginx-stack 1 Swarm

[root@node1 nginx-volume]# docker stack services nginx-stack
ID NAME MODE REPLICAS
IMAGE PORTS
l8t8q0my72hv nginx-stack_cnginxsvc replicated 3 /3
192.168.122.100/library/centos-nginx:v1 *:81->80/tcp

[root@node1 ~]# docker volume ls
DRIVER VOLUME NAME
local 1e43364d8093004c63da5db7620b0173951eb8fc6c9350fd1ae3eec975b89203
local 6d5ab4ce239c8662ef91d920697045087d1725d3292f5af23f5ff649d715333d
local 49e2b7a92e65863eea49f79cfb27821e97032abab87a8665c9e26810be9057fa
local 90b0437f701a74fa5296deac14e31cf560cc235f98b4ec2b585dcf29e4bc46ba
local 586ffd04cf12bfa1774a284247fb8b0347413a5a83c0597595629d0388c8290d
local 633c6fb7a889e30c3791adf9e0db821ed7bd1aca4464d42d7055bb7ef587a758
local 665c7d39ceb6d5b600f1ab6e49a9035def5435d0fd46edbb001dded6686ee2d3
local a06e038abbb7fc766852f138fabfa4aafe8f0bc193bd68d4a96c3541ae755622
local dcf83c973c4574dfec91c611e0eaae59181aa52304ac56a8f90147ff96b5c5ba
local e7802d2eb9f16ce8aa85b0d8c2fc265c4414719ef2f5a0fe90509cd797b8474f
local nginx-stack_smartgovolume1

[root@node2 ~]# docker volume ls
DRIVER VOLUME NAME
local nginx-stack_smartgovolume1

[root@node3 ~]# docker volume ls
DRIVER VOLUME NAME
local nginx-stack_smartgovolume1

[root@node3 ~]# ls /opt/dockervolume/
404.html 50x.html index.html nginx-logo.png poweredby.png
10.5 docker stack
10.5.1 是什么
-
早期使用service发布,每次只能发布一个service
-
yaml可以发布多个服务,但是使用docker-compose只能在一台主机发布
-
借助docker swarm同时发布多服务
-
是docker生态service发布的最高层次
10.5.2 案例
目标:
-
远程管理docke host
-
监控docker host上运行的容器
[root@node1 ~]# cat docker-compose.yaml
version: "3"

services:
  nginx:
    image: nginx:alpine
    ports:
      - 80:80
    deploy:
      mode: replicated
      replicas: 4

  visualizer:
    image: dockersamples/visualizer
    ports:
      - "9001:8080"
    volumes:
      - "/var/run/docker.sock:/var/run/docker.sock"
    deploy:
      replicas: 1
      placement:
        constraints: [node.role == manager]

  portainer:
    image: portainer/portainer
    ports:
      - "9000:9000"
    volumes:
      - "/var/run/docker.sock:/var/run/docker.sock"
    deploy:
      replicas: 1
      placement:
        constraints: [node.role == manager]
- docker stack 运行多服务
[root@node1 ~]# docker stack deploy -c docker-compose.yaml stack-demo
Creating network stack-demo_default
Creating service stack-demo_portainer
Creating service stack-demo_nginx
Creating service stack-demo_visualizer
[root@node1 ~]# docker stack ls
NAME SERVICES ORCHESTRATOR
stack-demo 3 Swarm
