简介
本文主要介绍基于腾讯云对象存储COS,如何快速实现一个app的文件直传功能。您的服务器上只需要生成和管理访问密钥,无需关心细节,文件数据都存放在腾讯云 COS 上。
架构说明
对于app应用,把永久密钥放到客户端代码中,这既容易泄露您的密钥信息,也不便于控制用户访问权限。我们建议通过在请求时携带临时密钥,您可以临时授权您的 App 访问您的存储资源,而不会泄露您的永久密钥,密钥的有效期由您指定,过期后自动失效。
腾讯云COS 移动端 SDK(Android/IOS)均很好的支持了通过临时密钥来授权请求,您只需要在后台搭建一个临时密钥的服务,即可无缝给终端 COS 请求进行授权。
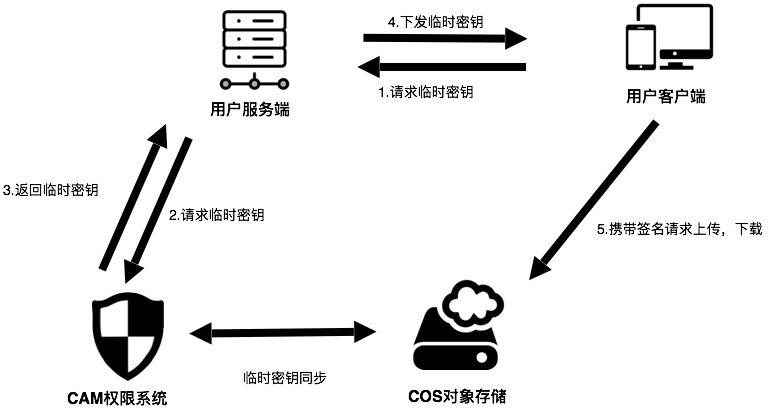
架构图
整体架构图如下所示:
其中:
- 用户客户端:即用户手机 App。
- COS:腾讯云对象存储,负责存储 App 上传的数据。
- CAM:腾讯云访问管理,用于生成 COS 的临时密钥。
- 用户服务端:用户自己的后台服务器,这里用于获取临时密钥,并返回给应用 App。
前提条件
- 创建存储桶。
在 COS 控制台 上创建存储桶。按照您的需求,请将存储桶权限设置为私有读写或者公有读私有写。详细操作步骤请参见 创建存储桶 和 设置访问权限 。 - 获取永久密钥。
临时密钥需要通过永久密钥生成。请前往 API 密钥管理 获取 SecretId、SecretKey,前往 账号信息 获取 APPID。
注意:
目前腾讯云有COS特惠活动,新人1元起
实践步骤
搭建临时密钥服务
出于安全考虑,签名使用临时密钥,需要服务端搭建临时密钥服务,并提供 API 接口给客户端使用。具体搭建步骤请参见 临时密钥生成及使用指引。
注意:
正式部署时服务端请加一层您的网站本身的权限检验。
选择合适的权限
按照最小权限原则,建议您按照自己的需求,通过 Policy 控制临时密钥的权限范围。服务器下发一个完全读写权限的密钥,一旦被攻击,可能导致其他用户的数据泄露。具体的配置方法请参见临时密钥生成及使用指引。
SDK 接入授权服务
Android
搭建好临时密钥服务后,您需要将 SDK 接入到授权服务上,SDK 会负责控制请求的并发数,也会将有效的密钥缓存在本地,并在密钥失效之后重新再次请求,您无需管理获取的密钥。
标准响应体授权
如果您直接将 STS SDK 中得到的 JSON 数据作为临时密钥服务的响应体(cossign 即采用了这种方式),那么您可以使用如下代码来创建 COS SDK 中的授权类:
import android.content.Context;
import com.tencent.cos.xml.*;
import com.tencent.qcloud.core.auth.*;
import com.tencent.qcloud.core.common.*;
import com.tencent.qcloud.core.http.*;
import java.net.*;


Context context = ...;
CosXmlServiceConfig cosXmlServiceConfig = ...;

/**
 * 获取授权服务的 url 地址
 */
URL url = null; // 后台授权服务的 url 地址
try {
    url = new URL("your_auth_server_url");
} catch (MalformedURLException e) {
    e.printStackTrace();
}

/**
 * 初始化 {@link QCloudCredentialProvider} 对象,来给 SDK 提供临时密钥。
 */
QCloudCredentialProvider credentialProvider = new SessionCredentialProvider(new HttpRequest.Builder<String>()
                .url(url)
                .method("GET")
                .build());

CosXmlService cosXmlService = new CosXmlService(context, cosXmlServiceConfig, credentialProvider);
说明:
这种方式下签名的开始时间为手机本地时间,因此如果手机本地时间偏差较大(十分钟以上),可能会导致签名出错,这种情况建议使用下述的自定义响应体授权。
自定义响应体授权
如果您想获得更大的灵活性,例如自定义临时密钥服务的 HTTP 响应体,给终端返回服务器时间作为签名的开始时间,用来避免由于用户手机本地时间偏差过大导致的签名不正确,或者使用其他的协议来进行终端和服务端之间的通信,那么您可以继承 BasicLifecycleCredentialProvider 类,并实现其 fetchNewCredentials():
请先定义一个 MyCredentialProvider 类:
import android.content.Context;
import com.tencent.cos.xml.*;
import com.tencent.qcloud.core.auth.*;
import com.tencent.qcloud.core.common.*;
import com.tencent.qcloud.core.http.*;
import java.net.*;


public class MyCredentialProvider extends BasicLifecycleCredentialProvider {

    @Override
    protected QCloudLifecycleCredentials fetchNewCredentials() throws QCloudClientException {

        // 首先从您的临时密钥服务器获取包含了签名信息的响应
        ....

        // 然后解析响应,获取密钥信息
        String tmpSecretId = ...;
        String tmpSecretKey = ...;
        String sessionToken = ...;
        long expiredTime = ...;

        // 返回服务器时间作为签名的起始时间
        long beginTime = ...;

        // todo something you want

        // 最后返回临时密钥信息对象
        return new SessionQCloudCredentials(tmpSecretId, tmpSecretKey, sessionToken, beginTime, expiredTime);
    }
}
利用您定义的 MyCredentialProvider 实例来授权请求:
import android.content.Context;
import com.tencent.cos.xml.*;
import com.tencent.qcloud.core.auth.*;
import com.tencent.qcloud.core.common.*;
import com.tencent.qcloud.core.http.*;
import java.net.*;

Context context = ...;
CosXmlServiceConfig cosXmlServiceConfig = ...;

/**
 * 初始化 {@link QCloudCredentialProvider} 对象,来给 SDK 提供临时密钥。
 */
QCloudCredentialProvider credentialProvider = new MyCredentialProvider();

CosXmlService cosXmlService = new CosXmlService(context, cosXmlServiceConfig, credentialProvider);
完整的示例代码请参见 Android COS Transfer Practice。
更多关于 Android 如何向 COS 上传和下载文件,请参见 Android SDK 快速入门。
iOS
我们提供了 QCloudCredentailFenceQueue 来方便地获取和管理临时签名。QCloudCredentailFenceQueue 提供了栅栏机制,也就是说您使用 QCloudCredentailFenceQueue 获取签名的话,所有需要获取签名的请求会等待签名完成后再执行,免去了自己管理异步过程。
使用 QCloudCredentailFenceQueue,我们需要先生成一个实例。
 //AppDelegate.m
//AppDelegate需遵循QCloudCredentailFenceQueueDelegate协议
//
- (BOOL)application:(UIApplication * )application didFinishLaunchingWithOptions:(NSDictionary * )launchOptions {
    // init step
    self.credentialFenceQueue = [QCloudCredentailFenceQueue new];
    self.credentialFenceQueue.delegate = self;
    return YES;
}
然后调用 QCloudCredentailFenceQueue 的类需要遵循 QCloudCredentailFenceQueueDelegate 并实现协议内定义的方法:
- (void) fenceQueue:(QCloudCredentailFenceQueue * )queue requestCreatorWithContinue:(QCloudCredentailFenceQueueContinue)continueBlock当通过 QCloudCredentailFenceQueue 去获取签名时,所有需要签名的 SDK 里的请求都会等待该协议定义的方法内拿到了签名所需的参数并生成有效的签名后执行。请看以下示例:
- (void)fenceQueue:(QCloudCredentailFenceQueue *)queue requestCreatorWithContinue:(QCloudCredentailFenceQueueContinue)continueBlock {
    QCloudHTTPRequest* request = [QCloudHTTPRequest new];
    request.requestData.serverURL = @“your sign service url”;//请求的URL

    [request setConfigureBlock:^(QCloudRequestSerializer *requestSerializer, QCloudResponseSerializer *responseSerializer) {
        requestSerializer.serializerBlocks = @[QCloudURLFuseWithURLEncodeParamters];
        responseSerializer.serializerBlocks = @[QCloudAcceptRespnseCodeBlock([NSSet setWithObjects:@(200), nil],nil),//规定返回码是200以外的时候返回错误
                                                QCloudResponseJSONSerilizerBlock];//按照JSON格式解析返回的数据
    }];

    [request setFinishBlock:^(id response, NSError *error) {
        if (error) {
            error = [NSError errorWithDomain:@"com.tac.test" code:-1111 userInfo:@{NSLocalizedDescriptionKey:@"没有获取到临时密钥"}];
            continueBlock(nil, error);
        } else {
            QCloudCredential* crendential = [[QCloudCredential alloc] init];
            crendential.secretID = response[@"data"][@"credentials"][@"tmpSecretId"];
            crendential.secretKey = response[@"data"][@"credentials"][@"tmpSecretKey"];
            credential.startDate =[NSDate dateWithTimeIntervalSince1970:@"返回的服务器时间"]
            crendential.experationDate = [NSDate dateWithTimeIntervalSinceNow:[response[@"data"][@"expiredTime"] intValue]];
            crendential.token = response[@"data"][@"credentials"][@"sessionToken"];;
            QCloudAuthentationV5Creator* creator = [[QCloudAuthentationV5Creator alloc] initWithCredential:crendential];
            continueBlock(creator, nil);

        }
    }];
    [[QCloudHTTPSessionManager shareClient] performRequest:request];
}
更多关于 iOS 如何向 COS 上传和下载文件,请参见 iOS SDK 快速入门。
