通常使用权重时,layout_wight layout_height 一般设置为0. 这里讲一下宽属性设置为warp_content,再结合权重使用。
权重尺寸的计算方式
android:layout_weight的真实含义是: 那么该 View的宽度 等于 原有宽度(android:layout_width)加上剩余空间的占比!
剩余空间 = 父控件空间 - 所有子控件所需要的空间
示例一 : wight 和 match_parent 使用
设屏幕宽度为w, 两个TextView的宽度设置为match_parent, 那么它们两个view测量申请的宽度均为屏幕宽度w.
剩余宽度 = 父控件空间 - 所有子控件所需要的空间 = w - ( w + w) = -w;
第一个TextView剩余宽度 = -w * 1/3 = -1/3 w
第一个TextView宽度 = 原有宽度(android:layout_width) + 剩余空间的占比 = w + (-w * 1/3) = 2/3 w
第二个TextView宽度 = 原有宽度(android:layout_width) + 剩余空间的占比 = w + (-w * 2/3) = 1/3 w
<LinearLayout
    android:layout_width="match_parent"
    android:layout_height="wrap_content"
    android:orientation="horizontal">

    <TextView
        android:layout_width="match_parent"
        android:layout_height="wrap_content"
        android:layout_weight="1"
        android:background="#fff"
        android:text="  111"
        android:textSize="15dp" />

    <TextView
        android:layout_width="match_parent"
        android:layout_height="wrap_content"
        android:layout_weight="2"
        android:background="#0a1"
        android:text="222"
        android:textSize="15dp" />

</LinearLayout>
示例二: wight 和 wrap_content使用
两个TextView文本内容都是1234567 , 他们测量所需要的绘制宽度为 182px, 父控件总共是300px。
剩余宽度 = 父控件空间 - 所有子控件所需要的空间 = 300px - 182px * 2 = -64px
第一个TextView宽度 = 原有宽度(android:layout_width) + 剩余空间的占比 = 182px + (-64px * 1/3) = 160px
第二个TextView宽度 = 原有宽度(android:layout_width) + 剩余空间的占比 = 182px + (-64px * 2/3) = 140px
<LinearLayout
    android:layout_width="300px"
    android:layout_height="wrap_content"
    android:orientation="horizontal">

    <TextView
        android:layout_width="wrap_content"
        android:layout_height="wrap_content"
        android:layout_weight="1"
        android:autoSizeTextType="none"
        android:background="#fff"
        android:lines="1"
        android:text="1234567"
        android:textSize="15dp" />

    <TextView
        android:layout_width="wrap_content"
        android:layout_height="wrap_content"
        android:layout_weight="2"
        android:autoSizeTextType="none"
        android:background="#0a1"
        android:lines="1"
        android:text="1234567"
        android:textSize="15dp" />
</LinearLayout>
实践一:wight 和 wrap_content使用 平分剩余空间
如下图,一个列表,每个item水平分布两个textview, 字体内容不确定。要求字体只显示一行,且必须显示完整。在内容显示不下时,缩小字体。
备注:如下解决方案可能并不是最优的解决方案,可以通过代码,动态计算每一条item中文案绘制所需要的宽度,调整字体大小,让左右两侧字体大小一致且能让内容完整显示。
<LinearLayout
    android:layout_width="90dp"
    android:layout_height="wrap_content"
    android:orientation="horizontal">


    <androidx.appcompat.widget.AppCompatTextView
        android:layout_width="wrap_content"
        android:layout_height="wrap_content"
        android:layout_weight="1"
        android:autoSizeMinTextSize="3dp"
        android:autoSizeTextType="uniform"
        android:background="@android:color/white"
        android:gravity="center_vertical"
        android:lines="1"
        android:text="涨跌幅:"
        android:textSize="15dp" />


    <androidx.appcompat.widget.AppCompatTextView
        android:layout_width="wrap_content"
        android:layout_height="wrap_content"
        android:layout_marginLeft="10dp"
        android:layout_weight="1"
        android:autoSizeMinTextSize="3dp"
        android:autoSizeTextType="uniform"
        android:background="@android:color/holo_green_light"
        android:lines="1"
        android:text="32.32%"
        android:textSize="15dp" />


</LinearLayout>
。。。。。
实践二: wight 和 wrap_content minHeight 共同使用,补全不确定剩余空间。
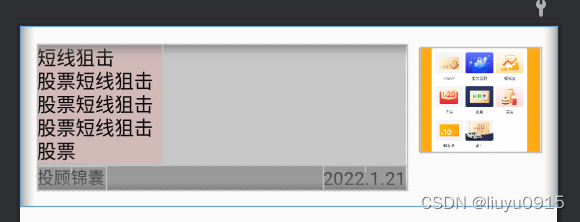
需求:如下图所示,右侧图片宽高尺寸固定,宽93dp 高80dp , 左侧第一行是文本,默认情况下最多五行,可点击展开与折叠,第二行是投顾锦囊。在左侧文本内容较少时,左侧控件整体高度如下图,投顾锦囊控件要与ImageView对齐,第一行文本上方始终与图片上方对齐。
解决左侧最小高度问题:设置左侧left_root_View android:minHeight="85dp". 因为要去掉TextView默认下上padding,与ImageView实现绝对对齐(可怕的UI设计)。。。, 85dp = 80dp + 3dp + 2dp ; 然后为了保证投顾锦囊在最小高度下与图片对齐,在第一行文本控件与投顾锦囊父控件中间加一个 View,设置高度为1dp, wight=1, 这样就可以实现了。
实现原理:left_root_View 控件设置了最小高度 minHeight 为85dp, 它的高度属性为wrap_content属性, 当测量的子view之后,测量结果小于minHeight则按minHeight有设置高度,如果大于minHeight则按实际来设置; 假设left_root_view中三个子控件中,第一控件测量需要高度40dp,第二控件测量所需要高度为1dp, 第三控件所需高度为20dp, 此时所需要的总高度 61dp。 由于第二个控件设置了权重,且只有它一个控件有权重。在第一次测量完成后,根据结果,left_root_view的高度为minHeight, 然后再根据权重分配原则,根据第二控件的父控件 left_root_view 的实际尺寸 - 子view所需尺寸 = 85 - 61 = 24dp = 剩余尺寸,剩余尺寸会根据权重比分配到设置权重的控件上。此处只有第二个控件设置了权重,剩余尺寸全部分配给它,那么它的尺寸为 1dp + 24dp = 25dp. 如果三个子控件所需高度超过minHeight,假设第一、三控件所需100dp、20dp的高度,此时测量三个子控件所需高度为100dp + 1dp + 20dp = 121dp > minHeight, 剩余尺寸 = 121dp - 121dp = 0dp , 第二控件的高度为1dp + 0dp = 1dp.
备注:第二个控件的高度不能设置为0dp, 因为如果设置为0dp和权重,且它的父控件的高度属性为wrap_content, 那么它的测量模式为MeasureSpec.UNSPECIFIED, 这样会让父控件获取最大的高度空间来分配给它,如果这是一条item,那么item的高度可能就是列表的最大高度, 第二控件的高度 = 列表高度 - 第1 - 第3控件测量的高度。所以这里不能将第二控件的高度设置为0。
<?xml version="1.0" encoding="utf-8"?>
<LinearLayout xmlns:android="http://schemas.android.com/apk/res/android"
    xmlns:tools="http://schemas.android.com/tools"
    android:layout_width="match_parent"
    android:layout_height="wrap_content"
    android:orientation="horizontal"
    android:padding="13dp">

    <LinearLayout
        android:id="@+id/left_root_View"
        android:layout_width="0dp"
        android:background="#88999999"
        android:layout_height="wrap_content"
        android:layout_centerVertical="true"
        android:layout_toLeftOf="@+id/imageView"
        android:layout_weight="1"
        android:minHeight="85dp"
        android:orientation="vertical">

        <TextView
            android:id="@+id/titleTv"
            android:background="#88daadaa"
            android:layout_width="wrap_content"
            android:layout_height="wrap_content"
            android:ellipsize="end"
            android:maxLines="5"
            android:textColor="@color/black"
            android:textSize="15dp"
            tools:text="短线狙击  \n股票短线狙击  \n股票短线狙击  \n股票短线狙击  \n股票 " />

        <View
            android:layout_width="40dp"
            android:layout_height="1dp"
            android:layout_weight="1"
            android:background="#3f0" />

        <RelativeLayout
            android:layout_width="match_parent"
            android:layout_height="wrap_content"
            android:background="#999">

            <TextView
                android:id="@+id/sourceTv"
                android:layout_width="wrap_content"
                android:layout_height="wrap_content"
                android:layout_centerVertical="true"
                android:gravity="center_vertical"
                android:text="投顾锦囊"
                android:textSize="13dp" />

            <TextView
                android:id="@+id/timeTv"
                android:layout_width="wrap_content"
                android:layout_height="wrap_content"
                android:layout_alignParentRight="true"
                android:layout_centerVertical="true"
                android:layout_marginLeft="5dp"
                android:ellipsize="end"
                android:gravity="center_vertical|right"
                android:lines="1"
                tools:text="2022.1.21" />

        </RelativeLayout>
    </LinearLayout>

    <ImageView
        android:id="@+id/picIv"
        android:layout_width="93dp"
        android:layout_height="80dp"
        android:layout_marginLeft="10dp"
        android:layout_marginTop="3dp"
        android:layout_marginBottom="2dp"
        android:background="#fa1"
        android:src="@drawable/welfare_mall" />

</LinearLayout>


