目录
1.4 在web.xml中注册DispatchServlet
1.SpringMVC的入门案例
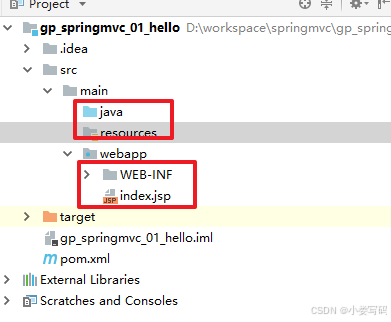
1.1 通过maven构建一个web项目
1.2 添加对应的依赖及Tomcat插件
<dependencies>
<dependency>
<groupId>junit</groupId>
<artifactId>junit</artifactId>
<version>4.11</version>
<scope>test</scope>
</dependency>
<!-- https://mvnrepository.com/artifact/org.springframework/spring-webmvc -->
<dependency>
<groupId>org.springframework</groupId>
<artifactId>spring-webmvc</artifactId>
<version>5.1.17.RELEASE</version>
</dependency>
</dependencies>
<build>
<finalName>gp_springmvc_01_hello</finalName>
<plugins>
<!-- tomcat插件 -->
<plugin>
<groupId>org.apache.tomcat.maven</groupId>
<artifactId>tomcat7-maven-plugin</artifactId>
<version>2.2</version>
<configuration>
<!-- 端口号 -->
<port>8082</port>
<!-- /表示访问路径 省略项目名 -->
<path>/</path>
<!-- 设置编码方式 -->
<uriEncoding>utf-8</uriEncoding>
</configuration>
</plugin>
</plugins>1.3 创建SpringMVC的配置文件
<?xml version="1.0" encoding="UTF-8"?>
<beans xmlns="http://www.springframework.org/schema/beans"
xmlns:xsi="http://www.w3.org/2001/XMLSchema-instance"
xsi:schemaLocation="http://www.springframework.org/schema/beans http://www.springframework.org/schema/beans/spring-beans.xsd">
<!-- 处理器映射器 -->
<bean class="org.springframework.web.servlet.handler.BeanNameUrlHandlerMapping" />
<!-- 处理器适配器 -->
<bean class="org.springframework.web.servlet.mvc.SimpleControllerHandlerAdapter" />
</beans>1.4 在web.xml中注册DispatchServlet
<!DOCTYPE web-app PUBLIC
"-//Sun Microsystems, Inc.//DTD Web Application 2.3//EN"
"http://java.sun.com/dtd/web-app_2_3.dtd" >
<web-app>
<display-name>Archetype Created Web Application</display-name>
<!-- 注册前端控制器-->
<servlet>
<servlet-name>springmvc</servlet-name>
<servlet-class>org.springframework.web.servlet.DispatcherServlet</servlet-class>
<init-param>
<!-- 关联配置文件 -->
<param-name>contextConfigLocation</param-name>
<param-value>classpath:spring-mvc.xml</param-value>
</init-param>
</servlet>
<servlet-mapping>
<servlet-name>springmvc</servlet-name>
<url-pattern>/</url-pattern>
</servlet-mapping>
</web-app>
1.5 创建自定义的Controller
package com.gupaoedu;
import org.springframework.web.servlet.ModelAndView;
import org.springframework.web.servlet.mvc.Controller;
import javax.servlet.http.HttpServletRequest;
import javax.servlet.http.HttpServletResponse;
public class UserController implements Controller {
/**
* 处理请求的方法
* @param httpServletRequest
* @param httpServletResponse
* @return
* @throws Exception
*/
@Override
public ModelAndView handleRequest(HttpServletRequest httpServletRequest
, HttpServletResponse httpServletResponse) throws Exception {
System.out.println("controller 执行了....");
ModelAndView view = new ModelAndView();
view.setViewName("/index.jsp");
return view;
}
}
1.6 在Springmvc配置文件中注册
<?xml version="1.0" encoding="UTF-8"?>
<beans xmlns="http://www.springframework.org/schema/beans"
xmlns:xsi="http://www.w3.org/2001/XMLSchema-instance"
xsi:schemaLocation="http://www.springframework.org/schema/beans http://www.springframework.org/schema/beans/spring-beans.xsd">
<!-- 处理器映射器 -->
<bean class="org.springframework.web.servlet.handler.BeanNameUrlHandlerMapping" />
<!-- 处理器适配器 -->
<bean class="org.springframework.web.servlet.mvc.SimpleControllerHandlerAdapter" />
<!-- 注册自定义的Controller name必须加 / 前缀-->
<bean class="com.gupaoedu.UserController" name="/user"/>
</beans>原理分析:
DispatchServlet
init:IoC容器的初始化操作
初始化SpringMVC的九大组件
protected void initStrategies(ApplicationContext context) {
    this.initMultipartResolver(context);
    this.initLocaleResolver(context);
    this.initThemeResolver(context);
    // 加载我们在配置文件中添加的处理器映射器
    this.initHandlerMappings(context);
    // 加载我们在配置文件中添加的处理器适配器
    this.initHandlerAdapters(context);
    this.initHandlerExceptionResolvers(context);
    this.initRequestToViewNameTranslator(context);
    this.initViewResolvers(context);
    this.initFlashMapManager(context);
}
2.SpringMVC基于注解的使用方式
2.1 SpringMVC配置文件修改
<?xml version="1.0" encoding="UTF-8"?>
<beans xmlns="http://www.springframework.org/schema/beans"
xmlns:xsi="http://www.w3.org/2001/XMLSchema-instance"
xmlns:context="http://www.springframework.org/schema/context"
xmlns:mvc="http://www.springframework.org/schema/mvc"
xsi:schemaLocation="http://www.springframework.org/schema/beans
http://www.springframework.org/schema/beans/spring-beans.xsd
http://www.springframework.org/schema/context
http://www.springframework.org/schema/context/spring-context.xsd
http://www.springframework.org/schema/mvc
http://www.springframework.org/schema/mvc/spring-mvc.xsd
">
<!-- 开启扫描 -->
<context:component-scan base-package="com.gupaoedu.controller" />
<!-- 开启SpringMVC注解的使用 -->
<mvc:annotation-driven />
</beans>2.2 自定义控制器
package com.gupaoedu.controller;
import org.springframework.stereotype.Controller;
import org.springframework.web.bind.annotation.RequestMapping;
import org.springframework.web.servlet.ModelAndView;
import javax.servlet.http.HttpServletRequest;
import javax.servlet.http.HttpServletResponse;
@Controller // 将UserController对象交给IoC容器管理
@RequestMapping("/user") // 类头部的可以省略
public class UserController {
/**
* 具体处理请求的方法 【头部的mapping+方法的mapping】
* http://localhost:8082/user/query
* @return
*/
@RequestMapping("/query")
public String query(){
    System.out.println("query ..... ");
    return "/index.jsp";
}
@RequestMapping("/save")
public String add(){
System.out.println("save ..... ");
return "/index.jsp";
}
@RequestMapping("/delete")
public String delete(){
System.out.println("delete ..... ");
return "/index.jsp";
}
@RequestMapping("/update")
public String update(){
System.out.println("update ..... ");
return "/index.jsp";
}
}
2.3 测试
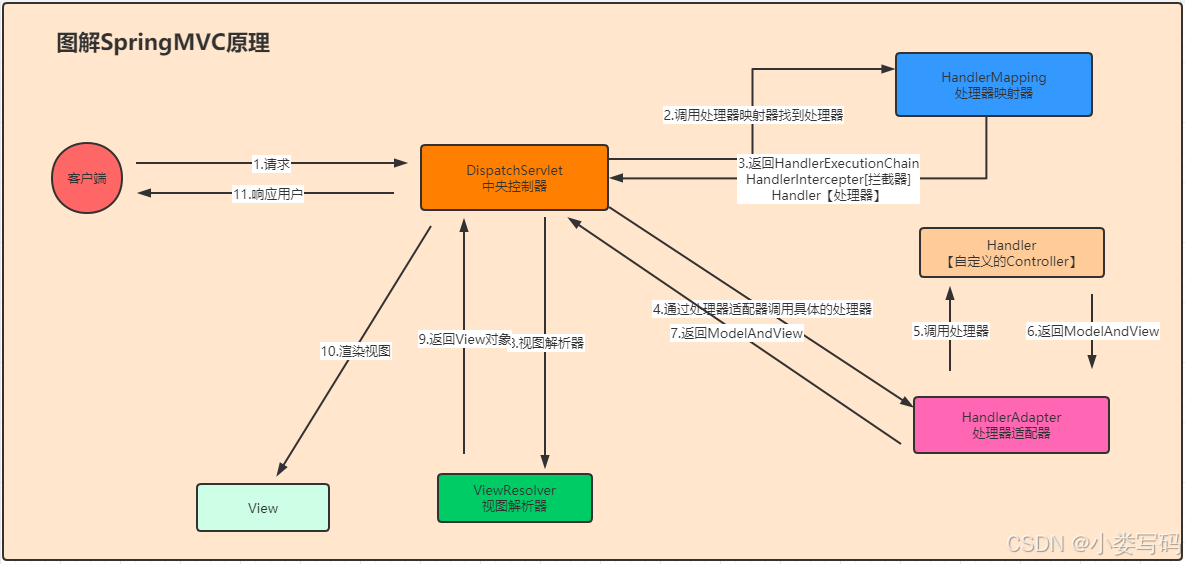
3.SpringMVC工作原理图解
4.SpringMVC中响应请求
4.1 响应返回字符串
我们可以在处理方法的最后返回一个要跳转的页面地址”/“不要漏了
@RequestMapping("/query")
public String query(){
System.out.println("query ..... ");
return "/index.jsp";
}4.2 不响应
如果用户提交了请求后服务端不需要给客户端一个响应,那么我们可以指定返回类型为void同时在方法头部添加@ResponseBody注解即可
@RequestMapping("/save")
@ResponseBody
public void add(){
    System.out.println("save ..... ");
}
4.3 直接返回一个ModelAndView对象
我们也可以直接返回一个ModelAndView对象
@RequestMapping("/delete")
public ModelAndView delete(){
    System.out.println("delete ..... ");
    ModelAndView mm = new ModelAndView();
    mm.setViewName("/index.jsp");
    return mm;
}
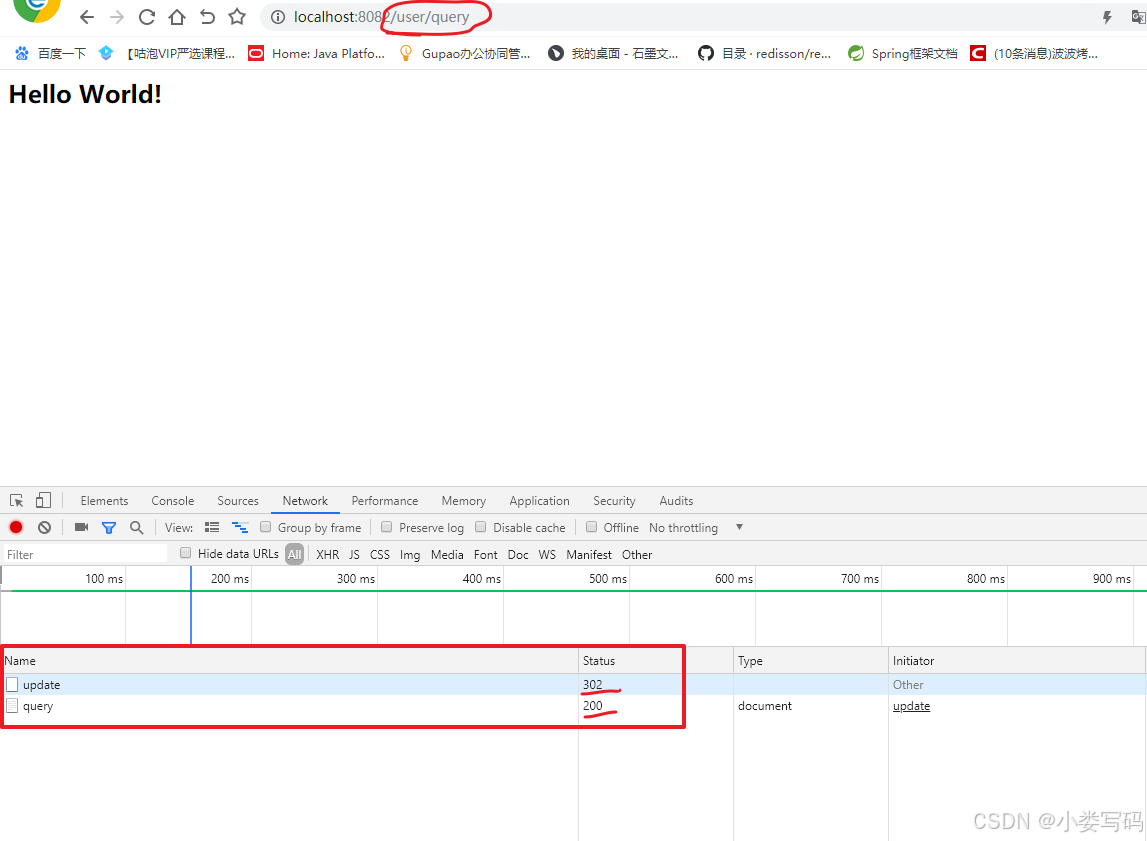
4.4 重定向跳转
有些情况下重定向跳转也是我们开发中必须使用的形式
@RequestMapping("/update")
public String update(){
    System.out.println("update ..... ");
    return "redirect:/user/query";
}
4.5 视图解析器添加前后缀
<!-- 配置视图解析器 -->
<bean class="org.springframework.web.servlet.view.InternalResourceViewResolver" >
    <property name="suffix" value=".jsp"/>
    <property name="prefix" value="/" />
</bean>
那这样的话响应的页面就会自动添加对应的前后缀信息
@RequestMapping("/query")
public String query(){
    System.out.println("query ..... ");
    return "index";
}
4.6 通过HttpServletResponse响应
仅仅只需要在方法的形参中声明这两个变量即可~
@RequestMapping("/fun1")
public void fun1(HttpServletRequest request
                 ,HttpServletResponse response) throws Exception {
    // response.sendRedirect("/index.jsp");
    System.out.println("fun1 ...");
    request.getRequestDispatcher("/index.jsp").forward(request,response);
}
5.SpringMVC接收请求数据
5.1 基本数据类型
直接在形参中声明要接收的数据,默认情况下形参必须和传过来的数据参数名一致
@RequestMapping("/query")
public String query(@RequestParam(value = "ids",required = true,defaultValue = "123") Integer id, String name){
    System.out.println("query ..... " + id + ":" + name);
    return "/index.jsp";
}
5.2 对象接收
如果传递过来的数据比较多,那么我们可以通过一个自定义的对象来接收
@RequestMapping("/save")
public String add(User user){
    System.out.println("save ..... " + user);
    return "/index.jsp";
}
5.3 通过数组接收
如果有多个名称相同的数据提交,我们可以使用数组的方式来接收
@RequestMapping("/delete")
public String delete(String[] loves){
    System.out.println("delete ..... ");
    if(loves !=null){
        for(String l : loves){
            System.out.println(l);
        }
    }
    return "/index.jsp";
}
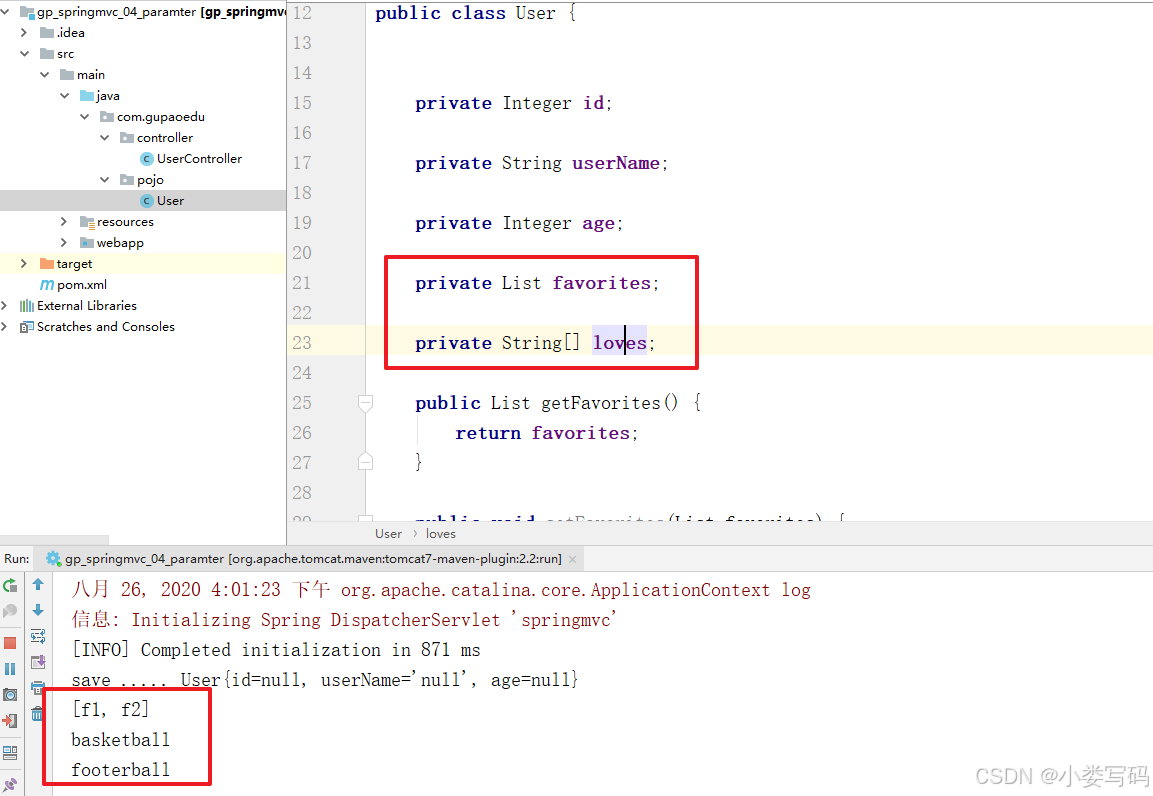
注意:在形参中我们不能够通过集合的方式来获取传递的参数
在自定义对象中可以使用集合获取数组的形式来接收请求的参数
5.4 自定义转换器
有时候客户端传递过来特殊类型的数据,SpringMVC中提供的默认的转换器不能支持该转换,此时我们就需要自定义转换器
package com.gupaoedu.convert;
import org.springframework.core.convert.converter.Converter;
import java.text.ParseException;
import java.text.SimpleDateFormat;
import java.util.Date;
public class DateConvert implements Converter<String,Date> {
@Override
public Date convert(String s) {
SimpleDateFormat sdf = new SimpleDateFormat("yyyy-MM-dd");
try {
return sdf.parse(s);
} catch (ParseException e) {
e.printStackTrace();
}
return null;
}
}
配置文件中注册
<?xml version="1.0" encoding="UTF-8"?>
<beans xmlns="http://www.springframework.org/schema/beans"
xmlns:xsi="http://www.w3.org/2001/XMLSchema-instance"
xmlns:context="http://www.springframework.org/schema/context"
xmlns:mvc="http://www.springframework.org/schema/mvc"
xsi:schemaLocation="http://www.springframework.org/schema/beans
http://www.springframework.org/schema/beans/spring-beans.xsd
http://www.springframework.org/schema/context
http://www.springframework.org/schema/context/spring-context.xsd
http://www.springframework.org/schema/mvc
http://www.springframework.org/schema/mvc/spring-mvc.xsd
">
<!-- 开启扫描 -->
<context:component-scan base-package="com.gupaoedu.controller" />
<!-- 开启SpringMVC注解的使用 -->
<mvc:annotation-driven conversion-service="formattingConversionServiceFactoryBean"/>
<!-- 配置转换器 -->
<bean class="org.springframework.format.support.FormattingConversionServiceFactoryBean"
id="formattingConversionServiceFactoryBean">
<property name="converters">
<set>
<bean class="com.gupaoedu.convert.DateConvert"/>
</set>
</property>
</bean>
</beans>6.响应数据
6.1 ModelAndView传递
@RequestMapping("/query")
public ModelAndView query(){
    System.out.println("query ..... ");
    ModelAndView mm = new ModelAndView();
    mm.setViewName("/user.jsp");
    mm.addObject("msg","msg.....");
    return mm;
}
然后在jsp页面中通过EL表达式获取传递的信息
<%--
  Created by IntelliJ IDEA.
  User: admin
  Date: 2020/8/26
  Time: 16:29
  To change this template use File | Settings | File Templates.
--%>
<%@ page contentType="text/html;charset=UTF-8" language="java" isELIgnored="false" %>
<html>
<head>
    <title>Title</title>
</head>
<body>
  hello<br>
  ${msg}
</body>
</html>
6.2 通过Map对象传值
ModelAndView使用起来稍微有点复杂,我们可以通过Map来简化操作
@RequestMapping("/save")
public String add(Map<String,Object> map){
    System.out.println("save ..... ");
    map.put("msg","map ...msg");
    return "/index.jsp";
}
6.2 通过Model来接收
@RequestMapping("/delete")
public String delete(Model model){
    System.out.println("delete ..... ");
    model.addAttribute("msg","model ...msg");
    return "/index.jsp";
}
6.3 通过ModelMap响应数据
@RequestMapping("/update")
public String update(ModelMap mm){
    System.out.println("update ..... ");
    mm.put("msg","ModelMap ... msg");
    return "/index.jsp";
}
前面介绍的多种方式的数据都是会被保存在request作用域中,如果我们同时需要将数据保存在Session对象中,我们只需要在类的头部添加一个@SessionAttributes注解即可
6.4 SpringMVC中的乱码问题
  <filter>
    <filter-name>encodeFiletr</filter-name>
    <filter-class>org.springframework.web.filter.CharacterEncodingFilter</filter-class>
    <init-param>
      <param-name>encoding</param-name>
      <param-value>utf-8</param-value>
    </init-param>
    <init-param>
      <param-name>forceRequestEncoding</param-name>
      <param-value>true</param-value>
    </init-param>
    <init-param>
      <param-name>forceResponseEncoding</param-name>
      <param-value>true</param-value>
    </init-param>
  </filter>
  <filter-mapping>
    <filter-name>encodeFiletr</filter-name>
    <url-pattern>/*</url-pattern>
  </filter-mapping>
7.SpringMVC文件上传操作
7.1 依赖的引入
 <!-- fileUpload 解析上传的文件用到的jar -->
<dependency>
    <groupId>commons-fileupload</groupId>
    <artifactId>commons-fileupload</artifactId>
    <version>1.3.1</version>
</dependency>
<dependency>
    <groupId>commons-io</groupId>
    <artifactId>commons-io</artifactId>
    <version>2.4</version>
</dependency>
7.2 表单页面
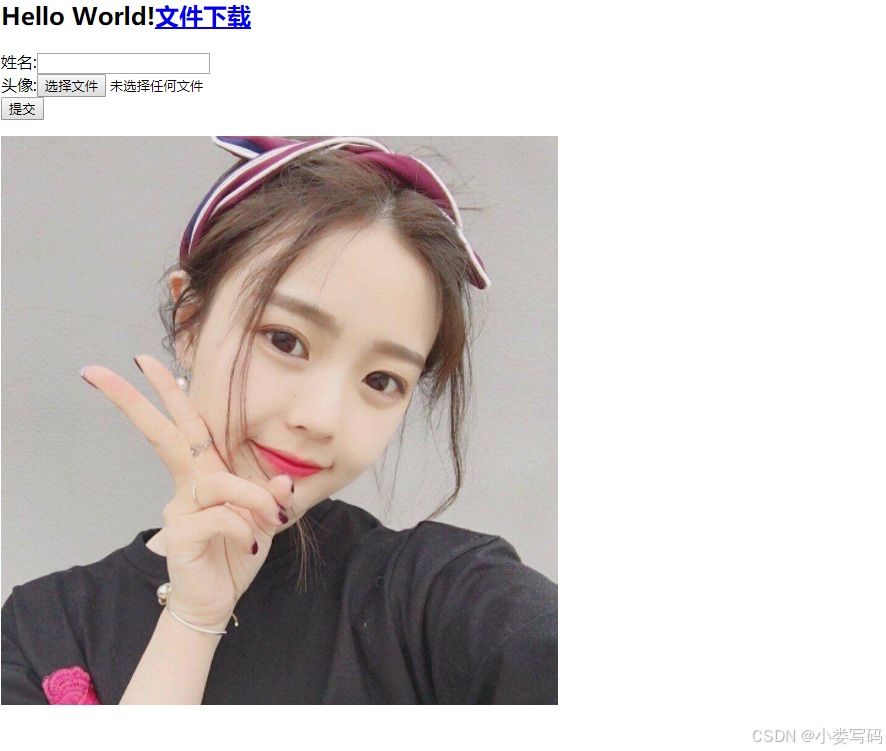
提交的方式必须是post 方式,提交的数据的类型必须是二进制文件
<html>
<body>
<h2>Hello World!</h2>
<form action="/user/save" method="post" enctype="multipart/form-data">
姓名:<input type="text" name="username"><br>
头像:<input type="file" name="headImg"><br>
<input type="submit" value="提交">
</form>
</body>
</html>
7.3 控制处理
提交的文件我们可以通过 MultipartFile 类型来接收
@RequestMapping("/save")
public String add(MultipartFile headImg,String username) throws IOException {
    System.out.println(username);
    System.out.println("文件名称:" + headImg.getOriginalFilename());
    headImg.transferTo(new File("d:/" + headImg.getOriginalFilename()));
    return "/index.jsp";
}
7.4 配置文件处理
<?xml version="1.0" encoding="UTF-8"?>
<beans xmlns="http://www.springframework.org/schema/beans"
xmlns:xsi="http://www.w3.org/2001/XMLSchema-instance"
xmlns:context="http://www.springframework.org/schema/context"
xmlns:mvc="http://www.springframework.org/schema/mvc"
xsi:schemaLocation="http://www.springframework.org/schema/beans
http://www.springframework.org/schema/beans/spring-beans.xsd
http://www.springframework.org/schema/context
http://www.springframework.org/schema/context/spring-context.xsd
http://www.springframework.org/schema/mvc
http://www.springframework.org/schema/mvc/spring-mvc.xsd
">
<!-- 开启扫描 -->
<context:component-scan base-package="com.gupaoedu.controller" />
<!-- 开启SpringMVC注解的使用 -->
<mvc:annotation-driven />
<!-- 文件上传的解析器-->
<bean class="org.springframework.web.multipart.commons.CommonsMultipartResolver" id="multipartResolver">
<property name="maxUploadSize">
<value>5242880</value>
</property>
</bean>
</beans>8.SpringMVC中的文件下载
@RequestMapping("/download")
public void download(HttpServletRequest request,
HttpServletResponse response){
File file = new File("d://1.png");
// 设置响应的头和客户端保存文件名
response.setCharacterEncoding("utf-8");
response.setContentType("multipart/form-data");
response.setHeader("Content-Disposition","attchement;filename=" + file.getName());
try {
// 打开本地文件流
InputStream in = new FileInputStream(file);
// 激活下载的流
ServletOutputStream out = response.getOutputStream();
byte[] b = new byte[1024];
int num = 0;
while ((num = in.read(b)) != -1){
out.write(b,0,num);
}
out.close();
in.close();
}catch (Exception e){
e.printStackTrace();
}
}
9.静态资源处理
默认的情况下在SpringMVC中只能访问jsp页面,其他的都会被DispatchServlet拦截,原因是DispatchServlet配置的时候用的/ 覆盖掉了defaultservlet所做的工作,所以我们只需要重新制定即可
  <filter-mapping>
    <filter-name>encodeFiletr</filter-name>
    <url-pattern>/*</url-pattern>
  </filter-mapping>
  <servlet-mapping>
    <servlet-name>default</servlet-name>
    <url-pattern>*.png</url-pattern>
  </servlet-mapping>
  <servlet-mapping>
    <servlet-name>default</servlet-name>
    <url-pattern>*.html</url-pattern>
  </servlet-mapping>
第二种方式就是在SpringMVC中指定映射的规则
<mvc:resources mapping="/img/**" location="/img/" />
10 SpringMVC服务端验证
最早的校验,就是服务端校验。早期的网站,用户输入一个邮箱地址,校验邮箱地址需要将地址发送到服务端,服务端进行校验,校验成功后,给前端一个响应。有了JavaScript,校验工作可以放在前端去执行。那么为什么还需要服务端校验呢? 因为前端传来的数据不可信。前端很容易获取都后端的数据接口,如果有人绕过页面,就会出现非法数据,所以服务端也要数据校验,总的来说: 1.前端校验要做,目的是为了提高用户体验 2.后端校验也要做,目的是为了数据安全
SpringMVC本身是没有提供校验框架的,我们需要使用Hibernate提供的校验框架
<dependency>
    <groupId>org.hibernate</groupId>
    <artifactId>hibernate-validator</artifactId>
    <version>5.3.0.Alpha1</version>
</dependency>
在配置文件中注册对应的校验框架
<?xml version="1.0" encoding="UTF-8"?>
<beans xmlns="http://www.springframework.org/schema/beans"
xmlns:xsi="http://www.w3.org/2001/XMLSchema-instance"
xmlns:context="http://www.springframework.org/schema/context"
xmlns:mvc="http://www.springframework.org/schema/mvc"
xsi:schemaLocation="http://www.springframework.org/schema/beans
http://www.springframework.org/schema/beans/spring-beans.xsd
http://www.springframework.org/schema/context
http://www.springframework.org/schema/context/spring-context.xsd
http://www.springframework.org/schema/mvc
http://www.springframework.org/schema/mvc/spring-mvc.xsd
">
<!-- 开启扫描 -->
<context:component-scan base-package="com.gupaoedu.controller" />
<!-- 开启SpringMVC注解的使用 -->
<mvc:annotation-driven validator="localValidatorFactoryBean" />
<mvc:resources mapping="/img/**" location="/img/" />
<!-- 文件上传的解析器-->
<bean class="org.springframework.web.multipart.commons.CommonsMultipartResolver" id="multipartResolver">
<property name="maxUploadSize">
<value>5242880</value>
</property>
</bean>
<!-- 配置验证框架 -->
<bean class="org.springframework.validation.beanvalidation.LocalValidatorFactoryBean" id="localValidatorFactoryBean">
<property name="providerClass" value="org.hibernate.validator.HibernateValidator"/>
<property name="validationMessageSource" ref="messageSource" />
</bean>
<bean class="org.springframework.context.support.ReloadableResourceBundleMessageSource" id="messageSource">
<property name="basename" value="classpath:volidata.properties"/>
<property name="fileEncodings" value="utf-8"/>
<property name="cacheSeconds" value="120"/>
</bean>
</beans>验证规则
| 注解 | 说明 |
|---|---|
| @Null | 被注解的元素必须为 null |
| @NotNull | 被注解的元素必须不为 null |
| @AssertTrue | 被注解的元素必须为 true |
| @AssertFalse | 被注解的元素必须为 false |
| @Min(value) | 被注解的元素必须是一个数字,其值必须大于等于指定的最小值 |
| @Max(value) | 被注解的元素必须是一个数字,其值必须小于等于指定的最大值 |
| @DecimalMin(value) | 被注解的元素必须是一个数字,其值必须大于等于指定的最小值 |
| @DecimalMax(value) | 被注解的元素必须是一个数字,其值必须小于等于指定的最大值 |
| @Size(max=, min=) | 被注解的元素的大小必须在指定的范围内 |
| @Digits (integer, fraction) | 被注解的元素必须是一个数字,其值必须在可接受的范围内 |
| @Past | 被注解的元素必须是一个过去的日期 |
| @Future | 被注解的元素必须是一个将来的日期 |
| @Pattern(regex=,flag=) | 被注解的元素必须符合指定的正则表达式 |
| @NotBlank(message =) | 验证字符串非null,且长度必须大于0 |
| 被注解的元素必须是电子邮箱地址 | |
| @Length(min=,max=) | 被注解的字符串的大小必须在指定的范围内 |
| @NotEmpty | 被注解的字符串的必须非空 |
| @Range(min=,max=,message=) | 被注解的元素必须在合适的范围内 |
在自定义的对象中指定验证规则
package com.gupaoedu.pojo;
import org.hibernate.validator.constraints.Length;
import javax.validation.constraints.Max;
import javax.validation.constraints.Min;
import javax.validation.constraints.NotNull;
import javax.validation.constraints.Null;
public class User {
private Integer id;
@NotNull(message = "账号不能为空")
@Length(message = "账号的长度必须在3~6位" ,max = 6,min = 3)
private String userName;
@Max(message = "age最大值是120",value = 120)
@Min(message = "age必须大于0" ,value = 0)
private Integer age;
public Integer getId() {
return id;
}
public void setId(Integer id) {
this.id = id;
}
public String getUserName() {
return userName;
}
public void setUserName(String userName) {
this.userName = userName;
}
public Integer getAge() {
return age;
}
public void setAge(Integer age) {
this.age = age;
}
}
在控制层中使用校验规则
@RequestMapping("/save")
public String add(@Validated User user, BindingResult br) throws IOException {
    System.out.println("save ....");
    List<ObjectError> allErrors = br.getAllErrors();
    for (ObjectError error:allErrors){
        System.out.println(error.getDefaultMessage());
    }
    return "/index.jsp";
}
分组验证
分组验证解决的是不同的同一个POJO对象在不同的场景用适用不同的验证规则
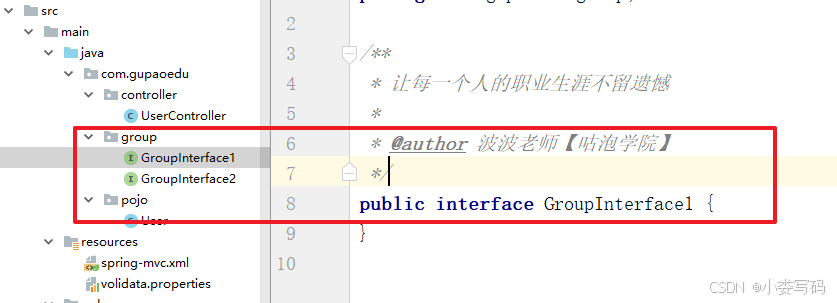
定义分组
验证规则和分组绑定
package com.gupaoedu.pojo;
import com.gupaoedu.group.GroupInterface1;
import com.gupaoedu.group.GroupInterface2;
import org.hibernate.validator.constraints.Length;
import org.hibernate.validator.constraints.NotBlank;
import javax.validation.constraints.Max;
import javax.validation.constraints.Min;
import javax.validation.constraints.NotNull;
import javax.validation.constraints.Null;
public class User {
@NotBlank(message = "ID不能为空" ,groups = {GroupInterface1.class})
private Integer id;
@NotBlank(message = "{user.username.empty}" ,groups = {GroupInterface1.class,GroupInterface2.class})
@Length(message = "账号的长度必须在3~6位" ,max = 6,min = 3,groups = {GroupInterface1.class,GroupInterface2.class})
private String userName;
@Max(message = "age最大值是120",value = 120,groups = {GroupInterface1.class,GroupInterface2.class})
@Min(message = "age必须大于0" ,value = 0,groups = {GroupInterface1.class,GroupInterface2.class})
private Integer age;
public Integer getId() {
return id;
}
public void setId(Integer id) {
this.id = id;
}
public String getUserName() {
return userName;
}
public void setUserName(String userName) {
this.userName = userName;
}
public Integer getAge() {
return age;
}
public void setAge(Integer age) {
this.age = age;
}
}
应用
@RequestMapping("/save")
public String add(@Validated({GroupInterface2.class}) User user, BindingResult br, Model model) throws IOException {
System.out.println("save ....");
List<ObjectError> allErrors = br.getAllErrors();
for (ObjectError error:allErrors){
System.out.println(error.getDefaultMessage());
}
return "/index.jsp";
}
@RequestMapping("/update")
public String update(@Validated({GroupInterface1.class}) User user, BindingResult br, Model model) throws IOException {
System.out.println("update ....");
List<ObjectError> allErrors = br.getAllErrors();
for (ObjectError error:allErrors){
System.out.println(error.getDefaultMessage());
}
return "/index.jsp";
}
11.SpringMVC中的JSON数据处理
Jackson依赖
<!-- https://mvnrepository.com/artifact/com.fasterxml.jackson.core/jackson-core --> <dependency> <groupId>com.fasterxml.jackson.core</groupId> <artifactId>jackson-core</artifactId> <version>2.9.9</version> </dependency> <dependency> <groupId>com.fasterxml.jackson.core</groupId> <artifactId>jackson-databind</artifactId> <version>2.9.9</version> </dependency>
响应数据为JSON格式的信息
@RequestMapping("/query")
@ResponseBody
public List<User> query(){
    System.out.println("query ..... ");
    return Arrays.asList(new User(1,"zhangsan1",18)
                         ,new User(2,"zhangsan2",19)
                         ,new User(3,"zhangsan3",12));
}
接受数据为JSON数据,提交的类型必须是post方式提交
<%@ page contentType="text/html;charset=UTF-8" language="java" %>
<html>
<head>
<meta http-equiv="Content-Type" content="text/html; charset=UTF-8">
<title>Insert title here</title>
<script type="text/javascript" src="js/jquery.min.js"></script>
</head>
<body>
<input type="button" value="提交JSON数据" onclick="fun1();">
<script type="text/javascript">
function fun1(){
$.ajax({
type: 'POST',
url: "/user/save",
contentType: "application/json",//如果想以json格式把数据提交到后台的话,这个必须有,否则只会当做表单提交
data: JSON.stringify({"userName":"sam","age":"12"}),//JSON.stringify()必须有,否则只会当做表单的格式提交
dataType: "json",//期待返回的数据类型
success: function(data){
alert("success:"+data);
},
error:function(data){
alert("error"+data);
}
});
}
</script>
</body>
</html>
12.Restful风格
Restful是一种设计风格,是一个规范,不是一个技术。
| 提交方式 | 地址 | 说明 |
|---|---|---|
| GET(查) | http://localhost:8080/book/1 | 查询id为1的书 |
| POST(增) | http://localhost:8080/book/1 | 添加一本书,书的id为1 |
| DELETE(删) | http://localhost:8080/book/1 | 删除id为1的书 |
| PUT(改) | http://localhost:8080/book/1 | 修改id为1的书 |
控制器处理
package com.gupaoedu.controller;
import com.gupaoedu.pojo.User;
import org.springframework.stereotype.Controller;
import org.springframework.web.bind.annotation.*;
import org.springframework.web.servlet.ModelAndView;
import javax.servlet.http.HttpServletRequest;
import javax.servlet.http.HttpServletResponse;
import java.util.Arrays;
import java.util.List;
/*@Controller // 将UserController对象交给IoC容器管理
//@RequestMapping("/user") // 类头部的可以省略
@ResponseBody*/
@RestController
public class UserController {
/**
* 具体处理请求的方法 【头部的mapping+方法的mapping】
* http://localhost:8082/user/query
* @return
*/
@GetMapping("/user/{id}/{name}")
public List<User> query(@PathVariable Integer id,@PathVariable String name){
System.out.println("query ..... " + id + " " + name);
return Arrays.asList(new User(1,"zhangsan1",18)
,new User(2,"zhangsan2",19)
,new User(3,"zhangsan3",12));
}
@PostMapping("/user")
public String add(@RequestBody User user){
System.out.println("save ..... " + user);
return "/index.jsp";
}
@DeleteMapping("/user")
public String delete(){
System.out.println("delete ..... ");
return "/index.jsp";
}
@PutMapping("/user")
public String update(){
System.out.println("update ..... ");
return "/index.jsp";
}
}
SpringMVC拦截器
定义自定义的拦截器
package com.gupaoedu.interceptor;
import org.springframework.web.servlet.HandlerInterceptor;
import org.springframework.web.servlet.ModelAndView;
import javax.servlet.http.HttpServletRequest;
import javax.servlet.http.HttpServletResponse;
public class MyInterceptor implements HandlerInterceptor {
/**
* 在自定义控制器执行之前执行
* @param request
* @param response
* @param handler
* @return
* false 拦截
* true 放过
*/
@Override
public boolean preHandle(HttpServletRequest request, HttpServletResponse response, Object handler) {
System.out.println("preHandle....");
return true;
}
/**
* 自定义控制器执行后执行
* 在返回ModelAndView之前执行
* @param request
* @param response
* @param handler
* @param modelAndView
*/
@Override
public void postHandle(HttpServletRequest request
, HttpServletResponse response
, Object handler, ModelAndView modelAndView) {
System.out.println("postHandle ....");
}
/**
* 自定义控制器执行后执行
* 在返回ModelAndView之后执行
* @param request
* @param response
* @param handler
* @param ex
*/
@Override
public void afterCompletion(HttpServletRequest request
, HttpServletResponse response
, Object handler, Exception ex) {
System.out.println("afterCompletion....");
}
}
注册拦截器
<!-- 配置拦截器 -->
<mvc:interceptors>
    <mvc:interceptor>
        <mvc:mapping path="/**"/>
        <bean class="com.gupaoedu.interceptor.MyInterceptor"/>
    </mvc:interceptor>
</mvc:interceptors>
