目录
1. MyBatis-Plus概述
MyBatis-Plus(简称 MP)是一个MyBatis的增强工具,在MyBatis的基础上只做增强不做改变,为简化开发、提高效率而生。
2. MyBatis-Plus代码生成器概述
AutoGenerator 是 MyBatis-Plus 的代码生成器,通过 AutoGenerator 可以快速生成 Entity、Mapper、Mapper XML、Service、Controller 等各个模块的代码,极大的提升了开发效率。
3. 快速入门
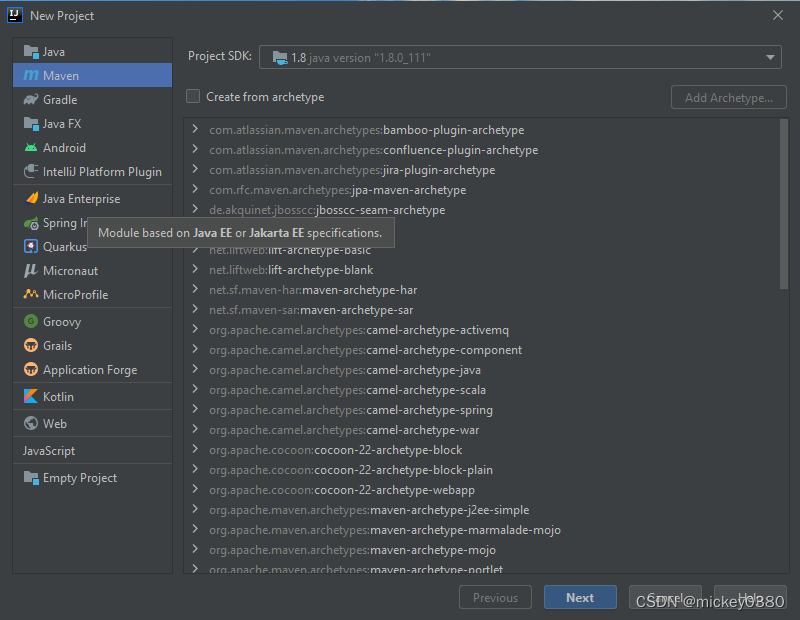
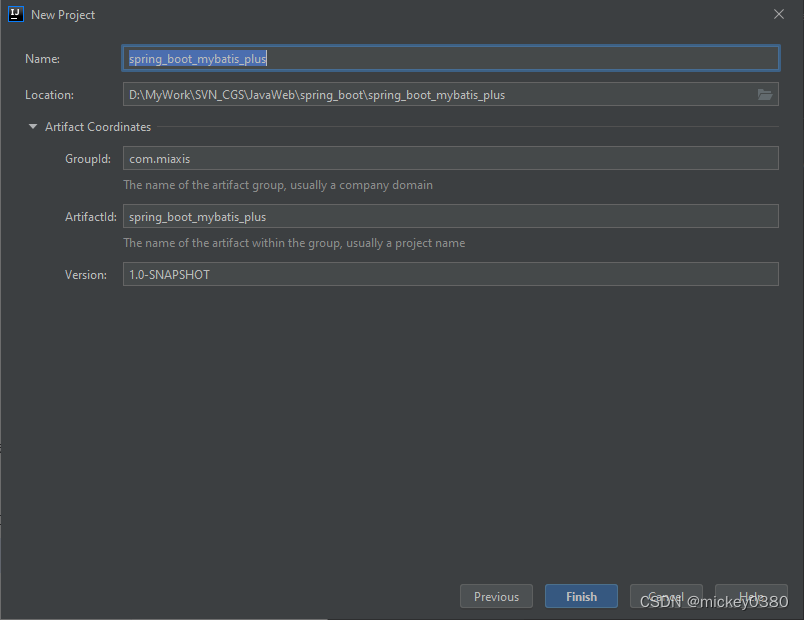
3.1 创建工程
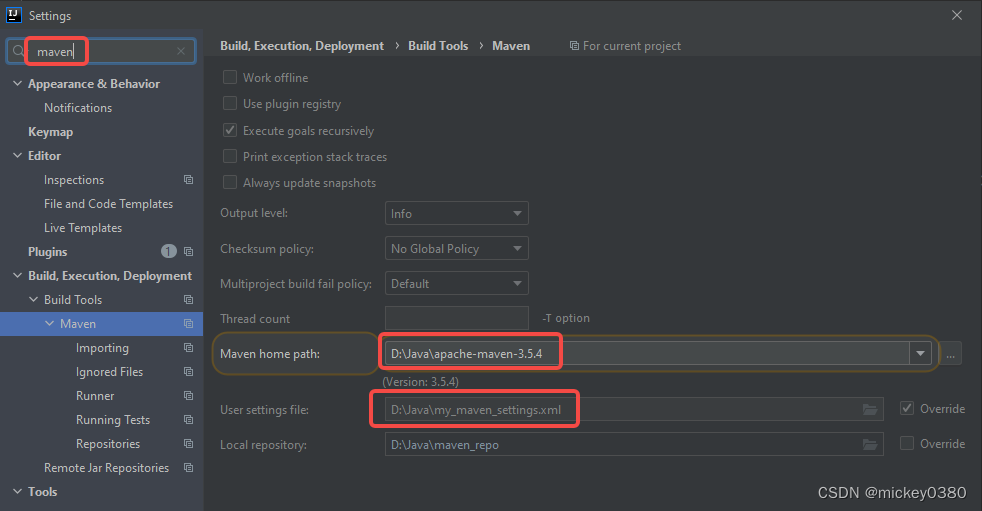
设置 Maven
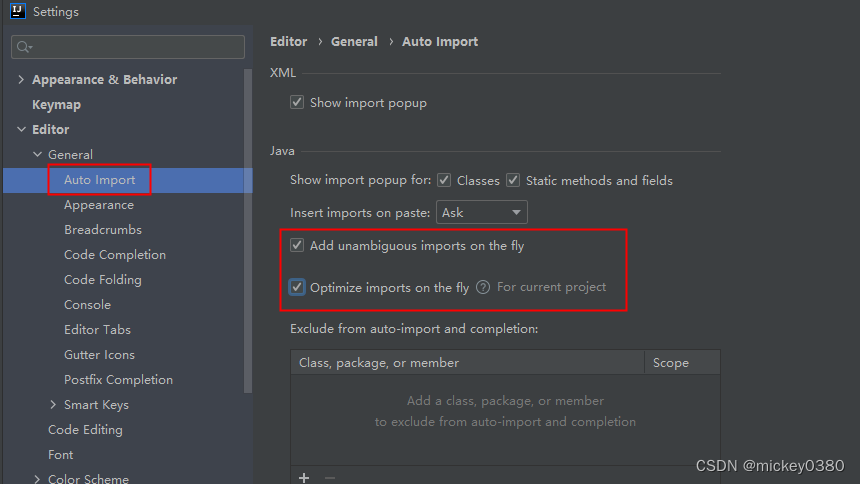
设置自动导入包 Auto Import
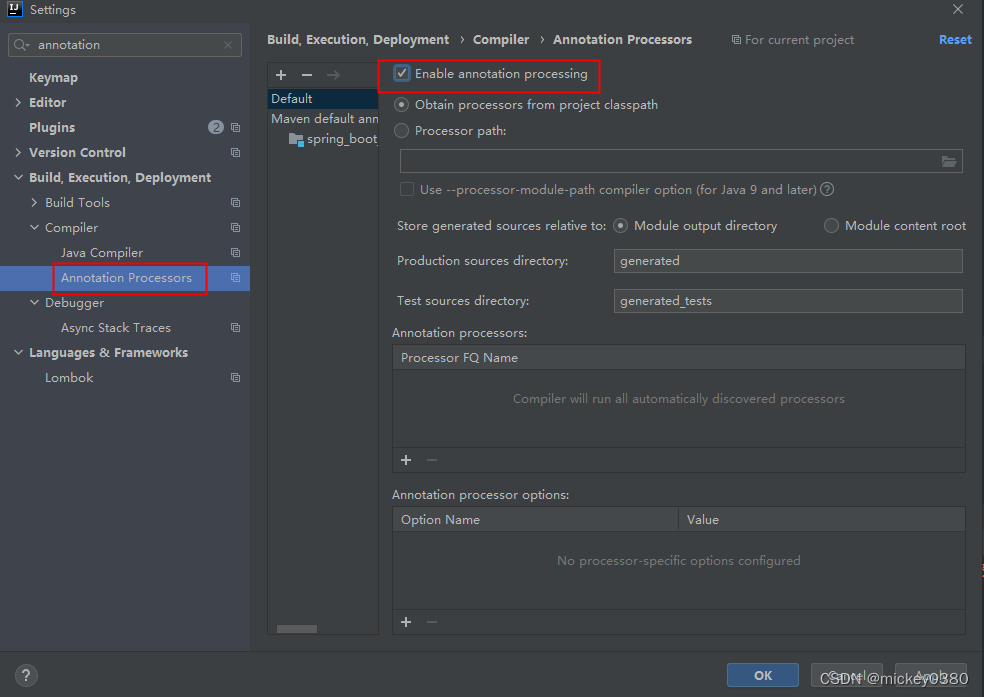
设置启动注解 Annotation Processors
3.2 导入依赖
<!--引入springboot依赖-->
<parent>
    <groupId>org.springframework.boot</groupId>
    <artifactId>spring-boot-starter-parent</artifactId>
    <version>2.3.4.RELEASE</version>
</parent>

<dependencies>
    <!--引入spring-boot启动器依赖, 添加启动器后web工程常用的依赖会自动帮你引入-->
    <dependency>
        <groupId>org.springframework.boot</groupId>
        <artifactId>spring-boot-starter-web</artifactId>
    </dependency>
    <!--test-->
    <dependency>
        <groupId>org.springframework.boot</groupId>
        <artifactId>spring-boot-starter-test</artifactId>
        <scope>test</scope>
    </dependency>
    <!--lombok-->
    <dependency>
        <groupId>org.projectlombok</groupId>
        <artifactId>lombok</artifactId>
    </dependency>
    <!--mybatis-plus-->
    <dependency>
        <groupId>com.baomidou</groupId>
        <artifactId>mybatis-plus-boot-starter</artifactId>
        <version>3.0.5</version>
    </dependency>
    <!--mysql-->
    <dependency>
        <groupId>mysql</groupId>
        <artifactId>mysql-connector-java</artifactId>
        <version>8.0.16</version>
    </dependency>
    <!-- velocity 模板引擎, Mybatis Plus 代码生成器需要 -->
    <dependency>
        <groupId>org.apache.velocity</groupId>
        <artifactId>velocity-engine-core</artifactId>
        <version>2.0</version>
    </dependency>
    <!--集成druid连接池-->
    <dependency>
        <groupId>com.alibaba</groupId>
        <artifactId>druid-spring-boot-starter</artifactId>
        <version>1.1.10</version>
    </dependency>
    <!--Swagger2-->
    <dependency>
        <groupId>io.springfox</groupId>
        <artifactId>springfox-swagger2</artifactId>
        <version>2.7.0</version>
    </dependency>
    <dependency>
        <groupId>io.springfox</groupId>
        <artifactId>springfox-swagger-ui</artifactId>
        <version>2.7.0</version>
    </dependency>
</dependencies>

<!--打包-->
<build>
    <plugins>
        <plugin>
            <groupId>org.springframework.boot</groupId>
            <artifactId>spring-boot-maven-plugin</artifactId>
        </plugin>
    </plugins>
</build>
3.3 添加配置文件
resources\application.yml 当中 添加数据库配置信息
# 配置服务端口
server:
  port: 8001

# 配置日志输出格式
logging:
  pattern:
    console: "%clr(%5p) %clr(-){faint} %clr(%-80.80logger{79}){cyan} %clr(:) %m%n"

spring:
  # 数据源配置
  datasource:
    username: root     #数据库用户名
    password: 163.com  #密码
    url: jdbc:mysql://localhost:3306/mybatis_db?serverTimezone=GMT%2B8
    driver-class-name: com.mysql.cj.jdbc.Driver
    type: com.zaxxer.hikari.HikariDataSource  #com.alibaba.druid.pool.DruidDataSource
    hikari:
      connection-test-query: SELECT 1
      connection-timeout: 60000
      idle-timeout: 500000
      max-lifetime: 540000
      maximum-pool-size: 12
      minimum-idle: 10
      pool-name: GuliHikariPool

# sql输出日志配置
mybatis-plus:
  configuration:
    log-impl: org.apache.ibatis.logging.stdout.StdOutImpl
3.4 添加Swagger2配置类
package com.miaxis.config;

import org.springframework.context.annotation.Bean;
import org.springframework.context.annotation.Configuration;
import springfox.documentation.builders.ApiInfoBuilder;
import springfox.documentation.builders.PathSelectors;
import springfox.documentation.builders.RequestHandlerSelectors;
import springfox.documentation.service.ApiInfo;
import springfox.documentation.spi.DocumentationType;
import springfox.documentation.spring.web.plugins.Docket;
import springfox.documentation.swagger2.annotations.EnableSwagger2;

@Configuration
@EnableSwagger2
public class SwaggerConfig {
    @Bean
    public Docket createRestApi() {
        return new Docket(DocumentationType.SWAGGER_2)
                .apiInfo(apiInfo())
                .select()
                .apis(RequestHandlerSelectors.basePackage("com.miaxis"))// 指定扫描包下面的注解
                .paths(PathSelectors.any())
                .build();
    }
    // 创建api的基本信息
    private ApiInfo apiInfo() {
        return new ApiInfoBuilder()
                .title("集成Swagger2构建RESTful APIs")
                .description("集成Swagger2构建RESTful APIs")
                .termsOfServiceUrl("https://www.miaxis.com")
                .contact("Mickey")
                .version("1.0.0")
                .build();
    }
}
3.5 添加统一返回数据格式
-
创建状态码接口类
package com.miaxis.utils;

public interface ResultCode {
    /*成功状态码*/
    Integer SUCCESS = 20000;
    /*失败的状态码*/
    Integer ERROR = 20001;
}-
创建统一结果类
package com.miaxis.utils;

import io.swagger.annotations.ApiModelProperty;
import lombok.Data;

import java.util.HashMap;
import java.util.Map;
@Data
public class ResponseResult{
    private ResponseResult(){}
    @ApiModelProperty(value = "是否成功")
    private Boolean success;
    @ApiModelProperty(value = "状态码")
    private Integer code;
    @ApiModelProperty(value = "返回消息")
    private String message;
    @ApiModelProperty(value = "返回的数据")
    private Map<String,Object> data = new HashMap<>();

    /*提供工具方法*/
    public static ResponseResult ok(){
        ResponseResult responseResult = new ResponseResult();
        responseResult.setSuccess(true);
        responseResult.setCode(ResultCode.SUCCESS);
        responseResult.setMessage("成功");
        return responseResult;
    }
    public static ResponseResult error(){
        ResponseResult responseResult = new ResponseResult();
        responseResult.setSuccess(false);
        responseResult.setCode(ResultCode.ERROR);
        responseResult.setMessage("失败");
        return responseResult;
    }
    public ResponseResult success(Boolean success){
        this.setSuccess(success);
        return this;
    }
    public ResponseResult message(String message){
        this.setMessage(message);
        return this;
    }
    public ResponseResult code(Integer code){
        this.setCode(code);
        return  this;
    }
    public ResponseResult data(String key,Object value){
        this.data.put(key,value);
        return this;
    }
    public ResponseResult data(Map<String,Object> map){
        this.setData(map);
        return this;
    }
}
3.6 添加统一异常处理
-
创建全局异常处理类
package com.miaxis.exception;

import com.miaxis.utils.ResponseResult;
import org.springframework.web.bind.annotation.ControllerAdvice;
import org.springframework.web.bind.annotation.ExceptionHandler;
import org.springframework.web.bind.annotation.ResponseBody;

/*全局异常处理器, 只要发生了异常,如果在自己控制当中 没有去捕获 , 就会到此控制器*/
@ControllerAdvice
public class GlobalExceptionHandler {
    @ExceptionHandler(Exception.class)
    @ResponseBody
    public ResponseResult error(Exception e){
        e.printStackTrace();
        return ResponseResult.error().message(e.getMessage());
    }

    //自定义异常
    @ExceptionHandler(CustomException.class)
    @ResponseBody //返回json数据
    public ResponseResult error(CustomException e){
        e.printStackTrace();
        return ResponseResult.error().code(e.getCode()).message(e.getMsg());
    }
}-
创建自定义异常处理类
package com.miaxis.exception;

import lombok.AllArgsConstructor;
import lombok.Data;

@Data
@AllArgsConstructor  //生成带参数的构造器
public class CustomException extends RuntimeException{
    private Integer code;
    private String msg;
}-
在需要的地方,主动抛出异常,进入该方法
throw new CustomException(20001,"数据不存在");3.7 添加代码生成类
/src/test/Java下创建类CodeGenerator
注意修改:输出路径,数据库名、账号、密码、表名
import com.baomidou.mybatisplus.annotation.DbType;
import com.baomidou.mybatisplus.annotation.IdType;
import com.baomidou.mybatisplus.generator.AutoGenerator;
import com.baomidou.mybatisplus.generator.config.DataSourceConfig;
import com.baomidou.mybatisplus.generator.config.GlobalConfig;
import com.baomidou.mybatisplus.generator.config.PackageConfig;
import com.baomidou.mybatisplus.generator.config.StrategyConfig;
import com.baomidou.mybatisplus.generator.config.rules.DateType;
import com.baomidou.mybatisplus.generator.config.rules.NamingStrategy;
import org.junit.Test;

public class CodeGenerator {
    @Test
    public void main() {
        // 1、创建代码生成器
        AutoGenerator mpg = new AutoGenerator();

        // 2、全局配置
        GlobalConfig gc = new GlobalConfig();
        //配置输出路径 (注意修改)
        gc.setOutputDir("D:\\MyWork\\SVN_CGS\\JavaWeb\\spring_boot\\spring_boot_mybatis_plus2\\src\\main\\java");
        gc.setAuthor("Mickey");
        gc.setOpen(false); //生成后是否打开资源管理器
        gc.setFileOverride(false); //重新生成时文件是否覆盖
        /*
         * mp生成service层代码,默认接口名称第一个字母有 I
         * */
        gc.setControllerName("%sController");
        gc.setServiceName("%sService");
        gc.setServiceImplName("%sServiceImpl");
        gc.setMapperName("%sMapper");
        gc.setXmlName("%sMapper");
        gc.setIdType(IdType.ID_WORKER_STR); //主键策略
        gc.setDateType(DateType.ONLY_DATE);//定义生成的实体类中日期类型
        gc.setSwagger2(true);  //开启Swagger2模式
        mpg.setGlobalConfig(gc);

        // 3、数据源配置
        DataSourceConfig dsc = new DataSourceConfig();
        dsc.setUrl("jdbc:mysql://localhost:3306/mybatis_db?serverTimezone=GMT%2B8");
        dsc.setDriverName("com.mysql.cj.jdbc.Driver");
        dsc.setUsername("root");
        dsc.setPassword("163.com");
        dsc.setDbType(DbType.MYSQL);
        mpg.setDataSource(dsc);

        // 4、包配置
        PackageConfig pc = new PackageConfig();
        pc.setModuleName("mybatis"); //模块名
        pc.setParent("com.miaxis");  //com.miaxis.模块名称.功能 -> com.miaxis.mybatis.controller
        pc.setController("controller");
        pc.setEntity("entity");
        pc.setService("service");
        pc.setMapper("mapper");
        mpg.setPackageInfo(pc);

        // 5、策略配置
        StrategyConfig strategy = new StrategyConfig();
        strategy.setInclude("user");  //数据库-表名
        //数据库表映射到实体的命名策略 驼峰命名
        strategy.setNaming(NamingStrategy.underline_to_camel);
        //生成实体时去掉表前缀
        //strategy.setTablePrefix("video_");
        //数据库表字段映射到实体的命名策略
        strategy.setColumnNaming(NamingStrategy.underline_to_camel);
        // lombok 模型 @Accessors(chain = true) setter链式操作
        strategy.setEntityLombokModel(true);
        //restful api风格控制器
        strategy.setRestControllerStyle(true);
        //url中驼峰转连字符
        strategy.setControllerMappingHyphenStyle(true);
        mpg.setStrategy(strategy);

        // 6、执行
        mpg.execute();
    }
}
3.8 编写启动类
启动类Appliction.java添加包扫描
package com.miaxis;

import org.mybatis.spring.annotation.MapperScan;
import org.springframework.boot.SpringApplication;
import org.springframework.boot.autoconfigure.SpringBootApplication;

@SpringBootApplication
@MapperScan("com.miaxis.mybatis.mapper")  //启动类Appliction.java添加包扫描
public class Application {
    public static void main(String[] args) {
        SpringApplication.run(Application.class, args);
    }
}
3.9 编写测试控制类
@RestController
@RequestMapping("/mybatis/user")
public class UserController {
    /*使用代码生成器生成的service当中已经有很多的基础服务 ,直接调用即可*/
    @Autowired
    private UserService userService;

    @GetMapping("/getUserList")
    public ResponseResult getUserList(){
        //float t = 1/0;  //测试异常情况
        List<User> list = userService.list(null);
        return ResponseResult.ok().data("list",list);
    }
}
3.10 测试
-
运行启动类
-
直接访问测试 http://localhost:8001/mybatis/user/getUserList
-
通过Swagger测试 http://localhost:8001/swagger-ui.html
4. Demo下载地址
编译器版本:IntelliJ IDEA 2020.3.2 x64
JDK版本:java 1.8.0_111
