利用springboot + JWT + Redis 搭建一个带token身份令牌验证的后端框架
从零开始建议先看我的上一篇教程搭好sprongboot框架:快速搭建springboot+mybatis-plus代码自动生成器的后端框架
------------------------------>>>>免费下载代码文件zip,可直接导入IDEA,数据库的User表很简单,自己建以下就好了
项目环境
- IDEA 2020
- springboot 2.3.7.RELEASE
- mybatis-plus 3.5.1
- JDK 1.8
操作步骤
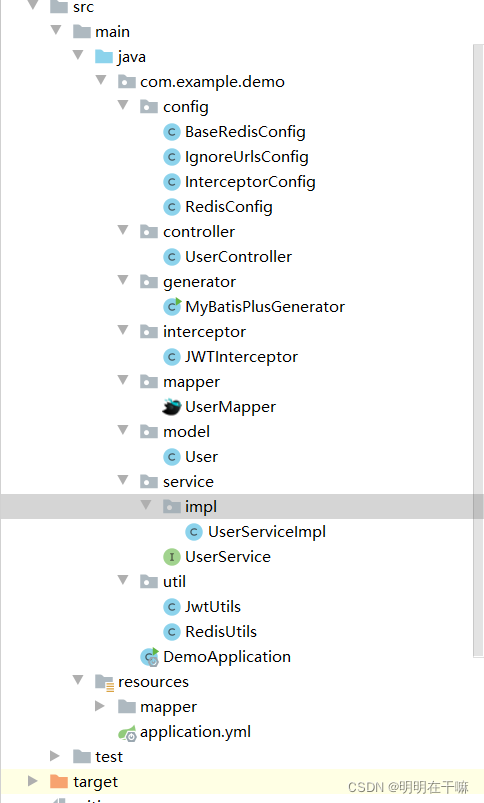
- 项目目录结构
- 用户类
import com.baomidou.mybatisplus.annotation.IdType;
import com.baomidou.mybatisplus.annotation.TableField;
import com.baomidou.mybatisplus.annotation.TableId;
import java.io.Serializable;
import java.time.LocalDate;

import com.baomidou.mybatisplus.extension.activerecord.Model;
import io.swagger.annotations.ApiModel;
import io.swagger.annotations.ApiModelProperty;
import lombok.Getter;
import lombok.Setter;

/**
 * <p>
 *
 * </p>
 *
 * @author pengmq
 * @since 2022/04/09 15:23
 */
@Getter
@Setter
@ApiModel(value = "User对象", description = "")
public class User extends Model<User> implements Serializable {

    private static final long serialVersionUID = 1L;

    /**
     * 登录时间
     * */
    @TableField(exist = false)
    private Long loginTime ;

    /**
     * 令牌过期时间
     * */
    @TableField(exist = false)
    private Long expireTime ;


    @TableId(value = "id", type = IdType.AUTO)
    private Integer id;

    @ApiModelProperty("0-->管理员 1-->普通用户")
    private Integer flag;

    @ApiModelProperty("账号")
    private String account;

    @ApiModelProperty("密码")
    private String password;

    @ApiModelProperty("昵称")
    private String nickname;

    @ApiModelProperty("身份证号")
    private String idcard;

    @ApiModelProperty("真实姓名")
    private String realname;

    @ApiModelProperty("0-->女 1-->男")
    private Integer gender;

    @ApiModelProperty("出生日期")
    private LocalDate birthday;

    @ApiModelProperty("0-->禁用 1--启用")
    private Integer state;

    @ApiModelProperty("信用分")
    private Integer credit;

    @Override
    public String toString() {
        return "User{" +
                "loginTime=" + loginTime +
                ", expireTime=" + expireTime +
                ", id=" + id +
                ", flag=" + flag +
                ", account='" + account + '\'' +
                ", password='" + password + '\'' +
                ", nickname='" + nickname + '\'' +
                ", idcard='" + idcard + '\'' +
                ", realname='" + realname + '\'' +
                ", gender=" + gender +
                ", birthday=" + birthday +
                ", state=" + state +
                ", credit=" + credit +
                '}';
    }
}
- 引入相关依赖
<!--JWT(Json Web Token)登录支持-->
<dependency>
    <groupId>io.jsonwebtoken</groupId>
    <artifactId>jjwt</artifactId>
    <version>0.9.0</version>
</dependency>
<!--redis依赖配置-->
<dependency>
    <groupId>org.springframework.boot</groupId>
    <artifactId>spring-boot-starter-data-redis</artifactId>
</dependency>
<!--fastjson-->
<dependency>
    <groupId>com.alibaba</groupId>
    <artifactId>fastjson</artifactId>
    <version>1.2.12</version>
</dependency>
<!--SpringBoot配置处理-->
<dependency>
    <groupId>org.springframework.boot</groupId>
    <artifactId>spring-boot-configuration-processor</artifactId>
    <optional>true</optional>
</dependency>
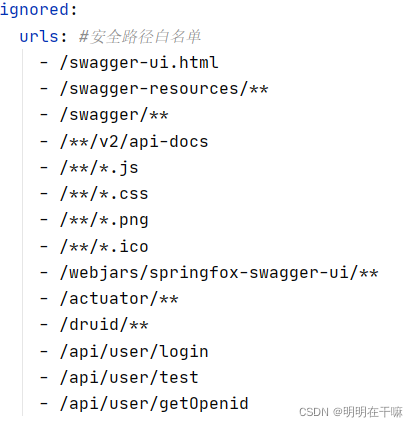
- 编写yml配置文件,从零开始的建议把项目中的application.properties改为application.yml。
注意修改yml中的数据库地址、账号、密码、以及不需要token令牌的安全路径白名单
spring:
datasource:
url: jdbc:mysql://localhost:3306/devicemanage?useUnicode=true&characterEncoding=UTF-8&serverTimezone=Asia/Shanghai
username: root
password: root
redis:
host: localhost # Redis服务器地址
database: 0 # Redis数据库索引(默认为0)
port: 6379 # Redis服务器连接端口
password: # Redis服务器连接密码(默认为空)
timeout: 3000ms # 连接超时时间(毫秒)
main:
allow-bean-definition-overriding: true
ignored:
urls: #安全路径白名单
- /swagger-ui.html
- /swagger-resources/**
- /swagger/**
- /**/v2/api-docs
- /**/*.js
- /**/*.css
- /**/*.png
- /**/*.ico
- /webjars/springfox-swagger-ui/**
- /actuator/**
- /druid/**
- /api/user/login
- /api/user/test
- /api/user/getOpenid
jwt:
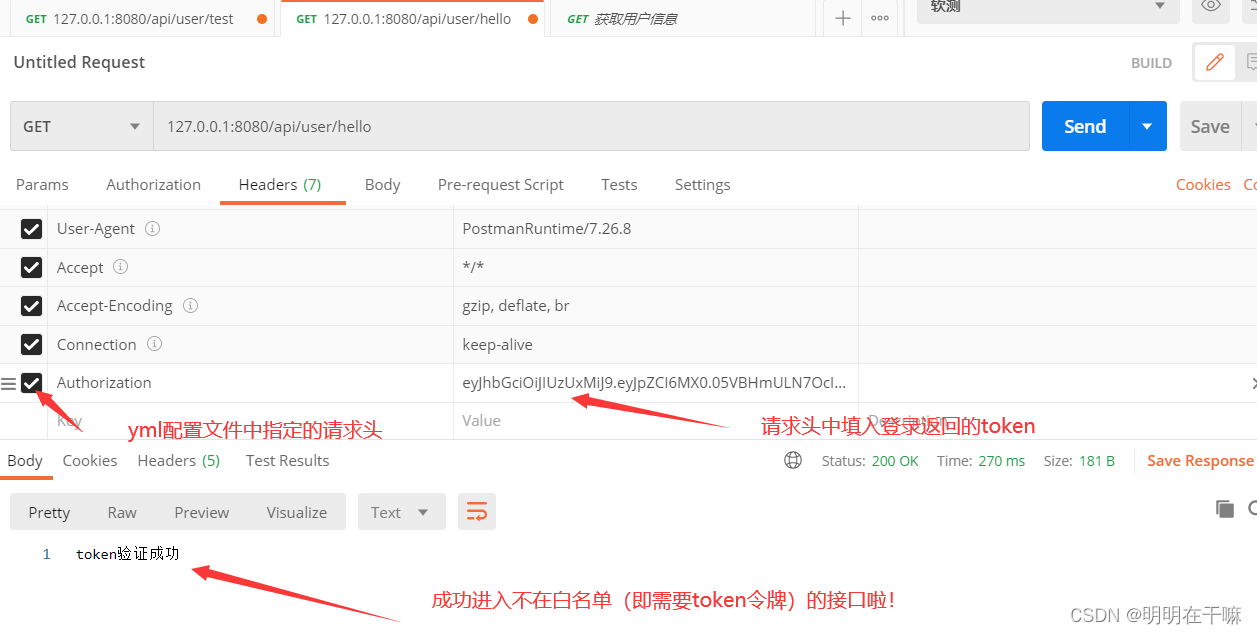
tokenHeader: Authorization #JWT存储的请求头
sign: pengmq-secret #JWT加解密使用的密钥
expireTime: 30 #jwtToken的默认有效时间 单位分钟
tokenHead: 'Bearer ' #JWT负载中拿到开头
-
准备好JWT工具类和Redis工具类
JwtUtils.class
package com.example.demo.util;
import com.example.demo.model.User;
import io.jsonwebtoken.Claims;
import io.jsonwebtoken.Jwts;
import io.jsonwebtoken.SignatureAlgorithm;
import org.springframework.beans.factory.annotation.Value;
import org.springframework.stereotype.Component;
import java.util.*;
import java.util.concurrent.TimeUnit;

/**
 * @author pengmq
 * @date 2021年06月24日 13:35
 */
@Component
public class JwtUtils {

    /**
     * 自定义秘钥
     * */
    private static String sign;

    /**
     * jwtToken的默认有效时间 单位分钟
     * */
    private static int expireTime;

    @Value("${jwt.sign}")
    public void setSign(String sign1){
        JwtUtils.sign = sign1;
    }

    @Value("${jwt.expireTime}")
    public void setExpireTime(int expireTime1){
        JwtUtils.expireTime = expireTime1;
    }

    /**
     * 生成jwt token
     * @param map  要存放负载信息
     * */
    public static String createJwtToken(Map<String,Object> map){
        return  Jwts.builder()
                .setClaims(map) //放入payLoad部分的信息
                .signWith(SignatureAlgorithm.HS512,sign)
                .compact();

    }


    /**
     * 从令牌中获取数据,就是payLoad部分存放的数据。如果jwt被改,该函数会直接抛出异常
     * @param token  令牌
     * */
    public static Claims  parseToken(String token){
        System.out.println(token);
        return Jwts.parser()
                .setSigningKey(sign)
                .parseClaimsJws(token)
                .getBody();
    }

    /**
     * 验证用户信息
     * @param token  jwtToken
     * */
    public static User verifyJwtToken(String token){
        Claims claims = parseToken(token);
        System.out.println("claims:::"+claims.toString());
        String id = String.valueOf(claims.get("id"));
        System.out.println("id:::"+id);
        //从redis中获取用户信息
        Object user = RedisUtils.getValue(id);
        User user1 = (User) user;

        return user1 ;
    }


    /**
     * 刷新令牌时间,刷新redis缓存时间
     * @param  user 用户信息
     * */
    public static void refreshToken(User user){
        //重新设置User对象的过期时间,再刷新缓存
        user.setExpireTime(System.currentTimeMillis()+1000L * 60 * expireTime);
        RedisUtils.saveValue(user.getId()+"",user,expireTime,TimeUnit.MINUTES);
    }

    /**
     * 设置用户的登录时间和令牌有效时间
     * @param user
     * @return
     */
    public static User setTime(User user){
        user.setExpireTime(System.currentTimeMillis()+1000L * 60 * expireTime);
        user.setLoginTime(System.currentTimeMillis());
        return user;
    }
}
RedisUtils.class
其中用到了RedisTemplate暂时会报错,等编写redis配置类就好了
import org.springframework.beans.factory.annotation.Autowired;
import org.springframework.data.redis.core.RedisTemplate;
import org.springframework.stereotype.Component;

import javax.annotation.PostConstruct;
import java.util.concurrent.TimeUnit;

/**
 * @author pengmq
 * @date 2021年06月28日 15:22
 */
@Component
public class RedisUtils {

    @Autowired
    private RedisTemplate<String, Object> redisTemplate;


    private static RedisUtils redisUtils ;

    @PostConstruct
    public void init(){
        redisUtils = this ;
        redisUtils.redisTemplate = this.redisTemplate ;
    }

    /**
     * redis存入数据
     * @param key 键名
     * @param value  值
     * @param time 保存时间
     * @param timeUnit  时间单位
     * */
    public static void saveValue(String key, Object value, int time, TimeUnit timeUnit){
        redisUtils.redisTemplate.opsForValue().set(key,value,time,timeUnit);
    }

    /**
     * 获取redis中的值
     * @param key 键名
     * */
    public static Object getValue(String key){
        return redisUtils.redisTemplate.opsForValue().get(key);
    }


}
- Redis配置类
BaseRedisConfig.java
import com.fasterxml.jackson.annotation.JsonAutoDetect;
import com.fasterxml.jackson.annotation.PropertyAccessor;
import com.fasterxml.jackson.databind.ObjectMapper;
import com.fasterxml.jackson.databind.jsontype.impl.LaissezFaireSubTypeValidator;
import org.springframework.context.annotation.Bean;
import org.springframework.data.redis.cache.RedisCacheConfiguration;
import org.springframework.data.redis.cache.RedisCacheManager;
import org.springframework.data.redis.cache.RedisCacheWriter;
import org.springframework.data.redis.connection.RedisConnectionFactory;
import org.springframework.data.redis.core.RedisTemplate;
import org.springframework.data.redis.serializer.Jackson2JsonRedisSerializer;
import org.springframework.data.redis.serializer.RedisSerializationContext;
import org.springframework.data.redis.serializer.RedisSerializer;
import org.springframework.data.redis.serializer.StringRedisSerializer;

import java.time.Duration;

/**
 * Redis基础配置
 * Created by pengmq
 */
public class BaseRedisConfig {

    @Bean
    public RedisTemplate<String, Object> redisTemplate(RedisConnectionFactory redisConnectionFactory) {
        RedisSerializer<Object> serializer = redisSerializer();
        RedisTemplate<String, Object> redisTemplate = new RedisTemplate<>();
        redisTemplate.setConnectionFactory(redisConnectionFactory);
        redisTemplate.setKeySerializer(new StringRedisSerializer());
        redisTemplate.setValueSerializer(serializer);
        redisTemplate.setHashKeySerializer(new StringRedisSerializer());
        redisTemplate.setHashValueSerializer(serializer);
        redisTemplate.afterPropertiesSet();
        return redisTemplate;
    }

    @Bean
    public RedisSerializer<Object> redisSerializer() {
        //创建JSON序列化器
        Jackson2JsonRedisSerializer<Object> serializer = new Jackson2JsonRedisSerializer<>(Object.class);
        ObjectMapper objectMapper = new ObjectMapper();
        objectMapper.setVisibility(PropertyAccessor.ALL, JsonAutoDetect.Visibility.ANY);
        //必须设置,否则无法将JSON转化为对象,会转化成Map类型
        objectMapper.activateDefaultTyping(LaissezFaireSubTypeValidator.instance, ObjectMapper.DefaultTyping.NON_FINAL);
        serializer.setObjectMapper(objectMapper);
        return serializer;
    }

    @Bean
    public RedisCacheManager redisCacheManager(RedisConnectionFactory redisConnectionFactory) {
        RedisCacheWriter redisCacheWriter = RedisCacheWriter.nonLockingRedisCacheWriter(redisConnectionFactory);
        //设置Redis缓存有效期为1天
        RedisCacheConfiguration redisCacheConfiguration = RedisCacheConfiguration.defaultCacheConfig()
                .serializeValuesWith(RedisSerializationContext.SerializationPair.fromSerializer(redisSerializer())).entryTtl(Duration.ofDays(1));
        return new RedisCacheManager(redisCacheWriter, redisCacheConfiguration);
    }
RedisConfig.java
import org.springframework.cache.annotation.EnableCaching;
import org.springframework.context.annotation.Configuration;

/**
 * Redis配置类
 * Created by penmgmq
 */
@EnableCaching
@Configuration
public class RedisConfig extends BaseRedisConfig {

}
- 编写拦截器 JWTInterceptor.java
import com.example.demo.model.User;
import com.example.demo.util.JwtUtils;
import com.fasterxml.jackson.databind.ObjectMapper;
import io.jsonwebtoken.SignatureException;
import org.springframework.beans.factory.annotation.Value;
import org.springframework.web.servlet.HandlerInterceptor;
import javax.servlet.http.HttpServletRequest;
import javax.servlet.http.HttpServletResponse;
import java.util.HashMap;
import java.util.Map;
/**
* @author pengmq
* @date 2021年06月24日 17:16
* Jwt拦截器
*/
public class JWTInterceptor implements HandlerInterceptor {
@Value("${jwt.tokenHeader}")
private String tokenHeader;
@Value("${jwt.tokenHead}")
private String tokenHead;
@Override
public boolean preHandle(HttpServletRequest request, HttpServletResponse response, Object handler) throws Exception{
Map<Object, Object> map = new HashMap<>();
//如果是OPTIONS请求 直接放行
String method = request.getMethod();
try {
if(method.equals("OPTIONS")){
return true;
}
//从请求中获取令牌
String jwtToken = request.getHeader(tokenHeader);
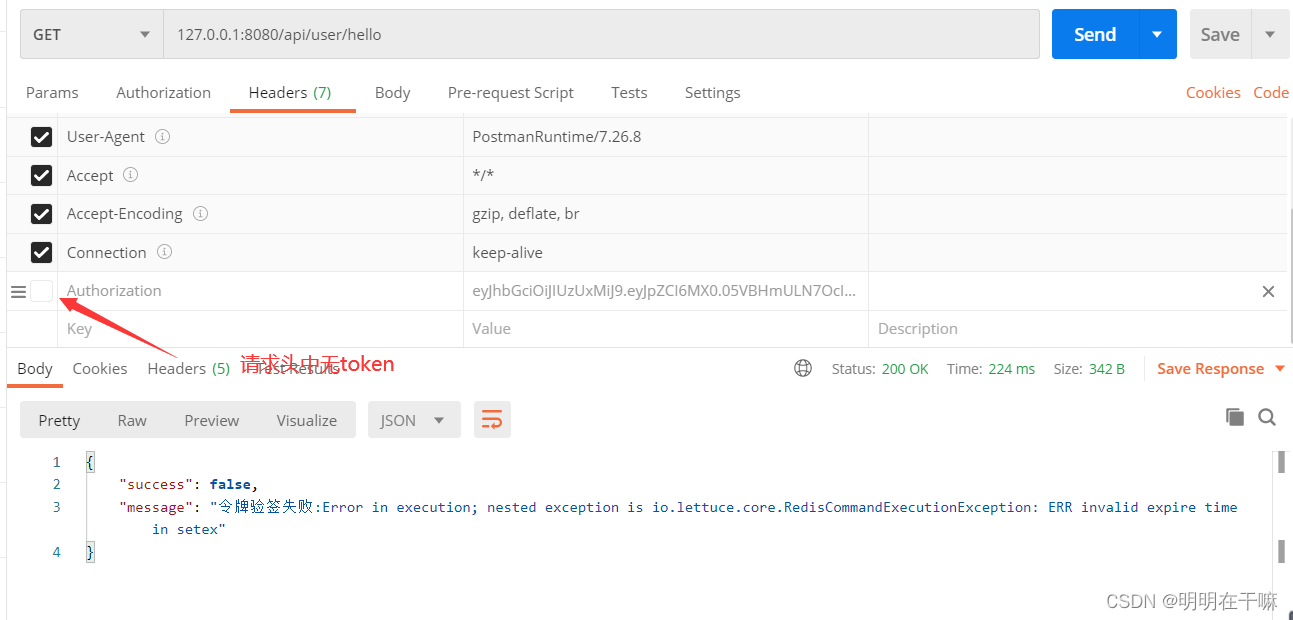
if(String.valueOf(jwtToken).equals("null")){
throw new SignatureException("令牌不合法");
}
if (jwtToken.startsWith(tokenHead)){
jwtToken = jwtToken.substring(tokenHead.length());// The part after "Bearer " 前端的安全规则会在token前自动生成 Bearer 字符串前缀,共7个字符,需要删掉
}
//验证token
User user = JwtUtils.verifyJwtToken(jwtToken);
// System.out.println("user:::);
//验证成功后,如果令牌有效时间<=5分钟,则签发新的令牌,刷新令牌时间
if(user != null){
if(user.getExpireTime() - System.currentTimeMillis() <= 1000L * 60 * 5){
JwtUtils.refreshToken(user);
}
return true ;
}else{
map.put("success",false);
map.put("code",401);
map.put("message","令牌已失效,请重新登录");
}
}catch(SignatureException e){
e.printStackTrace();
map.put("message","令牌不合法");
map.put("code",401);
map.put("success",false);
}catch (Exception e) {
e.printStackTrace();
map.put("message","令牌验签失败:"+e.getMessage());
map.put("success",false);
}
String jsonMap = new ObjectMapper().writeValueAsString(map);
response.setContentType("application/json;charset=UTF-8");
response.getWriter().println(jsonMap);
return false;
}
}
- 白名单配置类 IgnoreUrlsConfig.java
import lombok.Data;
import org.springframework.boot.context.properties.ConfigurationProperties;
import org.springframework.stereotype.Component;

import java.util.ArrayList;
import java.util.List;

/**
 * 用于配置白名单资源路径
 * Created by pengmq .
 */
@Component
@Data
@ConfigurationProperties(prefix = "ignored")
public class IgnoreUrlsConfig {

    private List<String> urls = new ArrayList<>();


}
- 拦截器配置类(注册拦截器)
import com.example.demo.interceptor.JWTInterceptor;
import org.springframework.context.annotation.Bean;
import org.springframework.context.annotation.Configuration;
import org.springframework.web.servlet.config.annotation.InterceptorRegistry;
import org.springframework.web.servlet.config.annotation.WebMvcConfigurer;

import java.util.ArrayList;
import java.util.List;

/**
 * @author pengmq
 * @date 2021年06月24日 17:45
 * 拦截器配置文件
 */
@Configuration
public class InterceptorConfig implements WebMvcConfigurer {

    private List<String> urls = new ArrayList<>();


    /**
     * 添加拦截器的方式,可直接new一个对象,
     * registry.addInterceptor(new ParamInterceptor()),
     * 但通过手动new出来的拦截器中,无法使用@Autowired 和 @Value 加载对象和配置文件参数。
     *
     * 所以需要在添加拦截器此处,通过@Bean 注解,意味着将这个对象
     * 交给spring管理。那么该拦截器才可以使用@Value等spring管理的注解
     * @return
     */
    @Bean
    public JWTInterceptor jwtInterceptor(){
        return new JWTInterceptor();
    }

    /**
     * 注册拦截器
     * */
    @Override
    public void addInterceptors(InterceptorRegistry registry){
        urls = ignoreUrlsConfig().getUrls();
        System.out.println(ignoreUrlsConfig().getUrls());
        registry.addInterceptor(jwtInterceptor())
                .addPathPatterns("/**") //拦截的地址
                .excludePathPatterns(urls); //不需要拦截的地址,如登录接口
    }


    @Bean
    public IgnoreUrlsConfig ignoreUrlsConfig() {
        return new IgnoreUrlsConfig();
    }
}
测试jwt生成的token
白名单中有login接口 无hello接口
- 编写登录接口以及需要令牌验证的其它接口
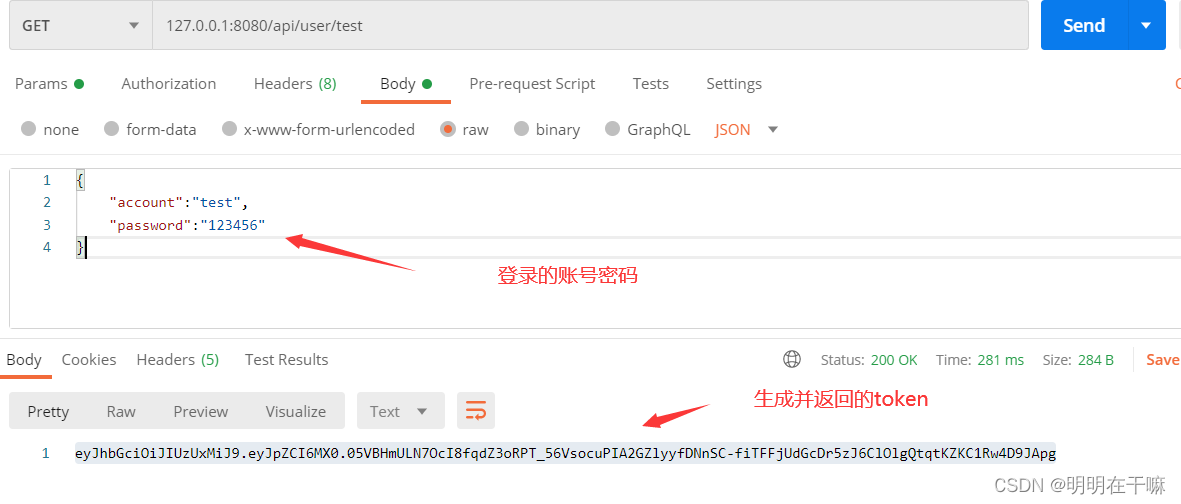
@GetMapping("/login")
    public String test(@RequestBody User userDto){
        String account = userDto.getAccount();
        String password = userDto.getPassword();
        String token;
        User user = new User();
        QueryWrapper<User> queryWrapper = new QueryWrapper<User>();
        queryWrapper.lambda().eq(User::getAccount,account);
        user = user.selectOne(queryWrapper);
        if (password.equals(user.getPassword())){ //一个简单的登录逻辑
            User jwtUser = JwtUtils.setTime(user);
            RedisUtils.saveValue(jwtUser.getId()+"",jwtUser,30, TimeUnit.MINUTES); //将用户信息存入redis数据库 第三和第四个参数为有效时间和时间单位
            Map<String,Object> userInfoMap = new HashMap<String, Object>();
            userInfoMap.put("id",jwtUser.getId());
            token = JwtUtils.createJwtToken(userInfoMap); //使用工具类生成token
            System.out.println(token);
            return token;
        }else {
            return "登录失败";
        }
    }

    @GetMapping(value = "/hello")
    public String hello(){
        System.out.println("你登陆成功");
        return "token验证成功";
    }
-
访问登录接口生成token
-
不使用token访问其它接口
-
使用token访问其它接口
大量参考这位博主的文章 如有侵权,请联系删除
springboot整合JWT+Redis