文章目录
vue elementui navmenu 多级导航菜单
路由跳转(一)
- el-menu标签中的router
| 参数 | 说明 | 类型 | 可选值 | 默认值 |
|---|---|---|---|---|
| router | 是否使用 vue-router 的模式,启用该模式会在激活导航时以 index 作为 path 进行路由跳转 | boolean | — | false |
<el-menu router>
组件(NavMenu.vue) 中的路由跳转,:index="navMenu.entity.name"
:default-active="activeIndex"中的activeIndex默认值也要是.entity.name的值
此时菜单数据中的value没有用到,可以删除。
注意路由变化
组件(NavMenu.vue)
<template>
  <div class="navMenu">

    <template v-for="navMenu in navMenus">
        <!-- 最后一级菜单 -->
      <el-menu-item v-if="!navMenu.childs&&navMenu.entity"
                    :key="navMenu.entity.id" :data="navMenu" :index="navMenu.entity.name"
                   >
        <i :class="navMenu.entity.icon"></i>
        <span slot="title">{{navMenu.entity.alias}}</span>
      </el-menu-item>

      <!-- 此菜单下还有子菜单 -->
      <el-submenu v-if="navMenu.childs&&navMenu.entity"
                  :key="navMenu.entity.id" :data="navMenu" :index="navMenu.entity.name">
        <template slot="title">
          <i :class="navMenu.entity.icon"></i>
          <span> {{navMenu.entity.alias}}</span>
        </template>
        <!-- 递归 -->
        <NavMenu :navMenus="navMenu.childs"></NavMenu>
      </el-submenu>
    </template>

  </div>
</template>

<script>
  export default {
    name: 'NavMenu',
    props: ['navMenus'],
    data() {
      return {}
    },
    methods: {}
  }
</script>

<style>
</style>
调用(app.vue)
<template>
  <div>
    <el-menu
      background-color="#545c64"
      text-color="#fff"
      active-text-color="#ffd04b"
      :default-active="activeIndex"
      router
    >
      <NavMenu :navMenus="menuData"></NavMenu>
    </el-menu>
    <router-view></router-view>
  </div>
</template>

<script>
import NavMenu from "./components/NavMenu.vue";
export default {
  components: {
    NavMenu: NavMenu
  },
  data() {
    return {
      activeIndex: 'aa',
      menuData: [
        {
          //一级
          entity: {
            id: 0,
            name: "aa",
            icon: "el-icon-message",
            alias: "一级菜单"
          }
        },
        {
          //一级
          entity: {
            id: 1,
            name: "systemManage",
            icon: "el-icon-message",
            alias: "两级菜单"
          },
          //二级
          childs: [
            {
              entity: {
                id: 3,
                name: "authManage",
                icon: "el-icon-loading",
                alias: "权限管理",
                value: { path: "/hello" }
              }
            },
            {
              entity: {
                id: 4,
                name: "roleManage",
                icon: "el-icon-bell",
                alias: "角色管理",
                value: "/system/role"
              }
            },
            {
              entity: {
                id: 2,
                name: "menuManage",
                icon: "el-icon-edit",
                alias: "菜单管理",
                value: "/system/menu"
              }
            },
            {
              entity: {
                id: 5,
                name: "groupManage",
                icon: "el-icon-mobile-phone\r\n",
                alias: "分组管理",
                value: "/system/group"
              }
            }
          ]
        },
        {
          //一级
          entity: {
            id: 6,
            name: "userManage",
            icon: "el-icon-news",
            alias: "三级菜单"
          },
          //二级
          childs: [
            {
              entity: {
                id: 7,
                name: "accountManage",
                icon: "el-icon-phone-outline\r\n",
                alias: "帐号管理",
                value: ""
              },
              //三级
              childs: [
                {
                  entity: {
                    id: 14,
                    name: "emailManage",
                    icon: "el-icon-sold-out\r\n",
                    alias: "邮箱管理",
                    value: "/content/email"
                  }
                },
                {
                  entity: {
                    id: 13,
                    name: "passManage",
                    icon: "el-icon-service\r\n",
                    alias: "密码管理",
                    value: "/content/pass"
                  }
                }
              ]
            },
            {
              entity: {
                id: 8,
                name: "integralManage",
                icon: "el-icon-picture",
                alias: "积分管理",

                value: "/user/integral"
              }
            }
          ]
        },
        {
          //一级
          entity: {
            id: 40,

            name: "contentManage",
            icon: "el-icon-rank",
            alias: "四级菜单"
          },
          //er级
          childs: [
            {
              entity: {
                id: 41,
                name: "classifyManage2",
                icon: "el-icon-printer",
                alias: "分类管理"
              },
              //三级
              childs: [
                {
                  entity: {
                    id: 42,
                    name: "classifyManage3",
                    icon: "el-icon-printer",
                    alias: "分类管理"
                  },
                  //四级
                  childs: [
                    {
                      entity: {
                        id: 43,
                        name: "classifyManage4",
                        icon: "el-icon-printer",
                        alias: "分类管理",
                        value: "/content/classify"
                      }
                    }
                  ]
                }
              ]
            }
          ]
        }
      ]
    };
  }
};
</script>

<style>
</style>
路由跳转(二)
- Menu-Item Attribute
| 参数 | 说明 | 类型 | 可选值 | 默认值 |
|---|---|---|---|---|
| route | Vue Router 路径对象 | Object | — | — |
此方法要同时设置<el-menu router>,否则无效
组件(NavMenu.vue) 中的路由跳转,
:route="navMenu.entity.value"
:index="navMenu.entity.name"只是唯一标识,与:default-active="activeIndex"中的activeIndex是对应的
NavMenu.vue的<el-menu-item中加上:route="navMenu.entity.value"
<!-- 最后一级菜单 -->
      <el-menu-item v-if="!navMenu.childs&&navMenu.entity"
                    :key="navMenu.entity.id" :data="navMenu" :index="navMenu.entity.name"  :route="navMenu.entity.value"
                   >
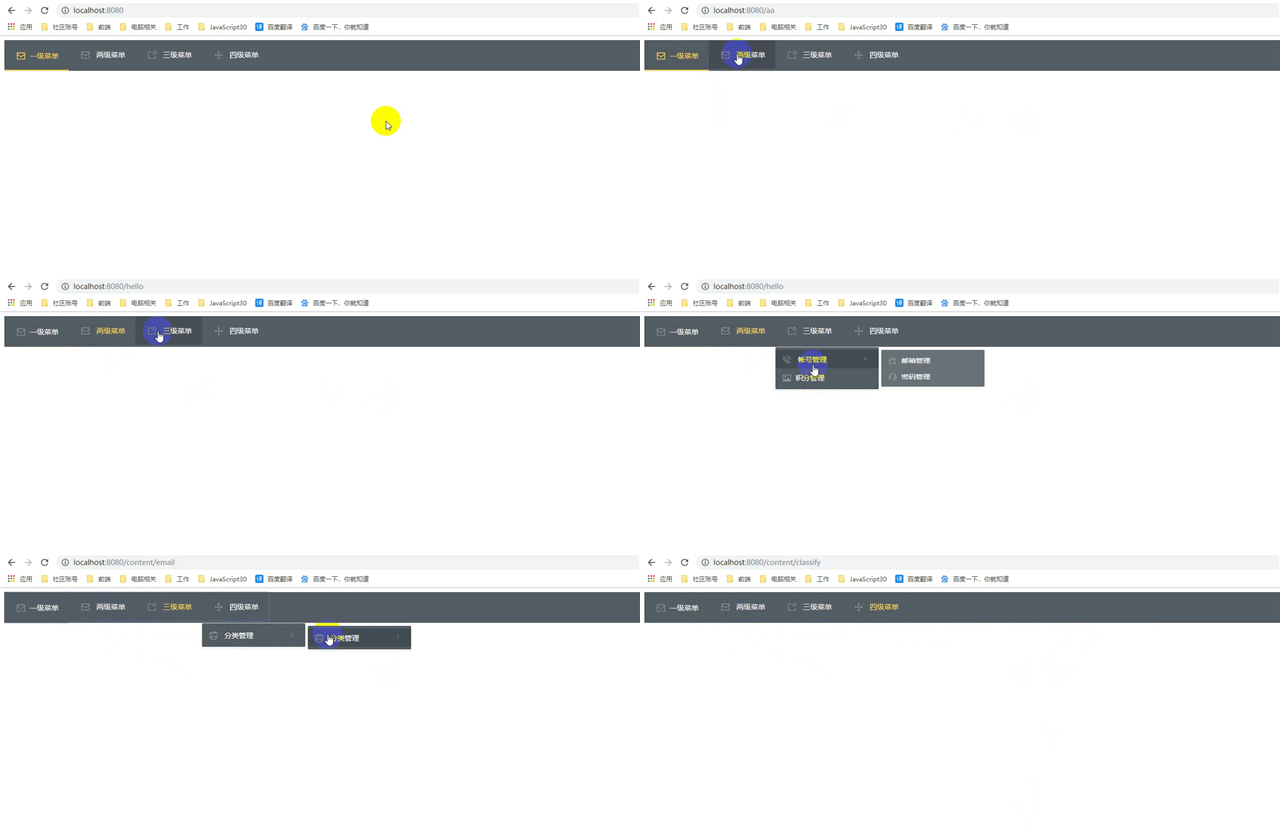
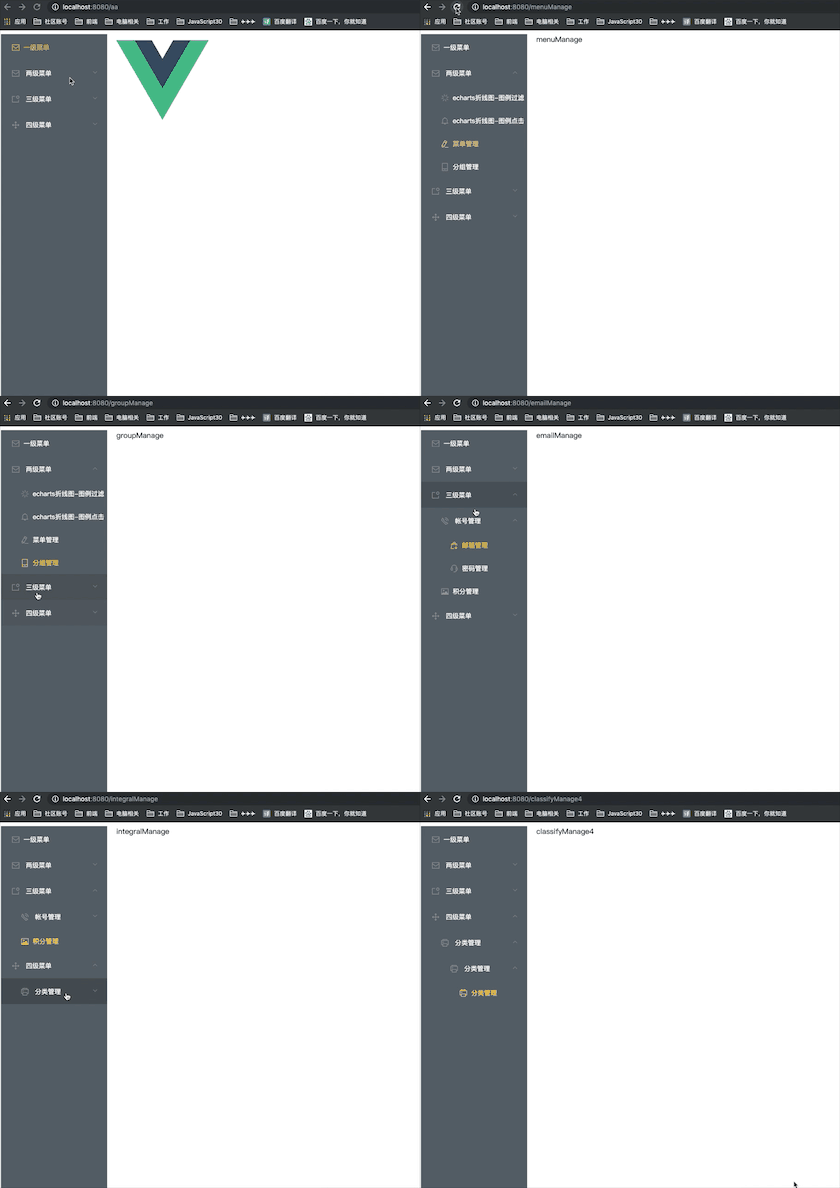
此时效果图(路由变化)
水平效果图
区别
- 调用时在 app.vue 文件中
<el-menu>中添加mode="horizontal" - 此时样式并不完全是水平样式,,因为我们的组件NavMenu.vue中嵌套了一层div(组件template下必须有一个跟标签),导致elementui 的样式发生变化,因为它调用的方式是( .el-menu–horizontal>.el-submenu)用了
>子元素选择器。
所以要在NavMenu.vue中添加样式
如果是克隆的代码 ,请注意将<el-menu>中的style样式去掉
/* 水平样式 */
 .el-menu--horizontal>div>.el-submenu {
    float: left;
}
/* 一级菜单的样式 */
.el-menu--horizontal>div>.el-menu-item {
    float: left;
    height: 60px;
    line-height: 60px;
    margin: 0;
    border-bottom: 2px solid transparent;
    color: #909399;
}
/* 解决下图1 下拉三角图标 */
.el-menu--horizontal>div>.el-submenu .el-submenu__icon-arrow {
    position: static;
    vertical-align: middle;
    margin-left: 8px;
    margin-top: -3px;
}
/* 解决下图2 无下拉菜单时 不对齐问题 */
.el-menu--horizontal>div>.el-submenu .el-submenu__title {
    height: 60px;
    line-height: 60px;
    border-bottom: 2px solid transparent;
    color: #909399;
}
图1(看上述代码)
图2(看上述代码)
问题
1 刷新页面
- 刷新页面时,如果路由为非active路由,激活路由与实际路由不符合(因为页面路由不变,但是
activeIndex变成默认值)
App.vue中添加这段代码,刷新后重置到默认的路由
mounted(){
    this.$router.push('/')
  }
2 非最后一层,点击可跳转路由
默认的路由跳转是此级菜单中的最后一层可跳转,若想其他层也可跳转,可进行如下设置
NavMenu.vue 中,在<el-submenu>中添加@click.native="goto(navMenu.entity.value)"
goto(path){
        if(path){
          this.$router.push(path)
        }
      }
如果哪个目录不可跳转路由,可将其设置value='',但是不能没有value这个值。
但是,由此引发一个问题就是,点击后,虽然路由跳转,但是没有当前路由激活样式。(因为elementui的默认样式只有在最后一层)
观察路由变化,点击无变化的是设置value=''
有其他方案,也可提供给我,谢谢!
3 水平菜单点击多路由时,有轮廓
简单粗暴的解决方法
// NavMenu.vue
<style scoped>
*{
  outline:none;
}
</style>
4 刷新不折叠导航
在app.vue中添加
mounted(){
	let start = window.location.href.lastIndexOf('/');
	let path = window.location.href.slice(start+1);
	this.activeIndex = path;
}
主要是在刷新是获取浏览器地址 截取对应的路由 当前激活菜单的 index 重新设置即可 :default-active=“activeIndex”,
这里的activeIndex 和路由一致都是 entity.name
5 水平菜单过长,可滚动
添加两个style 样式在对应的位置,但是这样的话,水平菜单中有下拉菜单,并且超过页面宽度,会点不到,所以你设置的宽度要大于展开所有下拉的宽度。
这个的宽度,你可以根据你有多少个菜单项 或者是当前窗口的宽度,计算后赋值给width
<el-menu
      background-color="#545c64"
      text-color="#fff"
      active-text-color="#ffd04b"
      :default-active="activeIndex"
      router
      mode="horizontal"
      style="overflow-x:auto;"
    >
      <NavMenu :navMenus="menuData" style="width:800px;overflow-x:auto;"></NavMenu>
    </el-menu>
6 垂直菜单过长,可滚动
<el-menu ... style="height:100vh;width:230px;float:left;overflow-y:auto;">
...
</el-menu>
另一篇我的关于多级导航菜单的博客
elementui通过routerl配置多级导航菜单


