写在前头
Android的换肤机制有不少,通过加载不同资源文件进行换肤,通过不同的Style文件进行换肤,但是最主流的还是插件式换肤,将资源文件打成一个包,通过AssetManager去加载这个包中的资源文件来换肤。
换肤代码
public class SkinManager {
    private SkinManager(){
    }

    private static SkinManager mInstance;

    public Resources getmResource() {
        return mResource;
    }

    private Resources mResource;
    private String mSkinName;
    private String mSkinPath;
    private static Context mContext;
    private String mPackageName;
    private boolean IsThemeExists = false;

    public static SkinManager getInstance(Context context){
        if(mInstance==null){
            mInstance = new SkinManager();
            mContext = context;
        }
        return mInstance;
    }

    public void initSkinName(String path){
        this.mSkinName = path;
        mSkinPath = mContext.getFilesDir()+ "/Skins/"+ mSkinName;
        File file = new File(mSkinPath);
        if(TextUtils.isEmpty(mSkinName)||!file.exists()){
            mResource = mContext.getResources(); //使用默认资源
            mPackageName = mContext.getPackageName();
            return;
        }
        try {
            //读取本地皮肤资源
            Resources superRes = mContext.getResources();
            //通过反射创建AssetManger
            AssetManager asset = AssetManager.class.newInstance();
            //添加本地下载好的皮肤
            @SuppressLint("PrivateApi")
            Method method = AssetManager.class.getDeclaredMethod("addAssetPath",String.class);
            method.invoke(asset, mSkinPath);
            mResource = new Resources(asset,superRes.getDisplayMetrics(),superRes.getConfiguration());
            // 获取skinPath包名
            PackageManager pm = mContext.getPackageManager();
            PackageInfo packageInfo = pm.getPackageArchiveInfo(
                    mSkinPath, PackageManager.GET_ACTIVITIES);
            mPackageName = packageInfo.packageName;
        } catch (InstantiationException e) {
            e.printStackTrace();
        } catch (IllegalAccessException e) {
            e.printStackTrace();
        } catch (NoSuchMethodException e) {
            e.printStackTrace();
        } catch (InvocationTargetException e) {
            e.printStackTrace();
        } catch (Exception e){
            e.printStackTrace();
        }
        IsThemeExists = true;
    }

    /**
     * 通过名字获取Drawable
     * @param resName
     * @return
     */
    public Drawable getDrawableByName(String resName){
        try {
            int resId = mResource.getIdentifier(resName, "drawable", mPackageName);
            return mResource.getDrawable(resId);
        }catch (Exception e){
            e.printStackTrace();
            return null;
        }
    }

    /**
     * 通过名字获取mipmap
     * @param resName
     * @return
     */
    public Drawable getMipmapByName(String resName){
        try {
            int resId = mResource.getIdentifier(resName, "mipmap", mPackageName);
            return mResource.getDrawable(resId);
        }catch (Exception e){
            e.printStackTrace();
            return null;
        }
    }

    /**
     * 通过名字获取资源id
     * @param defType 资源类型
     * @param resName 资源名字
     * @return
     */
    public int getResIdByName(String defType,String resName){
        try {
            return mResource.getIdentifier(resName, defType, mPackageName);
        }catch (Exception e){
            e.printStackTrace();
            return -1;
        }
    }

    /**
     * 通过名字获取颜色
     * @param resName
     * @return -1为color不存在
     */
    public Integer getColorByName(String resName){
        try {
            int resId = mResource.getIdentifier(resName, "color", mPackageName);
            return mResource.getColor(resId);
        }catch (Exception e){
            e.printStackTrace();
            return null;
        }
    }

    public boolean judgeThemeExists(){
        return IsThemeExists;
    }
}
资源文件打包方法
(1)新建一个不带有activity的android项目
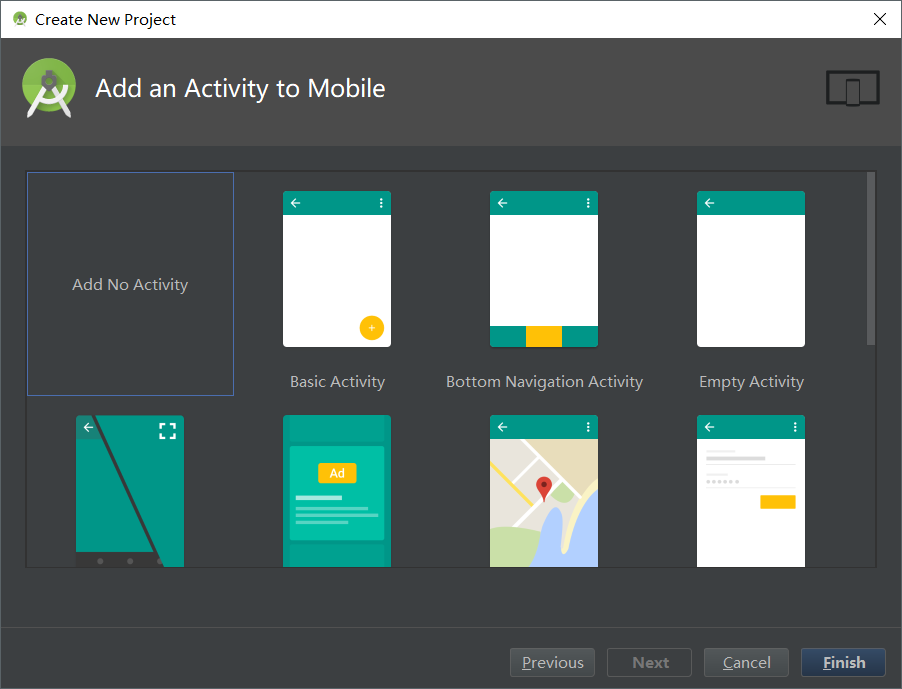
(2)将资源文件放入这个项目之中
这里有两种方法来加载包里的资源文件,通过资源文件名直接加载,或者通过创建一个类来返回资源文件的方法加载。后者更便于修改资源文件名称,前者要求资源文件名称必须相同,但是更为简便。各有各的优势,看自己的取舍了。通过第二种方法加载的话我们需要修改一下代码,需要去加载类而不是加载资源文件。
皮肤包中的资源工具类
public class UIUtil {

    public static String getTextString(Context ctx){
        return ctx.getResources().getString(R.string.app_name);
    }

    public static Drawable getImageDrawable(Context ctx){
        return ctx.getResources().getDrawable(R.drawable.ic_launcher);
    }

    public static View getLayout(Context ctx){
        return LayoutInflater.from(ctx).inflate(R.layout.activity_main, null);
    }

    public static int getTextStringId(){
        return R.string.app_name;
    }

    public static int getImageDrawableId(){
        return R.drawable.ic_launcher;
    }

    public static int getLayoutId(){
        return R.layout.activity_main;
    }

}
修改后的加载类的方法
  try {
        // 获取插件Apk的AssetManager对象
        AssetManager assetManager = PluginUtils
                .getPluginAssetManager(file);
        // 获取插件Apk的Resources对象
        Resources resources = PluginUtils.getPluginResources(
                assetManager, this.getResources().getDisplayMetrics(),
                this.getResources().getConfiguration());
        // 类加载器
        DexClassLoader dexClassLoader = new DexClassLoader(
                file.getAbsolutePath(), this.getDir(skinName,
                Context.MODE_PRIVATE).getAbsolutePath(), null,
                this.getClassLoader());
        // 反射拿到R.drawable类的字节码文件对象
        Class<?> c = dexClassLoader.loadClass(skinPackageName
                + ".R$drawable");
        Field[] fields = c.getDeclaredFields();
        for (Field field : fields) {
            if (field.getName().equals("img_night")) {
                int imgId = field.getInt(R.drawable.class);
                Drawable background = resources.getDrawable(imgId);
                container.setBackgroundDrawable(background);
            }
        }
    } catch (Exception e) {
        e.printStackTrace();
    }
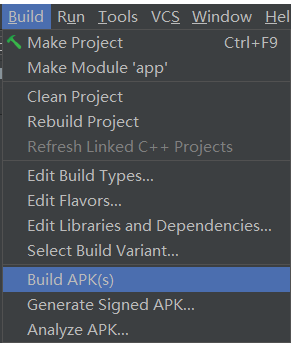
(3)打包
这里打包不管是不是签名包都是可以的,然后将打好的包放入手机指定路径中,就可以加载了。一般会把这些包保存到服务器,让用户选择喜欢的皮肤并进行下载即可。