websocket 通信
后端
后端-配置类:
package com.yupi.project.config;

import org.springframework.context.annotation.Configuration;
import org.springframework.web.socket.config.annotation.EnableWebSocket;
import org.springframework.web.socket.config.annotation.WebSocketConfigurer;
import org.springframework.web.socket.config.annotation.WebSocketHandlerRegistry;

@Configuration
@EnableWebSocket
public class WebSocketConfig implements WebSocketConfigurer {
    @Override
    public void registerWebSocketHandlers(WebSocketHandlerRegistry registry) {
        registry.addHandler(new MyWebSocketHandler(), "/ws").setAllowedOrigins("*");
    }
}
后端-消息处理类:
package com.yupi.project.config;

import org.springframework.web.socket.TextMessage;
import org.springframework.web.socket.WebSocketSession;
import org.springframework.web.socket.handler.TextWebSocketHandler;

public class MyWebSocketHandler extends TextWebSocketHandler {
    @Override
    public void afterConnectionEstablished(WebSocketSession session) throws Exception {
        // 连接建立后的逻辑
        System.out.println(session.getId());
    }

    @Override
    protected void handleTextMessage(WebSocketSession session, TextMessage message) throws Exception {
        // 处理收到的消息
        System.out.println("Received message from client [" + session.getId() + "]: " + message.getPayload());

        // 回送消息给客户端
        String echoMessage = "Echo: " + message.getPayload()+",session id is"+session.getId();
        TextMessage returnMessage = new TextMessage(echoMessage);
        session.sendMessage(returnMessage);

        System.out.println("Sent message to client [" + session.getId() + "]: " + returnMessage.getPayload());
    }
}
前端
前端测试页面代码:
进入页面后,会自动建立一个websocket连接
<template>
  <div>
    123
    <!-- Your component template -->
    <button @click="sendMessage">发送消息</button>
  </div>
</template>

<script>
import { webSocketService } from '@/services/webSocketService';

export default {
  name: 'YourComponentName',
  data() {
    return {
      message: '',
      authToken: 'your-auth-token-here' // 请替换为实际的token获取逻辑
    };
  },
  mounted() {
    webSocketService.connect(this.authToken);
  },
  beforeUnmount() {
    webSocketService.disconnect();
  },
  methods: {
    sendMessage() {
      webSocketService.sendMessage(JSON.stringify({ message: '12345678' }));
    }
  }
};
</script>
前端js代码
// src/services/webSocketService.js
export const webSocketService = {
socket: null,
connect(authToken) {
// 注意:这里的URL应根据实际情况调整
//this.socket = new WebSocket(`ws://${location.hostname}:${location.port}/api/ws`);
this.socket = new WebSocket('ws://localhost:5173/api/ws');// 代理地址
// 发送认证信息
this.socket.onopen = () => {
this.socket.send(JSON.stringify({
type: 'auth',
token: authToken // 这里假设使用token进行认证
}));
};
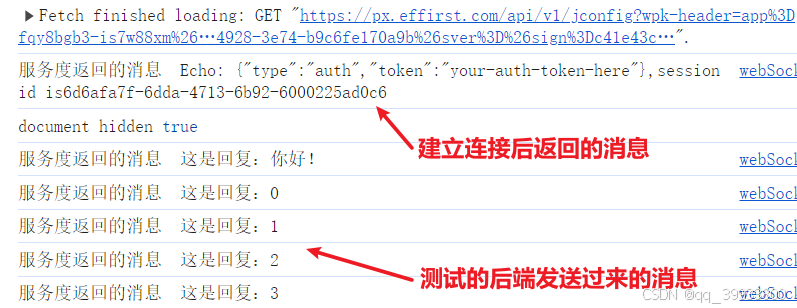
this.socket.onmessage = (event) => {
console.log('服务度返回的消息 ', event.data);
};
this.socket.onerror = (error) => {
console.error('WebSocket error: ', error);
};
},
sendMessage(message) {
console.log("this.socket")
console.log(this.socket)
if (this.socket && this.socket.readyState === WebSocket.OPEN) {
this.socket.send(message);
console.log('已发送消息')
}
},
disconnect() {
if (this.socket) {
this.socket.close();
}
}
};
前端代理:
  // 配置服务器的代理设置
  server: {
    // 代理配置,用于重定向请求到其他服务器
    proxy: {
      '/api': {
        target: 'ws://localhost:7529',//后端tomcat端口
        ws: true, // 开启WebSocket代理
        changeOrigin: true,
        rewrite: (path) => path.replace(/^\/api/, 'api')
      }
    }
  }
结果:
拓展:
1、消息发送后还没有关闭,前后端如何关闭?
2、如何广播消息?
3、利用session id 来对不同的客户端连接发送消息?只需要带着session id就可以给那个专门的客户端发送消息了。