Easy Redis Java 客户端:Redisson
前言
Redission是一个基于Redis的Java框架。它提供了许多分布式的数据结构和功能,如分布式锁、Map、Queue和Topic等。Redission可以帮助简化并发编程的复杂性,并提供可重入锁、公平锁等常用的分布式锁,支持异步执行、锁的自动续期、锁的等待,等特性。
Redisson的宗旨是促进使用者对Redis的关注分离(Separation of Concern),从而让使用者能够将精力更集中地放在处理业务逻辑上。
你可能会有点蒙,Redisson和Jedis、Lettuce有什么区别?
总结下来,Jedis 把 Redis 命令封装的非常全面,Lettuce 则进一步丰富了 Api,支持 Redis 各种高级特性。
但是两者并没有进一步深化,只给了你操作 Redis 数据库的工具,而 Redisson 则是基于 Redis、Lua 和 Netty 建立起了一套的分布式解决方案,比如分布式锁的实现,分布式对象的操作等等。
引入官方依赖:
<dependency>
   <groupId>org.redisson</groupId>
   <artifactId>redisson</artifactId>
   <version>3.29.0</version>
</dependency>
SpringBoot提供的依赖:
<dependency>
    <groupId>org.redisson</groupId>
    <artifactId>redisson-spring-boot-starter</artifactId>
    <version>3.29.0</version>
</dependency>
配置文件
有多种方式来集成Redisson配置:编程式配置、声明式配置
声明式配置
- 通用配置
#redis地址
spring.redis.host=127.0.0.1
#redis端口
spring.redis.port=6379
#redis密码(非必须)
spring.redis.password=123456
使用通用的 Spring Boot 2.7.x 及以下设置:
spring:
  redis:
    database:
    host:
    port:
    password:
    ssl:
    timeout:
    connectTimeout:
    clientName:
    cluster:
      nodes:
    sentinel:
      master:
      nodes:
示例如下(yaml文件修改格式即可):
#数据库编码
spring.redis.database= 0
##是否开启ssl
spring.redis.ssl=false
# 读取超时
spring.redis.timeout=5000
# 连接超时
spring.redis.connect-timeout=10000
##客户端名称
spring.redis.client-name=myClientName
##集群部署 ip:port,...
spring.redis.cluster.nodes=192.168.1.1:6379,192.168.1.2:6379,192.168.1.3:6379
##哨兵模式 主节点名称
#spring.redis.sentinel.master=mymaster
##哨兵模式 节点列表 ip:port,...
spring.redis.sentinel.nodes=192.168.1.1:7001,192.168.1.1:7002,192.168.1.1:7003
- Redisson引入文件
另外也可以使用 Redisson 配置文件,再application. properties添加
spring.redis.redisson.file=classpath:redisson.yml
resources目录下创建redisson.yml文件
# 单节点配置
singleServerConfig:
  # 数据库编号
  database: 0
  # 节点地址
  address: redis://127.0.0.1:6379
  # 密码
  password: 123456
- 使用竖杠符号
|
竖杠符号(|)是YAML语法中的一种特殊表示方式,称为"折叠文本块"标记。它用于指示多行文本块,在保留换行符的同时,将所有行连接成单个字符串。在这种情况下,文本块的缩进会被忽略,而每行的缩进将被认为是相对于最短缩进的偏移量。这在配置文件中特别有用,因为它允许你在不失去可读性的情况下编写多行文本。
可以直接再application. properties添加(注意|格式)
  redis:
    redisson:
      config: |
        singleServerConfig:
          address: redis://127.0.0.1:6379
          password: 123456
编程式配置
#redis地址
spring.redis.host=127.0.0.1
#redis端口
spring.redis.port=6379
#redis密码(非必须)
spring.redis.password=123456
对应Java配置如下:
@Configuration
public class MyConfig {

    @Bean
    public RedissonClient redissonClient(){
        Config config = new Config();
        config.useSingleServer().setAddress("redis://127.0.0.1:6379");
        config.useSingleServer().setPassword("123456");
        return Redisson.create(config);
    }
}
- 集群模式
单点故障问题主要是由于Redis是单机运行的,该机器出现故障后,会间接导致使用Redis的程序出现错误。因此我们可以使用集群模式来避免这个问题。
---
clusterServersConfig:
  idleConnectionTimeout: 10000
  connectTimeout: 10000
  timeout: 3000
  retryAttempts: 3
  retryInterval: 1500
  failedSlaveReconnectionInterval: 3000
  failedSlaveNodeDetector: !<org.redisson.client.FailedConnectionDetector> {}
  password: null
  subscriptionsPerConnection: 5
  clientName: null
  loadBalancer: !<org.redisson.connection.balancer.RoundRobinLoadBalancer> {}
  subscriptionConnectionMinimumIdleSize: 1
  subscriptionConnectionPoolSize: 50
  slaveConnectionMinimumIdleSize: 24
  slaveConnectionPoolSize: 64
  masterConnectionMinimumIdleSize: 24
  masterConnectionPoolSize: 64
  readMode: "SLAVE"
  subscriptionMode: "SLAVE"
  nodeAddresses:
  - "redis://127.0.0.1:7004"
  - "redis://127.0.0.1:7001"
  - "redis://127.0.0.1:7000"
  scanInterval: 1000
  pingConnectionInterval: 30000
  keepAlive: false
  tcpNoDelay: true
threads: 16
nettyThreads: 32
codec: !<org.redisson.codec.Kryo5Codec> {}
transportMode: "NIO"
-
idleConnectionTimeout: 如果池连接一段时间未使用,并且当前连接数量大于最小空闲连接池大小,则将关闭并从池中删除。单位为毫秒,默认:10000。 -
connectTimeout: 连接到任何Redis服务器时超时,默认:10000。 -
timeout:Redis服务器响应超时。Redis命令发送成功后开始倒计时。单位为毫秒,默认:3000。 -
retryAttempts: 如果在retryAttempts之后Redis命令不能被发送到Redis服务器,将会抛出错误。但如果发送成功,则会启动超时。 -
retryInterval:在此时间间隔之后,将执行另一次发送Redis命令的尝试。单位为毫秒,默认:1500。 -
failedSlaveReconnectionInterval:Redis Slave重新连接尝试的时间间隔。单位为毫秒,默认:3000。 -
failedSlaveNodeDetector:定义失败的Redis Slave节点检测器对象。
(1)FailedConnectionDetector:如果Redis节点在定义的毫秒间隔内有持续的连接错误,则标记为失败。默认值是180000毫秒。
(2)FailedCommandsDetector:如果Redis节点有一定数量的命令执行错误,则将其标记为失败,该错误由定义的时间间隔定义,以毫秒为单位。
(3)FailedCommandsTimeoutDetector:如果Redis节点有一定数量的命令执行超时错误,则标记为失败,该错误由在定义的间隔中定义,以毫秒为单位。 -
password:Redis服务器鉴权密码。 -
subscriptionsPerConnection:每个订阅连接限制的订阅。 -
clientName:客户端连接名称。 -
loadBalancer:连接为多台Redis服务器的负载均衡器。 -
subscriptionConnectionMinimumIdleSize:订阅(发布/订阅)通道的最小空闲连接池大小。 -
subscriptionConnectionPoolSize:订阅(发布/订阅)通道的最大连接池大小。 -
slaveConnectionMinimumIdleSize:Redis 'slave’节点每个从节点的最小空闲连接数 -
slaveConnectionPoolSize:Redis 'slave’节点每个slave节点最大连接池大小。 -
masterConnectionMinimumIdleSize:每个Redis主节点的最小空闲连接数。 -
masterConnectionPoolSize:Redis主节点最大连接池大小。 -
readMode:设置读操作使用的节点类型。可用值:
(1)SLAVE-从从节点读取,如果没有SLAVE可用,使用MASTER。
(2)MASTER-从主节点读取,
(3)MASTER_SLAVE-从主节点和从节点读取 -
subscriptionMode:设置订阅操作使用的节点类型。可用值:
(1)SLAVE-订阅从节点,
(2)MASTER-订阅主节点, -
nodeAddresses:格式中添加Redis节点地址。可以一次添加多个节点。应该定义所有节点(主节点和从节点)。 -
scanInterval:复制节点扫描间隔(毫秒)。 -
pingConnectionInterval:PING命令发送间隔每连接到Redis。以毫秒为单位定义。 -
keepAlive:使能TCP连接keepAlive。 -
tcpNoDelay:使能TCP noDelay连接。 -
threads:线程用于执行对象的侦听器逻辑、对象和任务的调用处理程序。 -
nettyThreads:reddisson使用的所有内部redis客户端之间共享的线程数。Netty线程用于Redis响应解码和命令发送。 -
codec:Redis数据编解码器。读写Redis数据时使用。 -
transportMode:传输方式
(1)TransportMode.NIO,
(2)TransportMode.EPOLL-需要classpathnetty-transport-native-epoll中的库
(3)TransportMode.KQUEUE- -需要classpathnetty-transport-native-kqueue中的库
转换为Java配置,部分示例代码如下:
@Configuration
public class MyConfig {

    @Bean
    public RedissonClient redissonClient() throws IOException {
        Config config = new Config();
        config.useClusterServers()
                .setScanInterval(2000) // 集群状态扫描间隔(毫秒)
                // 使用"rediss://"进行SSL连接
                .addNodeAddress("redis://127.0.0.1:7000", "redis://127.0.0.1:7001")
                .addNodeAddress("redis://127.0.0.1:7002");
        config.useClusterServers().setIdleConnectionTimeout(50000);
        config.useSingleServer().setConnectTimeout(10000);
        config.useClusterServers().setTimeout(3000);
        config.setThreads(16);
        config.setNettyThreads(32);
        config.setTransportMode(TransportMode.NIO);
        return Redisson.create(config);
    }
- 复制模式
在复制模式下,将轮询每个节点的角色,以确定是否发生了故障转移,从而产生了新的主节点。
---
replicatedServersConfig:
  idleConnectionTimeout: 10000
  connectTimeout: 10000
  timeout: 3000
  retryAttempts: 3
  retryInterval: 1500
  failedSlaveReconnectionInterval: 3000
  failedSlaveNodeDetector: !<org.redisson.client.FailedConnectionDetector> {}
  password: null
  subscriptionsPerConnection: 5
  clientName: null
  loadBalancer: !<org.redisson.connection.balancer.RoundRobinLoadBalancer> {}
  subscriptionConnectionMinimumIdleSize: 1
  subscriptionConnectionPoolSize: 50
  slaveConnectionMinimumIdleSize: 24
  slaveConnectionPoolSize: 64
  masterConnectionMinimumIdleSize: 24
  masterConnectionPoolSize: 64
  readMode: "SLAVE"
  subscriptionMode: "SLAVE"
  nodeAddresses:
  - "redis://redishost1:2812"
  - "redis://redishost2:2815"
  - "redis://redishost3:2813"
  scanInterval: 1000
  monitorIPChanges: false
threads: 16
nettyThreads: 32
codec: !<org.redisson.codec.Kryo5Codec> {}
transportMode: "NIO"
monitorIPChanges:用于监控Redis节点的IP地址变化。
转换为Java配置,部分示例代码如下:
@Configuration
public class MyConfig {

    @Bean
    public RedissonClient redissonClient() throws IOException {
        Config config = new Config();
        config.useReplicatedServers()
                .setScanInterval(2000) // 集群状态扫描间隔(毫秒)
                // 使用"rediss://"进行SSL连接
                .addNodeAddress("redis://127.0.0.1:7000", "redis://127.0.0.1:7001")
                .addNodeAddress("redis://127.0.0.1:7002");
        RedissonClient redisson = Redisson.create(config);
        return redisson;
    }
}
- 单实例模式
所有的数据都存储在一个Redis实例中,不提供高可用性和故障转移机制。
---
singleServerConfig:
  idleConnectionTimeout: 10000
  connectTimeout: 10000
  timeout: 3000
  retryAttempts: 3
  retryInterval: 1500
  password: null
  subscriptionsPerConnection: 5
  clientName: null
  address: "redis://127.0.0.1:6379"
  subscriptionConnectionMinimumIdleSize: 1
  subscriptionConnectionPoolSize: 50
  connectionMinimumIdleSize: 24
  connectionPoolSize: 64
  database: 0
  dnsMonitoringInterval: 5000
threads: 16
nettyThreads: 32
codec: !<org.redisson.codec.Kryo5Codec> {}
transportMode: "NIO"
database:用于 Redis 连接的数据库索引dnsMonitoringInterval:以毫秒为单位的时间间隔检查终结点的 DNS。应用程序必须确保 JVM DNS 缓存 TTL 足够低以支持此功能。设置为禁用:-1。
转换为Java配置,部分示例代码如下:
@Configuration
public class MyConfig {
    @Bean
    public RedissonClient redissonClient() throws IOException {
        Config config = new Config();
        config.useSingleServer().setAddress("redis://127.0.0.1:6379");
        config.useSingleServer().setDatabase(0);
        config.useSingleServer().setDnsMonitoringInterval(3000);
        RedissonClient redisson = Redisson.create(config);
        return redisson;
    }
}
- 哨兵模式
当主节点出现故障时,由Redis Sentinel自动完成故障发现和转移,并通知应用方,实现高可用性。
---
sentinelServersConfig:
  idleConnectionTimeout: 10000
  connectTimeout: 10000
  timeout: 3000
  retryAttempts: 3
  retryInterval: 1500
  failedSlaveReconnectionInterval: 3000
  failedSlaveNodeDetector: !<org.redisson.client.FailedConnectionDetector> {}
  password: null
  subscriptionsPerConnection: 5
  clientName: null
  loadBalancer: !<org.redisson.connection.balancer.RoundRobinLoadBalancer> {}
  subscriptionConnectionMinimumIdleSize: 1
  subscriptionConnectionPoolSize: 50
  slaveConnectionMinimumIdleSize: 24
  slaveConnectionPoolSize: 64
  masterConnectionMinimumIdleSize: 24
  masterConnectionPoolSize: 64
  readMode: "SLAVE"
  subscriptionMode: "SLAVE"
  sentinelAddresses:
  - "redis://127.0.0.1:26379"
  - "redis://127.0.0.1:26389"
  masterName: "mymaster"
  database: 0
threads: 16
nettyThreads: 32
codec: !<org.redisson.codec.Kryo5Codec> {}
transportMode: "NIO"
sentinelAddresses:以host:port格式添加Redis Sentinel节点地址。一次可以添加多个节点。masterName:Redis Sentinel服务器和主变更监控任务使用的主服务器名称。
转换为Java配置,部分示例代码如下:
@Configuration
public class MyConfig {

    @Bean
    public RedissonClient redissonClient() throws IOException {
        Config config = new Config();
        config.useSentinelServers()
                .setMasterName("myMasterName")
                .setScanInterval(2000) //集群状态扫描间隔(毫秒)
                //使用"rediss://"进行SSL连接
                .addSentinelAddress("redis://127.0.0.1:26389", "redis://127.0.0.1:26379");

        RedissonClient redisson = Redisson.create(config);
        return redisson;
    }
}
- 主从模式
一主多从,一个主节点,多个从节点,其中主节点拥有读写操作权限,从节点只能拥有读权限,由此可以降低主节点的读取压力,降低损坏风险。
---
masterSlaveServersConfig:
  idleConnectionTimeout: 10000
  connectTimeout: 10000
  timeout: 3000
  retryAttempts: 3
  retryInterval: 1500
  failedSlaveReconnectionInterval: 3000
  failedSlaveNodeDetector: !<org.redisson.client.FailedConnectionDetector> {}
  password: null
  subscriptionsPerConnection: 5
  clientName: null
  loadBalancer: !<org.redisson.connection.balancer.RoundRobinLoadBalancer> {}
  subscriptionConnectionMinimumIdleSize: 1
  subscriptionConnectionPoolSize: 50
  slaveConnectionMinimumIdleSize: 24
  slaveConnectionPoolSize: 64
  masterConnectionMinimumIdleSize: 24
  masterConnectionPoolSize: 64
  readMode: "SLAVE"
  subscriptionMode: "SLAVE"
  slaveAddresses:
  - "redis://127.0.0.1:6381"
  - "redis://127.0.0.1:6380"
  masterAddress: "redis://127.0.0.1:6379"
  database: 0
threads: 16
nettyThreads: 32
codec: !<org.redisson.codec.Kryo5Codec> {}
transportMode: "NIO"
slaveAddresses:在host:portrediss://格式中添加Redis从节点地址。可以一次添加多个节点。使用SSL连接协议。masterAddress:在host:portrediss://格式的Redis主节点地址。使用SSL连接协议。
转换为Java配置,部分示例代码如下:
@Configuration
public class MyConfig {

    @Bean
    public RedissonClient redissonClient() throws IOException {
        Config config = new Config();
        config.useMasterSlaveServers()
                //使用"rediss://"进行SSL连接
                .setMasterAddress("redis://127.0.0.1:6379")
                .addSlaveAddress("redis://127.0.0.1:6389", "redis://127.0.0.1:6332", "redis://127.0.0.1:6419")
                .addSlaveAddress("redis://127.0.0.1:6399");

        RedissonClient redisson = Redisson.create(config);
        return redisson;
    }
}
基本使用
我们再以Redisson方式在代码中操作redis。
(1)查看所有key
@Controller
public class MyController {
    @Autowired
    private RedissonClient redissonClient;

    @GetMapping("/fetch")
    public void fetch(){
        RKeys rKeys = redissonClient.getKeys();
        rKeys.getKeysStream().forEach(System.out::println);
        /** Output
         *  test
         *  x
         */
    }
}
(2)判断key是否存在
@Controller
public class MyController {
    @Autowired
    private RedissonClient redissonClient;

    @GetMapping("/fetch")
    public void fetch(){
        //检查提供的密钥是否存在,返回现有密钥的数量
        long exists = redissonClient.getKeys().countExists("test");
        System.out.println(exists);
        /** Output
         *  1
         */
    }
}
(3)删除key
@Controller
public class MyController {
    @Autowired
    private RedissonClient redissonClient;

    @GetMapping("/fetch")
    public void fetch(){
    	//删除指定密钥,返回现有密钥的数量
        long exists = redissonClient.getKeys().delete("x");
        System.out.println(exists);
        /** Output
         *  1
         */
    }
}
(4)设置key有效期
@Controller
public class MyController {
    @Autowired
    private RedissonClient redissonClient;

    @GetMapping("/test")
    public void test(){
    	//返回true表示设置成功,false则失败
        boolean time = redissonClient.getKeys().expire("test",10,TimeUnit.SECONDS);
        System.out.println(time);
        /** Output
         *  true
         */
    }
}
(5)获取key有效期
@Controller
public class MyController {
    @Autowired
    private RedissonClient redissonClient;

    @GetMapping("/test")
    public void test(){
        //时间单位为毫秒,如果密钥不存在,则为-2。-1表示密钥存在,但没有相关的过期时间
        long time = redissonClient.getKeys().remainTimeToLive("test");
        System.out.println(time);
        /** Output
         *  3784
         */
    }
}
(6)查询key类型
@Controller
public class MyController {
    @Autowired
    private RedissonClient redissonClient;

    @GetMapping("/test")
    public void test(){
        //一共5种类型:OBJECT(string), MAP, LIST, SET, ZSET
        RType test = redissonClient.getKeys().getType("test");
        System.out.println(test.name());
        /** Output
         *  OBJECT
         */
    }
}
(7)重命名key
@Controller
public class MyController {
    @Autowired
    private RedissonClient redissonClient;

    @GetMapping("/test")
    public void test(){
    	//返回true表示设置成功,false则失败
        boolean test = redissonClient.getKeys().renamenx("test","test2");
        System.out.println(test);
        /** Output
         *  true
         */
    }
}
(8)移除key存活时间
@Controller
public class MyController {
    @Autowired
    private RedissonClient redissonClient;

    @GetMapping("/test")
    public void test(){
    	//返回true表示设置清除成功,false则失败
        boolean test = redissonClient.getKeys().clearExpire("test");
        System.out.println(test);
        /** Output
         *  true
         */
    }
}
- string
(1)设置字符串值。
@Controller
public class MyController {
    @Autowired
    private RedissonClient redissonClient;

    @GetMapping("/test")
    public void test(){
        RBucket<Object> test = redissonClient.getBucket("testStr");
        //test.set("hello");
        test.set("hello",1,TimeUnit.SECONDS);
    }
}
(2)获取值。
@Controller
public class MyController {
    @Autowired
    private RedissonClient redissonClient;

    @GetMapping("/test")
    public void test(){
        Object test = redissonClient.getBucket("testStr").get();
        System.out.println(test);
        /** Output
         *  hello
         */
    }
}
(3)获取字符串值的长度。
@Controller
public class MyController {
    @Autowired
    private RedissonClient redissonClient;

    @GetMapping("/test")
    public void test(){
        RBucket<Object> testStr = redissonClient.getBucket("testStr");
        System.out.println(testStr.size());
        /** Output
         *  5
         */
    }
}
(4)自加、自减
@Controller
public class MyController {
    @Autowired
    private RedissonClient redissonClient;

    @GetMapping("/test")
    public void test(){
        RAtomicLong atomicLong = redissonClient.getAtomicLong("myAtomicLong");
        //设置初始值
        atomicLong.set(10);
        //自增
        long l = atomicLong.incrementAndGet();
        System.out.println(l);
        //自减
        long l1 = atomicLong.decrementAndGet();
        System.out.println(l1);
        /** Output
         *  11
         *  10
         */
    }
}
- hash
(1)设置值,获取值。
@Controller
public class MyController {
    @Autowired
    private RedissonClient redissonClient;

    @GetMapping("/test")
    public void test(){
        //设置值
        RMap<Object, Object> rMap = redissonClient.getMap("maps");
        rMap.put("one",1);
        rMap.put("two",2);
        rMap.put("three",3);
        //设置过期时间
        rMap.expire(Duration.ofMinutes(1));
        //获取值
        RMap<Object, Object> maps = redissonClient.getMap("maps");
        System.out.println(maps);
    }
}
(2)获取所有keys和values。
@Controller
public class MyController {
    @Autowired
    private RedissonClient redissonClient;

    @GetMapping("/test")
    public void test(){
        RMap<Object, Object> rMap = redissonClient.getMap("maps");
        //所有key
        Set<Object> objects = rMap.keySet();
        objects.stream().forEach(item-> System.out.println(item));
        Collection<Object> values = rMap.values();
        //所有value
        values.stream().forEach(item-> System.out.println(item));
    }
}
很多方式和Map使用基本一致。
- list
(1)插入元素,获取元素,删除元素。
@Controller
public class MyController {
    @Autowired
    private RedissonClient redissonClient;

    @GetMapping("/test")
    public void test(){
        //插入元素
        RList<Object> rList = redissonClient.getList("lists");
        rList.add("one");
        rList.add("two");
        rList.add("three");
        //获取元素
//        List<Object> lists = redissonClient.getList("lists").range(0, -1);
        List<Object> lists = redissonClient.getList("lists").readAll();
        lists.stream().forEach(item-> System.out.println(item));
        //删除元素
        redissonClient.getList("lists").remove("one");//value删除
        redissonClient.getList("lists").remove(1);//下标删除
    }
}
很多方式和List使用基本一致。
- set
(1)插入元素,获取元素,删除元素。
@Controller
public class MyController {
    @Autowired
    private RedissonClient redissonClient;

    @GetMapping("/test")
    public void test(){
        //插入元素
        RSet<Object> rSet = redissonClient.getSet("sets");
        rSet.add("one");
        rSet.add("two");
        rSet.add("three");
        //获取元素
        Set<Object> objects = redissonClient.getSet("sets").readAll();
        objects.stream().forEach(item-> System.out.println(item));
        //删除元素
        redissonClient.getSet("sets").remove("one");
    }
}
很多方式和Set使用基本一致。
- zset
(1)添加元素,获取元素,删除元素。
@Controller
public class MyController {
    @Autowired
    private RedissonClient redissonClient;

    @GetMapping("/test")
    public void test(){
        //插入元素
        RScoredSortedSet<Object> zsets = redissonClient.getScoredSortedSet("zsets");
        zsets.add(2,"two");
        zsets.add(3,"three");
        zsets.add(1,"one");
        //获取元素
        Collection<ScoredEntry<Object>> zsets1 = redissonClient.getScoredSortedSet("zsets").entryRange(0, -1);
        zsets1.stream().forEach(item-> System.out.println(item.getValue()));//正序
        Collection<ScoredEntry<Object>> zsets2 = redissonClient.getScoredSortedSet("zsets").entryRangeReversed(0, -1);
        zsets2.stream().forEach(item-> System.out.println(item.getValue()));//倒序
		//删除元素
        redissonClient.getScoredSortedSet("zsets").remove("one");
    }
}
- 队列
在Redisson中,提供了RBlockingQueue, RDeque先进先出的队列结构。
(1)RDeque双端队列
@RestController
public class MyController {

    @Autowired
    RedissonClient redissonClient;

    @GetMapping("/test")
    public void test() {
        RQueue<Object> queue = redissonClient.getQueue("test");
        //插入队列
        queue.add("one");
        queue.add("two");
        queue.add("three");
        //获取队列并删除
        System.out.println(queue.poll());
        System.out.println(queue.poll());
        //删除指定队列
        queue.remove("three");
    }
}
(2)RBlockingQueue阻塞队列
@RestController
public class MyController {

    @Autowired
    RedissonClient redissonClient;

    @GetMapping("/test")
    public void test() throws InterruptedException {
        RBlockingQueue<Object> queue = redissonClient.getBlockingQueue("test");
        //放入元素,如果队列满,当前线程将会被阻塞
        queue.put("one");
        queue.put("two");
        queue.put("three");
        //获取队列,队列中没有元素将阻塞
        System.out.println(queue.take());
    }
}
- 布隆过滤器
布隆过滤器可以用于检索一个元素是否在一个集合中。它的优点是空间效率和查询时间都比一般的算法要好的多,缺点是有一定的误识别率和删除困难。
@Controller
public class MyController {
    @Autowired
    private RedissonClient redissonClient;

    @GetMapping("/test")
    public void test(){
        RBloomFilter rBloomFilter = redissonClient.getBloomFilter("blooms");
        // 初始化预期插入的数据量为10000和期望误差率为0.01
        rBloomFilter.tryInit(10000, 0.01);
        // 插入部分数据
        rBloomFilter.add("100");
        rBloomFilter.add("200");
        rBloomFilter.add("300");
        //设置过期时间
        rBloomFilter.expire(30, TimeUnit.SECONDS);
        // 判断是否存在
        System.out.println(rBloomFilter.contains("300"));
        System.out.println(rBloomFilter.contains("200"));
        System.out.println(rBloomFilter.contains("999"));
    }
}
除了这些,还有集群模式、主从复制、哨兵模式等等,以后有空再单独发布文章。
分布式锁
Redisson 提供了多种分布式锁的实现,其中包括可重入锁、公平锁、读写锁等,这些锁都是基于 Redis 实现的,具有高性能和可靠性。
可重入锁
可重入锁(Reentrant Lock)是一种同步机制,它允许线程在持有锁的情况下可以再次获取该锁,而不会造成死锁。具体来说,可重入锁允许一个线程在执行期间多次获得同一个锁,而不会被自己持有的锁所阻塞( Java 的内置锁(如 synchronized 和 ReentrantLock)都是支持重入的)。
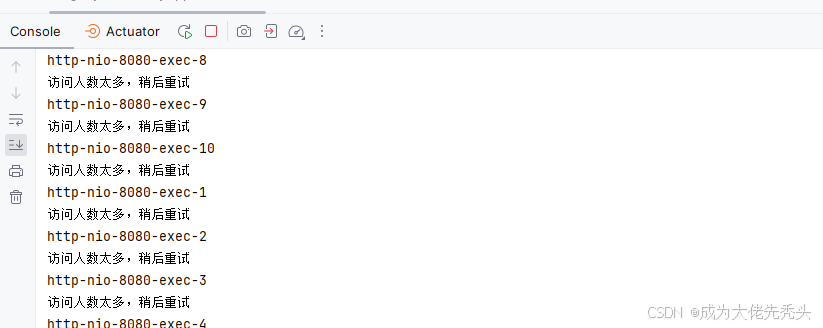
如果用以前的jedis,会导致第二次直接获取不到锁,示例代码如下:
@RestController
public class MyController {
    @Autowired
    private RedisTemplate<String, Object> redisTemplate;

    @GetMapping("/test")
    public void test() {
        String lockKey = "request_key";
        String clientId = "pod_1";
        try {
            if (!tryLock(lockKey,clientId)){
                System.out.println("访问人数太多,稍后重试");
                return;
            }
            System.out.println(Thread.currentThread().getName());
            reLock(lockKey,clientId);
        } finally {
            unLock(lockKey);
        }

    }
    /**
     * 测试锁的重入
     */
    private void reLock(String lockKey,String clientId) {
        try {
            if (!tryLock(lockKey,clientId)){
                System.out.println("访问人数太多,稍后重试");
                return;
            }
            System.out.println(Thread.currentThread().getName());
        } finally {
            unLock(lockKey);
        }
    }
    public boolean tryLock(String key, Object value) {
        return redisTemplate.opsForValue().setIfAbsent(key, value);
    }

    public Object unLock(String key) {
        return redisTemplate.delete(key);
    }


}
执行结果如图:
如果要解决这个问题,就需要进行更多的操作,比如:lua脚本或者存储获取锁的次数,来达到可重入锁的效果。
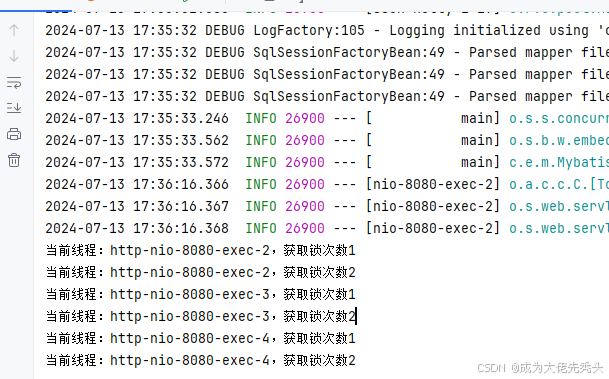
Redisson可重入锁实现了java.util.concurrent.locks.Lock接口,示例代码如下:
@RestController
public class MyController {
    @Autowired
    private RedissonClient redissonClient;

    private final static String LOCK_KEY = "myLock";

    @GetMapping("/test")
    public void test() {
        RLock lock = redissonClient.getLock(LOCK_KEY);
        try {
            if (!lock.tryLock()){
                System.out.println("访问人数太多,稍后重试");
                return;
            }
            System.out.println("当前线程:"+Thread.currentThread().getName()+",获取锁次数"+lock.getHoldCount());
            reLock();
        } finally {
            lock.unlock();
        }

    }
    /**
     * 测试锁的重入
     */
    private void reLock() {
        RLock lock = redissonClient.getLock(LOCK_KEY);
        try {
            if (!lock.tryLock()){
                System.out.println("访问人数太多,稍后重试");
                return;
            }
            System.out.println("当前线程:"+Thread.currentThread().getName()+",获取锁次数"+lock.getHoldCount());
        } finally {
            lock.unlock();
        }
    }

}
执行结果如图:
Redis中是通过HASH来存储锁,可重入锁的实现通常会使用Value值来跟踪锁的持有次数。每次成功获取锁时,Value值会递增;每次释放锁时,Value值递减。这样设计可以确保同一个线程可以多次获取锁,而不会引发死锁或其他同步问题。
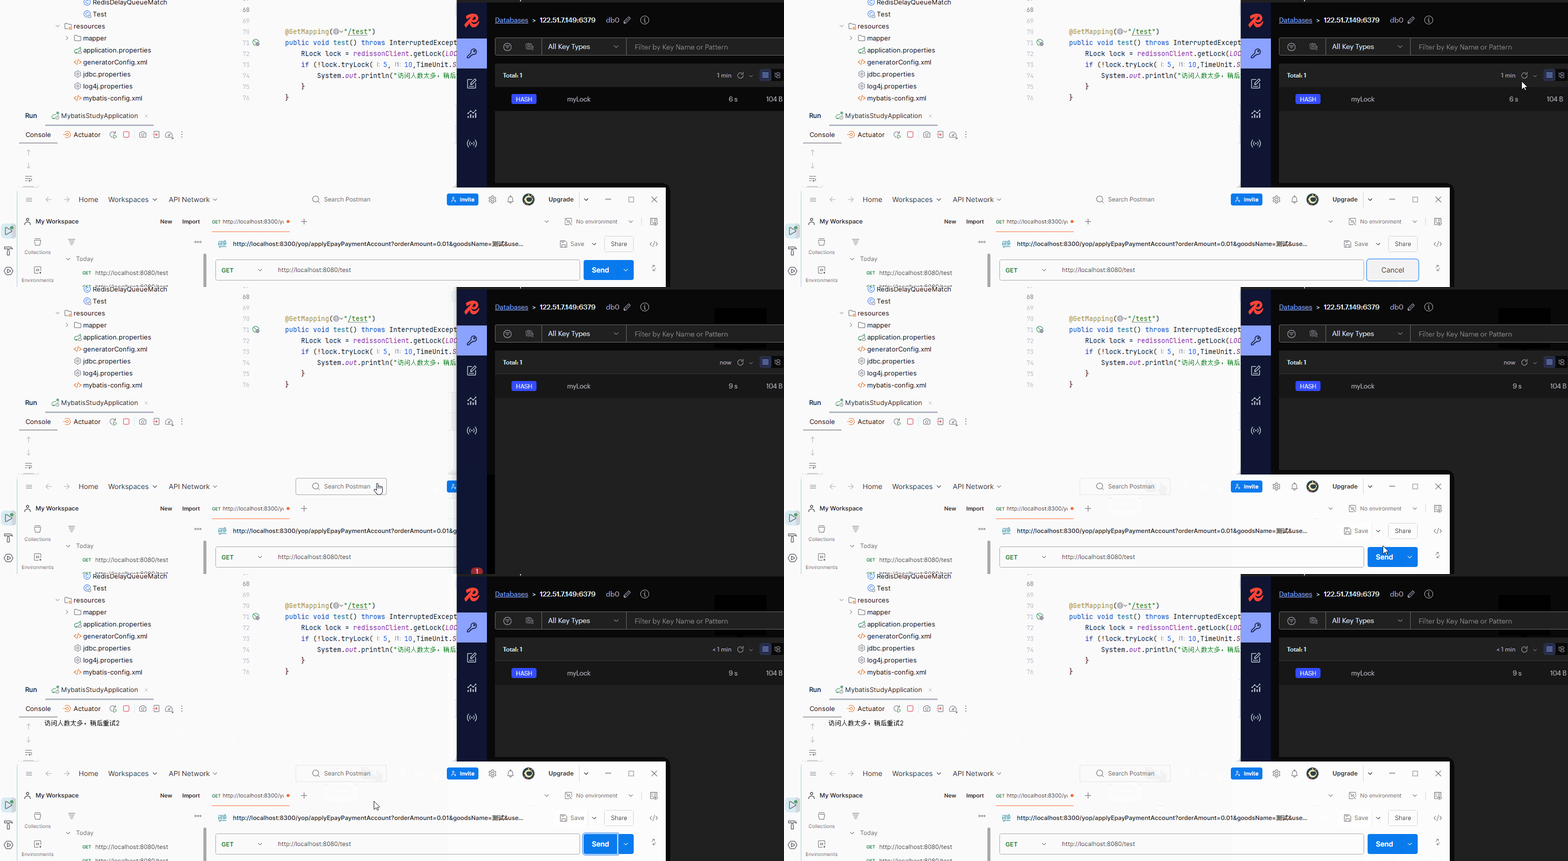
Redisson提供了多种方法获取锁,除了tryLock()方法,下面简单来介绍他们的用法:
lock()方法:和tryLock()方法一样,属于Lock类。无参方法,默认30秒有效期,10秒种进行续期,会阻塞。
@RestController
public class MyController {
    @Autowired
    private RedissonClient redissonClient;

    private final static String LOCK_KEY = "myLock";

    @GetMapping("/test")
    public void test() throws InterruptedException {
        RLock lock = redissonClient.getLock(LOCK_KEY);
        lock.lock();
    }
}
执行结果如图:
tryLock(long waitTime, TimeUnit unit)方法:属于Lock类。有参方法,设置获取锁的时间,超过时间自动释放,返回false。
@RestController
public class MyController {
    @Autowired
    private RedissonClient redissonClient;

    private final static String LOCK_KEY = "myLock";

    @GetMapping("/test")
    public void test() throws InterruptedException {
        RLock lock = redissonClient.getLock(LOCK_KEY);
        //设置获取锁的等待时间5秒
        if (!lock.tryLock(5,TimeUnit.SECONDS)){
            System.out.println("访问人数太多,稍后重试2");
        }
    }
}
执行结果如图:
tryLock(long waitTime, long leaseTime, TimeUnit unit)方法:属于RLock类。有参方法,设置获取锁的时间,锁的释放时间,未获取锁超过时间自动释放,获取锁后在指定时间内释放。
@RestController
public class MyController {
    @Autowired
    private RedissonClient redissonClient;

    private final static String LOCK_KEY = "myLock";

    @GetMapping("/test")
    public void test() throws InterruptedException {
        RLock lock = redissonClient.getLock(LOCK_KEY);
        //设置获取锁的等待时间5秒,锁的过期时间10秒
        if (!lock.tryLock(5,10,TimeUnit.SECONDS)){
            System.out.println("访问人数太多,稍后重试2");
        }
    }
}
执行结果如图:
lock(long leaseTime, TimeUnit unit)方法:属于RLock类。有参方法,设置锁的释放时间,超过时间自动释放。
@RestController
public class MyController {
    @Autowired
    private RedissonClient redissonClient;

    private final static String LOCK_KEY = "myLock";

    @GetMapping("/test")
    public void test() throws InterruptedException {
        RLock lock = redissonClient.getLock(LOCK_KEY);
        //10秒后自动释放锁
        lock.lock(10,TimeUnit.SECONDS);
    }
}
执行结果如图:
公平锁
可重入锁是非公平锁。公平锁是一种按照请求顺序获取锁的机制,即先到先得,能够避免饥饿现象。在 Redisson 中,公平锁的实现是基于 Redis 的原子操作和监听机制来实现的。
@RestController
public class MyController {
    @Autowired
    private RedissonClient redissonClient;

    private final static String LOCK_KEY = "myLock";

    @GetMapping("/test")
    public void test() throws InterruptedException {
        RLock lock = redissonClient.getFairLock(LOCK_KEY);
        lock.lock();
    }
}
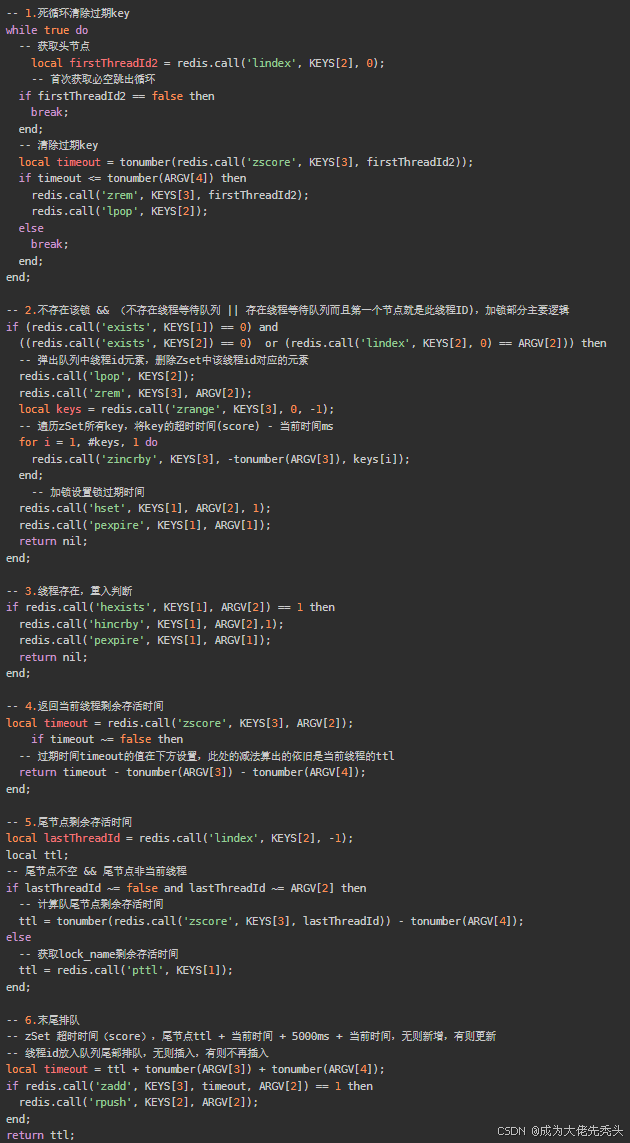
在Redisson中通过List和zSet去实现公平锁,把lua脚本复制出来整理,如图:
其中List维护了一个等待的线程队列redisson_lock_queue:[xxx},zSet维护了一个线程超时情况的有序集合redisson_lock_timeout:{xxx},在List存放等待线程ID,zSet中存放线程ID所对应的过期时间,通过排序来确认他们的优先级,每当上个线程执行完毕后释放锁,通知下一个线程。
读写锁
在Redisson中,读写锁是一种支持读写分离的锁机制,可以实现多个线程对数据的并发读取,以及写操作的互斥访问。
- 读锁(共享锁):多个线程可以同时获取读锁,用于并发读取共享资源,不阻塞其他读线程,但会阻塞写线程。
- 写锁(排它锁):写锁是互斥的,即同一时刻只允许一个线程获取写锁进行写操作,阻塞其他读写线程。
@RestController
public class MyController {
    @Autowired
    private RedissonClient redissonClient;

    private final static String LOCK_KEY = "myLock";

    @GetMapping("/test")
    public void test()  {
        RReadWriteLock lock = redissonClient.getReadWriteLock(LOCK_KEY);
        //读锁
        RLock rLock = lock.readLock();
        try {
            logger.info("获取读锁:"+Thread.currentThread().getName());
            Thread.sleep(3000);
        } catch (InterruptedException e) {
            e.printStackTrace();
        }
        logger.info("释放读锁:"+Thread.currentThread().getName());
        rLock.unlock();
		//写锁
        rLock = lock.writeLock();
        try {
            logger.info("获取写锁:"+Thread.currentThread().getName());
            Thread.sleep(3000);
        } catch (InterruptedException e) {
            e.printStackTrace();
        }
        logger.info("释放写锁:"+Thread.currentThread().getName());
        rLock.unlock();
    }
}
执行结果如图:
信号量
信号量允许定义一个计数器,该计数器表示当前可用的许可证数量。线程或客户端可以通过获取许可证来访问受信号量保护的资源,当许可证数量为0时,请求许可证的线程将被阻塞,直到有许可证可用。
@RestController
public class MyController {
    @Autowired
    private RedissonClient redissonClient;

    private final static String LOCK_KEY = "myLock";

    @GetMapping("/test")
    public void test() {
        RSemaphore lock = redissonClient.getSemaphore(LOCK_KEY);
        //设置初始许可证数量为10
        lock.trySetPermits(10);
        try {
            //获取一个信号量
            lock.acquire();
//            lock.tryAcquire();
//            lock.tryAcquireAsync();
//            lock.tryAcquire(23, TimeUnit.SECONDS);
//            lock.tryAcquireAsync(23, TimeUnit.SECONDS);
        } catch (InterruptedException e) {
            throw new RuntimeException(e);
        } finally {
            //释放一个信号量
//            lock.release();
//            lock.release(10);
//            lock.releaseAsync();
//            lock.releaseAsync(10);
        }
    }
}
如果不释放信号量,则会导致阻塞,执行结果如图:
联锁
Redisson的联锁(RedLock)是一种基于Redis实现的分布式锁方案,专门用于处理多节点、多实例环境下的分布式锁管理需求。它通过在多个独立的Redis实例上进行协调,确保在分布式系统中的不同节点上能够安全地获取和释放锁。
@Configuration
public class MyConfig {
    @Bean
    public RedissonClient redissonClient(){
        Config config = new Config();
        config.useSingleServer().setAddress("redis://127.0.0.1:6379").setPassword("123456");
        return Redisson.create(config);
    }
    @Bean
    public RedissonClient redissonClient2(){
        Config config = new Config();
        config.useSingleServer().setAddress("redis://127.0.0.1:6380").setPassword("123456");
        return Redisson.create(config);
    }
    @Bean
    public RedissonClient redissonClient3(){
        Config config = new Config();
        config.useSingleServer().setAddress("redis://127.0.0.1:6381").setPassword("123456");
        return Redisson.create(config);
    }
}
@RestController
public class MyController {
    @Autowired
    private RedissonClient redissonClient;
    @Autowired
    private RedissonClient redissonClient2;
    @Autowired
    private RedissonClient redissonClient3;

    private final static String LOCK_KEY = "myLock";

    @GetMapping("/test")
    public void test() {
        RLock lock1 = redissonClient.getLock(LOCK_KEY);
        RLock lock2 = redissonClient2.getLock(LOCK_KEY);
        RLock lock3 = redissonClient3.getLock(LOCK_KEY);

        RLock lock = redissonClient.getMultiLock(lock1,lock2,lock3);
        try {
            //同时加锁:lock1 lock2 lock3, 联锁通过在多个节点上加锁,需要大多数节点(超过半数)成功加锁才算整体加锁成功。
            lock.tryLock();
        } finally {
            lock.unlock();
        }
    }
}
红锁
Redisson的红锁(RedLock)是一种分布式锁方案,旨在提供跨多个Redis节点的高可用性和安全性。它是基于Redis实现的一种锁机制,特别适用于需要高可用性和分布式环境下的锁管理需求。
@RestController
public class MyController {
    @Autowired
    private RedissonClient redissonClient;
    @Autowired
    private RedissonClient redissonClient2;
    @Autowired
    private RedissonClient redissonClient3;

    private final static String LOCK_KEY = "myLock";

    @GetMapping("/test")
    public void test() {
        RLock lock1 = redissonClient.getLock(LOCK_KEY);
        RLock lock2 = redissonClient2.getLock(LOCK_KEY);
        RLock lock3 = redissonClient3.getLock(LOCK_KEY);

        RLock lock = redissonClient.getRedLock(lock1,lock2,lock3);
        try {
            // 同时加锁:lock1 lock2 lock3, 需要大部分(大多数)的锁节点成功加锁才能认为获取锁成功。例如,如果有5个Redis节点,需要至少3个节点成功加锁才算成功。
            lock.tryLock();
        } finally {
            lock.unlock();
        }
    }
}
加锁机制
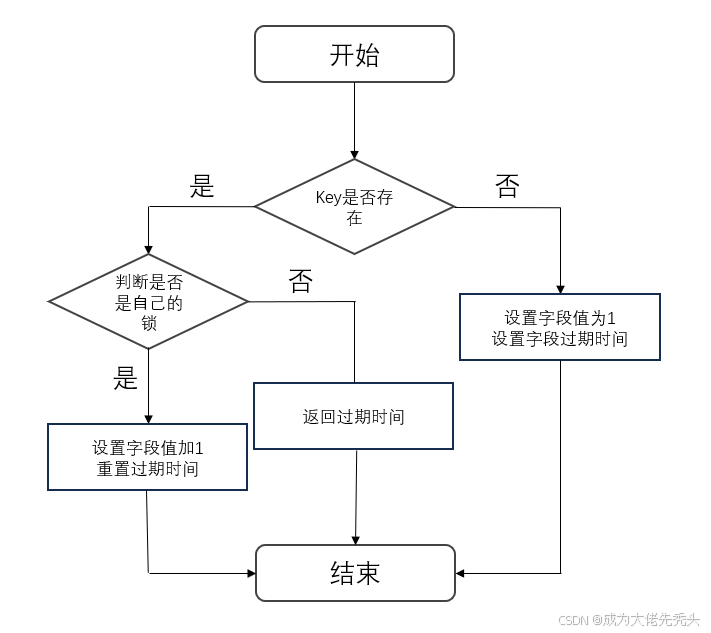
通过HASH来存储锁,key表示锁的名称,field表示持有者的线程ID,value重入次数。
基本流程如下:
底层是lua脚本,示例代码如下:
    <T> RFuture<T> tryLockInnerAsync(long waitTime, long leaseTime, TimeUnit unit, long threadId, RedisStrictCommand<T> command) {
        return this.evalWriteAsync(this.getRawName(), LongCodec.INSTANCE, command,
                        "if (redis.call('exists', KEYS[1]) == 0) " +//锁是否存在,O 表示不存在。
                        	"then " +
                        	"redis.call('hincrby', KEYS[1], ARGV[2], 1); " +//唯一标识的值+1
                        	"redis.call('pexpire', KEYS[1], ARGV[1]); " +//设置超时时间
                        	"return nil; " +
                        "end; " +
                        "if (redis.call('hexists', KEYS[1], ARGV[2]) == 1) " +//判断hash结构中 fieldKey与客户端的唯一标识是否相等。相等表示当前加锁请求是锁重入。
                        	"then " +
                        	"redis.call('hincrby', KEYS[1], ARGV[2], 1); " +
                        	"redis.call('pexpire', KEYS[1], ARGV[1]); " +
                        	"return nil; " +
                        "end; " +
                        "return redis.call('pttl', KEYS[1]);", //唯一标识不匹配,返回剩余过期时间
                        Collections.singletonList(this.getRawName()), new Object[]{unit.toMillis(leaseTime), this.getLockName(threadId)});
    }
KEYS[1]:锁的名称。ARGV[1]:锁的有效时间(单位毫秒)。ARGV[2]:客户端唯一标识,线程ID。
释放锁机制
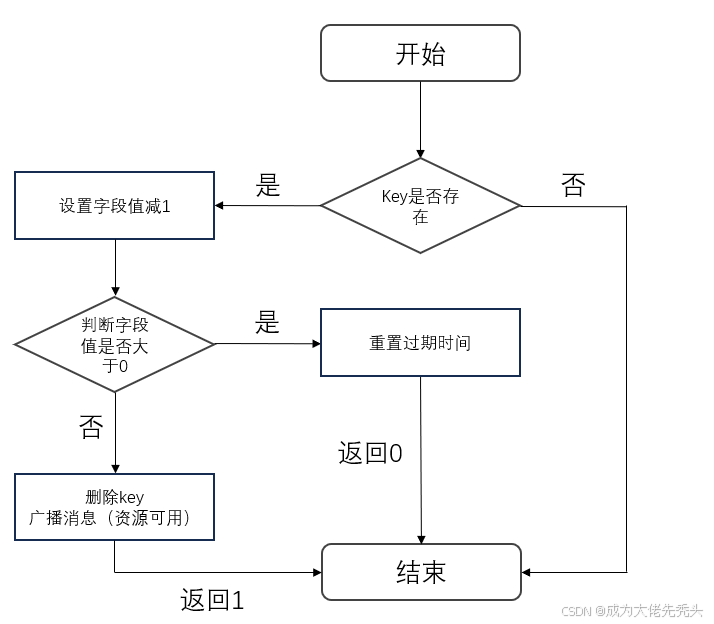
释放锁的时候要确保锁的重入次数为0,并且还需要保证不能删除别人的锁。
基本流程如下:
底层是lua脚本,示例代码如下:
    protected RFuture<Boolean> unlockInnerAsync(long threadId) {
        return this.evalWriteAsync(this.getRawName(), LongCodec.INSTANCE, RedisCommands.EVAL_BOOLEAN,
                "if (redis.call('hexists', KEYS[1], ARGV[3]) == 0) " +//判断key是否存在,0表示不存在
                        "then " +
                        "return nil;" +
                "end; " +
                "local counter = redis.call('hincrby', KEYS[1], ARGV[3], -1); " +//字段值-1
                "if (counter > 0) " +//判断字段值-1,后大于0
                        "then " +
                        "redis.call('pexpire', KEYS[1], ARGV[2]); " +//设置过期时间
                        "return 0;" +
               " else " +//判断字段值-1后,小于等于0
                        "redis.call('del', KEYS[1]); " +//删除key
                        "redis.call('publish', KEYS[2], ARGV[1]); " +//发布通知
                        "return 1; " +
               "end; " +
               "return nil;", Arrays.asList(this.getRawName(), this.getChannelName()), new Object[]{LockPubSub.UNLOCK_MESSAGE, this.internalLockLeaseTime, this.getLockName(threadId)});
    }
KEYS[1]:锁的名称。KEYS[2]:消息发布的目标频道。ARGV[1]:发布到频道的消息内容。ARGV[2]:锁的有效时间(单位毫秒)。ARGV[3]:客户端唯一标识,线程ID。
看门狗
Redisson中有一个WatchDog机制,也就是看门狗机制,主要用于给锁续期,在上面的可重入锁的执行结果中有介绍过,每10秒钟判断锁是否释放,如果没有释放则续期30秒钟。
一般用于解决业务执行时间大于锁的过期时间,导致锁被释放的情况。
一般是通过估算业务执行时间,设置锁的过期时间,但是会有很多意想不到的情况,并不可靠;另一种方法就是开辟一个线程去监听锁释是否被释放,也就是WatchDog机制,给锁续期。
一般在不设置过期时间,也就是leaseTiem为-1的情况下,才有WatchDog机制。
进入tryAcquireAsync()方法,判断是否设置了过期时间,没设置过期时间则leaseTime 为-1,进入else代码块。
    private <T> RFuture<Long> tryAcquireAsync(long waitTime, long leaseTime, TimeUnit unit, long threadId) {
        RFuture ttlRemainingFuture;
        //如果指定了加锁时间,会直接去加锁
        if (leaseTime > 0L) {
            ttlRemainingFuture = this.tryLockInnerAsync(waitTime, leaseTime, unit, threadId, RedisCommands.EVAL_LONG);
        } else {//没有设置过期时间,默认
            ttlRemainingFuture = this.tryLockInnerAsync(waitTime, this.internalLockLeaseTime, TimeUnit.MILLISECONDS, threadId, RedisCommands.EVAL_LONG);
        }
		//异步操作
        CompletionStage<Long> f = ttlRemainingFuture.thenApply((ttlRemaining) -> {
            if (ttlRemaining == null) {
                if (leaseTime > 0L) {
                    this.internalLockLeaseTime = unit.toMillis(leaseTime);
                } else {
                	//锁续期操作
                    this.scheduleExpirationRenewal(threadId);
                }
            }

            return ttlRemaining;
        });
        return new CompletableFutureWrapper(f);
    }
往下走进入scheduleExpirationRenewal()方法,第一次进来ExpirationEntry(Map结构存放,记录获取锁的次数)中为null,进入else代码块,添加线程id,然后执行renewExpiration()方法,实现刷新。
    protected void scheduleExpirationRenewal(long threadId) {
        ExpirationEntry entry = new ExpirationEntry();
        ExpirationEntry oldEntry = (ExpirationEntry)EXPIRATION_RENEWAL_MAP.putIfAbsent(this.getEntryName(), entry);
        if (oldEntry != null) {
            oldEntry.addThreadId(threadId);
        } else {
        	//记录锁次数
            entry.addThreadId(threadId);

            try {
            	//实现刷新
                this.renewExpiration();
            } finally {
                if (Thread.currentThread().isInterrupted()) {
                    this.cancelExpirationRenewal(threadId);
                }

            }
        }

    }
    public static class ExpirationEntry {
        private final Map<Long, Integer> threadIds = new LinkedHashMap();
        private volatile Timeout timeout;

        public ExpirationEntry() {
        }

        public synchronized void addThreadId(long threadId) {
            this.threadIds.compute(threadId, (t, counter) -> {
                counter = (Integer)Optional.ofNullable(counter).orElse(0);
                counter = counter + 1;
                return counter;
            });
        }
}
进入renewExpiration()方法,创建任务,延迟时间是过期时间的三分之一,也就是说,30/3=10s,每10秒钟刷新过期时间
    private void renewExpiration() {
        ExpirationEntry ee = (ExpirationEntry)EXPIRATION_RENEWAL_MAP.get(this.getEntryName());
        if (ee != null) {
        	//创建延时任务
            Timeout task = this.commandExecutor.getConnectionManager().newTimeout(new TimerTask() {
                public void run(Timeout timeout) throws Exception {
                    ExpirationEntry ent = (ExpirationEntry)RedissonBaseLock.EXPIRATION_RENEWAL_MAP.get(RedissonBaseLock.this.getEntryName());
                    if (ent != null) {
                        Long threadId = ent.getFirstThreadId();
                        if (threadId != null) {
                        	//具体续期脚本
                            CompletionStage<Boolean> future = RedissonBaseLock.this.renewExpirationAsync(threadId);
                            future.whenComplete((res, e) -> {
                                if (e != null) {
                                    RedissonBaseLock.log.error("Can't update lock " + RedissonBaseLock.this.getRawName() + " expiration", e);
                                    RedissonBaseLock.EXPIRATION_RENEWAL_MAP.remove(RedissonBaseLock.this.getEntryName());
                                } else {
                                    if (res) {//重新续期
                                        RedissonBaseLock.this.renewExpiration();
                                    } else {
                                        RedissonBaseLock.this.cancelExpirationRenewal((Long)null);
                                    }

                                }
                            });
                        }
                    }
                }
                //internalLockLeaseTime 的1/3时间去执行续期任务
            }, this.internalLockLeaseTime / 3L, TimeUnit.MILLISECONDS);
            ee.setTimeout(task);
        }
    }
通过lua脚本,重新设置有效期
    protected CompletionStage<Boolean> renewExpirationAsync(long threadId) {
        return this.evalWriteAsync(this.getRawName(), LongCodec.INSTANCE, RedisCommands.EVAL_BOOLEAN,
                "if (redis.call('hexists', KEYS[1], ARGV[2]) == 1) " +
                        "then " +
                        "redis.call('pexpire', KEYS[1], ARGV[1]); " +
                        "return 1;" +
                " end;" +
                " return 0;", Collections.singletonList(this.getRawName()), this.internalLockLeaseTime, this.getLockName(threadId));
    }
KEYS[1]:锁的名称。ARGV[1]:锁的有效时间(单位毫秒)。ARGV[2]:客户端唯一标识,线程ID。
释放锁的时候,同时移除锁的续期任务
    protected void cancelExpirationRenewal(Long threadId) {
    	//获取锁对象
        ExpirationEntry task = (ExpirationEntry)EXPIRATION_RENEWAL_MAP.get(this.getEntryName());
        if (task != null) {
            if (threadId != null) {
                task.removeThreadId(threadId);//移除任务
            }

            if (threadId == null || task.hasNoThreads()) {
                Timeout timeout = task.getTimeout();
                if (timeout != null) {
                    timeout.cancel();//关闭时间
                }
				//删除实例
                EXPIRATION_RENEWAL_MAP.remove(this.getEntryName());
            }

        }
    }
项目案例
延迟队列
如果你的项目不想过于集成太多中间件,又想实现定期通知的效果,比如:生日祝福、未支付的订单失效、异步处理等,项目也不是过于复杂,那么使用Redisson进行延迟任务是一个不错的选择。
@RestController
public class MyController {

    private static final Logger log = LoggerFactory.getLogger(MyController.class);

    @Autowired
    RedissonClient redissonClient;

    @GetMapping("/test")
    public void test() throws InterruptedException {
        RBlockingQueue<Object> queue = redissonClient.getBlockingQueue("test");
        RDelayedQueue<Object> delayedQueue = redissonClient.getDelayedQueue(queue);
        delayedQueue.offer("hello world",5,TimeUnit.SECONDS);
        log.info("添加任务成功");

        while (true){
            Object take = queue.take();
            log.info("收到任务:{}",take);
        }
    }
}
执行结果如下
然后我们将代码封装一下,示例代码如下:
封装工具类
@Component
public class RedisDelayQueueUtil {
    @Autowired
    private RedissonClient redissonClient;

    private static final Logger log = LoggerFactory.getLogger(RedisDelayQueueUtil.class);
    /**
     * 添加延迟队列
     *
     * @param value     队列值
     * @param delay     延迟时间
     * @param timeUnit  时间单位
     * @param queueCode 队列键
     * @param <T>
     */
    public <T> boolean addDelayQueue(@NonNull T value, @NonNull long delay, @NonNull TimeUnit timeUnit, @NonNull String queueCode) {
        if (StringUtils.isBlank(queueCode) || Objects.isNull(value)) {
            return false;
        }
        try {
            RBlockingDeque<Object> blockingDeque = redissonClient.getBlockingDeque(queueCode);
            RDelayedQueue<Object> delayedQueue = redissonClient.getDelayedQueue(blockingDeque);
            delayedQueue.offer(value, delay, timeUnit);
            log.info("(添加延时队列成功) 队列键:{},队列值:{},延迟时间:{}", queueCode, value, timeUnit.toSeconds(delay) + "秒");
        } catch (Exception e) {
            log.error("(添加延时队列失败) {}", e.getMessage());
            throw new RuntimeException("(添加延时队列失败)");
        }
        return true;
    }

    /**
     * 获取延迟队列
     *
     * @param queueCode
     * @param <T>
     */
    public <T> T getDelayQueue(@NonNull String queueCode) throws InterruptedException {
        if (StringUtils.isBlank(queueCode)) {
            return null;
        }
        RBlockingDeque<Map> blockingDeque = redissonClient.getBlockingDeque(queueCode);
        T value = (T) blockingDeque.take();
        return value;
    }
    /**
     * 删除指定队列中的消息
     *
     * @param o 指定删除的消息对象队列值(同队列需保证唯一性)
     * @param queueCode 指定队列键
     */
    public boolean removeDelayedQueue(@NonNull Object o, @NonNull String queueCode) {
        if (StringUtils.isBlank(queueCode) || Objects.isNull(o)) {
            return false;
        }
        RBlockingDeque<Object> blockingDeque = redissonClient.getBlockingDeque(queueCode);
        RDelayedQueue<Object> delayedQueue = redissonClient.getDelayedQueue(blockingDeque);
        boolean flag = delayedQueue.remove(o);
        //delayedQueue.destroy();
        return flag;
    }
}
监听类
public class DelayJob {
    private String message;

    public String getMessage() {
        return message;
    }

    public void setMessage(String message) {
        this.message = message;
    }
}
@Component
public class RedisDelayQueueMatch implements InitializingBean {
    @Autowired
    private List<RedisDelayQueueHandle> list;
    private static final Map<String,RedisDelayQueueHandle> maps = new HashMap<>();


    @Override
    public void afterPropertiesSet() throws Exception {
        list.stream().forEach(item ->{
            maps.put(item.code(),item);
        });
    }

    public RedisDelayQueueHandle match(String code){
        if(code == null){
            return null;
        }
        return maps.get(code);
    }
}
@Component
public class FileRedisDelayQueueRunner implements ApplicationRunner {
    private static final Logger log = LoggerFactory.getLogger(FileRedisDelayQueueRunner.class);
    @Autowired
    private RedisDelayQueueUtil redisDelayQueueUtil;

    @Autowired
    private RedisDelayQueueMatch redisDelayQueueMatch;

    ExecutorService executorService = Executors.newSingleThreadExecutor();

    @Override
    public void run(ApplicationArguments args) throws Exception {
        executorService.execute(() -> {
            while (true) {
                for (RedisDelayQueueEnum redisDelayQueueEnum : RedisDelayQueueEnum.values()) {
                    try {
                        Object delayQueue = redisDelayQueueUtil.getDelayQueue(redisDelayQueueEnum.getCode());
                        if (delayQueue != null) {
                            //通过code匹配出具体实现类
                            RedisDelayQueueHandle match = redisDelayQueueMatch.match(redisDelayQueueEnum.getCode());
                            DelayJob delayJob = new DelayJob();
                            delayJob.setMessage(delayJob.toString());
                            match.execute(delayJob);
                        }
                    } catch (InterruptedException e) {
                        throw new RuntimeException(e);
                    }
                }
            }
        });
    }
}
控制层代码
@RestController
public class MyController {
    @Autowired
    RedisDelayQueueUtil redisDelayQueueUtil;
    @GetMapping("/test")
    public void test() throws InterruptedException {
        redisDelayQueueUtil.addDelayQueue("hello world",10,TimeUnit.SECONDS, RedisDelayQueueEnum.payment_order.getCode());
    }
}
//处理类
public interface RedisDelayQueueHandle {
    void execute(DelayJob delayJob);
    String code();
}
//订单超时的具体处理类
@Component
public class PaymentOrderQueue implements RedisDelayQueueHandle{
    private static final Logger log = LoggerFactory.getLogger(PaymentOrderQueue.class);
    @Override
    public void execute(DelayJob delayJob) {
        log.info("订单超时,任务处理");
        //todo
    }

    @Override
    public String code() {
        return RedisDelayQueueEnum.payment_order.getCode();
    }
}
执行结果如图
发布订阅
Redisson提供了RTopic接口来实现发布/订阅模式。以下是一个使用Redisson进行发布订阅的简单示例:
@RestController
public class MyController {
    @Autowired
    MyPublisher myPublisher;
    @Autowired
    private RedissonClient redissonClient;
    @GetMapping("/publish")
    public void test() throws InterruptedException {
        //向频道发布消息
        myPublisher.publish("sendMessage","hello world");

    }
}
@Component
public class MyPublisher {
    Logger logger = LoggerFactory.getLogger(MyPublisher.class);

    @Autowired
    private RedissonClient redissonClient;

    public void publish(String name,String msg) {
        RTopic topic = redissonClient.getTopic(name);
        topic.publish(msg);
        logger.info("发送消息成功");
    }
}
@Component
public class MyListener implements MessageListener<String> {
    private static final Logger log = LoggerFactory.getLogger(MyListener.class);
    @Autowired
    private RedissonClient redissonClient;
    //开启监听
    @PostConstruct
    public void init(){
        //确保监听器已经准备好接收消息
        RTopic topic = redissonClient.getTopic("sendMessage");
        topic.addListener(String.class,this::onMessage);
    }
    @Override
    public void onMessage(CharSequence channel, String msg) {
        log.info("收到通知:{}",msg);
    }

}
执行结果如图
限流
Redisson使用RateLimiter进行限流操作,底层使用lua脚本,限流器每秒会产生X个令牌放入令牌桶,调用接口需要去令牌桶里面拿令牌。如果令牌被其它请求拿完了,那么自然而然,当前请求就调用不到指定的接口。
示例代码如下:
@RestController
public class MyController {

    private static final Logger log = LoggerFactory.getLogger(MyController.class);

    @Autowired
    private RedissonClient redissonClient;

    @GetMapping("/test")
    public void test() throws InterruptedException {
        // 2. 获取RRateLimiter对象
        RRateLimiter rateLimiter = redissonClient.getRateLimiter("myRateLimiter");
        // 3. 设置限流策略,例如每2分钟产生3个令牌
        rateLimiter.trySetRate(RateType.OVERALL, 3, 2, RateIntervalUnit.MINUTES);
        long l = rateLimiter.availablePermits();
        log.info("当前令牌桶可用数量:{}", l);
        // 4. 尝试获取许可证
//        rateLimiter.tryAcquire(1,1, TimeUnit.SECONDS)等待许可证的最长时间10毫秒,获取1个许可证
        if (rateLimiter.tryAcquire(1)) {
            // 如果获取到许可证,执行业务逻辑
            log.info("获取到许可证,执行业务逻辑");
        } else {
            // 如果未获取到许可证,执行拒绝策略
            log.info("未获取到许可证,执行拒绝策略");
        }
    }
}
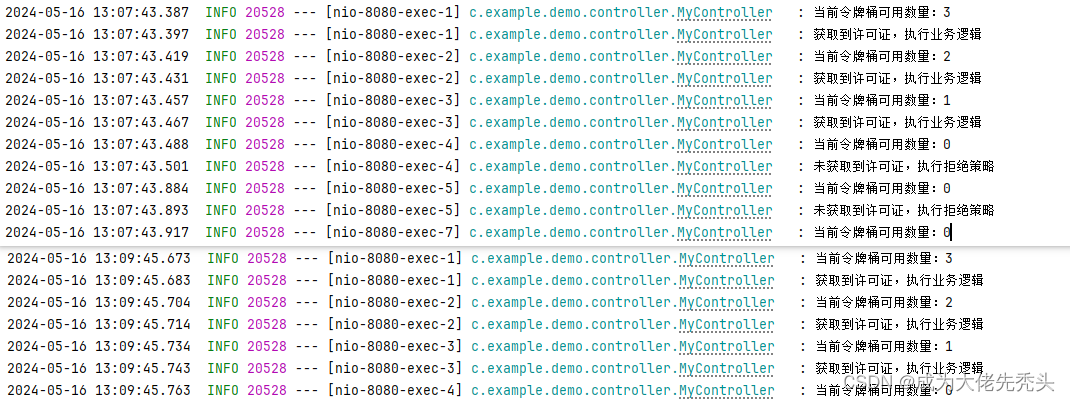
我们可以看到第一次请求完成后,再请求获取不到令牌,进入拒绝策略,间隔两分钟后生产了3个令牌,再次请求,执行结果如图
我们可以打开Redis客户端查看是如何管理的:rate令牌数,interval生产令牌桶间隔时间,type单机还是集群,示例如图所示:
{yourname}:permits使用zset存储,记录获取令牌的数据,示例如图所示:
{yourname}:value使用string存储,可以查看令牌数量,示例如图所示:
我们可以将他封装成一个注解,方便多业务场景的限流通用。示例代码如下:
@Target({ElementType.METHOD})
@Retention(RetentionPolicy.RUNTIME)
public @interface GlobalRateLimiter {
    String key();
    long rate() default 5L;
    long rateInterval() default 1L;
    RateIntervalUnit rateIntervalUnit() default RateIntervalUnit.SECONDS;
}
@Aspect
@Component
public class GlobalRateLimiterAspect {
    @Autowired
    private RedissonClient redissonClient;

    @Pointcut(value = "@annotation(com.example.mybatisstudy.annotation.GlobalRateLimiter)")
    public void pointcut(){

    }

    @Around("pointcut()")
    public Object around(ProceedingJoinPoint point) throws Throwable {
        MethodSignature signature = (MethodSignature) point.getSignature();
        Method method = signature.getMethod();
        GlobalRateLimiter annotation = method.getAnnotation(GlobalRateLimiter.class);
        String key = annotation.key();
        long rate = annotation.rate();
        long rateInterval = annotation.rateInterval();
        RateIntervalUnit rateIntervalUnit = annotation.rateIntervalUnit();

        RRateLimiter rateLimiter = redissonClient.getRateLimiter(key);
        if (!rateLimiter.isExists()){
            rateLimiter.trySetRate(RateType.OVERALL,rate,rateInterval,rateIntervalUnit);
            //todo 可以设置一个过期时间
        }
        if(!rateLimiter.tryAcquire(1)){
            throw new RuntimeException("请求过于频繁,请休息一下");
        }
        return point.proceed();
    }
}
@RestController
public class MyController {
    @GetMapping("/test")
    @GlobalRateLimiter(key = "test",rate = 2,rateInterval = 60)
    public ResponseEntity test() {
        return ResponseEntity.ok("成功");
    }
}
执行结果如图
分布式自增ID
分布式系统中生成自增ID是一个常见的需求,特别是在需要保证全局唯一性和并发性的场景下。Redis可以作为生成分布式自增ID的工具,我们可以通过计数器的实现方式:
@RestController
public class MyController {
    @Autowired
    private RedissonClient redissonClient;

    @GetMapping("/test")
    public void test() {
        System.out.println(id("memberId"));
        System.out.println(seqNo("memberNo"));
        /** OutPut:
         *  1721645124953002
         *  20240722184524000000000000000002
         */
    }

    /**
     * 生成16位的自增id
     * String.format("%0"+len+"d",atomicLong.incrementAndGet())用于格式化整型,补零到指定长度
     * 比如:
     * String.format("%0" + 3 + "d", id); 将生成字符串 "045"。
     * @param idName 唯一key值
     * @return 时间戳+补零自增
     */
    private String id(String idName){
        RAtomicLong atomicLong = redissonClient.getAtomicLong(idName);
        return System.currentTimeMillis() + String.format("%0"+3+"d",atomicLong.incrementAndGet());
    }

    /**
     * 生成32位的自增no,
     * String.format("%0"+len+"d",atomicLong.incrementAndGet())用于格式化整型,补零到指定长度
     * 比如:
     * String.format("%0" + 20 + "d", id); 将生成字符串 "000000000000000012345"。
     * @param seqName 唯一key值
     * @return 日期格式++补零自增
     */
    private String seqNo(String seqName){
        RAtomicLong atomicLong = redissonClient.getAtomicLong(seqName);
        //转换日期格式
        DateTimeFormatter dateTimeFormatters = DateTimeFormatter.ofPattern("yyyyMMddHHmmss");
        String localDateStr = LocalDateTime.now().format(dateTimeFormatters);
        //计算剩余补零长度
        int len = 32-localDateStr.length();
        return localDateStr + String.format("%0"+len+"d",atomicLong.incrementAndGet());

    }
}
封装
Spring提供了CacheManager接口,用于管理应用程序中的缓存。主要负责创建、配置、管理和销毁缓存对象。
Cache 是实际存储数据的对象或接口,它负责存储和检索缓存的数据。它是CacheManager的一部分,用于实际存储缓存项并提供相关的操作接口。
我们可以基于Spring提供这两个类,封装成自己的代码(以前公司这样用的,感觉很优雅),示例代码如下:
先创建一个CacheManager 的Bean。
@Configuration
public class MyConfig {
    @Bean
    public CacheManager cacheManager(RedissonClient redissonClient){
        RedissonSpringCacheManager redissonSpringCacheManager = new RedissonSpringCacheManager(redissonClient);
        return redissonSpringCacheManager;
    }
}
然后定义一个接口,实现它,编写基本功能操作
public interface CacheManage {
    Cache getCache(String name);
    String id16(String idName);
    String seqNo32(String seqName);
    RLock getLock(String key);
}
@Component
public class RedisCacheManage implements CacheManage {
    private CacheManager cacheManager;

    private RedissonClient redissonClient;

    public RedisCacheManage(CacheManager cacheManager, RedissonClient redissonClient) {
        this.cacheManager = cacheManager;
        this.redissonClient = redissonClient;
    }

    @Override
    public Cache getCache(String name) {
        return cacheManager.getCache(name);
    }

    /**
     * 生成16位的自增id
     * String.format("%0"+len+"d",atomicLong.incrementAndGet())用于格式化整型,补零到指定长度
     * 比如:
     * String.format("%0" + 3 + "d", id); 将生成字符串 "045"。
     * @param idName 唯一key值
     * @return 时间戳+补零自增
     */
    public String id16(String idName){
        RAtomicLong atomicLong = redissonClient.getAtomicLong(idName);
        return System.currentTimeMillis() + String.format("%0"+3+"d",atomicLong.incrementAndGet());
    }


    /**
     * 生成32位的自增no,
     * String.format("%0"+len+"d",atomicLong.incrementAndGet())用于格式化整型,补零到指定长度
     * 比如:
     * String.format("%0" + 20 + "d", id); 将生成字符串 "000000000000000012345"。
     * @param seqName 唯一key值
     * @return 日期格式++补零自增
     */
    public String seqNo32(String seqName){
        RAtomicLong atomicLong = redissonClient.getAtomicLong(seqName);
        //转换日期格式
        DateTimeFormatter dateTimeFormatters = DateTimeFormatter.ofPattern("yyyyMMddHHmmss");
        String localDateStr = LocalDateTime.now().format(dateTimeFormatters);
        //计算剩余补零长度
        int len = 32-localDateStr.length();
        return localDateStr + String.format("%0"+len+"d",atomicLong.incrementAndGet());

    }

    @Override
    public RLock getLock(String key) {
        return redissonClient.getLock(key);
    }
}
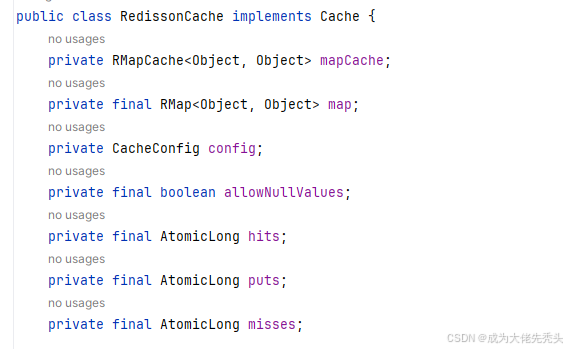
我们在Spring初始化的时候获取Cache,并定义为全局变量,往后都基于此Map进行put()和get()操作,便于管理,我们可以看下底层是如何存储的,如图所示,存储在Map结构中。
测试用例如下:
@RestController
public class MyController {
    @Autowired
    CacheManage cacheManage;

    Cache cache;

    @PostConstruct
    public void init(){
        cache = cacheManage.getCache("test_cache");
    }


    @GetMapping("/test")
    public void test() {
        cache.put("test_key","hello world");
        String s = cache.get("test_key", String.class);
        System.out.println(s);
        /** Output:
         *  hello world
         */
    }
}
执行结果如图
有一些场景可能需要设置缓存过期时间,防止长时间占用,浪费内存。
我们可以自定义一个CacheManage,然后继承RedissonSpringCacheManager,示例代码如下:
public class MyRedisCacheManage extends RedissonSpringCacheManager {

    public MyRedisCacheManage(RedissonClient redisson) {
        super(redisson);
    }

    @Override
    protected CacheConfig createDefaultConfig() {
    	//设置默认缓存过期时间,ttl过期时间为30分钟、最大空闲时间为5分钟
        return new CacheConfig(30 * 60 * 1000,5 * 60 * 1000);
    }
}
然后配置Bean的时候更换为自定义的类
@Configuration
public class MyConfig {
    @Bean
    public CacheManager cacheManager(RedissonClient redissonClient){
        MyRedisCacheManage redissonSpringCacheManager = new MyRedisCacheManage(redissonClient);
        return redissonSpringCacheManager;
    }
}
然后开启一个线程倒计时,如果达到空闲时间就会清除,否则ttl过期清除(经过测试hash里面过期清除的是最先插入的key值,不会全部清除)。
可能有些时候,你需要单独设置不同的过期时间,你可以这样处理
@Configuration
public class MyConfig {
    @Bean
    public CacheManager cacheManager(RedissonClient redissonClient){
        MyRedisCacheManage redissonSpringCacheManager = new MyRedisCacheManage(redissonClient);
        //单独设置缓存过期时间
        Map<String,CacheConfig> map = new HashMap<>();
        map.put("mycache1",new CacheConfig(5 * 60 * 1000,2 * 60 * 1000));
        map.put("mycache2",new CacheConfig(15 * 60 * 1000,7 * 60 * 1000));
        redissonSpringCacheManager.setConfig(map);
        return redissonSpringCacheManager;
    }
}
@RestController
public class MyController {
    @Autowired
    CacheManage cacheManage;
    Cache cache;
    Cache cache1;
    Cache cache2;

    @PostConstruct
    public void init(){
        cache = cacheManage.getCache("test_cache");
        cache1 = cacheManage.getCache("mycache1");
        cache2 = cacheManage.getCache("mycache2");
    }


    @GetMapping("/test")
    public void test() {
        cache.put("test_key","hello world");
        cache1.put("mycache1","hello world1");
        cache2.put("mycache2","hello world2");
    }
}
