目录
考试须知
物理机:foundation
| 账号 | 密码 |
| kiosk | redhat |
| root | Asimov |
ansible相关
| 系统 | IP | 说明 |
| workstation.lab.example.com | 172.25.250.9 | Ansible control node |
| servera.lab.example.com | 172.25.250.10 | Ansible managed node |
| serverb.lab.example.com | 172.25.250.11 | Ansible managed node |
| serverc.lab.example.com | 172.25.250.12 | Ansible managed node |
| serverd.lab.example.com | 172.25.250.13 | Ansible managed node |
| bastion.lab.example.com | 172.25.250.254 | Ansible managed node |
所有系统上已预装了SSH秘钥,允许免密钥进行root访问,在Ansible控制节点已创建用户账户student。此账户已预装SSH秘钥,允许在Ansible控制节点和各个Ansible受控节点之间进行SSH登录。所有工作应当保存在控制节点的/home/student/ansible中,并应当归student用户所有(请勿对考试环境的SSH进行任何修改)
一、安装和配置Ansible
按照下方所述,在控制节点 workstation.lab.example.com 上安装和配置 Ansible:
-
安装所需的软件包
-
创建名为
/home/student/ansible/inventory的静态清单文件,以满足以下要求:-
servera是
dev主机组的成员 -
serverb是
test主机组的成员 -
serverc和 serverd是
prod主机组的成员 -
bastion是
balancers主机组的成员 -
prod组是webservers主机组的成员
-
-
创建名为
/home/student/ansible/ansible.cfg的配置文件,以满足以下要求:-
主机清单文件为
/home/student/ansible/inventory -
playbook 中使用的角色的位置包括
/home/student/ansible/roles
-
答案:
安装ansible
sudo yum -y install ansible;ansible --version
创建目录
mkdir ansible
cd ansible
创建主机清单文件
vim /home/student/ansible/inventory
[dev]
servera

[test]
serverb

[prod]
serverc
serverd

[balancers]
bastion

[webservers:children]
prod
创建ansible配置文件
cp /etc/ansible/ansible.cfg ./
修改如下内容
inventory      = /home/student/ansible/inventory

roles_path    = /home/student/ansible/roles

host_key_checking = False

remote_user = student

[privilege_escalation]
become=True
become_method=sudo
become_user=root
become_ask_pass=False
创建角色目录
mkdir roles
验证
ansible all -m ping
二、创建和运行Ansible临时命令
作为系统管理员,您需要在受管节点上安装软件。
请按照正文所述,创建一个名为 /home/student/ansible/adhoc.sh 的 shell 脚本,该脚本将使用 Ansible 临时命令在各个受管节点上安装 yum 存储库:
存储库1:
-
存储库的名称为 rh
294_BASE -
描述为 rh
294 base software -
基础 URL 为
http://content.example.com/rhel8.0/x86_64/dvd/BaseOS -
GPG 签名检查为
启用状态 -
GPG 密钥 URL 为
http://content.example.com/rhel8.0/x86_64/dvd/RPM-GPG-KEY-redhat-release -
存储库为
启用状态
存储库2:
-
存储库的名称为 rh
294_STREAM -
描述为 rh
294 stream software -
基础 URL 为
http://content.example.com/rhel8.0/x86_64/dvd/AppStream -
GPG 签名检查为
启用状态 -
GPG 密钥 URL 为
http://content.example.com/rhel8.0/x86_64/dvd/RPM-GPG-KEY-redhat-release -
存储库为
启用状态
答案:
帮助文档:ansible-doc yum_repository
#创建并编辑脚本
vim /home/student/ansible/adhoc.sh

#!/bin/bash

ansible all -m yum_repository -a 'name=rh294_BASE description="rh294 base software" baseurl=http://content.example.com/rhel8.0/x86_64/dvd/BaseOS gpgcheck=yes gpgkey=http://content.example.com/rhel8.0/x86_64/dvd/RPM-GPG-KEY-redhat-release enabled=yes'

ansible all -m yum_repository -a 'name=rh294_AppStream description="rh294 appstream software" baseurl=http://content.example.com/rhel8.0/x86_64/dvd/AppStream gpgcheck=yes gpgkey=http://content.example.com/rhel8.0/x86_64/dvd/RPM-GPG-KEY-redhat-release enabled=yes'
执行脚本
chmod +x adhoc.sh
./adhoc.sh
验证
ansible all -m shell -a 'yum repolist'
ansible all -m shell -a 'yum -y install lftp'
三、安装软件包
创建一个名为 /home/student/ansible/packages.yml 的 playbook :
-
将
php和mariadb软件包安装到dev、test和prod主机组中的主机上 -
将
RPM Development Tools软件包组安装到dev主机组中的主机上 -
将
dev主机组中主机上的所有软件包更新为最新版本
答案:
帮助文档:ansible-doc yum
#创建并编辑playbook
vim /home/student/ansible/packages.yml

---
- name: install pgk
  hosts: dev,test,prod
  tasks:
    - name: install php mariadb
      yum:
        name:
          - php
          - mariadb
        state: latest

- name: install RPM Development Tools
  hosts: dev
  tasks:
    - name: install the 'RPM Development Tools' package group
      yum:
        name: "@RPM Development Tools"
        state: present

    - name: update all
      yum:
        name: '*'
        state: latest

#执行playbook
ansible-playbook packages.yml
四、使用RHEL系统角色
安装 RHEL 系统角色软件包,并创建符合以下条件的 playbook /home/student/ansible/timesync.yml :
-
在
所有受管节点上运行 -
使用
timesync角色 -
配置该角色,以使用当前有效的 NTP 提供商
-
配置该角色,以使用时间服务器
classroom.example.com -
配置该角色,以启用
iburst参数
答案:
#安装角色
yum search roles
sudo yum -y install rhel-system-roles.noarch
#查看软件所有的安装目录
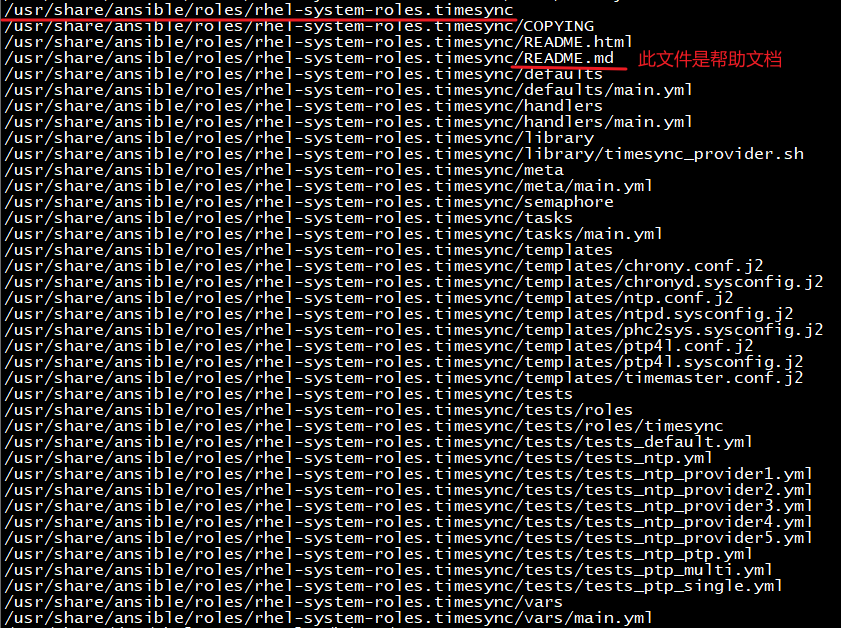
rpm -ql rhel-system-roles.noarch
复制安装的角色到 ~/ansible/roles/
cp -r /usr/share/ansible/roles/rhel-system-roles.timesync/ /home/student/ansible/roles/timesync
#编写playbook
vim /home/student/ansible/timesync.yml
---
- name: set time sync
  hosts: all
  vars:
    timesync_ntp_servers:
      - hostname: classroom.example.com
        iburst: yes
  roles:
    - timesync
#执行剧本
ansible-playbook timesync.yml
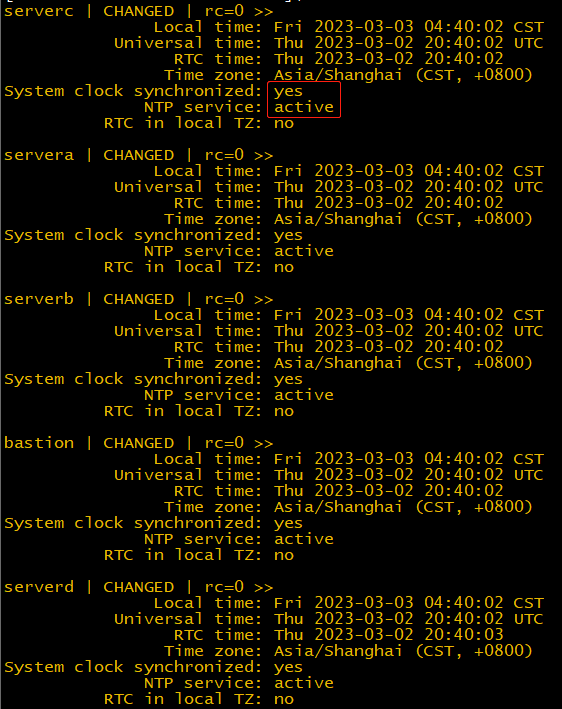
验证
ansible all -m shell -a 'timedatectl'
- 使用selinux角色
- 配置该角色,开启所有受控节点的selinux
答案:
复制安装的角色到 ~/ansible/roles/
cp -r /usr/share/ansible/roles/rhel-system-roles.selinux/ /home/student/ansible/roles/selinux
#编辑selinux.yml
vim selinux.yml

---
- name: set selinux
  hosts: all
  vars:
    selinux_state: enforcing
  roles:
    - role: selinux
      become: true

#执行剧本
ansible-playbook selinux.yml
五、使用Ansible Galaxy安装角色
使用 Ansible Galaxy 和要求文件 /home/student/ansible/roles/requirements.yml 。从以下 URL 下载角色并安装到 /home/student/ansible/roles :
-
http://content.example.com/haproxy.tar.gz此角色的名称应当为balancer -
http://content.example.com/phpinfo.tar.gz此角色的名称应当为phpinfo
答案:
#编辑playb
vim /home/student/ansible/roles/requirements.yml

---
- name: balancer
  src: http://content.example.com/haproxy.tar.gz

- name: phpinfo
  src: http://content.example.com/phpinfo.tar.gz

#执行playbook
ansible-galaxy install -r /home/student/ansible/roles/requirements.yml -p /home/student/ansible/roles/
六、创建和使用角色
根据下列要求,在 /home/student/ansible/roles 中创建名为 apache 的角色:
-
httpd 软件包已安装,设为在
系统启动时启用并启动 -
防火墙已启用并正在运行,并使用允许访问Web服务器的规则 -
模板文件
index.html.j2已存在,用于创建具有以下输出的文件/var/www/html/index.htmlWelcome to HOSTNAME on IPADDRESS其中,HOSTNAME 是受管节点的
完全限定域名,IPADDRESS则是受管节点的 IP 地址。
按照下方所述,创建一个使用角色的playbook /home/student/ansible/newrole.yml:
- 该playbook在webservers主机组中的主机上运行
答案:
#创建角色apache
ansible-galaxy init apache
#编辑playbook
vim /home/student/ansible/roles/apache/tasks/main.yml

---
# tasks file for apache
#帮助文档:ansible-doc yum
- name: install httpd
  yum:
    name:
      - httpd
      - firewalld
    state: present

#帮助文档:ansible-doc template
- name: copy file
  template:
    src: index.html.j2
    dest: /var/www/html/index.html

#帮助文档:ansible-doc service
- name: restart httpd
  service:
    name: httpd
    state: restarted
    enabled: yes

- name: restart firewalld
  service:
    name: firewalld
    state: restarted
    enabled: yes

#帮助文档:ansible-doc firewalld
- name: set firewalld
  firewalld:
    service: http
    permanent: yes
    state: enabled
    immediate: yes

#编辑j2模板
vim /home/student/ansible/roles/apache/templates/index.html.j2

Welcome to {{ ansible_fqdn }} on {{ ansible_default_ipv4.address }}

#编辑newrole.yml
vim /home/student/ansible/newrole.yml

---
- name: use roles apache
  hosts: webservers
  roles:
    - apache
执行playbook
ansible-playbook newrole.yml
验证
curl serverc
Welcome to serverc.lab.example.com on 172.25.250.12
curl serverd
Welcome to serverd.lab.example.com on 172.25.250.13
七、从Ansible Galaxy使用角色
根据下列要求,创建一个名为 /home/student/ansible/roles.yml 的 playbook :
-
playbook 中包含一个 play, 该 play 在
balancers主机组中的主机上运行并将使用balancer角色。-
此角色配置一项服务,以在
webservers主机组中的主机之间平衡 Web 服务器请求的负载。 -
浏览到
Welcom to serverc.lab.example.com on 172.25.250.12balancers主机组中的主机(例如http://bastion.lab.example.com )将生成以下输出: -
重新加载浏览器将从另一 Web 服务器生成输出:
Welcom to serverd.lab.example.com on 172.25.250.13`
-
- 例如浏览到
http://serverc.lab.example.com/hello.php会生成以下输出:
Hello PHP World from serverc.lab.example.com
另外还有 PHP 配置的各种详细信息,如安装的 PHP 版本等。
-
同样,浏览到
http://serverd.lab.example.com/hello.php会生成以下输出:Hello PHP World from serverd.lab.example.com
另外还有 PHP 配置的各种详细信息,如安装的 PHP 版本等。
答案:
#编辑playbook
vim /home/student/ansible/roles.yml

---
- name: get facts for webservers
  hosts: webservers

- name: use roles balancer on balancers group
  hosts: balancers
  roles:
    - balancer

- name: use roles phpinfo on webservers
  hosts: webservers
  roles:
    - phpinfo
执行playbook
ansible-playbook roles.yml
八(一)、创建和使用逻辑卷
创建一个名为 /home/student/ansible/lv.yml 的 playbook ,它将在所有受管节点上运行以执行下列任务:
-
创建符合以下要求的逻辑卷:
-
逻辑卷创建在
research卷组中 -
逻辑卷名称为
data -
逻辑卷大小为
1500 MiB
-
-
使用
ext4文件系统格式化逻辑卷 -
如果无法创建请求的逻辑卷大小,应显示错误信息
Could not create logical volume of that size,并且应改为使用大小
800 MiB。 -
如果卷组
research不存在,应显示错误信息Volume group done not exist。 -
不要以任何方式挂载逻辑卷
答案:
#编辑playbook
vim /home/student/ansible/lv.yml


---
- name: create lvm
  hosts: all
  tasks:
    - name: create data lvm
      block:
        - name: create 1500M
        #帮助文档:ansible-doc lvol
          lvol:
            vg: research
            lv: data
            size: 1500

      rescue:
        - name: show error msg
        #帮助文档:ansible-doc debug
          debug:
            msg: Could not create logical volume of that size

        - name: create 800M
          lvol:
            vg: research
            lv: data
            size: 800

      always:
        - name: format lv
        #帮助文档:ansible-doc filesystem
          filesystem:
            fstype: ext4
            dev: /dev/research/data

      when: "'research' in ansible_lvm.vgs"

    - name: show error msg about vg
      debug:
        msg: Volume group done not exist。

      when: "'research' not in ansible_lvm.vgs"
执行playbook
ansible-playbook lv.yml
八(二)、创建和使用分区
创建名为partion.yml的Playbook,对所有节点进行操作:
- 在vdb上创建一个主分区1500Mib
- 使用ext4文件系统进行格式化
- 将文件系统挂载到/newpart
- 如果分区大小不满足,产生报错信息 could not create partition os that size,则创建分区大小变成800Mib
- 如果磁盘不存在,产生报错信息:disk dose not exist
答案:
帮助文档:ansible-doc parted
#编辑playbook
vim partion.yml

---
- name: create primary partition
  hosts: all
  tasks:
    - name: create 1500MiB primary partition
      block:
        - name: create 1500M primary partition
          parted:
            device: /dev/vdb
            number: 1
            state: present
            part_start: 10MiB
            part_end: 1510MiB
            part_type: primary

      rescue:
        - name: show error msg
          debug:
            msg: could not create partition os that size

        - name: create 800M parimary partition
          parted:
            device: /dev/vdb
            number: 1
            state: present
            part_start: 10MiB
            part_end: 810MiB
            part_type: primary

      always:
        - name: format partition
          filesystem:
            fstype: ext4
            dev: /dev/vdb1

        - name: mkdir directory
          file:
            path: /newpart
            state: directory

        - name: mount
          mount:
            path: /newpart
            src: /dev/vdb1
            fstype: ext4
            state: mounted

      when: "ansible_devices.vdb is defined"

    - name: if vdb not exist
      debug:
        msg: disk dose not exist
      when: "ansible_devices.vdb is not defined"
执行playbook
ansible-playbook partion.yml
九、生成主机文件
-
将一个初始模板文件从
http://content.example.com/hosts.j2下载到/home/student/ansible -
完成该模板,以便用它生成以下文件:针对每个清单主机包含一行内容,其格式与
/etc/hosts相同 -
创建名为
/home/student/ansible/hosts.yml的 playbook ,它将使用此模板在dev主机组中的主机上生成文件/etc/myhosts。
该 playbook 运行后, dev 主机组中主机上的文件 /etc/myhosts 应针对每个受管主机包含一行内容:
127.0.0.1 localhost localhost.localdomain localhost4 localhost4.localdomain4 ::1 localhost localhost.localdomain localhost6 localhost6.localdomain6
172.25.250.9 workstation.lab.example.com workstation
172.25.250.10 servera.lab.example.com servera
172.25.250.11 serverb.lab.example.com serverb
172.25.250.12 serverc.lab.example.com serverc
172.25.250.13 serverd.lab.example.com serverd
注:清单主机名称的显示顺序不重要。
答案:
#下载模板文件
wget http://content.example.com/hosts.j2 -P /home/student/ansible
#编辑hosts.j2
127.0.0.1   localhost localhost.localdomain localhost4 localhost4.localdomain4
::1         localhost localhost.localdomain localhost6 localhost6.localdomain6

{% for i in groups.all %}
{{ hostvars[i].ansible_default_ipv4.address }} {{ hostvars[i].ansible_fqdn }} {{ hostvars[i].ansible_hostname }}
{% endfor %}

#编写playbook
vim /home/student/ansible/hosts.yml

---
- name: get facts
  hosts: all

- name: cp files
  hosts: dev
  tasks:
    - name: cp hosts
      template:
        src: /home/student/ansible/hosts.j2
        dest: /etc/hosts
执行playbook
ansible-playbook hosts.yml
魔法变量的使用
groups:列出清单中所有的组和主机
#编写playbook,查看groups内容
vim groups.yml

---
- name: get groups info
  hosts: dev
  tasks:
    - name: use debug
      debug:
       msg: "{{ groups }}"

#调用playbook结果显示
ok: [servera] => {
    "msg": {
        "all": [
            "servera",
            "serverb",
            "bastion",
            "serverc",
            "serverd"
        ],
        "balancers": [
            "bastion"
        ],
        "dev": [
            "servera"
        ],
        "prod": [
            "serverc",
            "serverd"
        ],
        "test": [
            "serverb"
        ],
        "ungrouped": [],
        "webservers": [
            "serverc",
            "serverd"
        ]
    }
}
hostvars:包含受控主机的变量,可以用于获取另一台受控主机的变量的值。如果还没有为受控主机收集事实,则它不会包含该主机信息
十、修改文件内容
按照下方所述,创建一个名为 /home/student/ansible/issue.yml 的 playbook :
-
该 playbook 将在
所有清单主机上运行 -
该 playbook 会将
/etc/issue的内容替换为下方所示的一行文本:-
在
dev主机组中的主机上,这行文本显示 为:Development -
在
test主机组中的主机上,这行文本显示 为:Test -
在
prod主机组中的主机上,这行文本显示 为:Production
-
答案:
#编写playbook
vim /home/student/ansible/issue.yml

---
- name: update issue
  hosts: all
  tasks:
    - name:
      copy:
        content: "Development"
        dest: /etc/issue
      when: "'dev' in group_names"

    - name:
      copy:
        content: "Test"
        dest: /etc/issue
      when: "'test' in group_names"

    - name:
      copy:
        content: "Production"
        dest: /etc/issue
      when: "'prod' in group_names"
执行playbook
ansible-playbook issue.yml
魔法变量
group_names:列出当前受控主机所属的所有组
十一、创建web内容目录
按照下方所述,创建一个名为 /home/student/ansible/webcontent.yml 的 playbook :
-
该 playbook 在
dev主机组中的受管节点上运行 -
创建符合下列要求的目录
/webdev:-
所有者为
devops组 -
具有常规权限:
owner=read+write+execute , group=read+write+execute ,other=read+execute -
具有
特殊权限:设置组 ID
-
-
用符号链接将
/var/www/html/webdev链接到/webdev -
创建文件
/webdev/index.html,其中包含如下所示的单行文件:Development -
在
dev主机组中主机上浏览此目录(例如http://servera.lab.example.com/webdev/)将生成以下输出:Development
答案:
#编辑playbook
vim /home/student/ansible/webcontent.yml

---
- name: install pkg
  hosts: dev
  tasks:
    - name: install httpd firewalld
      yum:
        name:
          - httpd
          - firewalld
        state: present

#帮助文档:ansible-doc group
    - name: create group
      group:
        name: devops
        state: present

- name: set web
  hosts: dev
  tasks:
    #帮助文档:ansible-doc group
    - name: create directory
      file:
        path: /webdev
        group: devops
        mode: '2775'
        state: directory

    #帮助文档:ansible-doc copy
    - name: create /web/index.html
      copy:
        content: 'Development'
        dest: /webdev/index.html

    #帮助文档:ansible-doc sefcontext
    - name: set selinux
      sefcontext:
        target: '/webdev(/.*)?'
        setype: httpd_sys_content_t

    - name: set selinux
      shell:
        cmd: restorecon -R -v /webdev

    #帮助文档:ansible-doc file
    - name: create link
      file:
        src: /webdev
        dest: /var/www/html/webdev
        state: link

- name: started service
  hosts: dev
  tasks:
    - name: started httpd
      service:
        name: httpd
        state: restarted

    - name: started firewalld
      service:
        name: firewalld
        state: restarted

    - name: set firewall
      firewalld:
        service: http
        permanent: yes
        state: enabled
        immediate: yes
执行playbook
ansible-playbook webcontent.yml
十二、生成硬件报告
创建一个名为 /home/student/ansible/hwreport.yml 的 playbook ,它将在所有受管节点上生成含有以下信息的输出文件 /root/hwreport.txt :
-
清单主机名称 -
以
MB表示的总内存大小 -
BIOS 版本 -
磁盘设备
vda 的大小 -
磁盘设备
vdb 的大小 -
输出文件中的每一行含有一个 key=value 对。
您的 playbook 应当:
-
从
http://content.example.com/hwreport.empty下载文件,并将它保存为/root/hwreport.txt -
使用
正确的值改为 /root/hwreport.txt -
如果硬件项不存在,相关的值应设为
NONE
答案:
hwreport.empty文件内容如下:
hostname: inventoryhostname
mem: memory_in_MB
bios: BIOS_version
vda: disk_vda_size
vdb: disk_vdb_size
#编辑playbook
vim /home/student/ansible/hwreport.yml

---
- name:
  hosts: all
  tasks:
    - name: download hwreport
      get_url:
        url: http://content.example.com/hwreport.empty
        dest: /root/hwreport.txt

    #帮助文档:ansible-doc replace
    - name: get inventory_hostname
      replace:
        path: /root/hwreport.txt
        regexp: 'inventoryhostname'
        replace: "{{ inventory_hostname }}"

    - name: get memory_in_MB
      replace:
        path: /root/hwreport.txt
        regexp: 'memory_in_MB'
        replace: "{{ ansible_memtotal_mb }}"


    - name: get BIOS_version
      replace:
        path: /root/hwreport.txt
        regexp: 'BIOS_version'
        replace: "{{ ansible_bios_version }}"

    - name: get disk_vda_size
      replace:
        path: /root/hwreport.txt
        regexp: 'disk_vda_size'
        replace: "{{ ansible_devices.vda.size | default('NONE',true) }}"


    - name: get disk_vdb_size
      replace:
        path: /root/hwreport.txt
        regexp: 'disk_vdb_size'
        replace: "{{ ansible_devices.vdb.size | default('NONE',true) }}"
执行playbook
ansible-playbook hwreport.yml
魔法变量
inventory_hostname:获取被操作的当前主机的主机名称,此主机名称不是linux系统的主机名,而是该主机在主机清单中配置的名称。
十三、创建密码库
按照下方所述,创建一个 Ansible 库来存储用户密码:
-
库名称为
/home/student/ansible/locker.yml -
库中含有两个变量,名称如下:
-
pw_developer,值为Imadev -
pw_manager,值为Imamgr
-
-
用于加密和解密该库的密码为
whenyouwishuponastar -
密码存储在文件
/home/student/ansible/secret.txt中
答案:
#编辑playbook
vim /home/student/ansible/locker.yml

---
pw_developer: Imadev
pw_manager: Imamgr
创建密码文件
echo 'whenyouwishuponastar' > /home/student/ansible/secret.txt
设定密码文件权限
chmod 600 secret.txt
使用密码文件加密yml文件
ansible-vault encrypt locker.yml --vault-id=/home/student/ansible/secret.txt
十四、创建用户账户
-
从
http://content.example.com/user_list.yml下载要创建的用户的列表,并将它保存到/home/student/ansible -
在本次考试中使用在其他位置创建的密码库
/home/student/ansible/locker.yml。创建名为/home/student/ansible/users.yml的 playbook ,从而按以下所述创建用户帐户:-
职位描述为
developer的用户应当:-
在
dev和test主机组中的受管节点上创建 -
从
pw_developer变量分配密码,密码有效期30天 -
是补充组 student的成员
-
-
职位描述为
manager的用户应当:-
在
prod主机组中的受管节点上创建 -
从
pw_manager变量分配密码,密码有效期30天 -
是补充组
opsmgr的成员
-
-
-
密码采用
SHA512哈希格式。 -
您的 playbook 应能够在本次考试中使用在其他位置创建的库密码文件
/home/student/ansible/secret.txt正常运行。
答案:
#编辑playbook
vim /home/student/ansible/users.yml

---
- name:
  hosts: dev,test
  vars_files:
    - /home/student/ansible/locker.yml
    - /home/student/ansible/user_list.yml
  tasks:
    - name: create group
      group:
        name: student
        state: present

    - name: create user in developer
      user:
        name: "{{ item.name }}"
        groups: student
        password: "{{ pw_developer | password_hash('sha512') }}"
        state: present
      loop: "{{ users }}"
      when: item.job == "developer"

    - name: chage passwd time
      shell:
        cmd: chage -M 30 {{ item.name }}
      loop: "{{ users }}"
      when: item.job == "developer"

- name:
  hosts: prod
  vars_files:
    - /home/student/ansible/locker.yml
    - /home/student/ansible/user_list.yml
  tasks:
    - name: create group
      group:
        name: opsmgr
        state: present

    - name: create user in prod
      user:
        name: "{{ item.name }}"
        groups: opsmgr
        password: "{{ pw_manager  | password_hash('sha512') }}"
        state: present
      loop: "{{ users }}"
      when: item.job == "manager"

    - name: chage passwd time
      shell:
        cmd: chage -M 30 {{ item.name }}
      loop: "{{ users }}"
      when: item.job == "manager"
执行playbook
ansible-playbook users.yml --vault-id=secret.txt
十五、更新Ansible库的秘钥
按照下方所述,更新现有 Ansible 库的密钥:
-
从
http://content.example.com/salaries.yml下载 Ansible 库到/home/student/ansible -
当前的库密码为
insecure8sure -
新的库密码为
bbs2you9527 -
库使用
新密码保持加密状态
答案:
下载yml文件
wget http://content.example.com/salaries.yml -P /home/student/ansible/
修改该文件密码
ansible-vault rekey salaries.yml
输入旧密码
输入新密码
确认新密码
十六、配置cron作业
创建一个名为/home/student/ansible/cron.yml的playbook,此playbook在dev主机组运行。配置cron作业,该作业每隔两分钟运行并执行以下命令:
logger"EX294 in progress",以用户natasha身份运行
答案:
#编辑playbook
vim /home/student/ansible/cron.yml

---
- name: set cron job1
  hosts: dev
  tasks:
    - name: add user
      user:
        name: natasha
        state: present

    - name: set cron job2
      cron:
        name: "cron on dev"
        minute: "*/2"
        user: natasha
        job: 'logger"EX294 in progress"'
执行playbook
ansible-playbook cron.yml

