Nacos配置中心
1.nacos作为配置中心介绍
1.nacos不仅可以用作服务发现,同时也是微服务框架中配置管理中心。每个服务都有一堆属于自己的配置,例如:数据库、redis、分布式中间件,这些配置其实相同的内容只需要维护一份就行了,而且如果其中的某些属性发生了变化,每个微服务都需要进行修改,所以配置中心集中管理微服务配置尤为重要。
2.配置中心使用
1.引入nacos配置中心依赖
		<dependency>
            <groupId>com.alibaba.cloud</groupId>
            <artifactId>spring-cloud-starter-alibaba-nacos-config</artifactId>
        </dependency>
2.创建bootstrap.properties文件
# 配置中心地址
spring.cloud.nacos.config.server-addr=127.0.0.1:8848
springcloud默认加载名称为bootstrap.properties的配置文件,我们将配置中心的地址配置后,再指定需要加载的配置文件,服务启动时就会从nacos服务端拉取对应配置信息。
3.配置动态刷新
    @Value("${common.age}")
    private String age;
    @Value("${common.name}")
    private String name;
1.可以使用@Value注解来引用配置,但是如果修改了配置,这个bean中的配置将不会修改,如果想让bean中的属性同步修改需要再添加一个属性 @RefreshScope。
问题及解决办法: @RefreshScope引入这个注解,则标注了这个bean的作用范围就是@Scope(“refresh”),它不同于单例Bean存在与单例池也不同于原型bean,每次使用时都新生成。这个范围的bean在创建后会存在于BeanLifecycleWrapperCache这个缓存。当配置发生修改后会调用RefreshScope#refreshAll() 进行缓存清理,新生成bean中就有了新属性值,如果在这个bean中使用@Scheduled定义了定时任务那么这个任务就会失效,需要主动调用一下这个bean才会触发定时任务。推荐一下用法
@RestController
@RefreshScope  //动态感知修改后的值
public class TestController implements ApplicationListener<RefreshScopeRefreshedEvent>{
    @Value("${common.age}")
     String age;
    @Value("${common.name}")
     String name;
    @GetMapping("/common")
    public String hello() {
        return name+","+age;
    }
    //触发@RefreshScope执行逻辑会导致@Scheduled定时任务失效
    @Scheduled(cron = "*/3 * * * * ?")  //定时任务每隔3s执行一次
    public void execute() {
        System.out.println("定时任务正常执行。。。。。。");
    }
    @Override
    public void onApplicationEvent(RefreshScopeRefreshedEvent event) {
        this.execute();
    }
}
通过监听事件的方式可以使定时任务不失效,因为在清除缓存bean时就会发布一个对应的监听事件,此时调用这个方法又会重新生成bean.
4.配置文件加载顺序
NacosPropertySourceLocator#locate
	public PropertySource<?> locate(Environment env) {
		nacosConfigProperties.setEnvironment(env);
		ConfigService configService = nacosConfigManager.getConfigService();

		if (null == configService) {
			log.warn("no instance of config service found, can't load config from nacos");
			return null;
		}
		long timeout = nacosConfigProperties.getTimeout();
		nacosPropertySourceBuilder = new NacosPropertySourceBuilder(configService,
				timeout);
		String name = nacosConfigProperties.getName();

		String dataIdPrefix = nacosConfigProperties.getPrefix();
		if (StringUtils.isEmpty(dataIdPrefix)) {
			dataIdPrefix = name;
		}

		if (StringUtils.isEmpty(dataIdPrefix)) {
			dataIdPrefix = env.getProperty("spring.application.name");
		}

		CompositePropertySource composite = new CompositePropertySource(
				NACOS_PROPERTY_SOURCE_NAME);

		loadSharedConfiguration(composite);
		loadExtConfiguration(composite);
		loadApplicationConfiguration(composite, dataIdPrefix, nacosConfigProperties, env);
		return composite;
	}
NacosPropertySourceLocator#loadApplicationConfiguration
	private void loadApplicationConfiguration(
			CompositePropertySource compositePropertySource, String dataIdPrefix,
			NacosConfigProperties properties, Environment environment) {
		String fileExtension = properties.getFileExtension();
		String nacosGroup = properties.getGroup();
		// load directly once by default
		loadNacosDataIfPresent(compositePropertySource, dataIdPrefix, nacosGroup,
				fileExtension, true);
		// load with suffix, which have a higher priority than the default
		loadNacosDataIfPresent(compositePropertySource,
				dataIdPrefix + DOT + fileExtension, nacosGroup, fileExtension, true);
		// Loaded with profile, which have a higher priority than the suffix
		for (String profile : environment.getActiveProfiles()) {
			String dataId = dataIdPrefix + SEP1 + profile + DOT + fileExtension;
			loadNacosDataIfPresent(compositePropertySource, dataId, nacosGroup,
					fileExtension, true);
		}

	}
结论:
Spring Cloud Alibaba Nacos Config 目前提供了三种配置能力从 Nacos 拉取相关的配置。
A: 通过 spring.cloud.nacos.config.shared-configs 支持多个共享 Data Id 的配置
B: 通过 spring.cloud.nacos.config.ext-config[n].data-id 的方式支持多个扩展 Data Id 的配置
C: 通过内部相关规则(应用名、应用名+ Profile )自动生成相关的 Data Id 配置
当三种方式共同使用时,他们的一个优先级关系是:A < B < C
优先级从高到低:
${spring.application.name}-${profile}.${file-extension:properties}
${spring.application.name}.${file-extension:properties}
${spring.application.name}
extensionConfigs    一个微服务的多个配置,比如 nacos,mybatis
sharedConfigs       多个微服务公共配置,比如 redis
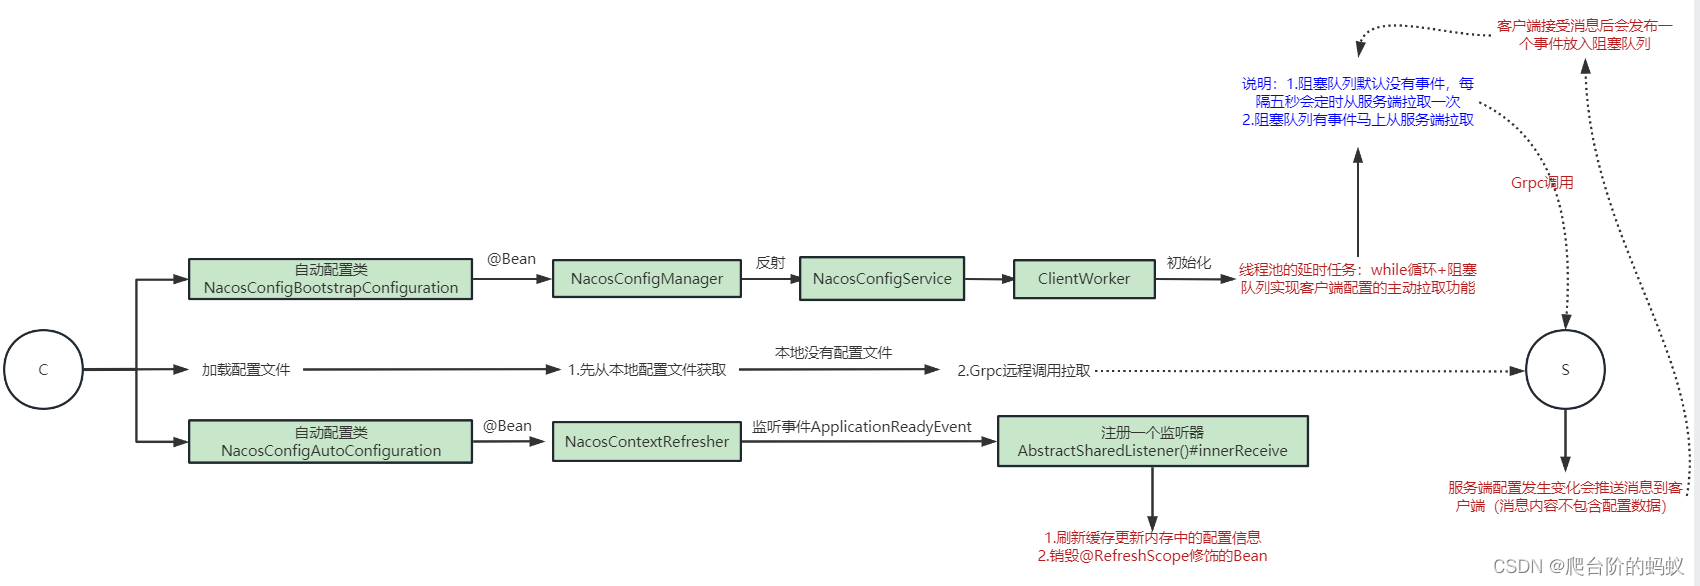
5.客户端拉取配置和服务端推送配置流程
客户端有定时轮询拉取机制,服务端有主动推动机制。实现了配置的变化的快速更新。
核心代码
5.1 客户端拉取配置
- 1.客户端ClientWork实例化时构造方法中会启动定时任务checkConfigInfo()
ClientWorker#ClientWorker
    public ClientWorker(final ConfigFilterChainManager configFilterChainManager, ServerListManager serverListManager,
            final Properties properties) throws NacosException {
        this.configFilterChainManager = configFilterChainManager;

        init(properties);

        agent = new ConfigRpcTransportClient(properties, serverListManager);
        int count = ThreadUtils.getSuitableThreadCount(THREAD_MULTIPLE);
        ScheduledExecutorService executorService = Executors
                .newScheduledThreadPool(Math.max(count, MIN_THREAD_NUM), r -> {
                    Thread t = new Thread(r);
                    t.setName("com.alibaba.nacos.client.Worker");
                    t.setDaemon(true);
                    return t;
                });
        agent.setExecutor(executorService);
        agent.start();

    }
- 2.agent.start()实际调用的是父类中的start方法
ConfigTransportClient#start
    public void start() throws NacosException {
        securityProxy.login(this.properties);
        this.executor.scheduleWithFixedDelay(() -> securityProxy.login(properties), 0,
                this.securityInfoRefreshIntervalMills, TimeUnit.MILLISECONDS);
        startInternal();
    }
- 3.利用阻塞队列+while循环实现轮询
        public void startInternal() {
            executor.schedule(() -> {
                while (!executor.isShutdown() && !executor.isTerminated()) {
                    try {
                        listenExecutebell.poll(5L, TimeUnit.SECONDS);
                        if (executor.isShutdown() || executor.isTerminated()) {
                            continue;
                        }
                        executeConfigListen();
                    } catch (Exception e) {
                        LOGGER.error("[ rpc listen execute ] [rpc listen] exception", e);
                    }
                }
            }, 0L, TimeUnit.MILLISECONDS);

        }
5.2 服务端推送配置
- 1.服务端发布配置 关键代码
ConfigController#publishConfig
// 发布配置持久化
 persistService.insertOrUpdateBeta(configInfo, betaIps, srcIp, srcUser, time, false);
// 发布配置变化事件 最终会通知客户端配置发生变化
ConfigChangePublisher.notifyConfigChange(
                    new ConfigDataChangeEvent(true, dataId, group, tenant, time.getTime()));
- 2.服务端通知客户端配置变化 关键代码
RpcConfigChangeNotifier#configDataChanged
// 构造请求参数发送客户端  通知客户端具体配置文件(dataId)发生变化
ConfigChangeNotifyRequest notifyRequest = ConfigChangeNotifyRequest.build(dataId, group, tenant);

RpcPushTask rpcPushRetryTask = new RpcPushTask(notifyRequest, 50, client, clientIp, metaInfo.getAppName());
push(rpcPushRetryTask);
- 3.客户端处理器处理服务端的通知
.ConfigRpcTransportClient#initRpcClientHandler
/*
 * Register Config Change /Config ReSync Handler
 */
rpcClientInner.registerServerRequestHandler((request) -> {
    if (request instanceof ConfigChangeNotifyRequest) {
        ConfigChangeNotifyRequest configChangeNotifyRequest = (ConfigChangeNotifyRequest) request;
        LOGGER.info("[{}] [server-push] config changed. dataId={}, group={},tenant={}",
                rpcClientInner.getName(), configChangeNotifyRequest.getDataId(),
                configChangeNotifyRequest.getGroup(), configChangeNotifyRequest.getTenant());
        String groupKey = GroupKey
                .getKeyTenant(configChangeNotifyRequest.getDataId(), configChangeNotifyRequest.getGroup(),
                        configChangeNotifyRequest.getTenant());

        CacheData cacheData = cacheMap.get().get(groupKey);
        if (cacheData != null) {
            synchronized (cacheData) {
                cacheData.getLastModifiedTs().set(System.currentTimeMillis());
                cacheData.setSyncWithServer(false);
                notifyListenConfig();
            }

        }
        return new ConfigChangeNotifyResponse();
    }
    return null;
});
- 4.客户端处理服务端通知,添加阻塞队列 和前面的客户端ClientWork使用的同一个阻塞队列
 public void notifyListenConfig() {
     listenExecutebell.offer(bellItem);
 }
- 5.客户端处理事件监听
ConfigRpcTransportClient#executeConfigListen
// 构造请求参数 参数中包含 list<dataId>
ConfigBatchListenRequest configChangeListenRequest = buildConfigRequest(listenCaches);
// 向nacos-server发起调用 服务端返回具体哪些配置发生变化
(ConfigChangeBatchListenResponse) requestProxy(
                                rpcClient, configChangeListenRequest);
// 检查并且刷新客户端配置
refreshContentAndCheck(changeKey, !isInitializing);
- 6.客户端拿到变化的配置后
ClientWorker#refreshContentAndCheck
// 从nacos获取具体的配置变化信息
getServerConfig(cacheData.dataId, cacheData.group, cacheData.tenant, 3000L,notify);
// 刷新缓存内容及MD5
cacheData.setContent(response.getContent());
// 比较MD5
cacheData.checkListenerMd5();
- 7.回调客户端的监听器
CacheData#safeNotifyListener
listener.receiveConfigInfo(contentTmp);

# NacosContextRefresher#registerNacosListener
private void registerNacosListener(final String groupKey, final String dataKey) {
		String key = NacosPropertySourceRepository.getMapKey(dataKey, groupKey);
		Listener listener = listenerMap.computeIfAbsent(key,
				lst -> new AbstractSharedListener() {
					@Override
					public void innerReceive(String dataId, String group,
							String configInfo) {
						refreshCountIncrement();
						nacosRefreshHistory.addRefreshRecord(dataId, group, configInfo);
						// todo feature: support single refresh for listening
						applicationContext.publishEvent(
								new RefreshEvent(this, null, "Refresh Nacos config"));
						if (log.isDebugEnabled()) {
							log.debug(String.format(
									"Refresh Nacos config group=%s,dataId=%s,configInfo=%s",
									group, dataId, configInfo));
						}
					}
				});
		try {
			configService.addListener(dataKey, groupKey, listener);
		}
		catch (NacosException e) {
			log.warn(String.format(
					"register fail for nacos listener ,dataId=[%s],group=[%s]", dataKey,
					groupKey), e);
		}
	}
6、事件监听机制和发布订阅机制区别
事件监听机制有以下角色:(用spring中的举例)
1.ApplicationEventPublisher 事件发布者(真正发布事件借助事件多播器)
2.ApplicationEventMulticaster 事件多播器(事件监听器注册在事件多播器上)
3.ApplicationListener 事件监听器
4.ApplicationEvent 事件
事件监听机制:事件多播器来发布事件,根据事件类型找到对应事件的监听器,调用监听器的onApplicationEvent方法。
发布订阅角色: (用nacos中的举例)
1.NotifyCenter 事件通知中心(借助事件发布者发布事件)
2.Event 事件
3.EventPublisher 事件发布者(事件订阅者注册在发布者上面)
4.Subscriber 事件订阅者
发布订阅机制:事件发布者发布事件将事件放入阻塞队列,事件发布者根据事件类型找到对应事件的订阅者,从阻塞队列获取事件调用订阅者的onEvent方法
