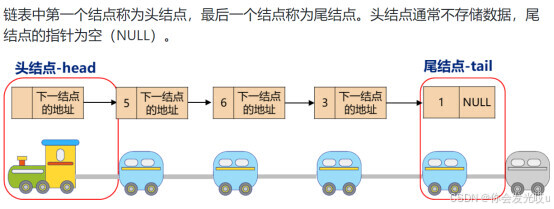
链表(Linked List)是一种线性数据结构,由一组节点(Node)组成,每个节点包含两个部分:数据域(存储数据)和指针域(指向下一个节点的地址)。与数组不同,链表中的元素在内存中不是连续存储的,使用指针进行连接
-
链表类似于火车:有一个火车头,火车头会连接一个节点,节点上有乘客(类似于数据),并且这个节点会连接下一个节点,以此类推
-
实现栈和队列:链表结构非常适合实现这些数据结构。
-
LRU缓存:双向链表和哈希表结合实现。
-
操作系统进程管理:使用链表管理进程调度队列。
-
图和树结构:使用链表作为底层存储
比较
链表和数组一样,可以用于存储一系列的元素,但是链表和数组的实现机制完全不同
-
数组:
-
数组的创建通常需要申请一段连续的内存空间(一整块的内存),并且大小是固定的(大多数编程语言数组都是固定的)
-
当前数组不能满足容量需求时,需要扩容。 (一般情况下是申请一个更大的数组,比如2倍,然后将原数组中的元素复制过去)
-
在数组开头或中间位置插入数据的成本很高,需要进行大量元素的位移
-
-
链表:
-
链表中的元素在内存中不必是连续的空间,可以充分利用计算机的内存,实现灵活的内存动态管理
-
链表不必在创建时就确定大小,并且大小可以无限的延伸下去
-
链表在插入和删除数据时,时间复杂度可以达到O(1),相对数组效率高很多
-
链表访问任何一个位置的元素时,都需要从头开始访问。(无法跳过第一个元素访问任何一个元素)
-
链表无法通过下标直接访问元素,需要从头一个个访问,直到找到对应的元素
-
-
时间复杂度对比
-
在实际开发中,选择使用数组还是链表 需要根据具体应用场景来决定
-
如果数据量不大,且需要频繁随机 访问元素,使用数组可能会更好
-
如果数据量大,或者需要频繁插入 和删除元素,使用链表可能会更好
-
操作
-
append(element):向链表尾部添加一个新的项 -
travers():为了可以方便的看到链表上的每一个元素,我们实现一个遍历链表每一个元素的方法 -
insert(position,element):向链表的特定位置插入一个新的项 -
get(position):获取对应位置的元素 -
indexOf(element):返回元素在链表中的索引。如果链表中没有该元素则返-1 -
update(position,element):修改某个位置的元素 -
removeAt(position):从链表的特定位置移除一项 -
remove(element):从链表中移除一项 -
peek():头的值 -
isEmpty():如果链表中不包含任何元素,返回true,如果链表长度大于0则返回false -
size():链表的长度
结构封装
-
封装一个
Node类,用于封装每一个节点上的信息(包括值和指向下一个节点的引用),它是一个泛型类 -
封装一个
LinkedList类,用于表示我们的链表结构和操作 -
链表中我们保存三个属性,一个是链表的长度,一个是链表中第一个节点,这里也加最后一个节点,方便实现循环和双向链表
class Node<T> {
  value: T;
  next: Node<T>;
  constructor(value: T) {
    this.value = value;
  }
}


export interface ILinkedList<T> {
  append(value: T): void;
  traverse(): void;
  insert(value: T, position: number): boolean;
  removeAt(position: number): T | null;
  get(position: number): T | null;
  update(value: T, position: number): boolean;
  indexOf(value: T): number;
  remove(value: T): T | null;
  isEmpty(): boolean;
  size(): number
}

class LinkedList<T> implements ILinkedList<T> {
  head: Node<T> | null = null;
  tail: Node<T> | null = null;
  length: number = 0;

  append(value: T): void {
    throw new Error("Method not implemented.");
  }
  traverse(): void {
    throw new Error("Method not implemented.");
  }
  insert(value: T, position: number): boolean {
    throw new Error("Method not implemented.");
  }
  removeAt(position: number): T | null {
    throw new Error("Method not implemented.");
  }
  get(position: number): T | null {
    throw new Error("Method not implemented.");
  }
  update(value: T, position: number): boolean {
    throw new Error("Method not implemented.");
  }
  indexOf(value: T): number {
    throw new Error("Method not implemented.");
  }
  remove(value: T): T | null {
    throw new Error("Method not implemented.");
  }
  peek(value: T): T | undefined {
    throw new Error("Method not implemented.");
  }
  isEmpty(): boolean {
    throw new Error("Method not implemented.");
  }
  size(): number {
    throw new Error("Method not implemented.");
  }
}

const linked = new LinkedList<string>();
console.log(linked.head); // null
单向链表
实现
在下面实现各种方法时,我们会定义变量 previous 来保存前一个节点和 current 保存当前节点
-
各种方法实现都是通过操作变量来达到操作链表
-
这是因为变量实际上是链表中节点的引用,而不是节点的副本
-
链表的节点是对象,变量实际上指向的是链表中某个节点的内存地址(引用)
-
因此当我们修改变量时也会影响链表中的节点,这种机制使得我们能够轻松操作链表中的节点
-
部分方法图解如下:
-
append(element): 向链表表尾部追加数据链表为空,直接赋值为
head链表不为空,需要向其他节点后面追加节点
-
insert(position,element)添加到第一个位置,表示新添加的节点是头,需要将原来的头节点作为新节点的
next,head指向新节点添加到其他位置,需要先找到这个节点位置,通过循环向下找,并在这个过程中保存上一个节点和下一个节点,找到正确的位置后,将新节点的
next指向下一个节点,将上一个节点的next指向新的节点(步骤颠倒后续链表之间的连接就会断掉) -
removeAt(position):从链表的特定位置移除一项移除第一项时,直接让
head指向第二项信息,第一项信息没有引用指向后面会被回收掉移除其他项的信息时,通过循环,找到正确的位置,将上一项的
next指向current项的next
-
-
完整代码如下: 抽取共同方法
export class Node<T> {
  value: T;
  next: Node<T> | null = null;
  constructor(value: T) {
    this.value = value;
  }
}

export interface ILinkedList<T> {
  append(value: T): void;
  traverse(): void;
  insert(value: T, position: number): boolean;
  removeAt(position: number): T | null;
  get(positon: number): T | null;
  update(value: T, position: number): boolean;
  indexOf(value: T): number;
  remove(value: T): T | null;
  peek(value: T): T | undefined;
  isEmpty(): boolean;
  size(): number;
}

export class LinkedList<T> implements ILinkedList<T> {
  // 使用protected也是为了让其子类继承时使用
  protected head: Node<T> | null = null;
  protected tail: Node<T> | null = null;
  protected length: number = 0;

  protected getNode(position: number): {
    previous: Node<T> | null;
    current: Node<T> | null;
  } {
    let index = 0;
    let previous: Node<T> | null = null;
    let current = this.head;

    while (index++ < position && current) {
      previous = current;
      current = current.next;
    }
    return { current, previous };
  }

  private isTail(node: Node<T>) {
    return this.tail === node;
  }

  /* 向链表表尾部追加数据 */
  append(value: T): void {
    const newNode = new Node(value);
    // 链表为空,直接赋值为head
    if (!this.head) {
      this.head = newNode;
    } else {
      // 链表不为空,循环找到尾部节点,让其next指向新节点完成追加
      // let current = this.head;
      // while (current.next) {
      //   current = current.next;
      // }
      // current.next = newNode;
      this.tail!.next = newNode;
    }
    this.tail = newNode;
    this.length++;
  }

  /* 链表的遍历方法 */
  traverse(): void {
    let values: T[] = [];

    let current = this.head;
    while (current) {
      values.push(current.value);
      current = this.isTail(current) ? null : current.next; // 考虑循环链表的情况
    }
    if (this.head && this.tail!.next === this.head) {
      // 循环链表时
      values.push(this.head.value);
    }
    console.log(this.length, values.join(" -> "));
  }

  /* 向链表的特定位置插入一个新的项 */
  insert(value: T, position: number): boolean {
    // 1.越界的判断
    if (position < 0 && position > this.length) return false;

    // 2.根据value创建新的节点
    const newNode = new Node(value);
    let { previous, current } = this.getNode(position);

    // 头部插入
    if (position === 0) {
      newNode.next = this.head;
      this.head = newNode;
    } else {
      // 中尾部插入
      newNode.next = current;
      previous!.next = newNode;

      if (position === this.length) {
        // 尾部插入tail为新节点
        this.tail = newNode;
      }
    }
    this.length++;
    return true;
  }
  removeAt(position: number): T | null {
    // 1.越界的判断
    if (position < 0 || position >= this.length) return null;

    let { current, previous } = this.getNode(position);
    if (position === 0) {
      this.head = current?.next ?? null;

      if (this.length === 1) {
        this.tail = null;
      }
    } else {
      previous!.next = current?.next ?? null;
      if (current === this.tail) {
        // 尾部删除tail为前一个节点
        this.tail = previous;
      }
    }

    this.length--;
    return current?.value ?? null;
  }

  // 获取方法
  get(position: number): T | null {
    // 越界问题
    if (position < 0 || position >= this.length) return null;

    let { current } = this.getNode(position);
    return current?.value ?? null;
  }

  // 更新方法
  update(value: T, position: number): boolean {
    if (position < 0 || position >= this.length) return false;

    // 获取对应位置的节点, 直接更新即可
    let { current } = this.getNode(position);
    current!.value = value;
    return true;
  }

  // 根据值, 获取对应位置的索引
  indexOf(value: T): number {
    let index = 0;
    let current = this.head;
    while (current) {
      if (current.value === value) return index;
      current = this.isTail(current) ? null : current.next; // 考虑循环链表的情况
      index++;
    }
    return -1;
  }

  // 删除方法: 根据value删除节点
  remove(value: T): T | null {
    const index = this.indexOf(value);
    return this.removeAt(index);
  }

  peek(): T | undefined {
    return this.head?.value;
  }

  // 判读单链表是否为空
  isEmpty(): boolean {
    return this.length === 0;
  }

  size(): number {
    return this.length;
  }
}

const linked = new LinkedList<string>();
linked.append("aaa");
linked.append("bbb");
linked.append("ccc");
linked.traverse(); // 3 aaa -> bbb -> ccc

linked.insert("zzz", 0);
linked.insert("ddd", 2);
linked.insert("eee", 5);
linked.traverse(); // 6 zzz -> aaa -> ddd -> bbb -> ccc -> eee

console.log(linked.removeAt(0)); // zzz
console.log(linked.removeAt(1)); // ddd
console.log(linked.removeAt(3)); // eee
linked.traverse(); // 3 aaa -> bbb -> ccc

console.log(linked.get(0)); // aaa
console.log(linked.get(1)); // bbb
console.log(linked.get(2)); // ccc
console.log(linked.get(3)); // null

console.log(linked.update("aa", 0)); // true
console.log(linked.update("cc", 2)); // true
console.log(linked.update("dd", 3)); // false
linked.traverse(); // 3 aa -> bbb -> cc

console.log(linked.indexOf("aa")); // 0
console.log(linked.indexOf("ccc")); // -1

linked.remove("bbb");
linked.traverse(); // 2 aa -> cc

console.log(linked.isEmpty()); // false
面试题
-
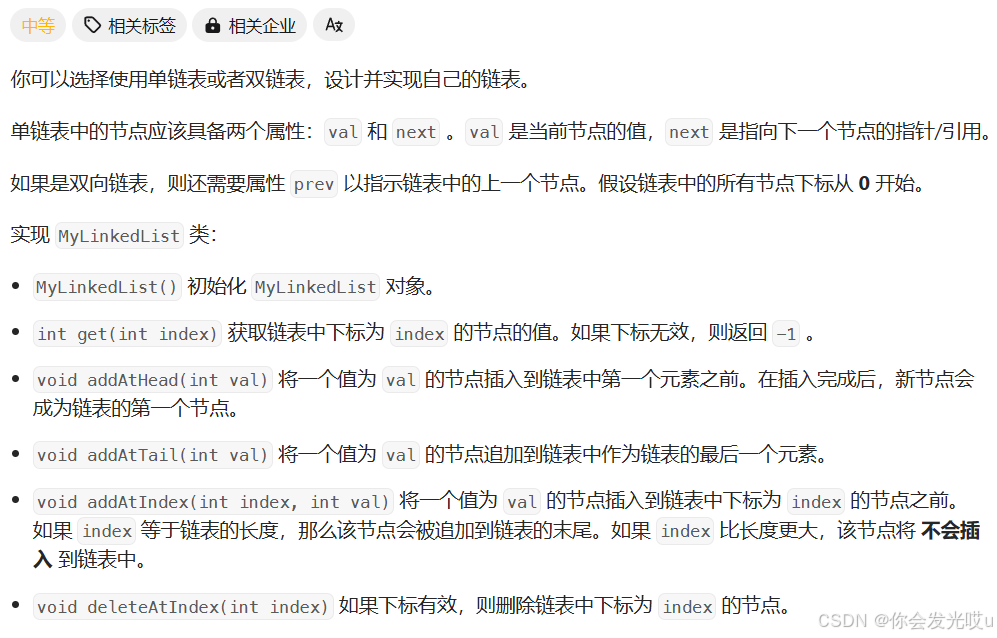
设计链表 https://leetcode.cn/problems/design-linked-list/description/ 上面代码已经完成
-
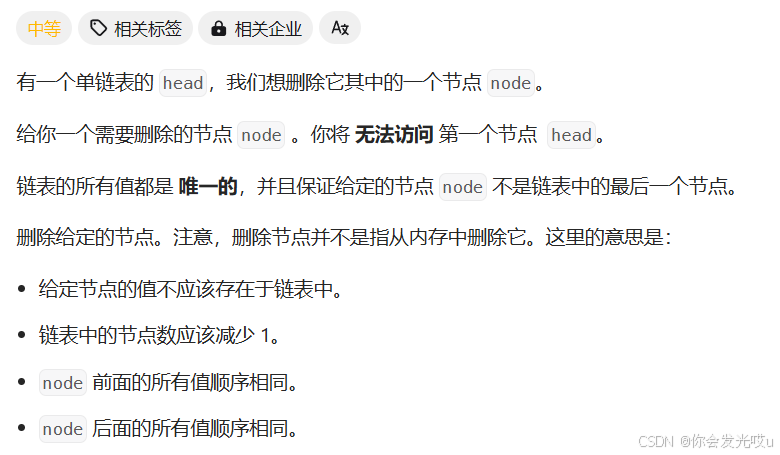
删除链表中的节点 https://leetcode.cn/problems/delete-node-in-a-linked-list/description/
class ListNode { val: number; next: ListNode | null; constructor(val?: number, next?: ListNode | null) { this.val = val === undefined ? 0 : val; this.next = next === undefined ? null : next; } } function deleteNode(node: ListNode | null): void { node!.val = node!.next!.val node!.next = node!.next!.next } -
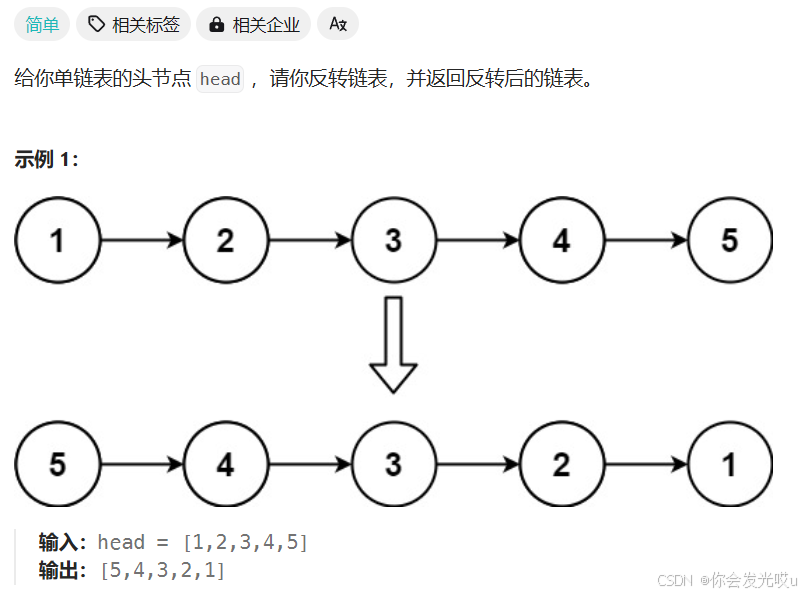
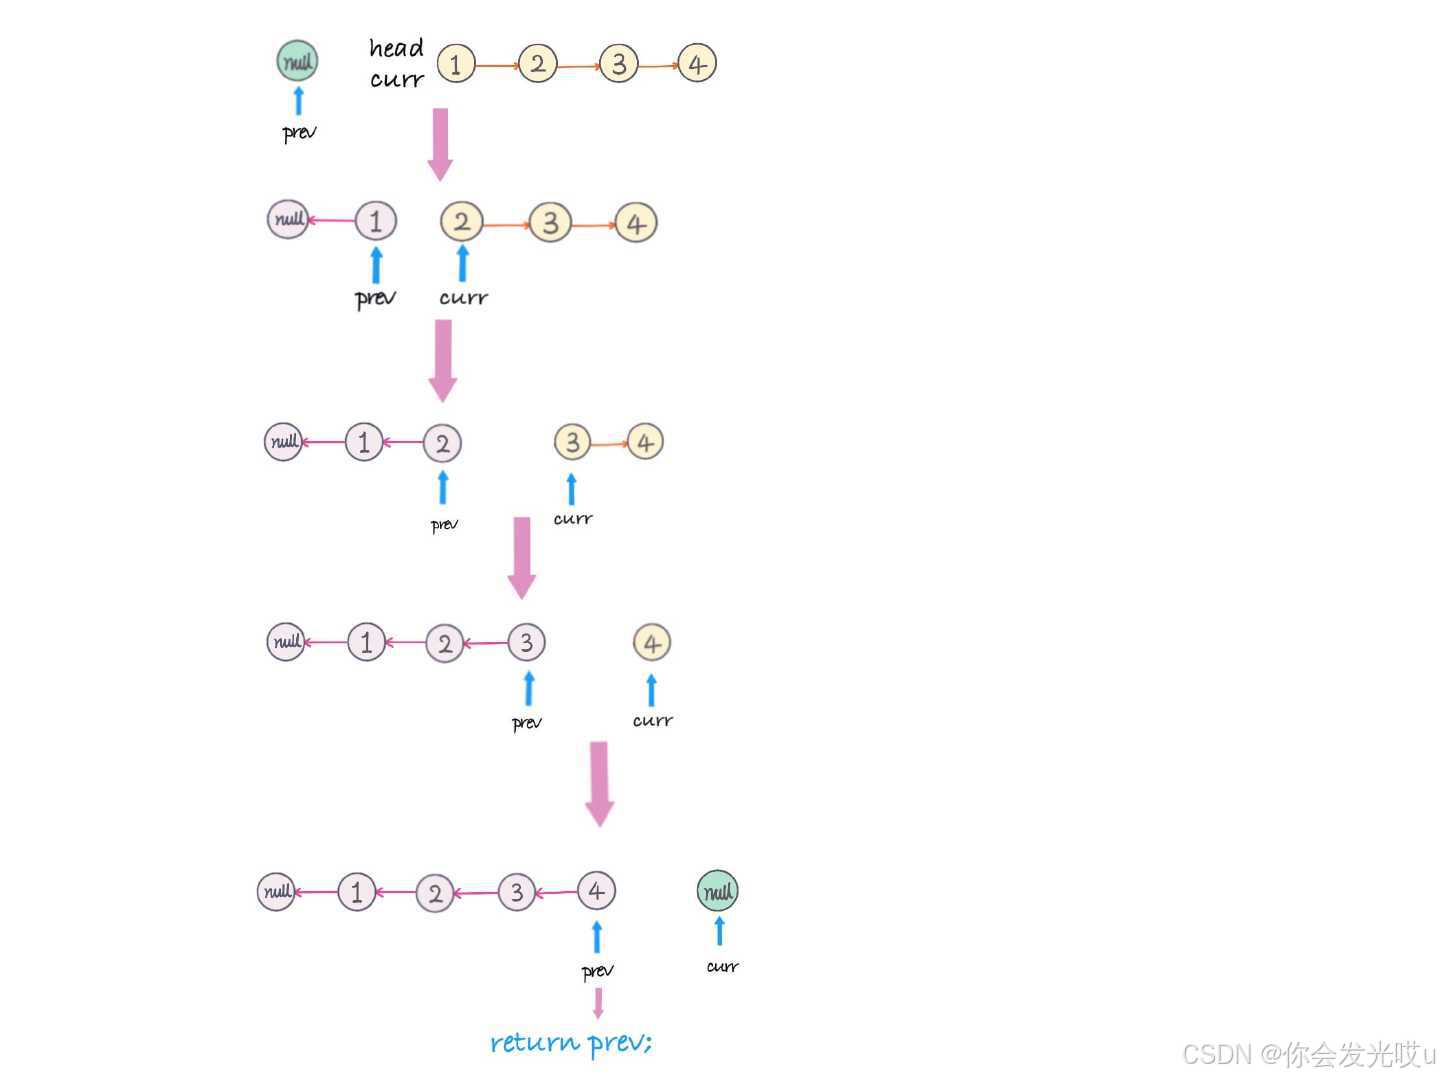
反转链表 https://leetcode.cn/problems/reverse-linked-list/description/
-
非递归实现:
class Node { val: number; next: ListNode | null; constructor(val?: number, next?: ListNode | null) { this.val = val === undefined ? 0 : val; this.next = next === undefined ? null : next; } } function reverseList(head: Node | null): Node | null { // 1.判断节点为null, 或者只要一个节点, 那么直接返回即可 if (head === null || head.next === null) return head; let previous: Node | null = null; while (head) { const current: Node | null = head.next; head.next = previous; previous = head; head = current; } return previous; } -
递归实现:
function reverseList<T>(head: Node | null): Node | null {
  // 如果使用的是递归, 那么递归必须有结束条件
  if (head === null || head.next === null) return head;
  const newHead = reverseList(head?.next ?? null);
  head.next.next = head;
  head.next = null;
  return newHead;
}
let n = new Node(1);
n.next = new Node(2);
n.next.next = new Node(3);
n.next.next.next = new Node(4);
n.next.next.next.next = new Node(5);

let current = reverseList(n);
while (current) {
  console.log(current.value); // 5 4 3 2 1
  current = current.next;
}
-
循环链表
循环链表(Circular Linked List)是一种特殊的链表结构,其中链表的最后一个节点指向链表的第一个节点,从而形成一个闭环。它的主要特性是任何一个节点都可以通过不断访问 next 指针回到起点节点,因此在循环链表中没有空指针这种终止条件
实现
-
方式一:从零去实现一个新的链表,包括其中所有的属性和方法
-
方式二:继承自之前封装的
LinkedList,只实现差异化的部分,我们使用这个方式 -
实现代码如下:实现
append、实现insert、实现removeAt、indexOf和traverse在写单向链表时判断了循环的情况不需要再重构import { LinkedList } from "./单向链表实现.ts"; class CircularLinkedList<T> extends LinkedList<T> { append(value: T): void { super.append(value); this.tail!.next = this.head; } insert(value: T, position: number): boolean { const isSuccess = super.insert(value, position); if (isSuccess && (position === this.length - 1 || position === 0)) { // 如果插入成功 && (尾部插入 || 头部插入)都需要更新tail.next this.tail!.next = this.head; } return isSuccess; } removeAt(position: number): T | null { const value = super.removeAt(position); if ( value && this.tail && (position === this.length - 1 || position === 0) ) { // 如果删除成功 && tail != null &&(尾部删除 || 头部删除)都需要更新tail.next this.tail!.next = this.head; } return value; } } const linked = new CircularLinkedList<string>(); linked.append("aaa"); linked.append("bbb"); linked.append("ccc"); linked.traverse(); // 3 aaa -> bbb -> ccc -> aaa linked.insert("zzz", 0); linked.insert("ddd", 2); linked.insert("eee", 5); linked.traverse(); // zzz -> aaa -> ddd -> bbb -> ccc -> eee -> zzz console.log(linked.removeAt(0)); // zzz console.log(linked.removeAt(1)); // ddd console.log(linked.removeAt(3)); // eee linked.traverse(); // 3 aaa -> bbb -> ccc -> aaa console.log(linked.get(0)); // aaa console.log(linked.get(1)); // bbb console.log(linked.get(2)); // ccc console.log(linked.get(3)); // null console.log(linked.update("aa", 0)); // true console.log(linked.update("cc", 2)); // true console.log(linked.update("dd", 3)); // false linked.traverse(); // 3 aa -> bbb -> cc -> aa console.log(linked.indexOf("aa")); // 0 console.log(linked.indexOf("ccc")); // -1 linked.remove("bbb"); linked.traverse(); // 2 aa -> cc -> aa console.log(linked.isEmpty()); // false
双向链表
双向链表(Doubly Linked List)是一种数据结构,类似于单向链表,但每个节点包含两个指针,一个指向下一个节点,一个指向前一个节点
- 优点:
-
可以从头到尾、也可以从尾到头进行遍历,灵活性更高
-
删除和插入操作时,不需要像单向链表那样只能从头遍历找到前一个节点
-
- 缺点:
-
每个节点需要额外的指针(
prev),会占用更多的存储空间 -
每次在插入或删除某个节点时,需要处理四个引用,实现起来要困难一些
-
实现
-
封装双向链表节点:需要进一步添加一个
prev属性,用于指向前一个节点 -
实现代码如下:因为差距较大重新实现
append、insert、removeAt,新增加prepend(在头部添加元素)、postTraverse(从尾部遍历所有节点)import { LinkedList, Node } from "./单向实现"; class DoublyNode<T> extends Node<T> { next: DoublyNode<T> | null = null; prev: DoublyNode<T> | null = null; } class DoublyLinkedList<T> extends LinkedList<T> { protected head: DoublyNode<T> | null = null; protected tail: DoublyNode<T> | null = null; // 尾部追加元素 append(value: T): void { const newNode = new DoublyNode(value); if (!this.head) { this.head = newNode; } else { this.tail!.next = newNode; // 不能将一个父类的对象, 赋值给一个子类的类型 // 可以将一个子类的对象, 赋值给一个父类的类型(多态) newNode.prev = this.tail; } this.tail = newNode; this.length++; } // 插入元素 insert(value: T, position: number): boolean { if (position < 0 && position > this.length) return false; if (position === 0) { this.prepend(value); } else if (position === this.length) { this.append(value); } else { const newNode = new DoublyNode(value); /* 使用 as 断言它是 DoublyNode<T> 类型, 那么在后续代码中,TypeScript 会允许你访问 DoublyNode<T> 类型中的属性(例如 prev), 即使这个属性在 Node<T> 类型中并未定义 */ const current = this.getNode(position).current as DoublyNode<T>; newNode.next = current; newNode.prev = current.prev; current.prev!.next = newNode; current.prev = newNode; this.length++; } return true; } // 删除元素 removeAt(position: number): T | null { if (position < 0 || position >= this.length) return null; let current = this.head; if (position === 0) { if (this.length === 1) { this.head = null; this.tail = null; } else { this.head = this.head!.next; this.head!.prev = null; } } else if (position === this.length - 1) { current = this.tail; this.tail = this.tail!.prev; this.tail!.next = null; } else { current = this.getNode(position).current as DoublyNode<T> current!.next!.prev = current!.prev; current!.prev!.next = current!.next; } this.length--; return current?.value ?? null; } // 在头部添加元素 prepend(value: T): boolean { const newNode = new DoublyNode(value); newNode.next = this.head; if (this.head) { this.head.prev = newNode; } else { this.tail = newNode; } this.head = newNode; this.length++; return true; } // 从尾部开始遍历所有节点 postTraverse() { let values: T[] = []; let current = this.tail; while (current) { values.push(current.value); current = current.prev; } console.log(this.length, values.join(" <- ")); } } const linked = new DoublyLinkedList<string>(); linked.prepend("aaa"); linked.append("bbb"); linked.append("ccc"); linked.traverse(); // 3 aaa -> bbb -> ccc linked.postTraverse(); // 3 ccc <- bbb <- aaa linked.insert("zzz", 0); linked.insert("ddd", 2); linked.insert("eee", 5); linked.traverse(); // 6 zzz -> aaa -> ddd -> bbb -> ccc -> eee console.log(linked.removeAt(0)); // zzz console.log(linked.removeAt(1)); // ddd console.log(linked.removeAt(3)); // eee linked.traverse(); // 3 aaa -> bbb -> ccc console.log(linked.get(0)); // aaa console.log(linked.get(1)); // bbb console.log(linked.get(2)); // ccc console.log(linked.get(3)); // null console.log(linked.update("aa", 0)); // true console.log(linked.update("cc", 2)); // true console.log(linked.update("dd", 3)); // false linked.traverse(); // 3 aa -> bbb -> cc console.log(linked.indexOf("aa")); // 0 console.log(linked.indexOf("ccc")); // -1 linked.remove("bbb"); linked.traverse(); // 2 aa -> cc console.log(linked.isEmpty()); // false
