在现代Web应用中日历组件几乎无处不在,它不仅是展示日期和时间的工具更是提升用户体验的重要组成部分,在这篇文章中,我们将深入探讨如何在React应用中集成并使用Toast UI Calendar日历组件打造出美观、交互性强的日程管理系统。
目录
初识Calendar
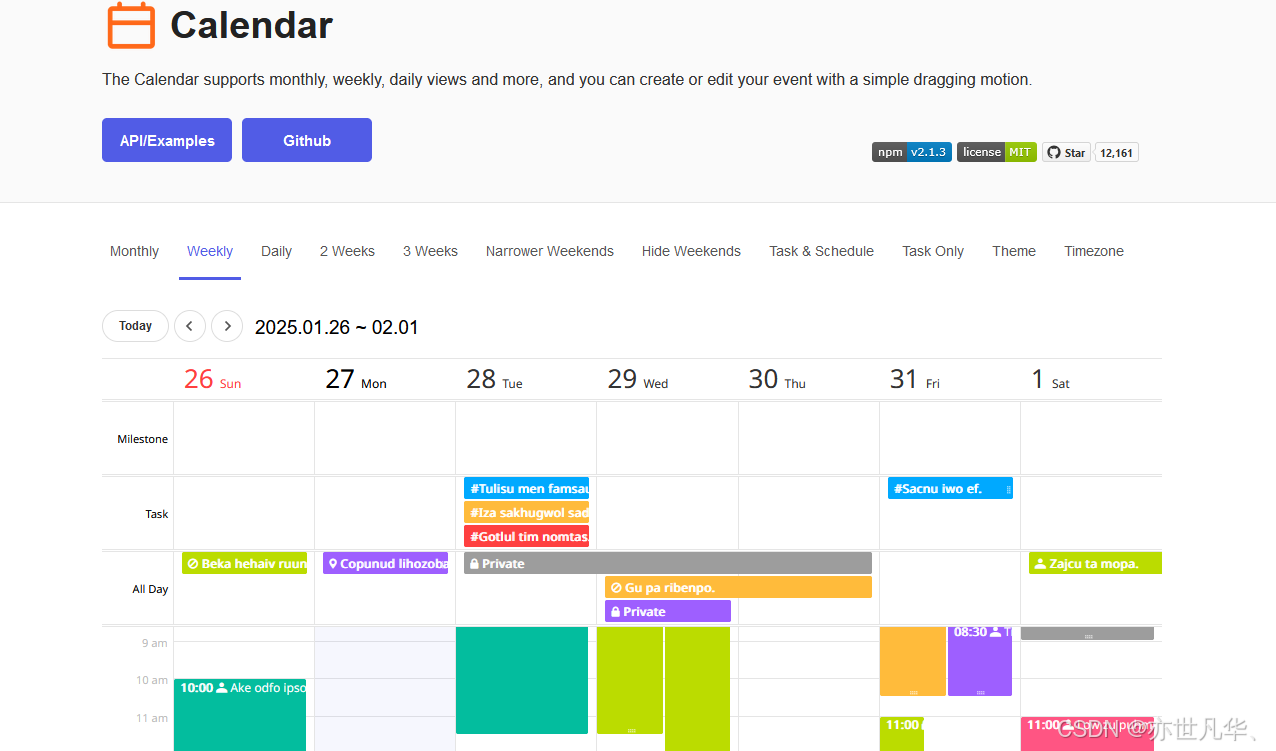
Toast UI Calendar是一个基于JS和React构建的开源日历组件,专门用于提供功能丰富灵活且易于定制的日历界面,它支持多种视图模式(如月视图、周视图、日视图、列表视图等),使得用户能够高效地查看和管理日程、事件和任务,其官方网址:地址 如下所示:
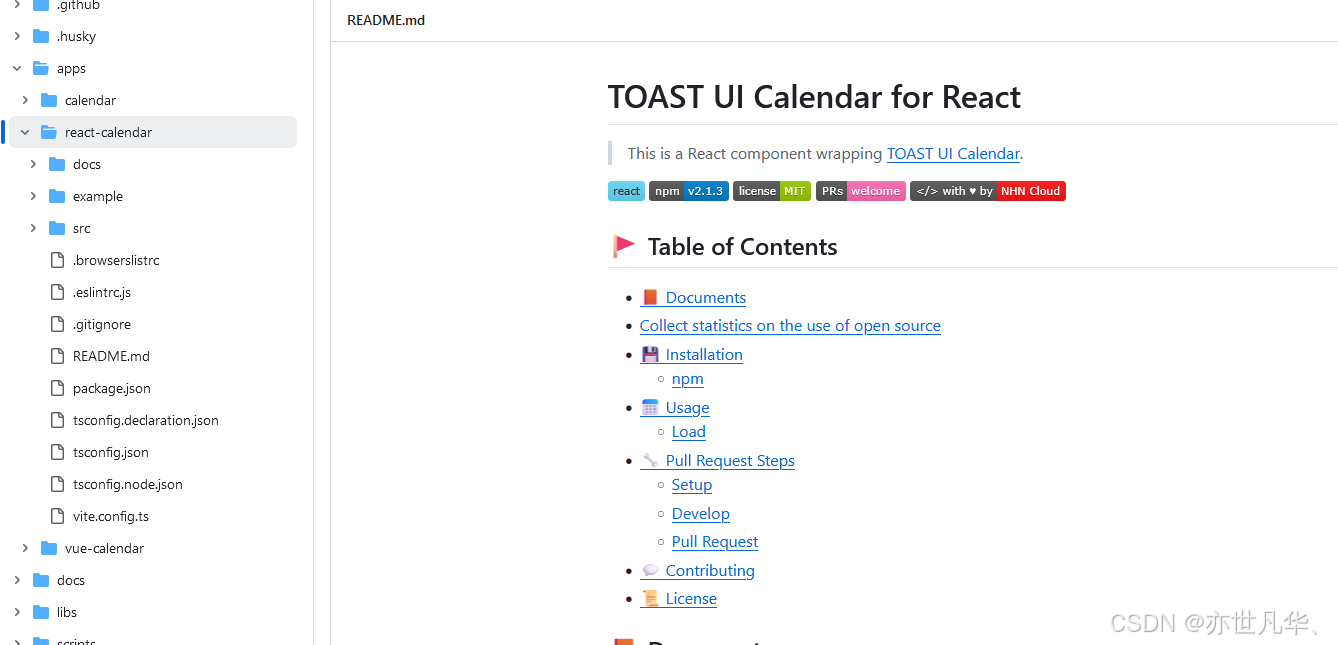
该日历表同时支持react和vue,这里我们拿react进行举例,可以打开react的github文档:地址 :
终端执行如下命令进行安装:
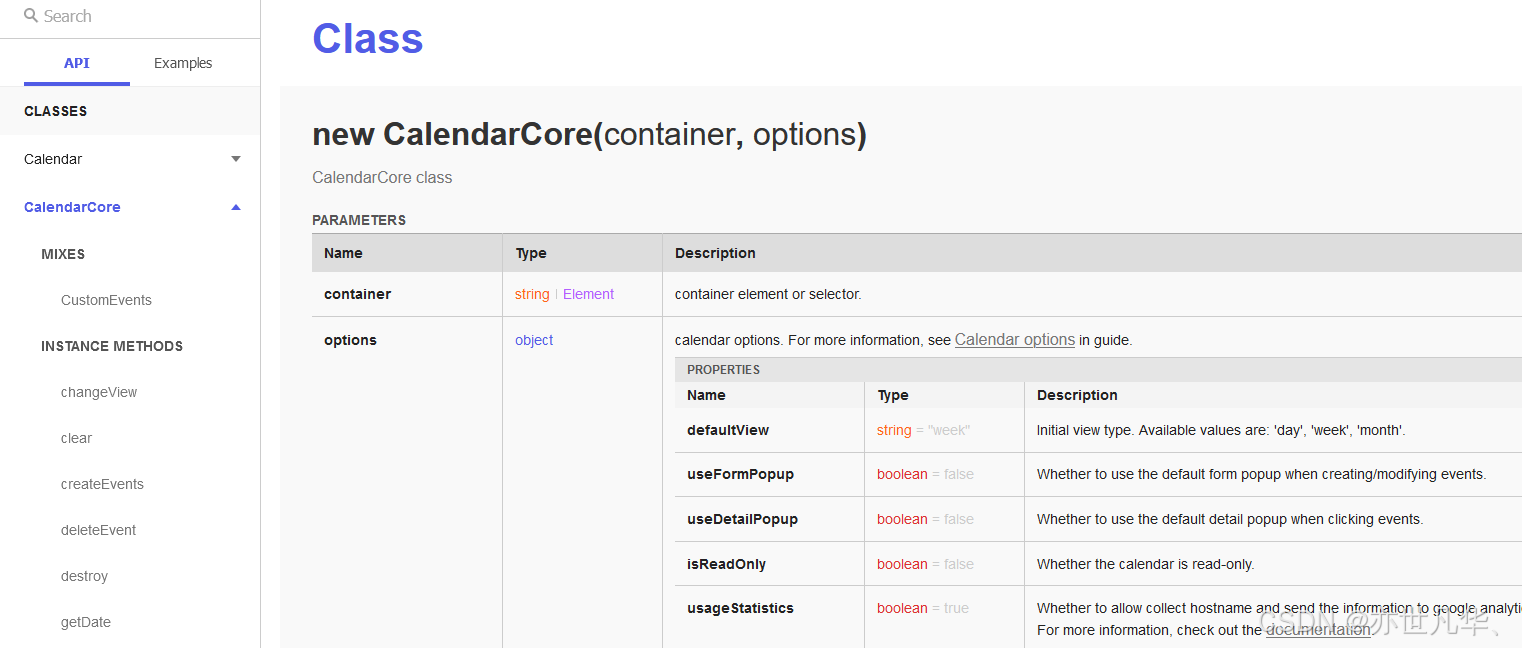
npm install --save @toast-ui/react-calendar接下来我们根据官方文档给出的一些API示例,简单的复刻一下一些相关的案例情况:
周日历的复现
接下来我们开始使用React框架来实现一个周日历表的复现,通过集成 Toast UI Calendar实现基础的日历展示,和自定义视图与交互方式,为用户提供更加灵活的日程安排体验,接下来将为你提供一些实用的技巧和思路,对周日历进行简单的复刻:
时间切换调整
需要实现能够借助antd的周日期选择,动态的切换周日历。这里我们借助日历组件的实例,在日期组件切换时间的同时设置一下日历的时间:
import { useRef, useState } from 'react';
import { DatePicker } from 'antd';
import Calendar from '@toast-ui/react-calendar';
import '@toast-ui/calendar/dist/toastui-calendar.min.css';
import dayjs from 'dayjs';

const CalendarComponents = () => {
    const calendarRef = useRef<any>(null); // 使用 ref 获取 Toast UI Calendar 实例
    const [currentWeekDate, setCurrentWeekDate] = useState<any>(dayjs());
    return (
        <>
            <DatePicker picker="week" value={currentWeekDate}
                onChange={(value: any) => {
                    setCurrentWeekDate(value);
                    if (calendarRef.current) calendarRef.current.getInstance().setDate(value.toDate());
                }}
            />
            <Calendar ref={calendarRef} height="400px" view="week" />
        </>
    );
}

export default CalendarComponents;
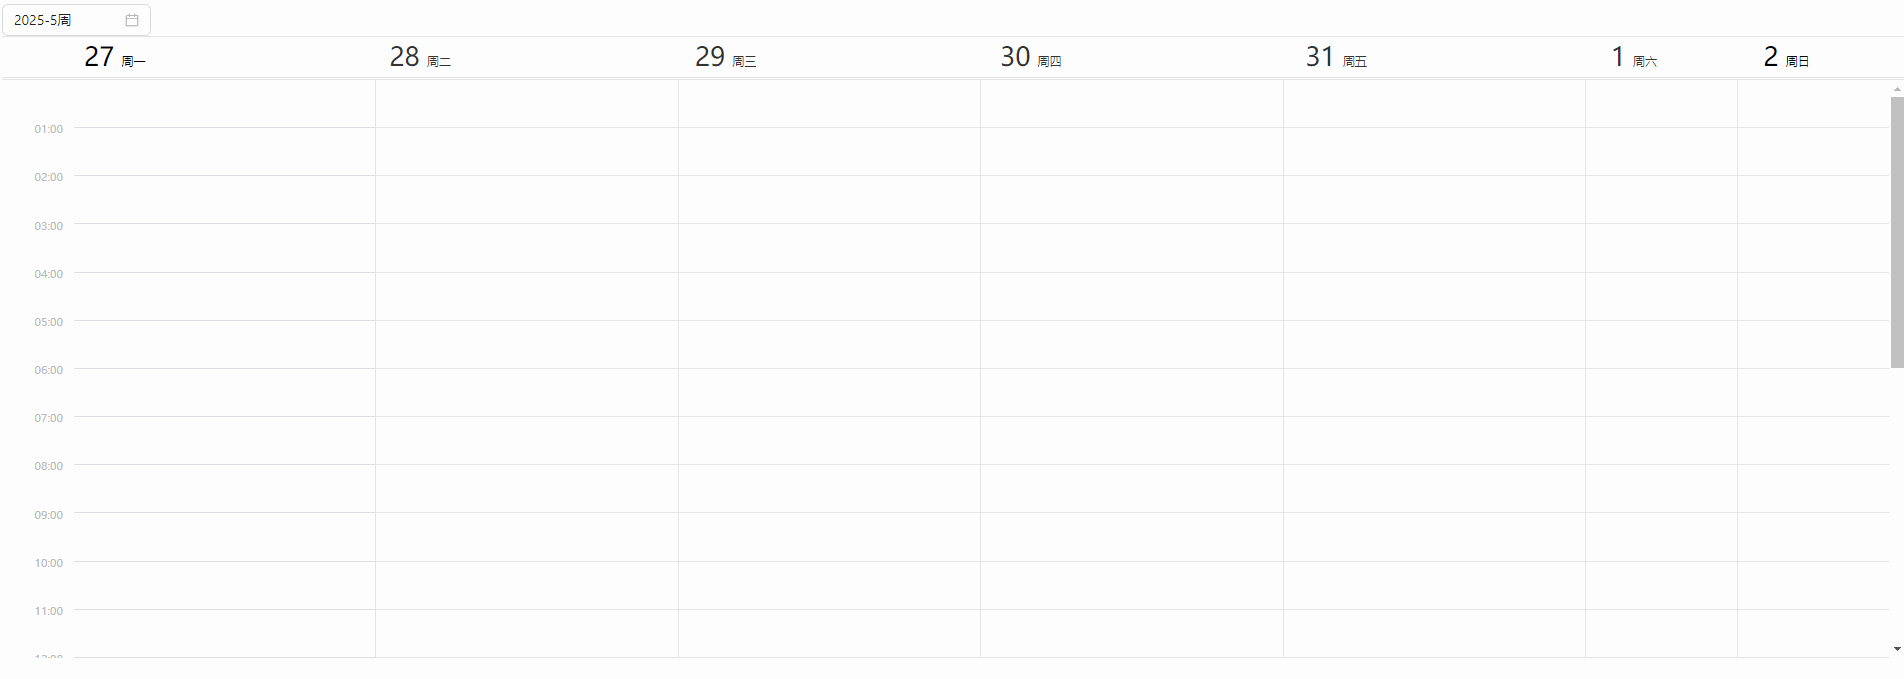
设置中文时间
接下来我们需要对周日历的一些内容进行相应的调整:设置只读;设置中文日期;设置一周开始为周一;设置周末为窄格式显示;删除Task、Milestone;
import { useRef, useState } from 'react';
import Calendar from '@toast-ui/react-calendar';
import '@toast-ui/calendar/dist/toastui-calendar.min.css';
import { DatePicker } from 'antd';
import dayjs from 'dayjs';

const CalendarComponents = () => {
    const calendarRef = useRef<any>(null); // 使用 ref 获取 Toast UI Calendar 实例
    const [currentWeekDate, setCurrentWeekDate] = useState<any>(dayjs());
    return (
        <>
            <DatePicker picker="week" value={currentWeekDate}
                onChange={(value: any) => {
                    setCurrentWeekDate(value);
                    if (calendarRef.current) calendarRef.current.getInstance().setDate(value.toDate());
                }}
            />
            <Calendar ref={calendarRef} height="700px" view="week"
                isReadOnly={true} // 设置日历为只读模式
                week={

  {
                    dayNames: ['周日', '周一', '周二', '周三', '周四', '周五', '周六'], // 自定义星期名称
                    startDayOfWeek: 1, // 设置一周的开始为周一(0为周日)
                    narrowWeekend: true, // 设置周末为窄格式显示
                    taskView: false, // 自定义任务视图显示状态
                    showNowIndicator: false, // 自定义现在时间指示器显示状态
                }}
            />
        </>
    );
}

export default CalendarComponents;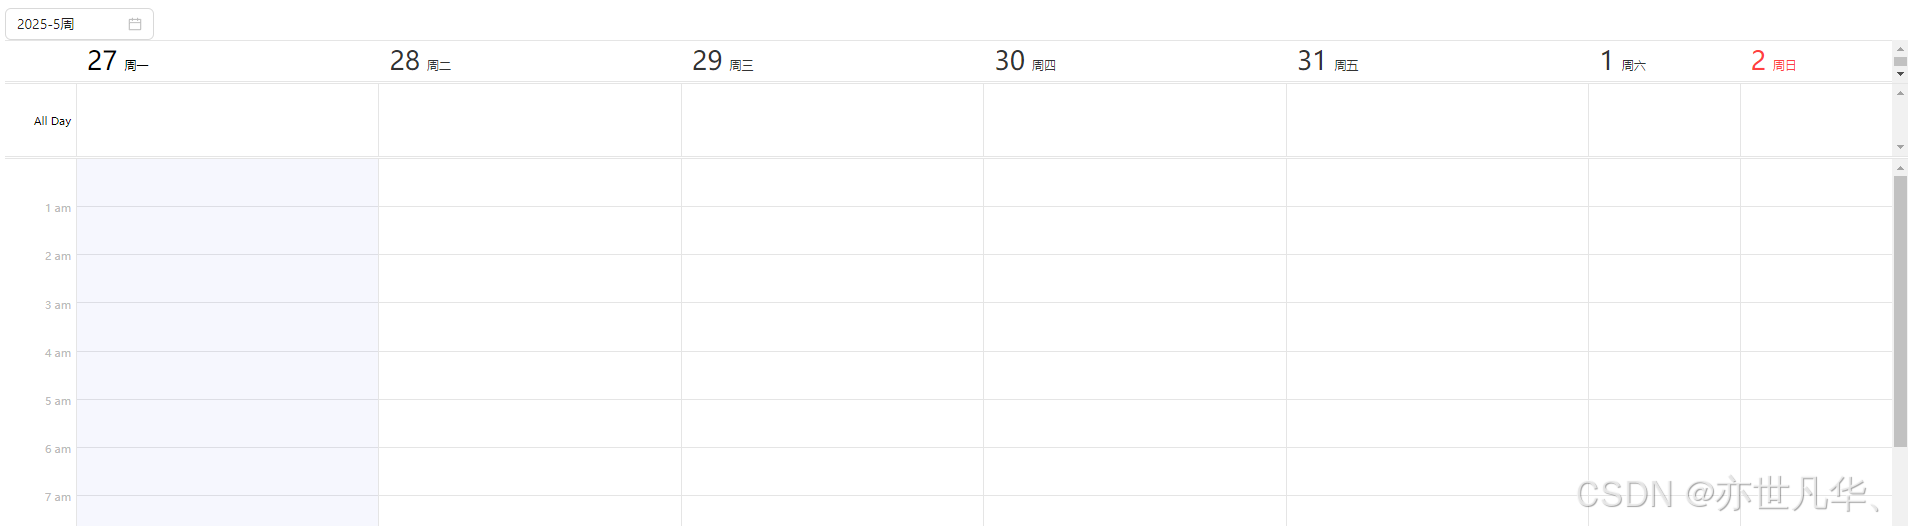
All Day隐藏
这里我发现了All Day无法通过配置删除(可能我看的官方文档不够仔细,但是就是没有发现),这里我们通过CSS定位到All Day的位置,然后通过display: none;隐藏掉,并且我发现周日那天文字好像被标红了,统一一点吧,这里还是通过CSS进行样式还原,如下所示:
.toastui-calendar-week-view-day-names {
    overflow-y: hidden !important; // 清除日期默认滚动条
    .toastui-calendar-holiday-sun {
        color: inherit !important; // 清除周日默认颜色
    }
}
.toastui-calendar-allday {
    display: none !important; // 清除全天事件

}
.toastui-calendar-panel-resizer {
    display: none !important; // 清除底部滚动条
}
时间刻度调整
这里我发现左侧的时间格式还是用到了am和pm的方式,这里我想使用01到23点这种时间,我发现我安装的这个日历组件库的包没有中文语言包,找了网上很多资料发现其他人都没有讲到这个点,如果想设置时间格式的话需要通过timezone配置对象中的zones进行设置,但是我发现就是说那个默认的am和pm就是消除不掉,这里我翻阅官方文档没有发现一些其他好的方法,这里通过配置再通过手动的css样式进行调整,如果大家有好的方法还原打在评论区:
import { useRef, useState } from 'react';
import Calendar from '@toast-ui/react-calendar';
import '@toast-ui/calendar/dist/toastui-calendar.min.css';
import { DatePicker } from 'antd';
import dayjs from 'dayjs';
import "./index.less"

const CalendarComponents = () => {
    const calendarRef = useRef<any>(null); // 使用 ref 获取 Toast UI Calendar 实例
    const [currentWeekDate, setCurrentWeekDate] = useState<any>(dayjs());
    return (
        <>
            <DatePicker picker="week" value={currentWeekDate}
                onChange={(value: any) => {
                    setCurrentWeekDate(value);
                    if (calendarRef.current) calendarRef.current.getInstance().setDate(value.toDate());
                }}
            />
            <Calendar ref={calendarRef} height="700px" view="week"
                isReadOnly={true} // 设置日历为只读模式
                week={

  {
                    dayNames: ['周日', '周一', '周二', '周三', '周四', '周五', '周六'], // 自定义星期名称
                    startDayOfWeek: 1, // 设置一周的开始为周一(0为周日)
                    narrowWeekend: true, // 设置周末为窄格式显示
                    taskView: false, // 自定义任务视图显示状态
                    showNowIndicator: false, // 自定义现在时间指示器显示状态
                }}
                timezone={

  {
                    zones: [ // 这里没有发现其他好的方法,只能通过两个一样的标签设置,然后清除第一个
                        { timezoneName: 'Asia/Shanghai', displayLabel: '', tooltip: '' },
                        { timezoneName: 'Asia/Shanghai', displayLabel: '', tooltip: '' },
                    ]
                }}
            />
        </>
    );
}

export default CalendarComponents;
.toastui-calendar-week-view-day-names {
overflow-y: hidden !important; // 清除日期默认滚动条
.toastui-calendar-holiday-sun {
color: inherit !important; // 清除周日默认颜色
}
}
.toastui-calendar-allday {
display: none !important; // 清除全天事件
}
.toastui-calendar-panel-resizer {
display: none !important; // 清除底部滚动条
}
/* 这里主要是用来设置左侧时间格式的 */
.toastui-calendar-timegrid-time-column {
.toastui-calendar-timegrid-hour-rows:nth-child(1) {
border-right: none !important; // 清除时分事件第一列边框
margin-left: 30px !important; // 清除时分事件第一列左边距
}
.toastui-calendar-timegrid-hour-rows:nth-child(2) {
display: none !important; // 清除时分事件第一行
}
}
.toastui-calendar-timezone-labels-slot {
display: none !important; // 清除时分事件时分标签
}
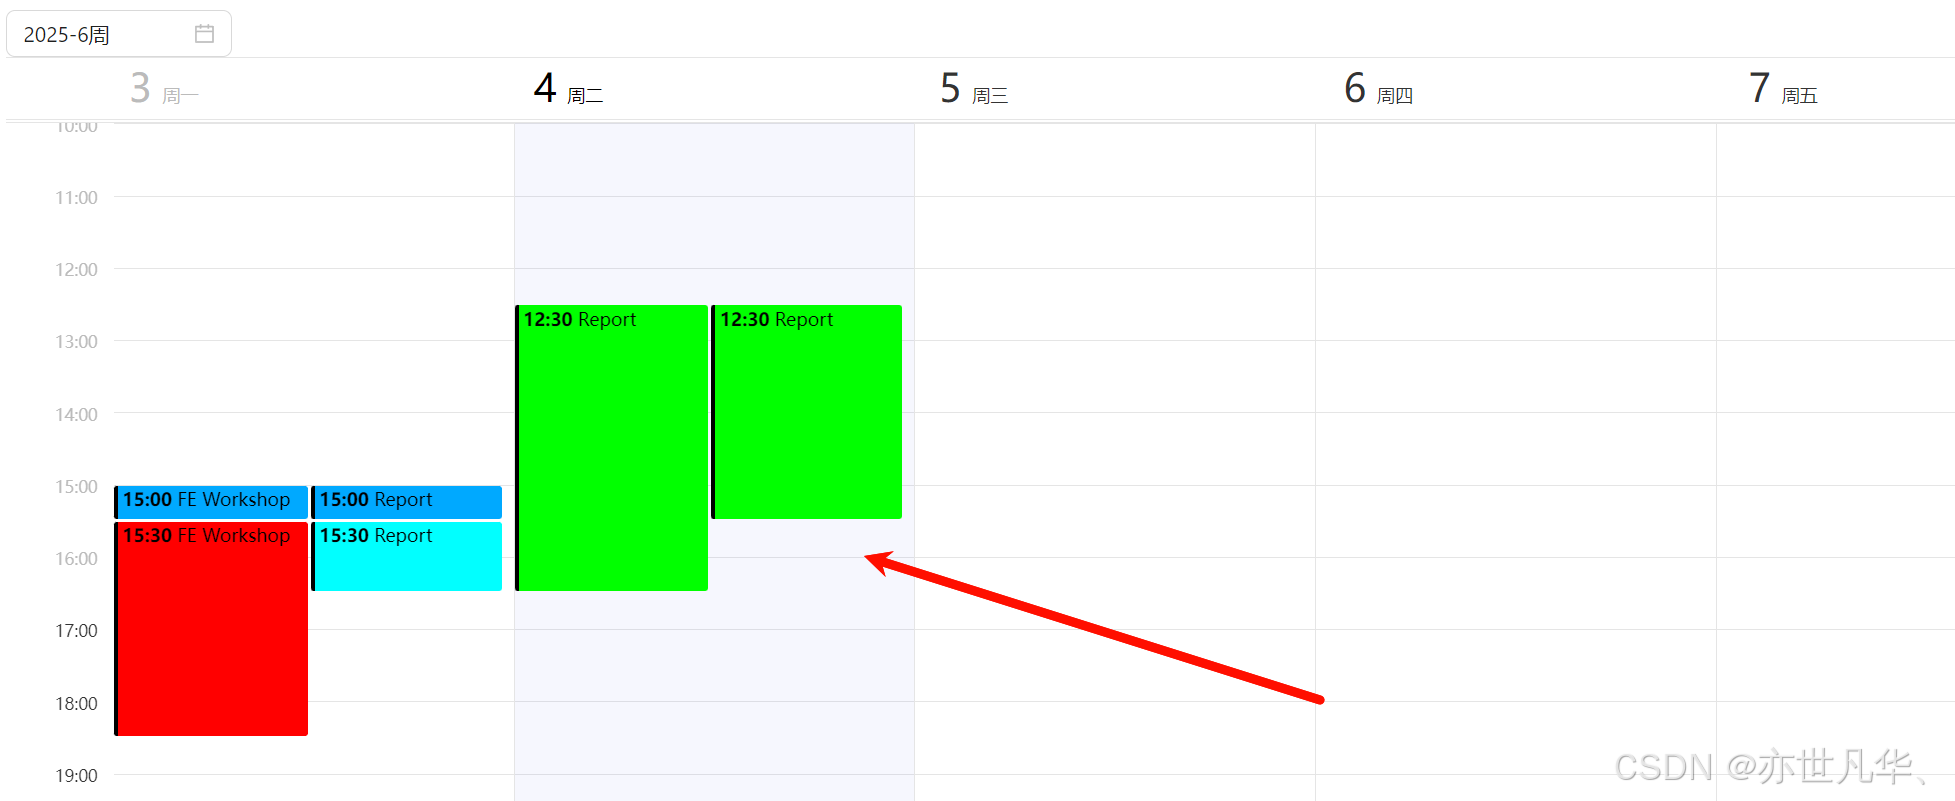
数据任务设置
接下来我们需要开始给这个周日历设置一些任务和样式了:
这里通过calendars设置任务的颜色和名称,通过events设置任务的具体数据,如下所示:
import { useRef, useState } from 'react';
// @ts-ignore
import Calendar from '@toast-ui/react-calendar';
import '@toast-ui/calendar/dist/toastui-calendar.min.css';
import { DatePicker } from 'antd';
import dayjs from 'dayjs';
import "./index.less"
const CalendarComponents = () => {
const calendarRef = useRef<any>(null); // 使用 ref 获取 Toast UI Calendar 实例
const [currentWeekDate, setCurrentWeekDate] = useState<any>(dayjs());
return (
<>
<DatePicker picker="week" value={currentWeekDate}
onChange={(value: any) => {
setCurrentWeekDate(value);
if (calendarRef.current) calendarRef.current.getInstance().setDate(value.toDate());
}}
/>
<Calendar ref={calendarRef} height="700px" view="week" isReadOnly={true}
useDetailPopup={false} // 自定义详情弹出层显示状态
useFormPopup={false} // 自定义表单弹出层显示状态
week={
{
dayNames: ['周日', '周一', '周二', '周三', '周四', '周五', '周六'], // 自定义星期名称
startDayOfWeek: 1, // 设置一周的开始为周一(0为周日)
narrowWeekend: true, // 设置周末为窄格式显示
taskView: false, // 自定义任务视图显示状态
showNowIndicator: false, // 自定义现在时间指示器显示状态
}}
timezone={
{
zones: [
{ timezoneName: 'Asia/Shanghai', displayLabel: '', tooltip: '' },
{ timezoneName: 'Asia/Shanghai', displayLabel: '', tooltip: '' },
]
}}
calendars={initialCalendars} // 自定义日历颜色和名称
events={initialEvents} // 自定义事件数据
/>
</>
);
}
export default CalendarComponents;
const initialCalendars = [
{ id: '0', name: 'Private', backgroundColor: '#9e5fff', borderColor: '#000' },
{ id: '1', name: 'Company', backgroundColor: '#00a9ff', borderColor: '#000' },
{ id: '2', name: 'hahahah', backgroundColor: '#ff0000', borderColor: '#000' },
{ id: '3', name: '213124', backgroundColor: '#00ffff', borderColor: '#000' },
{ id: '4', name: 'Coy', backgroundColor: '#00ff00', borderColor: '#000' },
];
const initialEvents = [
{ calendarId: '0', title: 'TOAST UI Calendar Study', start: '2025-02-02T15:00:00', end: '2025-02-02T15:30:00' },
{ calendarId: '0', title: 'Practice', start: '2025-02-02T15:00:00', end: '2025-02-02T15:30:00' },
{ calendarId: '1', title: 'FE Workshop', start: '2025-02-03T15:00:00', end: '2025-02-03T15:30:00' },
{ calendarId: '1', title: 'Report', start: '2025-02-03T15:00:00', end: '2025-02-03T15:30:00' },
{ calendarId: '2', title: 'FE Workshop', start: '2025-02-03T15:30:00', end: '2025-02-03T18:30:00' },
{ calendarId: '3', title: 'Report', start: '2025-02-03T15:30:00', end: '2025-02-03T16:30:00' },
{ calendarId: '4', title: 'Report', start: '2025-02-04T12:30:00', end: '2025-02-04T16:30:00' },
{ calendarId: '4', title: 'Report', start: '2025-02-04T12:30:00', end: '2025-02-04T15:30:00' },
];效果如下所示,感觉还是不错的:
那如果我们想设置任务块中的数据显示的样式,该如何操作呢?这里我们需要设置一下模板内容,设置一下样式即可,如下所示在Calendar组件中配置了时间的模板:
template={
{
time(event: any) {
const { start, end, title, body: { description } } = event;
return (
`<div class="week-template-custom">
<div class="week-template-custom-title">${title}</div>
<div class="week-template-custom-body">${description}</div>
</div>`
)
},
}}这里根据自己情况调整一下任务的样式吧:
/* 这里主要是用来设置任务快内容数据的 */
.toastui-calendar-template-time {
height: 100%;
.week-template-custom {
width: 100%;
height: 100%;
overflow: hidden; /* 超出高度的内容隐藏 */
word-wrap: break-word; /* 自动换行 */
white-space: normal; /* 允许内容换行 */
.week-template-custom-title {
font-size: 14px;
font-weight: bold;
color: #3e0cba;
}
.week-template-custom-body {
font-size: 13px;
font-weight: 600;
color: #fff;
}
}
}在具体的任务里面,我添加了一个body,里面自定义一些要添加的内容,这里我设置了一下描述
const initialEvents = [
{ calendarId: '0', title: 'Calendar Study', body: { description: "任务描述...." }, start: '2025-02-02T15:00:00', end: '2025-02-02T15:30:00' },
{ calendarId: '0', title: 'Practice', body: { description: "任务描述...." }, start: '2025-02-02T15:00:00', end: '2025-02-02T15:30:00' },
{ calendarId: '1', title: 'FE Workshop', body: { description: "任务描述...." }, start: '2025-02-03T15:00:00', end: '2025-02-03T15:30:00' },
{ calendarId: '1', title: 'Report', body: { description: "任务描述...." }, start: '2025-02-03T15:00:00', end: '2025-02-03T15:30:00' },
{ calendarId: '2', title: 'FE Workshop', body: { description: "任务描述...." }, start: '2025-02-03T15:30:00', end: '2025-02-03T18:30:00' },
{ calendarId: '3', title: 'Report', body: { description: "任务描述...." }, start: '2025-02-03T15:30:00', end: '2025-02-03T16:30:00' },
{ calendarId: '4', title: 'Report', body: { description: "任务描述...." }, start: '2025-02-04T12:30:00', end: '2025-02-04T16:30:00' },
{ calendarId: '4', title: 'Report', body: { description: "任务描述...." }, start: '2025-02-04T12:30:00', end: '2025-02-04T15:30:00' },
];最终呈现的效果如下所示:
任务详情弹框
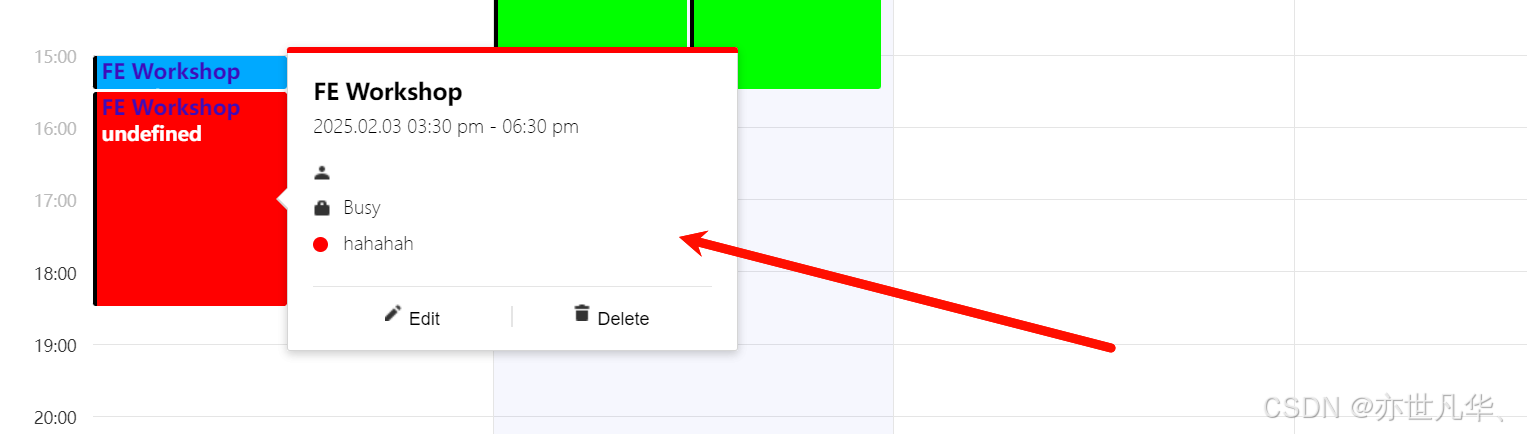
默认详情弹框:@toast-ui/react-calendar组件库提供了默认的详情弹框,只要设置了如下配置就可以使用默认弹框进行使用了:
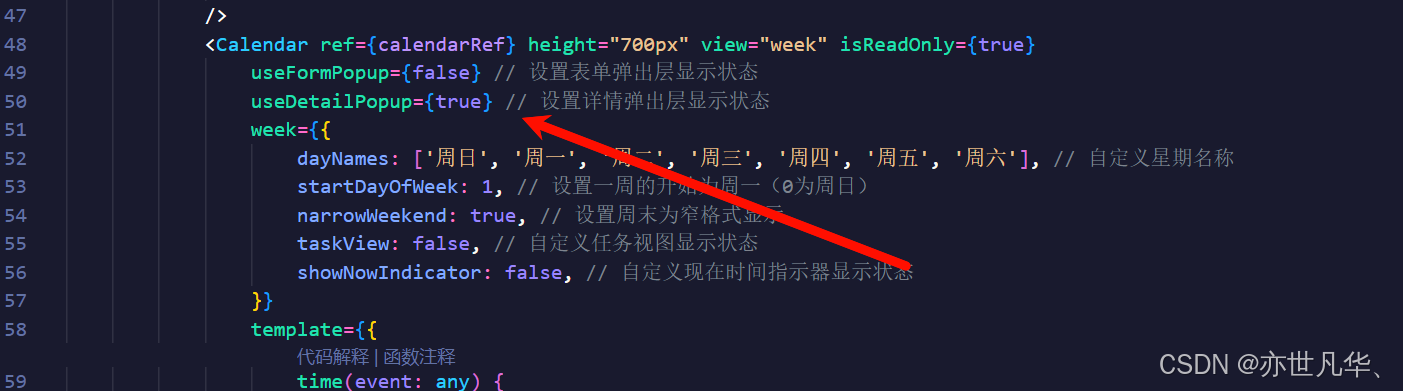
但是默认弹框有一些缺点,就是不能支持自定义内容设置,并且设置的任务数据必须严格按照传参的内容进行设置,一旦不按钮任务对象规定的数据进行设置的话就会报错,如下任务数据body中的内容并不是规范数据,但是我设置了之后就会报错,只有没有设置body的才会有效果:

效果呈现如下所示,我感觉这个默认的任务详情弹框有一些鸡肋了:
自定义任务详情:官方提供的默认详情弹框显然是不能满足我们日常的开发需求的,所以这里我们需要自己手动的设置一下自定义的任务弹框,这里我们借助antd的Popover组件来实现弹框的效果,在弹框中设置一个div,该div就是获取当前点击任务对应的坐标,然后弹框跟着div走即可。
比较难的就是如果有滚动条的情况下,还要计算当前弹框的top移动位置的变化,通过记录上一次的滚动位置和这一次的滚动位置之差来计算当前的滚动距离,说实话还是比较难的,我也是弄了好一会才弄出来,直接贴代码吧,大家可以看看:
import { useEffect, useRef, useState } from 'react';
// @ts-ignore
import Calendar from '@toast-ui/react-calendar';
import '@toast-ui/calendar/dist/toastui-calendar.min.css';
import { DatePicker, Popover } from 'antd';
import dayjs from 'dayjs';
import "./index.less"
const CalendarComponents = () => {
const calendarRef = useRef<any>(null); // 使用 ref 获取 Toast UI Calendar 实例
const [currentWeekDate, setCurrentWeekDate] = useState<any>(dayjs());
const [selectedEvent, setSelectedEvent] = useState<any>(); // 存储当前选中事件的状态信息
const [popoverVisible, setPopoverVisible] = useState(false); // 控制弹框的显示状态
const [popoverPosition, setPopoverPosition] = useState({ x: 0, y: 0 }); // 弹框位置信息
const weekViewElementRef = useRef<any>(null);
const lastScrollTopRef = useRef(0); // 用于记录上一次的滚动位置
const handleClickEvent = (event: any) => {
setPopoverVisible(true);
setSelectedEvent(event);
const weekViewElement = calendarRef.current?.containerElementRef.current
.querySelector('.toastui-calendar-week-view')
.querySelector('.toastui-calendar-time');
weekViewElementRef.current = weekViewElement;
if (weekViewElement) {
const x = event.nativeEvent.clientX
const y = event.nativeEvent.clientY
setPopoverPosition({ x, y });
lastScrollTopRef.current = weekViewElement.scrollTop; // 初始化上一次滚动位置
}
};
useEffect(() => {
const handleScroll = () => {
if (popoverVisible && weekViewElementRef) {
const weekViewElement = weekViewElementRef.current;
const currentScrollTop = weekViewElement.scrollTop;
const scrollDistance = currentScrollTop - lastScrollTopRef.current;
console.log("weekViewElement.scrollTop", selectedEvent)
const event = selectedEvent;
if (event) {
const x = event.nativeEvent.clientX
const y = event.nativeEvent.clientY - scrollDistance;
setPopoverPosition({ x, y });
}
}
};
if (weekViewElementRef.current) {
weekViewElementRef.current.addEventListener('scroll', handleScroll);
}
return () => {
if (weekViewElementRef.current) {
weekViewElementRef.current.removeEventListener('scroll', handleScroll);
}
};
}, [popoverVisible, selectedEvent]);
return (
<>
<DatePicker picker="week" value={currentWeekDate}
onChange={(value: any) => {
setCurrentWeekDate(value);
if (calendarRef.current) calendarRef.current.getInstance().setDate(value.toDate());
}}
/>
<Calendar ref={calendarRef} height="700px" view="week" isReadOnly={true}
useFormPopup={false} // 设置表单弹出层显示状态
useDetailPopup={false} // 设置详情弹出层显示状态
week={
{
dayNames: ['周日', '周一', '周二', '周三', '周四', '周五', '周六'], // 自定义星期名称
startDayOfWeek: 1, // 设置一周的开始为周一(0为周日)
narrowWeekend: true, // 设置周末为窄格式显示
taskView: false, // 自定义任务视图显示状态
showNowIndicator: false, // 自定义现在时间指示器显示状态
}}
template={
{
time(event: any) {
const { title, body: { description } } = event;
return (
`<div class="week-template-custom">
<div class="week-template-custom-title">${title}</div>
<div class="week-template-custom-body">${description}</div>
</div>`
)
},
}}
timezone={
{
zones: [
{ timezoneName: 'Asia/Shanghai', displayLabel: '', tooltip: '' },
{ timezoneName: 'Asia/Shanghai', displayLabel: '', tooltip: '' },
]
}}
calendars={initialCalendars} // 自定义日历颜色和名称
events={initialEvents} // 自定义事件数据
onClickEvent={handleClickEvent}
/>
<Popover
open={popoverVisible}
onOpenChange={() => setPopoverVisible(false)}
content={() => {
if (!selectedEvent?.event) return
const { title, start, end, body: { description } } = selectedEvent?.event;
return (
<>
<div style={
{ fontSize: '15px', fontWeight: 'bold' }}>{title}</div>
<div>{dayjs(start).format('YYYY-MM-DD')} - {dayjs(end).format('YYYY-MM-DD')}</div>
<div>{description}</div>
</>
)
}}
trigger="click"
placement="topLeft"
getPopupContainer={() => weekViewElementRef.current}
>
<div style={
{ position: 'absolute', left: popoverPosition.x + 'px', top: popoverPosition.y + 'px' }}></div>
</Popover>
</>
);
}
export default CalendarComponents;
const initialCalendars = [
{ id: '0', name: 'Private', backgroundColor: '#9e5fff', borderColor: '#000' },
{ id: '1', name: 'Company', backgroundColor: '#00a9ff', borderColor: '#000' },
{ id: '2', name: 'hahahah', backgroundColor: '#ff0000', borderColor: '#000' },
{ id: '3', name: '213124', backgroundColor: '#00ffff', borderColor: '#000' },
{ id: '4', name: 'Coy', backgroundColor: '#00ff00', borderColor: '#000' },
];
const initialEvents = [
{ calendarId: '0', title: 'Calendar Study', body: { description: "任务描述...." }, start: '2025-02-03T01:00:00', end: '2025-02-03T05:30:00' },
{ calendarId: '0', title: 'Practice', body: { description: "任务描述...." }, start: '2025-02-03T01:00:00', end: '2025-02-03T03:30:00' },
{ calendarId: '1', title: 'FE Workshop', start: '2025-02-03T15:00:00', end: '2025-02-03T15:30:00' },
{ calendarId: '1', title: 'Report', body: { description: "任务描述...." }, start: '2025-02-03T15:00:00', end: '2025-02-03T15:30:00' },
{ calendarId: '2', title: 'FE Workshop', start: '2025-02-03T15:30:00', end: '2025-02-03T18:30:00' },
{ calendarId: '3', title: 'Report', body: { description: "任务描述...." }, start: '2025-02-03T15:30:00', end: '2025-02-03T16:30:00' },
{ calendarId: '4', title: 'Report', body: { description: "任务描述...." }, start: '2025-02-04T12:30:00', end: '2025-02-04T16:30:00' },
{ calendarId: '4', title: 'Report', body: { description: "任务描述...." }, start: '2025-02-04T12:30:00', end: '2025-02-04T15:30:00' },
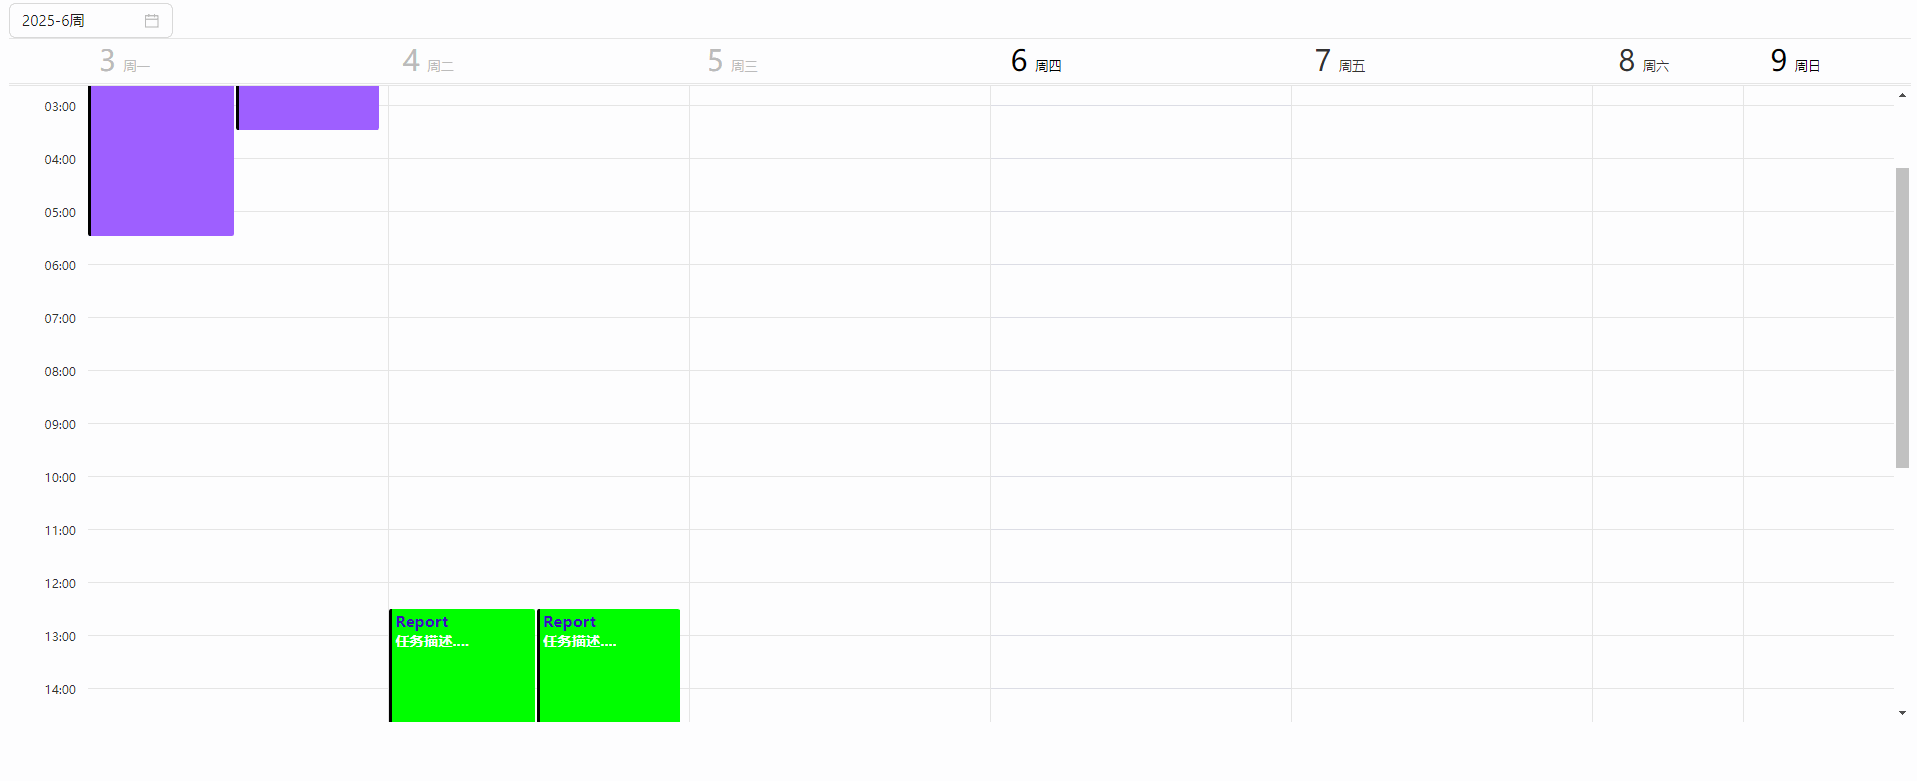
];效果如下所示,怎么说呢,也是实现了效果了吧,具体的弹框样式可以自己再根据自身情况调整一下,这个不难,这里就不再赘述了,这里的难点主要还是当前弹框的位置定位问题还有计算,我这里主要设置的是在日历的time容器里面进行计算,而不是直接相当于body元素进行计算位置,这里还是要注意一下的:
总结:其他的类似月日历的话,还是相同的道理,多看看官方文档,也是自己能够琢磨出来的,没啥好讲的,这里讲解一下典型的周日历就足够了,主要还是看文档以及自己能够主动的去动手去尝试。
这里我直接把我的源码贴出来,大家直接复制粘贴运行就行了,没啥大的问题,有帮助的话给个一键三联吧,哈哈:
tsx文件内容:
import { useEffect, useRef, useState } from 'react';
// @ts-ignore
import Calendar from '@toast-ui/react-calendar';
import '@toast-ui/calendar/dist/toastui-calendar.min.css';
import { DatePicker, Popover } from 'antd';
import dayjs from 'dayjs';
import "./index.less"
const CalendarComponents = () => {
const calendarRef = useRef<any>(null); // 使用 ref 获取 Toast UI Calendar 实例
const [currentWeekDate, setCurrentWeekDate] = useState<any>(dayjs());
const [selectedEvent, setSelectedEvent] = useState<any>(); // 存储当前选中事件的状态信息
const [popoverVisible, setPopoverVisible] = useState(false); // 控制弹框的显示状态
const [popoverPosition, setPopoverPosition] = useState({ x: 0, y: 0 }); // 弹框位置信息
const weekViewElementRef = useRef<any>(null);
const lastScrollTopRef = useRef(0); // 用于记录上一次的滚动位置
const handleClickEvent = (event: any) => {
setPopoverVisible(true);
setSelectedEvent(event);
const weekViewElement = calendarRef.current?.containerElementRef.current
.querySelector('.toastui-calendar-week-view')
.querySelector('.toastui-calendar-time');
weekViewElementRef.current = weekViewElement;
if (weekViewElement) {
const x = event.nativeEvent.clientX
const y = event.nativeEvent.clientY
setPopoverPosition({ x, y });
lastScrollTopRef.current = weekViewElement.scrollTop; // 初始化上一次滚动位置
}
};
useEffect(() => {
const handleScroll = () => {
if (popoverVisible && weekViewElementRef) {
const weekViewElement = weekViewElementRef.current;
const currentScrollTop = weekViewElement.scrollTop;
const scrollDistance = currentScrollTop - lastScrollTopRef.current;
console.log("weekViewElement.scrollTop", selectedEvent)
const event = selectedEvent;
if (event) {
const x = event.nativeEvent.clientX
const y = event.nativeEvent.clientY - scrollDistance;
setPopoverPosition({ x, y });
}
}
};
if (weekViewElementRef.current) {
weekViewElementRef.current.addEventListener('scroll', handleScroll);
}
return () => {
if (weekViewElementRef.current) {
weekViewElementRef.current.removeEventListener('scroll', handleScroll);
}
};
}, [popoverVisible, selectedEvent]);
return (
<>
<DatePicker picker="week" value={currentWeekDate}
onChange={(value: any) => {
setCurrentWeekDate(value);
if (calendarRef.current) calendarRef.current.getInstance().setDate(value.toDate());
}}
/>
<Calendar ref={calendarRef} height="700px" view="week" isReadOnly={true}
useFormPopup={false} // 设置表单弹出层显示状态
useDetailPopup={false} // 设置详情弹出层显示状态
week={
{
dayNames: ['周日', '周一', '周二', '周三', '周四', '周五', '周六'], // 自定义星期名称
startDayOfWeek: 1, // 设置一周的开始为周一(0为周日)
narrowWeekend: true, // 设置周末为窄格式显示
taskView: false, // 自定义任务视图显示状态
showNowIndicator: false, // 自定义现在时间指示器显示状态
}}
template={
{
time(event: any) {
const { title, body: { description } } = event;
return (
`<div class="week-template-custom">
<div class="week-template-custom-title">${title}</div>
<div class="week-template-custom-body">${description}</div>
</div>`
)
},
}}
timezone={
{
zones: [
{ timezoneName: 'Asia/Shanghai', displayLabel: '', tooltip: '' },
{ timezoneName: 'Asia/Shanghai', displayLabel: '', tooltip: '' },
]
}}
calendars={initialCalendars} // 自定义日历颜色和名称
events={initialEvents} // 自定义事件数据
onClickEvent={handleClickEvent}
/>
<Popover
open={popoverVisible}
onOpenChange={() => setPopoverVisible(false)}
content={() => {
if (!selectedEvent?.event) return
const { title, start, end, body: { description } } = selectedEvent?.event;
return (
<>
<div style={
{ fontSize: '15px', fontWeight: 'bold' }}>{title}</div>
<div>{dayjs(start).format('YYYY-MM-DD')} - {dayjs(end).format('YYYY-MM-DD')}</div>
<div>{description}</div>
</>
)
}}
trigger="click"
placement="topLeft"
getPopupContainer={() => weekViewElementRef.current}
>
<div style={
{ position: 'absolute', left: popoverPosition.x + 'px', top: popoverPosition.y + 'px' }}></div>
</Popover>
</>
);
}
export default CalendarComponents;
const initialCalendars = [
{ id: '0', name: 'Private', backgroundColor: '#9e5fff', borderColor: '#000' },
{ id: '1', name: 'Company', backgroundColor: '#00a9ff', borderColor: '#000' },
{ id: '2', name: 'hahahah', backgroundColor: '#ff0000', borderColor: '#000' },
{ id: '3', name: '213124', backgroundColor: '#00ffff', borderColor: '#000' },
{ id: '4', name: 'Coy', backgroundColor: '#00ff00', borderColor: '#000' },
];
const initialEvents = [
{ calendarId: '0', title: 'Calendar Study', body: { description: "任务描述...." }, start: '2025-02-03T01:00:00', end: '2025-02-03T05:30:00' },
{ calendarId: '0', title: 'Practice', body: { description: "任务描述...." }, start: '2025-02-03T01:00:00', end: '2025-02-03T03:30:00' },
{ calendarId: '1', title: 'FE Workshop', start: '2025-02-03T15:00:00', end: '2025-02-03T15:30:00' },
{ calendarId: '1', title: 'Report', body: { description: "任务描述...." }, start: '2025-02-03T15:00:00', end: '2025-02-03T15:30:00' },
{ calendarId: '2', title: 'FE Workshop', start: '2025-02-03T15:30:00', end: '2025-02-03T18:30:00' },
{ calendarId: '3', title: 'Report', body: { description: "任务描述...." }, start: '2025-02-03T15:30:00', end: '2025-02-03T16:30:00' },
{ calendarId: '4', title: 'Report', body: { description: "任务描述...." }, start: '2025-02-04T12:30:00', end: '2025-02-04T16:30:00' },
{ calendarId: '4', title: 'Report', body: { description: "任务描述...." }, start: '2025-02-04T12:30:00', end: '2025-02-04T15:30:00' },
];less文件内容:
.toastui-calendar-time {
position: relative;
}
.toastui-calendar-week-view-day-names {
    overflow-y: hidden !important; // 清除日期默认滚动条
    .toastui-calendar-holiday-sun {
        color: inherit !important; // 清除周日默认颜色
    }
}
.toastui-calendar-allday {
    display: none !important; // 清除全天事件
}
.toastui-calendar-panel-resizer {
    display: none !important; // 清除底部滚动条
}

/* 这里主要是用来设置左侧时间格式的 */
.toastui-calendar-timegrid-time-column {
    .toastui-calendar-timegrid-hour-rows:nth-child(1) {
        border-right: none !important; // 清除时分事件第一列边框
        margin-left: 30px !important; // 清除时分事件第一列左边距
    }
    .toastui-calendar-timegrid-hour-rows:nth-child(2) {
        display: none !important; // 清除时分事件第一行
    }
}
.toastui-calendar-timezone-labels-slot {
    display: none !important; // 清除时分事件时分标签
}
/* 这里主要是用来设置任务快内容数据的 */
.toastui-calendar-template-time {
    height: 100%;
    .week-template-custom {
        width: 100%;
        height: 100%;
        overflow: hidden;        /* 超出高度的内容隐藏 */
        word-wrap: break-word;   /* 自动换行 */
        white-space: normal;     /* 允许内容换行 */
        .week-template-custom-title {
            font-size: 14px;
            font-weight: bold;
            color: #3e0cba;
        }
        .week-template-custom-body {
            font-size: 13px;
            font-weight: 600;
            color: #fff;
        }
    }
}