建模与转化
在Android Studio中使用深度学习模型的话,有一种方式是使用tflite,可以参考这篇博客:时序信号的模型使用tflite的示例,但如果模型本来就比较小的话,可以直接使用tensorflow的.pb文件,不用转化为tflite模型。如果是使用pytorch或者keras建模的模型文件,可以通过函数转化为tensorflow的.pb文件。如下文件就是keras模型转化为tf的代码(convert_keras_to_tf.py)。
# convert_keras_to_tf.py
import tensorflow as tf
import os
import keras.backend as K
from keras.models import load_model


def keras_to_tensorflow(keras_model, output_dir, model_name, out_prefix="output_", log_tensorboard=True):
    if os.path.exists(output_dir) == False:
        os.mkdir(output_dir)

    out_nodes = []

    for i in range(len(keras_model.outputs)):
        out_nodes.append(out_prefix + str(i + 1))
        tf.identity(keras_model.output[i], out_prefix + str(i + 1))

    sess = K.get_session()

    from tensorflow.python.framework import graph_util, graph_io

    init_graph = sess.graph.as_graph_def()

    main_graph = graph_util.convert_variables_to_constants(sess, init_graph, out_nodes)

    graph_io.write_graph(main_graph, output_dir, name=model_name, as_text=False)

    if log_tensorboard:
        from tensorflow.python.tools import import_pb_to_tensorboard

        import_pb_to_tensorboard.import_to_tensorboard(
            os.path.join(output_dir, model_name),
            output_dir)

if __name__ == "__main__":
    """
    生成.pd的模型文件,用于在Android中调用。
    """
    keras_model = load_model('models/dense_model.h5')
    keras_model.summary()
    output_dir = 'tensorflow_model'
    keras_to_tensorflow(keras_model, output_dir, 'dense_model_tf.pb')
如果是pytorch模型的话,需要先把pytorch模型转化为keras,然后再转为tf.这里需要用keras重建网络结构,所以适用于一般的简单自己建的网络,附上pytorch转keras的代码(convert_pytorch_to_keras.py,未经过测试,如果不行的话,需要自己调试。)
import torch
import torch.nn as nn
from torch.autograd import Variable
import keras.backend as K
from keras.models import *
from keras.layers import *

import torch
from torchvision.models import squeezenet1_1


class PytorchToKeras(object):
   def __init__(self,pModel,kModel):
       super(PytorchToKeras,self)
       self.__source_layers = []
       self.__target_layers = []
       self.pModel = pModel
       self.kModel = kModel

       K.set_learning_phase(0)

   def __retrieve_k_layers(self):

       for i,layer in enumerate(self.kModel.layers):
           if len(layer.weights) > 0:
               self.__target_layers.append(i)

   def __retrieve_p_layers(self,input_size):
       input = torch.randn(input_size)
       input = Variable(input.unsqueeze(0))
       hooks = []
       def add_hooks(module):
           def hook(module, input, output):
               if hasattr(module,"weight"):
                   self.__source_layers.append(module)
           if not isinstance(module, nn.ModuleList) and not isinstance(module,nn.Sequential) and module != self.pModel:
               hooks.append(module.register_forward_hook(hook))
       self.pModel.apply(add_hooks)
       self.pModel(input)
       for hook in hooks:
           hook.remove()

   def convert(self,input_size):
       self.__retrieve_k_layers()
       self.__retrieve_p_layers(input_size)
       for i,(source_layer,target_layer) in enumerate(zip(self.__source_layers,self.__target_layers)):

           weight_size = len(source_layer.weight.data.size())

           transpose_dims = []

           for i in range(weight_size):
               transpose_dims.append(weight_size - i - 1)
           self.kModel.layers[target_layer].set_weights([source_layer.weight.data.numpy().transpose(transpose_dims), source_layer.bias.data.numpy()])

   def save_model(self,output_file):
       self.kModel.save(output_file)
   def save_weights(self,output_file):
       self.kModel.save_weights(output_file)


"""
We explicitly redefine the Squeezent architecture since Keras has no predefined Squeezent
"""

def squeezenet_fire_module(input, input_channel_small=16, input_channel_large=64):

   channel_axis = 3

   input = Conv2D(input_channel_small, (1,1), padding="valid" )(input)
   input = Activation("relu")(input)

   input_branch_1 = Conv2D(input_channel_large, (1,1), padding="valid" )(input)
   input_branch_1 = Activation("relu")(input_branch_1)

   input_branch_2 = Conv2D(input_channel_large, (3, 3), padding="same")(input)
   input_branch_2 = Activation("relu")(input_branch_2)

   input = concatenate([input_branch_1, input_branch_2], axis=channel_axis)

   return input


def SqueezeNet(input_shape=(224,224,3)):


   image_input = Input(shape=input_shape)


   network = Conv2D(64, (3,3), strides=(2,2), padding="valid")(image_input)
   network = Activation("relu")(network)
   network = MaxPool2D( pool_size=(3,3) , strides=(2,2))(network)

   network = squeezenet_fire_module(input=network, input_channel_small=16, input_channel_large=64)
   network = squeezenet_fire_module(input=network, input_channel_small=16, input_channel_large=64)
   network = MaxPool2D(pool_size=(3,3), strides=(2,2))(network)

   network = squeezenet_fire_module(input=network, input_channel_small=32, input_channel_large=128)
   network = squeezenet_fire_module(input=network, input_channel_small=32, input_channel_large=128)
   network = MaxPool2D(pool_size=(3, 3), strides=(2, 2))(network)

   network = squeezenet_fire_module(input=network, input_channel_small=48, input_channel_large=192)
   network = squeezenet_fire_module(input=network, input_channel_small=48, input_channel_large=192)
   network = squeezenet_fire_module(input=network, input_channel_small=64, input_channel_large=256)
   network = squeezenet_fire_module(input=network, input_channel_small=64, input_channel_large=256)

   #Remove layers like Dropout and BatchNormalization, they are only needed in training
   #network = Dropout(0.5)(network)

   network = Conv2D(1000, kernel_size=(1,1), padding="valid", name="last_conv")(network)
   network = Activation("relu")(network)

   network = GlobalAvgPool2D()(network)
   network = Activation("softmax",name="output")(network)


   input_image = image_input
   model = Model(inputs=input_image, outputs=network)

   return model


keras_model = SqueezeNet()


#Lucky for us, PyTorch includes a predefined Squeezenet
pytorch_model = squeezenet1_1()

#Load the pretrained model
pytorch_model.load_state_dict(torch.load("squeezenet.pth"))

#Time to transfer weights

converter = PytorchToKeras(pytorch_model,keras_model)
converter.convert((3,224,224))

#Save the weights of the converted keras model for later use
converter.save_weights("squeezenet.h5")
在Android Studio中调用
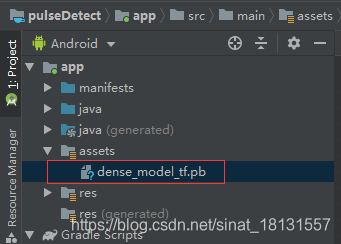
- 新建一个普通的Android Studio项目,将生成的.pd文件复制到app/assets文件夹下,如果没有就新建一个assets文件夹,如果还有一些其他文件,如json文件,也一并放在这里。
- 在build.gradle(Module:app)的dependencies添加一行:
implementation 'org.tensorflow:tensorflow-android:+'
- 打开MainACtivity.java文件,添加使用代码,首先需要在顶端将tensorflow导入:
import org.tensorflow.contrib.android.TensorFlowInferenceInterface;
- 将tensorflow_inference这个库导入:
    static {
        System.loadLibrary("tensorflow_inference");
        Log.i("load", "load tensorflow_inference successfully");
    }
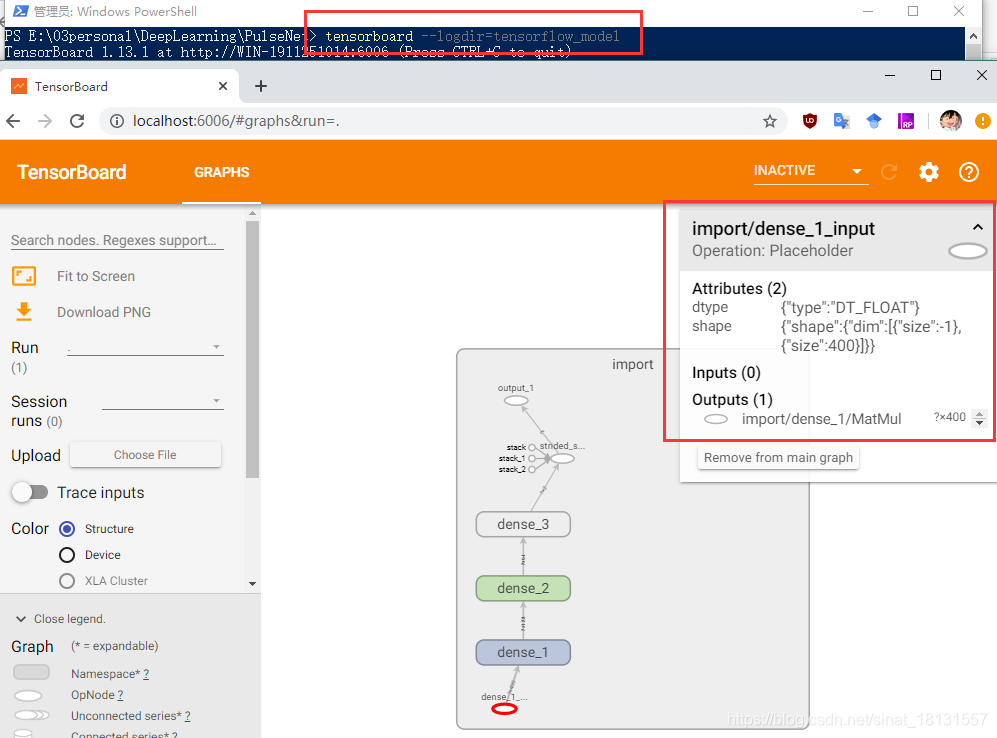
- 指定模型的信息,包括模型文件的位置,输入,输出层的名字,输入输出层的名字与维度可以通过在转化模型的文件夹下打开tensorboard的方式获得。打开tensorboard只有一个import节点,点击这个节点可以把整个网络打开看到所有的节点信息。
    // 模型节点信息
    private String MODEL_PATH = "file:///android_asset/dense_model_tf.pb";
    private String INPUT_NAME = "dense_1_input";
    private String OUTPUT_NAME = "output_1";
    private TensorFlowInferenceInterface tf;
- 用java写一个predict函数,
tf.feed(Input_layername,data,dims)分别就是输入层的名字,输入数据,以及输入数据的维度。使用tf.run(new String[]{OUTPUT_NAME});跑模型,使用float[] prediction = new float[2];tf.fetch(OUTPUT_NAME, prediction);将结果放到prediction这个变量中,prediction的维度也是根据模型的输出来定的。
public void predict() {
        float[] data = new float[400];
        for (int i = 0; i < data.length; i++) {
            data[i] = i;
        }
        // 设置tf模型的输入,...dims为数据的维度
        tf.feed(INPUT_NAME, data, 1, 400);
        // 得到结果
        tf.run(new String[]{OUTPUT_NAME});
        float[] prediction = new float[2];
        // 将预测的结果放在prediction中
        tf.fetch(OUTPUT_NAME, prediction);
        TextView resultView = findViewById(R.id.text_show);
        String result;
        if (prediction[0] > 0.5)
            result = "Not Pulse";
        else
            result = "Pulse";
        resultView.setText("识别结果为:" + result);
    }
- 将predict设置成一个一个按钮的单击响应函数,并且给tf设置模型位置
        tf = new TensorFlowInferenceInterface(getAssets(), MODEL_PATH);
        buttonSub = findViewById(R.id.button1);
        buttonSub.setOnClickListener(new View.OnClickListener() {
            @Override
            public void onClick(View view) {
                predict();
            }

        });
整个MainActivity.java最终如下代码文件,单击页面中的按钮,可以看到本文显示为:识别结果为:Not Pulse调用模型成功。如果是正常的数据,会显示为识别结果为:Pulse。这里由于信号是一维时序信号,所以通过本文显示一些信息就可以了,如果是图片,可以参考文档后的参考链接。
package com.example.pulsedetect;

import androidx.appcompat.app.AppCompatActivity;

import android.os.Bundle;
import android.util.Log;
import android.view.View;
import android.widget.Button;
import android.widget.ImageView;
import android.widget.TextView;

import org.tensorflow.contrib.android.TensorFlowInferenceInterface;

public class MainActivity extends AppCompatActivity {

    /*
     * 在需要调用TensoFlow的地方,加载so库“System.loadLibrary("tensorflow_inference");
     * 并”import org.tensorflow.contrib.android.TensorFlowInferenceInterface;就可以使用了
     * */
    //Load the tensorflow inference library
    //static{}(即static块),会在类被加载的时候执行且仅会被执行一次,一般用来初始化静态变量和调用静态方法。
    static {
        System.loadLibrary("tensorflow_inference");
        Log.i("load", "load tensorflow_inference successfully");
    }

    // 模型节点信息
    private String MODEL_PATH = "file:///android_asset/dense_model_tf.pb";
    private String INPUT_NAME = "dense_1_input";
    private String OUTPUT_NAME = "output_1";
    private TensorFlowInferenceInterface tf;


    @Override
    protected void onCreate(Bundle savedInstanceState) {
        super.onCreate(savedInstanceState);
        setContentView(R.layout.activity_main);

        ImageView imageView;
        TextView resultView;
        Button buttonSub;


        tf = new TensorFlowInferenceInterface(getAssets(), MODEL_PATH);
        buttonSub = findViewById(R.id.button1);
        buttonSub.setOnClickListener(new View.OnClickListener() {
            @Override
            public void onClick(View view) {
                predict();
            }

        });
    }

    public void predict() {
        float[] data = new float[400];
        for (int i = 0; i < data.length; i++) {
            data[i] = i;
        }
        // 设置tf模型的输入,...dims为数据的维度
        tf.feed(INPUT_NAME, data, 1, 400);
        // 得到结果
        tf.run(new String[]{OUTPUT_NAME});
        float[] prediction = new float[2];
        // 将预测的结果放在prediction中
        tf.fetch(OUTPUT_NAME, prediction);
        TextView resultView = findViewById(R.id.text_show);
        String result;
        if (prediction[0] > 0.5)
            result = "Not Pulse";
        else
            result = "Pulse";
        resultView.setText("识别结果为:" + result);
    }
}
Ref
- 对于图片模型,可能需要使用到一些java代码参考:https://blog.csdn.net/woomay/article/details/85078679
- johnolafenwa/Pytorch-Keras-ToAndroid
- Deploying PyTorch and Keras Models to Android with TensorFlow Mobile

