前言
对于Android的开发者来说,setContentView大家再熟悉不过了,在我们的Activity中首先就是要用它加载我们的布局,但是应该有一部分人是不知道加载布局的原理,也包括我,今天就从源码的角度分析setContentView加载布局原理。
准备工作
由于我们使用的Android API部分源码是隐藏的,当我们在AndroidStudio中是不能找到源码的,我们可以去官网下载相应源码去查看,当然在GitHub下载相应版本的API替换我们sdk下platforms相应api的android.jar。这样我们就可以在AndroidStudio查看到隐藏的api了,可以断点调试帮助我们阅读源码。
本篇文章分析源码是Android7.1(API25)。
Activiy setContentView源码分析
/**
* Set the activity content from a layout resource. The resource will be
* inflated, adding all top-level views to the activity.
*/
public void setContentView(@LayoutRes int layoutResID) {
getWindow().setContentView(layoutResID);
initWindowDecorActionBar();
}
在Activity中setContentView最终调用了getWindow()的setContentView·方法,getWindow()返回的是一个Window类,它表示一个窗口的概念,我们的Activity就是一个Window,Dialog和Toast也都是通过Window来展示的,这很好理解,它是一个抽象类,具体的实现是PhoneWindow,加载布局的相关逻辑都几乎都是它处理的。
@Override
public void setContentView(int layoutResID) {
// Note: FEATURE_CONTENT_TRANSITIONS may be set in the process of installing the window
// decor, when theme attributes and the like are crystalized. Do not check the feature
// before this happens.
if (mContentParent == null) {
installDecor();
} else if (!hasFeature(FEATURE_CONTENT_TRANSITIONS)) {
mContentParent.removeAllViews();
}
if (hasFeature(FEATURE_CONTENT_TRANSITIONS)) {
final Scene newScene = Scene.getSceneForLayout(mContentParent, layoutResID,
getContext());
transitionTo(newScene);
} else {
mLayoutInflater.inflate(layoutResID, mContentParent);
}
mContentParent.requestApplyInsets();
final Callback cb = getCallback();
if (cb != null && !isDestroyed()) {
cb.onContentChanged();
}
mContentParentExplicitlySet = true;
}
先判断mContentParent 是否为空,当然第一次启动时mContentParent 时为空的,然后执行installDecor();方法。
mContentParent不为空是通过hasFeature(FEATURE_CONTENT_TRANSITIONS)判断是否有转场动画,当没有的时候就把通过mContentParent.removeAllViews();移除mContentParent节点下的所有View.再通过inflate将我们的把布局填充到mContentParent,最后就是内容变化的回调。至于mContentParent 是什么东东,先留个悬念,稍后再说。
private void installDecor() {
mForceDecorInstall = false;
if (mDecor == null) {
mDecor = generateDecor(-1);
mDecor.setDescendantFocusability(ViewGroup.FOCUS_AFTER_DESCENDANTS);
mDecor.setIsRootNamespace(true);
if (!mInvalidatePanelMenuPosted && mInvalidatePanelMenuFeatures != 0) {
mDecor.postOnAnimation(mInvalidatePanelMenuRunnable);
}
} else {
mDecor.setWindow(this);
}
if (mContentParent == null) {
mContentParent = generateLayout(mDecor);
// Set up decor part of UI to ignore fitsSystemWindows if appropriate.
mDecor.makeOptionalFitsSystemWindows();
final DecorContentParent decorContentParent = (DecorContentParent) mDecor.findViewById(
R.id.decor_content_parent);
if (decorContentParent != null) {
mDecorContentParent = decorContentParent;
mDecorContentParent.setWindowCallback(getCallback());
if (mDecorContentParent.getTitle() == null) {
mDecorContentParent.setWindowTitle(mTitle);
}
final int localFeatures = getLocalFeatures();
for (int i = 0; i < FEATURE_MAX; i++) {
if ((localFeatures & (1 << i)) != 0) {
mDecorContentParent.initFeature(i);
}
}
mDecorContentParent.setUiOptions(mUiOptions);
if ((mResourcesSetFlags & FLAG_RESOURCE_SET_ICON) != 0 ||
(mIconRes != 0 && !mDecorContentParent.hasIcon())) {
mDecorContentParent.setIcon(mIconRes);
} else if ((mResourcesSetFlags & FLAG_RESOURCE_SET_ICON) == 0 &&
mIconRes == 0 && !mDecorContentParent.hasIcon()) {
mDecorContentParent.setIcon(
getContext().getPackageManager().getDefaultActivityIcon());
mResourcesSetFlags |= FLAG_RESOURCE_SET_ICON_FALLBACK;
}
if ((mResourcesSetFlags & FLAG_RESOURCE_SET_LOGO) != 0 ||
(mLogoRes != 0 && !mDecorContentParent.hasLogo())) {
mDecorContentParent.setLogo(mLogoRes);
}
// Invalidate if the panel menu hasn't been created before this.
// Panel menu invalidation is deferred avoiding application onCreateOptionsMenu
// being called in the middle of onCreate or similar.
// A pending invalidation will typically be resolved before the posted message
// would run normally in order to satisfy instance state restoration.
PanelFeatureState st = getPanelState(FEATURE_OPTIONS_PANEL, false);
if (!isDestroyed() && (st == null || st.menu == null) && !mIsStartingWindow) {
invalidatePanelMenu(FEATURE_ACTION_BAR);
}
} else {
//设置标题
mTitleView = (TextView) findViewById(R.id.title);
if (mTitleView != null) {
if ((getLocalFeatures() & (1 << FEATURE_NO_TITLE)) != 0) {
final View titleContainer = findViewById(R.id.title_container);
if (titleContainer != null) {
titleContainer.setVisibility(View.GONE);
} else {
mTitleView.setVisibility(View.GONE);
}
mContentParent.setForeground(null);
} else {
mTitleView.setText(mTitle);
}
}
}
//......初始化属性变量
}
}
在上面的方法中主要工作就是初始化mDecor和mContentParent ,以及一些属性的初始化
protected DecorView generateDecor(int featureId) {
// System process doesn't have application context and in that case we need to directly use
// the context we have. Otherwise we want the application context, so we don't cling to the
// activity.
Context context;
if (mUseDecorContext) {
Context applicationContext = getContext().getApplicationContext();
if (applicationContext == null) {
context = getContext();
} else {
context = new DecorContext(applicationContext, getContext().getResources());
if (mTheme != -1) {
context.setTheme(mTheme);
}
}
} else {
context = getContext();
}
return new DecorView(context, featureId, this, getAttributes());
}
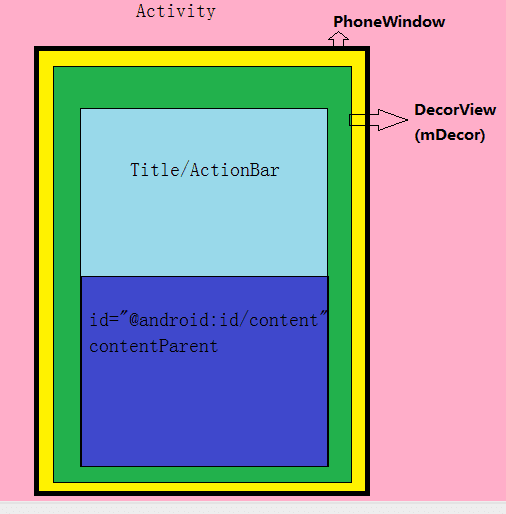
generateDecor初始化一个DecorView对象,DecorView继承了FrameLayout,是我们要显示布局的顶级View,我们看到的布局,标题栏都是它里面。
然后将mDecor作为参数调用generateLayout初始化mContetParent
protected ViewGroup generateLayout(DecorView decor) {
// Apply data from current theme.
//获取主题样式
TypedArray a = getWindowStyle();
//......省略样式的设置
// Inflate the window decor.
int layoutResource;
//获取feature并根据其来加载对应的xml布局文件
int features = getLocalFeatures();
if ((features & (1 << FEATURE_SWIPE_TO_DISMISS)) != 0) {
layoutResource = R.layout.screen_swipe_dismiss;
} else if ((features & ((1 << FEATURE_LEFT_ICON) | (1 << FEATURE_RIGHT_ICON))) != 0) {
if (mIsFloating) {
TypedValue res = new TypedValue();
getContext().getTheme().resolveAttribute(
R.attr.dialogTitleIconsDecorLayout, res, true);
layoutResource = res.resourceId;
} else {
layoutResource = R.layout.screen_title_icons;
}
// XXX Remove this once action bar supports these features.
removeFeature(FEATURE_ACTION_BAR);
// System.out.println("Title Icons!");
} else if ((features & ((1 << FEATURE_PROGRESS) | (1 << FEATURE_INDETERMINATE_PROGRESS))) != 0
&& (features & (1 << FEATURE_ACTION_BAR)) == 0) {
// Special case for a window with only a progress bar (and title).
// XXX Need to have a no-title version of embedded windows.
layoutResource = R.layout.screen_progress;
// System.out.println("Progress!");
} else if ((features & (1 << FEATURE_CUSTOM_TITLE)) != 0) {
// Special case for a window with a custom title.
// If the window is floating, we need a dialog layout
if (mIsFloating) {
TypedValue res = new TypedValue();
getContext().getTheme().resolveAttribute(
R.attr.dialogCustomTitleDecorLayout, res, true);
layoutResource = res.resourceId;
} else {
layoutResource = R.layout.screen_custom_title;
}
// XXX Remove this once action bar supports these features.
removeFeature(FEATURE_ACTION_BAR);
} else if ((features & (1 << FEATURE_NO_TITLE)) == 0) {
// If no other features and not embedded, only need a title.
// If the window is floating, we need a dialog layout
if (mIsFloating) {
TypedValue res = new TypedValue();
getContext().getTheme().resolveAttribute(
R.attr.dialogTitleDecorLayout, res, true);
layoutResource = res.resourceId;
} else if ((features & (1 << FEATURE_ACTION_BAR)) != 0) {
layoutResource = a.getResourceId(
R.styleable.Window_windowActionBarFullscreenDecorLayout,
R.layout.screen_action_bar);
} else {
layoutResource = R.layout.screen_title;
}
// System.out.println("Title!");
} else if ((features & (1 << FEATURE_ACTION_MODE_OVERLAY)) != 0) {
layoutResource = R.layout.screen_simple_overlay_action_mode;
} else {
// Embedded, so no decoration is needed.
layoutResource = R.layout.screen_simple;
// System.out.println("Simple!");
}
mDecor.startChanging();
mDecor.onResourcesLoaded(mLayoutInflater, layoutResource);
ViewGroup contentParent = (ViewGroup)findViewById(ID_ANDROID_CONTENT);
if (contentParent == null) {
throw new RuntimeException("Window couldn't find content container view");
}
if ((features & (1 << FEATURE_INDETERMINATE_PROGRESS)) != 0) {
ProgressBar progress = getCircularProgressBar(false);
if (progress != null) {
progress.setIndeterminate(true);
}
}
if ((features & (1 << FEATURE_SWIPE_TO_DISMISS)) != 0) {
registerSwipeCallbacks();
}
// 给顶层窗口设置标题和背景
if (getContainer() == null) {
final Drawable background;
if (mBackgroundResource != 0) {
background = getContext().getDrawable(mBackgroundResource);
} else {
background = mBackgroundDrawable;
}
mDecor.setWindowBackground(background);
final Drawable frame;
if (mFrameResource != 0) {
frame = getContext().getDrawable(mFrameResource);
} else {
frame = null;
}
mDecor.setWindowFrame(frame);
mDecor.setElevation(mElevation);
mDecor.setClipToOutline(mClipToOutline);
if (mTitle != null) {
setTitle(mTitle);
}
if (mTitleColor == 0) {
mTitleColor = mTextColor;
}
setTitleColor(mTitleColor);
}
mDecor.finishChanging();
return contentParent;
}
代码较多,先通过getWindowStyle获取主题样式进行初始化,然后通过getLocalFeatures获取设置的不同features加载不同的布局,例如我们通常在Activity 加入requestWindowFeature(Window.FEATURE_NO_TITLE);来隐藏标题栏,不管根据Feature最终使用的是哪一种布局,里面都有一个android:id="@android:id/content"的FrameLayout,我们的布局文件就添加到这个FrameLayout中了。我们看一下一个简单的布局
android:orientation="vertical"
android:fitsSystemWindows="true">
android:inflatedId="@+id/action_mode_bar"
android:layout="@layout/action_mode_bar"
android:layout_width="match_parent"
android:layout_height="wrap_content"
android:theme="?attr/actionBarTheme" />
android:layout_width="match_parent"
android:layout_height="?android:attr/windowTitleSize"
style="?android:attr/windowTitleBackgroundStyle">
style="?android:attr/windowTitleStyle"
android:background="@null"
android:fadingEdge="horizontal"
android:gravity="center_vertical"
android:layout_width="match_parent"
android:layout_height="match_parent" />
android:layout_width="match_parent"
android:layout_height="0dip"
android:layout_weight="1"
android:foregroundGravity="fill_horizontal|top"
android:foreground="?android:attr/windowContentOverlay" />
通过上面的分析,你应该明白了requestWindowFeature为什么必须在setContentView之前设置了,如果在之后设置,那么通过上面的分析在setContentView执行时已经从本地读取features,而此时还没有设置,当然就无效了。
ViewGroup contentParent = (ViewGroup)findViewById(ID_ANDROID_CONTENT);
public static final int ID_ANDROID_CONTENT = com.android.internal.R.id.content;
通过上面findViewById获取该对象。不过在获取ViewGroup之前还有一个重要的方法
void onResourcesLoaded(LayoutInflater inflater, int layoutResource) {
mStackId = getStackId();
if (mBackdropFrameRenderer != null) {
loadBackgroundDrawablesIfNeeded();
mBackdropFrameRenderer.onResourcesLoaded(
this, mResizingBackgroundDrawable, mCaptionBackgroundDrawable,
mUserCaptionBackgroundDrawable, getCurrentColor(mStatusColorViewState),
getCurrentColor(mNavigationColorViewState));
}
mDecorCaptionView = createDecorCaptionView(inflater);
final View root = inflater.inflate(layoutResource, null);
if (mDecorCaptionView != null) {
if (mDecorCaptionView.getParent() == null) {
addView(mDecorCaptionView,
new ViewGroup.LayoutParams(MATCH_PARENT, MATCH_PARENT));
}
mDecorCaptionView.addView(root,
new ViewGroup.MarginLayoutParams(MATCH_PARENT, MATCH_PARENT));
} else {
// Put it below the color views.
addView(root, 0, new ViewGroup.LayoutParams(MATCH_PARENT, MATCH_PARENT));
}
mContentRoot = (ViewGroup) root;
initializeElevation();
}
这个比较好理解,root就是在上面判断的根据不同的features,加载的布局,然后将该布局通过addView添加到DecorView.到这里初始都成功了.
mLayoutInflater.inflate(layoutResID, mContentParent);
在回到最初setContentView中的一句代码,如上,我们也就好理解了,它就是将我们的布局文件inflate到mContentParent中。到这里Activity的加载布局文件就完毕了。
AppCompatActivity的setContentView分析
由于AppCompatActivity的setContentView加载布局的与Activity有很多不同的地方,而且相对Activity稍微复杂点,在这里也简单分析一下。
@Override
public void setContentView(@LayoutRes int layoutResID) {
getDelegate().setContentView(layoutResID);
}
通过名字也就知道把加载布局交给了一个委托对象。
@NonNull
public AppCompatDelegate getDelegate() {
if (mDelegate == null) {
mDelegate = AppCompatDelegate.create(this, this);
}
return mDelegate;
}
AppCompatDelegate时一个抽象类,如下图他有几个子类实现
为啥有那么多子类呢,其实通过名字我们也能猜到,是为了兼容。为了证明这点,我们看看create方法
private static AppCompatDelegate create(Context context, Window window,
AppCompatCallback callback) {
final int sdk = Build.VERSION.SDK_INT;
if (BuildCompat.isAtLeastN()) {
return new AppCompatDelegateImplN(context, window, callback);
} else if (sdk >= 23) {
return new AppCompatDelegateImplV23(context, window, callback);
} else if (sdk >= 14) {
return new AppCompatDelegateImplV14(context, window, callback);
} else if (sdk >= 11) {
return new AppCompatDelegateImplV11(context, window, callback);
} else {
return new AppCompatDelegateImplV9(context, window, callback);
}
}
这里就很明显了,根据不同的API版本初始化不同的delegate。通过查看代码setContentView方法的实现是在AppCompatDelegateImplV9中
@Override
public void setContentView(int resId) {
ensureSubDecor();
ViewGroup contentParent = (ViewGroup) mSubDecor.findViewById(android.R.id.content);
contentParent.removeAllViews();
LayoutInflater.from(mContext).inflate(resId, contentParent);
mOriginalWindowCallback.onContentChanged();
}
有了分析Activity的加载经验,我们就很容易明白contentParent和Activity中的mContentParent是一个东东,ensureSubDecor就是初始mSubDecor,然后removeAllViews,再将我们的布局填充到contentParent中。最后执行回调。
private void ensureSubDecor() {
if (!mSubDecorInstalled) {
mSubDecor = createSubDecor();
//省略部分代码
onSubDecorInstalled(mSubDecor);
}
}
private ViewGroup createSubDecor() {
TypedArray a = mContext.obtainStyledAttributes(R.styleable.AppCompatTheme);
//如果哦们不设置置AppCompat主题会报错,就是在这个地方
if (!a.hasValue(R.styleable.AppCompatTheme_windowActionBar)) {
a.recycle();
throw new IllegalStateException(
"You need to use a Theme.AppCompat theme (or descendant) with this activity.");
}
//省略..... 初始化一下属性
ViewGroup subDecor = null;
//PhtoWindowgetDecorView会调用installDecor,在Activity已经介绍过,主要工作就是初始化mDecor,mContentParent。
mWindow.getDecorView();
//省略
//根据设置加载不同的布局
if (!mWindowNoTitle) {
if (mIsFloating) {
// If we're floating, inflate the dialog title decor
subDecor = (ViewGroup) inflater.inflate(
R.layout.abc_dialog_title_material, null);
// Floating windows can never have an action bar, reset the flags
mHasActionBar = mOverlayActionBar = false;
} else if (mHasActionBar) {
/**
* This needs some explanation. As we can not use the android:theme attribute
* pre-L, we emulate it by manually creating a LayoutInflater using a
* ContextThemeWrapper pointing to actionBarTheme.
*/
TypedValue outValue = new TypedValue();
mContext.getTheme().resolveAttribute(R.attr.actionBarTheme, outValue, true);
Context themedContext;
if (outValue.resourceId != 0) {
themedContext = new ContextThemeWrapper(mContext, outValue.resourceId);
} else {
themedContext = mContext;
}
// Now inflate the view using the themed context and set it as the content view
subDecor = (ViewGroup) LayoutInflater.from(themedContext)
.inflate(R.layout.abc_screen_toolbar, null);
mDecorContentParent = (DecorContentParent) subDecor
.findViewById(R.id.decor_content_parent);
mDecorContentParent.setWindowCallback(getWindowCallback());
/**
* Propagate features to DecorContentParent
*/
if (mOverlayActionBar) {
mDecorContentParent.initFeature(FEATURE_SUPPORT_ACTION_BAR_OVERLAY);
}
if (mFeatureProgress) {
mDecorContentParent.initFeature(Window.FEATURE_PROGRESS);
}
if (mFeatureIndeterminateProgress) {
mDecorContentParent.initFeature(Window.FEATURE_INDETERMINATE_PROGRESS);
}
}
} else {
if (mOverlayActionMode) {
subDecor = (ViewGroup) inflater.inflate(
R.layout.abc_screen_simple_overlay_action_mode, null);
} else {
subDecor = (ViewGroup) inflater.inflate(R.layout.abc_screen_simple, null);
}
if (Build.VERSION.SDK_INT >= 21) {
// If we're running on L or above, we can rely on ViewCompat's
// setOnApplyWindowInsetsListener
ViewCompat.setOnApplyWindowInsetsListener(subDecor,
new OnApplyWindowInsetsListener() {
@Override
public WindowInsetsCompat onApplyWindowInsets(View v,
WindowInsetsCompat insets) {
final int top = insets.getSystemWindowInsetTop();
final int newTop = updateStatusGuard(top);
if (top != newTop) {
insets = insets.replaceSystemWindowInsets(
insets.getSystemWindowInsetLeft(),
newTop,
insets.getSystemWindowInsetRight(),
insets.getSystemWindowInsetBottom());
}
// Now apply the insets on our view
return ViewCompat.onApplyWindowInsets(v, insets);
}
});
} else {
// Else, we need to use our own FitWindowsViewGroup handling
((FitWindowsViewGroup) subDecor).setOnFitSystemWindowsListener(
new FitWindowsViewGroup.OnFitSystemWindowsListener() {
@Override
public void onFitSystemWindows(Rect insets) {
insets.top = updateStatusGuard(insets.top);
}
});
}
}
if (subDecor == null) {
throw new IllegalArgumentException(
"AppCompat does not support the current theme features: { "
+ "windowActionBar: " + mHasActionBar
+ ", windowActionBarOverlay: "+ mOverlayActionBar
+ ", android:windowIsFloating: " + mIsFloating
+ ", windowActionModeOverlay: " + mOverlayActionMode
+ ", windowNoTitle: " + mWindowNoTitle
+ " }");
}
if (mDecorContentParent == null) {
mTitleView = (TextView) subDecor.findViewById(R.id.title);
}
// Make the decor optionally fit system windows, like the window's decor
ViewUtils.makeOptionalFitsSystemWindows(subDecor);
//contentView 是我们布局填充的地方
final ContentFrameLayout contentView = (ContentFrameLayout) subDecor.findViewById(
R.id.action_bar_activity_content);
//这个就是和我们Activity中的介绍的mDecor层级中的mContentParent是一个东西,
final ViewGroup windowContentView = (ViewGroup) mWindow.findViewById(android.R.id.content);
if (windowContentView != null) {
// There might be Views already added to the Window's content view so we need to
// migrate them to our content view
while (windowContentView.getChildCount() > 0) {
final View child = windowContentView.getChildAt(0);
windowContentView.removeViewAt(0);
contentView.addView(child);
}
// Change our content FrameLayout to use the android.R.id.content id.
// Useful for fragments.
//清除windowContentView的id
windowContentView.setId(View.NO_ID);
//将contentView的id设置成android.R.id.content,在此我们应该明白了,contentView 就成为了Activity中的mContentParent,我们的布局加载到这个view中。
contentView.setId(android.R.id.content);
// The decorContent may have a foreground drawable set (windowContentOverlay).
// Remove this as we handle it ourselves
if (windowContentView instanceof FrameLayout) {
((FrameLayout) windowContentView).setForeground(null);
}
}
// Now set the Window's content view with the decor
//将subDecor 填充到DecorView中
mWindow.setContentView(subDecor);
//省略部分代码
return subDecor;
}
上面的处理逻辑就是先初始化一些主题样式,然后通过mWindow.getDecorView()初始化DecorView.和布局,然后createSubDecor根据主题加载不同的布局subDecor,通过findViewById获取contentView( AppCompat根据不同主题加载的布局中的View R.id.action_bar_activity_content)和windowContentView (
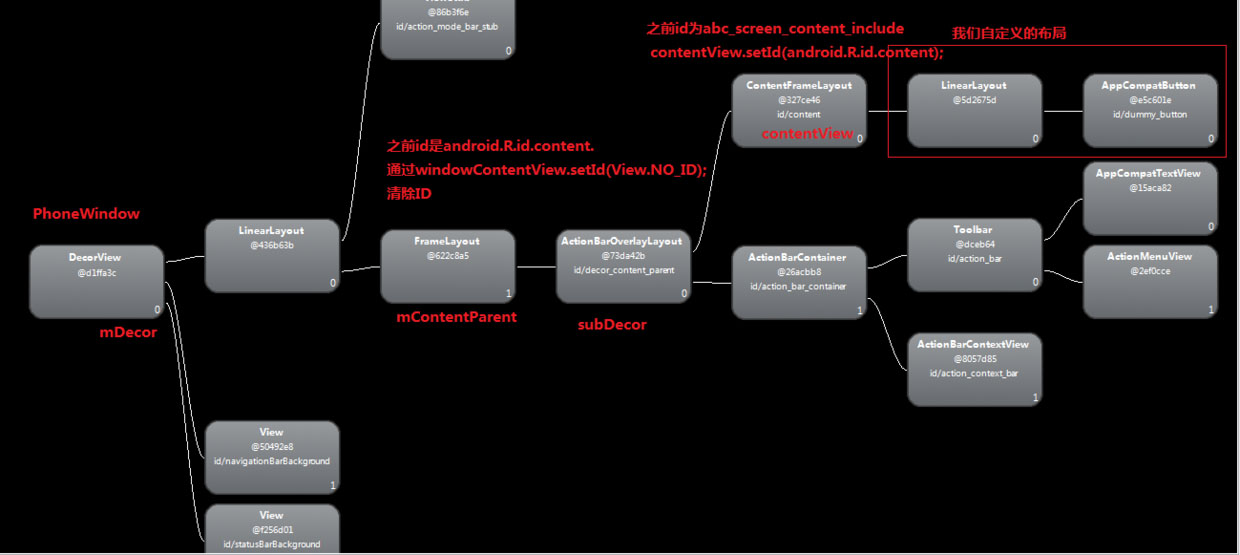
DecorView中的View android.R.id.content)控件。获取控件后将windowContentView 的id清空,并将 contentView的id由R.id.action_bar_activity_content更改为android.R.id.content。最后通过 mWindow.setContentView(subDecor);将subDecor添加到DecorView中。
//调用两个参数方法
@Override
public void setContentView(View view) {
setContentView(view, new ViewGroup.LayoutParams(MATCH_PARENT, MATCH_PARENT));
}
//此处处理和在Activity中分析的setContentView传资源ID进行加载布局是一样的,不同的是此时mContentParent 不为空,先removeAllViews(无转场动画情况)后再直接执行mContentParent.addView(view, params);即将subDecor添加到mContentParent
@Override
public void setContentView(View view, ViewGroup.LayoutParams params) {
// Note: FEATURE_CONTENT_TRANSITIONS may be set in the process of installing the window
// decor, when theme attributes and the like are crystalized. Do not check the feature
// before this happens.
if (mContentParent == null) {
installDecor();
} else if (!hasFeature(FEATURE_CONTENT_TRANSITIONS)) {
mContentParent.removeAllViews();
}
if (hasFeature(FEATURE_CONTENT_TRANSITIONS)) {
view.setLayoutParams(params);
final Scene newScene = new Scene(mContentParent, view);
transitionTo(newScene);
} else {
mContentParent.addView(view, params);
}
mContentParent.requestApplyInsets();
final Callback cb = getCallback();
if (cb != null && !isDestroyed()) {
cb.onContentChanged();
}
mContentParentExplicitlySet = true;
}
关于subDecor到底是什么布局,我们随便看一个布局R.layout.abc_screen_toolbar,有标题(mWindowNoTitle为false)并且有ActionBar(mHasActionBar 为true)的情况加载的布局。
xmlns:android="http://schemas.android.com/apk/res/android"
xmlns:app="http://schemas.android.com/apk/res-auto"
android:id="@+id/decor_content_parent"
android:layout_width="match_parent"
android:layout_height="match_parent"
android:fitsSystemWindows="true">
android:id="@+id/action_bar_container"
android:layout_width="match_parent"
android:layout_height="wrap_content"
android:layout_alignParentTop="true"
style="?attr/actionBarStyle"
android:touchscreenBlocksFocus="true"
android:gravity="top">
android:id="@+id/action_bar"
android:layout_width="match_parent"
android:layout_height="wrap_content"
app:navigationContentDescription="@string/abc_action_bar_up_description"
style="?attr/toolbarStyle"/>
android:id="@+id/action_context_bar"
android:layout_width="match_parent"
android:layout_height="wrap_content"
android:visibility="gone"
android:theme="?attr/actionBarTheme"
style="?attr/actionModeStyle"/>
不管哪个主题下的布局,都会有一个id 为 abc_screen_content_include最好将id更改为androd.R,content,然后添加到mDecor中的mContentParent中。我们可以同SDK中tools下hierarchyviewer工具查看我们的布局层级结构。例如我们AppCompatActivity中setContentView传入的布局文件,是一个线程布局,该布局下有一个Button,则查看到层级结构
参考链接:http://www.weyye.me/detail/framework-appcompatactivity-setcontentview/
总结
以上就是这篇文章的全部内容了,到这里setContentView已经分析完毕,希望本文的内容对大家的学习或者工作具有一定的参考学习价值,由于水平有限,难免有错误,若在阅读时发现不妥或者错误的地方留言指正,谢谢大家对脚本之家的支持。


