单机模式部署
下载
wget http://mirrors.tuna.tsinghua.edu.cn/apache/flink/flink-1.9.1/flink-1.9.1-bin-scala_2.11.tgz
解压
tar -zxvf flink-1.9.1-bin-scala_2.12.tgz -C /usr/app
不需要进行任何配置,直接使用以下命令就可以启动单机版本的 Flink:
bin/start-cluster.sh
WEB UI 界面
Flink 提供了 WEB 界面用于直观的管理 Flink 集群,访问端口为 8081:

作业提交
启动后可以运行安装包中自带的词频统计案例,具体步骤如下:
开启端口
nc -lk 9999
提交作业
bin/flink run examples/streaming/SocketWindowWordCount.jar --port 9999
package org.apache.flink.streaming.examples.socket;

import org.apache.flink.api.common.functions.FlatMapFunction;
import org.apache.flink.api.common.functions.ReduceFunction;
import org.apache.flink.api.java.utils.ParameterTool;
import org.apache.flink.streaming.api.datastream.DataStream;
import org.apache.flink.streaming.api.environment.StreamExecutionEnvironment;
import org.apache.flink.streaming.api.windowing.time.Time;
import org.apache.flink.util.Collector;

/**
 * Implements a streaming windowed version of the "WordCount" program.
 *
 * <p>This program connects to a server socket and reads strings from the socket.
 * The easiest way to try this out is to open a text server (at port 12345)
 * using the <i>netcat</i> tool via
 * <pre>
 * nc -l 12345 on Linux or nc -l -p 12345 on Windows
 * </pre>
 * and run this example with the hostname and the port as arguments.
 */
@SuppressWarnings("serial")
public class SocketWindowWordCount {

	public static void main(String[] args) throws Exception {

		// the host and the port to connect to
		final String hostname;
		final int port;
		try {
			final ParameterTool params = ParameterTool.fromArgs(args);
			hostname = params.has("hostname") ? params.get("hostname") : "localhost";
			port = params.getInt("port");
		} catch (Exception e) {
			System.err.println("No port specified. Please run 'SocketWindowWordCount " +
				"--hostname <hostname> --port <port>', where hostname (localhost by default) " +
				"and port is the address of the text server");
			System.err.println("To start a simple text server, run 'netcat -l <port>' and " +
				"type the input text into the command line");
			return;
		}

		// get the execution environment
		final StreamExecutionEnvironment env = StreamExecutionEnvironment.getExecutionEnvironment();

		// get input data by connecting to the socket
		DataStream<String> text = env.socketTextStream(hostname, port, "\n");

		// parse the data, group it, window it, and aggregate the counts
		DataStream<WordWithCount> windowCounts = text

				.flatMap(new FlatMapFunction<String, WordWithCount>() {
					@Override
					public void flatMap(String value, Collector<WordWithCount> out) {
						for (String word : value.split("\\s")) {
							out.collect(new WordWithCount(word, 1L));
						}
					}
				})

				.keyBy("word")
				.timeWindow(Time.seconds(5))

				.reduce(new ReduceFunction<WordWithCount>() {
					@Override
					public WordWithCount reduce(WordWithCount a, WordWithCount b) {
						return new WordWithCount(a.word, a.count + b.count);
					}
				});

		// print the results with a single thread, rather than in parallel
		windowCounts.print().setParallelism(1);

		env.execute("Socket Window WordCount");
	}

	// ------------------------------------------------------------------------

	/**
	 * Data type for words with count.
	 */
	public static class WordWithCount {

		public String word;
		public long count;

		public WordWithCount() {}

		public WordWithCount(String word, long count) {
			this.word = word;
			this.count = count;
		}

		@Override
		public String toString() {
			return word + " : " + count;
		}
	}
}
输入测试数据
a a b b c c c a e
查看控制台输出
可以通过 WEB UI 的控制台查看作业统运行情况:
也可以通过 WEB 控制台查看到统计结果:
停止作业
可以直接在 WEB 界面上点击对应作业的 Cancel Job 按钮进行取消,也可以使用命令行进行取消。使用命令行进行取消时,需要先获取到作业的 JobId,可以使用 flink list 命令查看,输出如下:
[root@hadoop01 flink-1.9.1]# ./bin/flink list
Waiting for response...
------------------ Running/Restarting Jobs -------------------
05.11.2019 08:19:53 : ba2b1cc41a5e241c32d574c93de8a2bc : Socket Window WordCount (RUNNING)
--------------------------------------------------------------
No scheduled jobs.
获取到 JobId 后,就可以使用 flink cancel 命令取消作业:
bin/flink cancel ba2b1cc41a5e241c32d574c93de8a2bc
停止 Flink
bin/stop-cluster.sh
Standalone Cluster
前置条件
使用该模式前,需要确保所有服务器间都已经配置好 SSH 免密登录服务。这里我以三台服务器为例,主机名分别为 hadoop001,hadoop002,hadoop003 , 其中 hadoop001 为 master 节点,其余两台为 slave 节点,搭建步骤如下:
搭建步骤
修改 conf/flink-conf.yaml 中 jobmanager 节点的通讯地址为 hadoop001:
jobmanager.rpc.address: hadoop001
修改 conf/slaves 配置文件,将 hadoop002 和 hadoop003 配置为 slave 节点:
hadoop002
hadoop003
将配置好的 Flink 安装包分发到其他两台服务器上:
 scp -r /usr/app/flink-1.9.1 hadoop002:/usr/app
 scp -r /usr/app/flink-1.9.1 hadoop003:/usr/app
在 hadoop001 上使用和单机模式相同的命令来启动集群:
bin/start-cluster.sh
此时控制台输出如下:
启动完成后可以使用 Jps 命令或者通过 WEB 界面来查看是否启动成功。
可选配置
除了上面介绍的 jobmanager.rpc.address 是必选配置外,Flink h还支持使用其他可选参数来优化集群性能,主要如下:
- jobmanager.heap.size:JobManager 的 JVM 堆内存大小,默认为 1024m 。
- taskmanager.heap.size:Taskmanager 的 JVM 堆内存大小,默认为 1024m 。
- taskmanager.numberOfTaskSlots:Taskmanager 上 slots 的数量,通常设置为 CPU 核心的数量,或其一半。
- parallelism.default:任务默认的并行度。
- io.tmp.dirs:存储临时文件的路径,如果没有配置,则默认采用服务器的临时目录,如 LInux 的 /tmp 目录。
更多配置可以参考 Flink 的官方手册:Configuration
Standalone Cluster HA
上面我们配置的 Standalone 集群实际上只有一个 JobManager,此时是存在单点故障的,所以官方提供了 Standalone Cluster HA 模式来实现集群高可用。
前置条件
在 Standalone Cluster HA 模式下,集群可以由多个 JobManager,但只有一个处于 active 状态,其余的则处于备用状态,Flink 使用 ZooKeeper 来选举出 Active JobManager,并依赖其来提供一致性协调服务,所以需要预先安装 ZooKeeper 。
另外在高可用模式下,还需要使用分布式文件系统来持久化存储 JobManager 的元数据,最常用的就是 HDFS,所以 Hadoop 也需要预先安装。关于 Hadoop 集群和 ZooKeeper 集群的搭建可以参考:
搭建步骤
修改 conf/flink-conf.yaml 文件,增加如下配置:
# 配置使用zookeeper来开启高可用模式
high-availability: zookeeper
# 配置zookeeper的地址,采用zookeeper集群时,可以使用逗号来分隔多个节点地址
high-availability.zookeeper.quorum: hadoop003:2181
# 在zookeeper上存储flink集群元信息的路径
high-availability.zookeeper.path.root: /flink
# 集群id
high-availability.cluster-id: /standalone_cluster_one
# 持久化存储JobManager元数据的地址,zookeeper上存储的只是指向该元数据的指针信息
high-availability.storageDir: hdfs://hadoop001:8020/flink/recovery
修改 conf/masters 文件,将 hadoop001 和 hadoop002 都配置为 master 节点
hadoop001:8081
hadoop002:8081
确保 Hadoop 和 ZooKeeper 已经启动后,使用以下命令来启动集群:
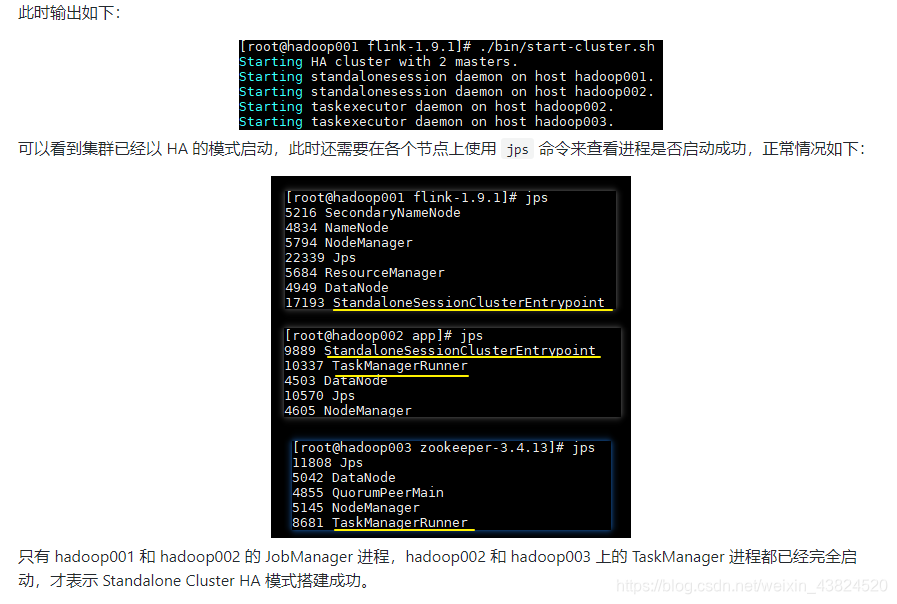
bin/start-cluster.sh


