面向对象三大特性
面向对象三大特性:封装、继承、多态。
- 封装:将类或接口实现细节包装、隐藏起来。
具体事例:JavaBean - 继承:通过extends关键字,让一个类和另一个类创建父子关系。
public class 父类 {
  public void info() {}
}

public class 子类 extends 父类 {
	// 重写
	@Override
	public class info() {}
}
- 多态:同一个行为可以具有不同的形态。
1)对象多态(引用多态):
父类 变量 = new 子类();
接口 变量 = new 子类();
2)行为多态(方法多态):2个父类,执行的不同的行为
父类 变量1 = new 子类();
父类 变量2 = new 子类();

变量1.方法名();
变量2.方法名();
3)重载:在同一个类中方法名相同,参数类表不同的多个方法。
public class 类名{
    public void 方法() {

    }
    public void 方法(String s) {

    }
}
面试题:
OOP(object oriented programming),即面向对象编程
面向对象具有四大特性,分别是
1.抽象:将一些事物的共性抽离出来归为一个类。
如对于动物,具有生命体征、活动能力等区别于其它事物的共同特征
2.封装:有选择地隐藏和暴露数据和方法
比如有U盘这个类,我希望隐藏内部组成和实现,只暴露USB接口以供使用
3.继承:子类可以直接使用父类的部分数据和方法,可以有选择的扩展
比如鸟是动物,但鸟扩展了飞行的能力。
4.多态:同一类的对象调用相同方法可以表现出不同的行为
比如动物实现了say()方法,猴子、马等动物重写了say()方法来表现不同的交流语言。"
集合操作
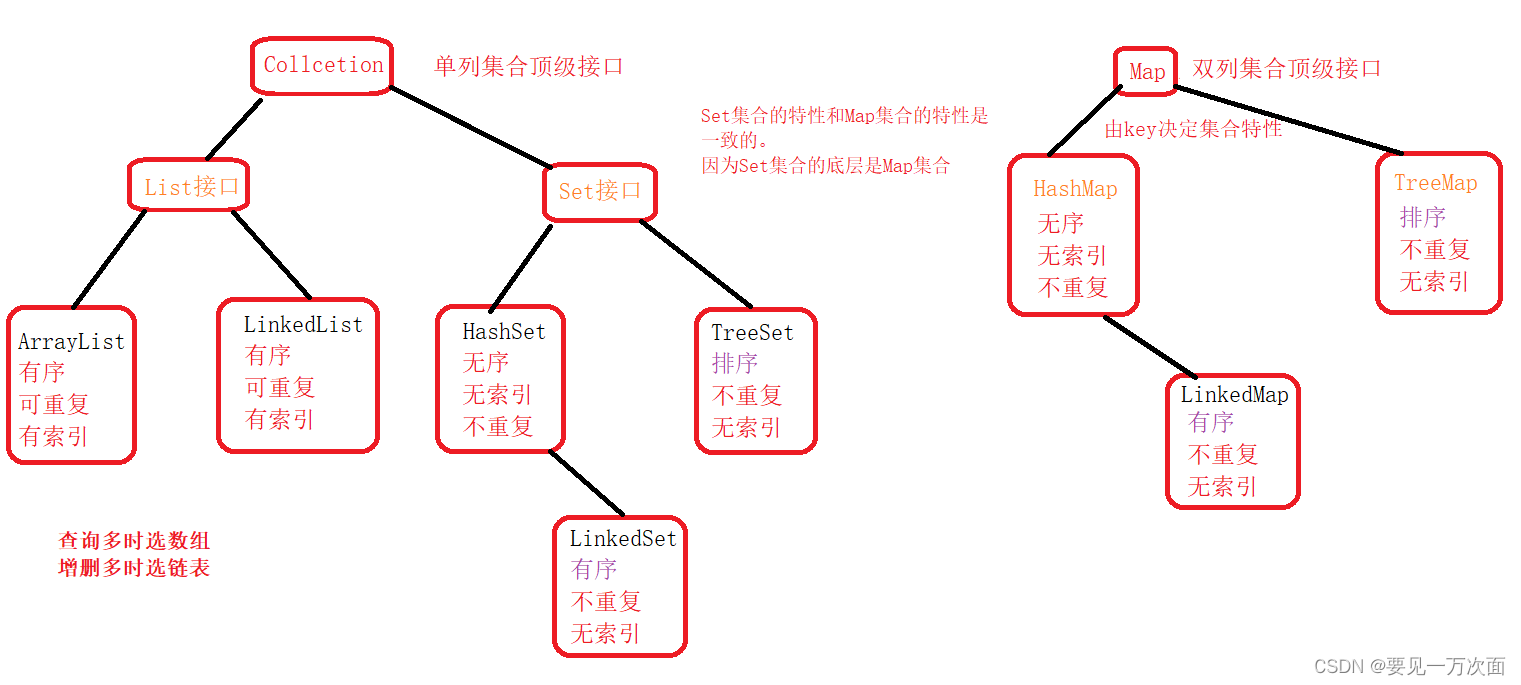
- 常见集合:
单列:List、Set
多例:Map - List基本操作
		// 1. 创建List集合
		List<String> list = new ArrayList<>();
		// 2. 添加
		list.add("abc");
		// 3. 遍历
		// 3.1 for循环
		for(int i = 0; i < list.size(); i++) {
			System.out.println("索引:" + i);
			System.out.println("item"+ list.get(i));
		}
		// 3.2 增强for
		for(String s : list) {
			System.out.println(s);
		}
		// 3.3 迭代器
		Iterator<String> iterator = list.iterator();
		while(iterator.hasNext()) {
   			String next = iterator.next();
			System.out.println(next);
		}
		// 3.4 lambda
		list.forEach(s -> System.out.println(s));
- Set基本操作
		// Set没有索引
		// 1. 创建Set集合
        Set<String> stringSet = new HashSet<>();
        // 2. 添加
        stringSet.add("李四");

        // 3. 遍历 set没有索引
        // 3.1. 增强for
        for(String s : stringSet) {
            System.out.println(s);
        }

        // 3.2. 迭代器
        Iterator<String> iterator1 = stringSet.iterator();
        while (iterator1.hasNext()) {

            String next = iterator1.next();

            System.out.println(next);
        }

        // 3.3. lambda
        stringSet.forEach(s -> {
            System.out.println(s);
        });
- Map基本操作
        // 1. 创建Map集合
        Map<Integer,String> map = new HashMap<>();

        // 2. 添加
        map.put(1,"a");
        map.put(2,"b");

        // 3. 遍历
        // 3.1 增强for
        for (Map.Entry<Integer,String> entry : map.entrySet()) {
            System.out.println(entry.getKey());
            System.out.println(entry.getValue());
        }

        for(Integer key : map.keySet()) {
            System.out.println(key);
            System.out.println(map.get(key));
        }

        // 3.2 迭代器
        Iterator<Map.Entry<Integer,String>> iterator2 = map.entrySet().iterator();
        while (iterator2.hasNext()) {
            Map.Entry<Integer, String> next = iterator2.next();
            System.out.println(next.getKey());
            System.out.println(next.getValue());
        }

        Iterator<Integer> iterator3 = map.keySet().iterator();
        while (iterator3.hasNext()) {
            Integer key = iterator3.next();
            String value = map.get(key);
            System.out.println(key);
            System.out.println(value);
        }

        // 3.3 lambda
        map.forEach((key, value) -> {
            System.out.println(key);
            System.out.println(value);
        });

        map.keySet().forEach(key -> {
            String value = map.get(key);
            System.out.println(key);
            System.out.println(value);
        });

        map.entrySet().forEach(entry -> {
            System.out.println(entry.getKey());
            System.out.println(entry.getValue());
        });
    }
集合总结
异常
-
什么是异常?
在编写或运行时程序的异常情况,统称为异常。 -
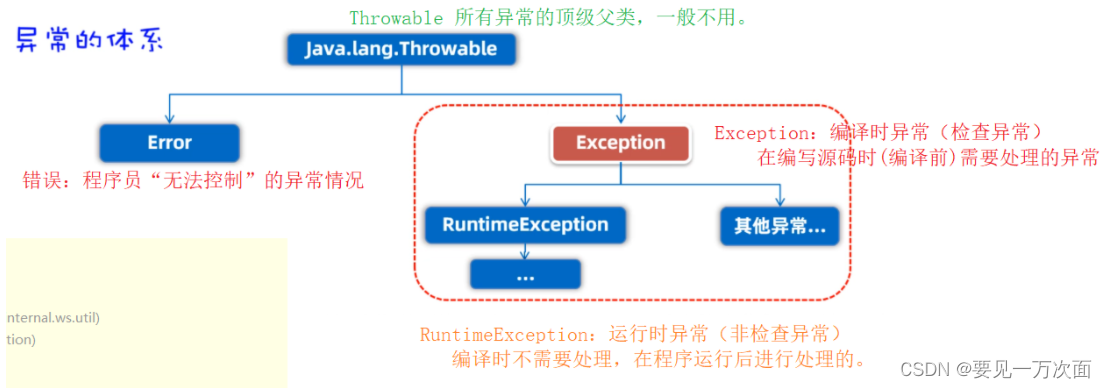
异常的体系结构【重点】
-
如何处理异常【重点】
抛出异常:
	public void 方法名() throws 异常类名, 异常类名2{		//声明异常
    	...;
    	//抛出异常
    	if()
    		throw new 异常类名();
    	//继续抛出
    	if()
        	throw new 异常类名2();
	}
捕获异常:
	try {
    	//代码,可能存在异常
    	方法名();
	} catch (异常类名 变量) {
    	//异常变量,获得具体的异常信息
	} catch (异常类名2 变量) {		//catch 先处理子异常,再处理父异常(大异常)
    	//异常变量,获得具体的异常信息
	} .... {
	} finally {
    	//最终(正常/异常 都执行)
	}
具体代码:
public class TestException {
    public static void main(String[] args) {
        try {
            info(1);
        } catch (SQLException e) {
            System.out.println("2:" + e.getMessage());
        } catch (IOException e) {
            System.out.println("3:" + e.getMessage());
        } finally {
            System.out.println("4: 最终的!");
        }
    }

    public static void info(int num) throws IOException, SQLException {
        if (num == 1) {
            throw new IOException();
        }

        if (num == 2) {
            throw new SQLException();
        }

        System.out.println("1. info方法调用!");
    }
}
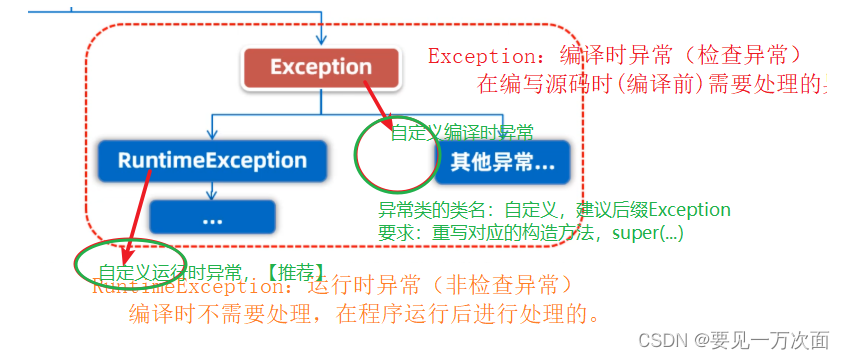
- 自定义异常
代码实现:
StudentException类【自定义】
public class StudentException extends Exception{
    public StudentException() {
    }

    public StudentException(String message) {
        super(message);
    }

    public StudentException(String message, Throwable cause) {
        super(message, cause);
    }

    public StudentException(Throwable cause) {
        super(cause);
    }

    public StudentException(String message, Throwable cause, boolean enableSuppression, boolean writableStackTrace) {
        super(message, cause, enableSuppression, writableStackTrace);
    }
}
UserException 类【自定义】
public class UserException extends RuntimeException {
    public UserException() {
    }

    public UserException(String message) {
        super(message);
    }

    public UserException(String message, Throwable cause) {
        super(message, cause);
    }

    public UserException(Throwable cause) {
        super(cause);
    }

    public UserException(String message, Throwable cause, boolean enableSuppression, boolean writableStackTrace) {
        super(message, cause, enableSuppression, writableStackTrace);
    }
}
TestCustom测试类
public class TestCustom {
    public static void main(String[] args) {

        try {
            info(2);
        } catch (StudentException e) {
            throw new RuntimeException(e);
        } finally {
            System.out.println("最终");
        }

    }

    public static void info(int num) throws StudentException {
        if(num == 1) {
            throw new StudentException("学生异常");
        }

        if(num == 2) {
            throw new UserException("用户异常");
        }

        System.out.println("info调用成功");
    }
}
可变参数
- 语法
类型… 变量名
public void info(String... strs) {}
- 使用
    public static void main(String[] args) {

        // 可变参数:实际参数的个数可以改变
        info("张三", "b","c","d");

        // 对象数组: 在可变参数中被打散作为实参进行传递
        String[] arr = {"1","2","3"};

        info("李四", arr);
    }

    // 可变参数语法: 类型... 变量名
    public static void info(String name, String... strs) {
        // 可变参数的变量相当于数组
        System.out.println("姓名:" + name);

        System.out.println(Arrays.toString(strs));
    }
- 注意事项
可变参数只能在参数列表中的最后一项
参数列表中只能存在一个可变参数,否则会报错
    //  public static void info(String name, String... strs)   对
    //  public static void info(String name, String... strs, int age) 错
    //  public static void info(String... names, String... strs)  错
}


