springboot 自动装配原理
文章目录
前言
springboot 大大降低了我们项目搭建成本,也对常用的框架版本进行了管理。
我们引入常用框架也只是在 Maven 中引入一个 starter jar 包,然后配置好关键配置,如数据源地址、用户名、密码等,就可以使用。
我们自己在工作中的也可以下一个 starter 供项目使用,极大方便了日常的开发。
而上面的一切都指向了 springboot 的自动装配功能,可以说没有自动装配功能就没有 springboot。甚至可以说 springboot 的自动装配是微应用的一个基石。
既然 springboot 的自动装配功能这么重要,我们更应该理解它的原理。
一、@SpringBootApplication 注解
想要了解 springboot 的启动过程,我们就要看 springboot 的启动类。
@SpringBootApplication
public class SpringbootFunctionApplication {
	public static void main(String[] args) {
		SpringApplication.run(SpringbootFunctionApplication.class, args);
	}
}
从 springboot 的启动类中我们可以看到,启动类只有两个东西需要我们去研究,一个是 main 方法,一个是 @SpringBootApplication 注解。
而我们需要学习的 springboot 自动装配原理,就在 @SpringBootApplication 当中。
那么我们点开 @SpringBootApplication 注解,看看 @SpringBootApplication 的源码。
@Target({ElementType.TYPE})
@Retention(RetentionPolicy.RUNTIME)
@Documented
@Inherited
@SpringBootConfiguration
@EnableAutoConfiguration
@ComponentScan(
    excludeFilters = {@Filter(
    type = FilterType.CUSTOM,
    classes = {TypeExcludeFilter.class}
), @Filter(
    type = FilterType.CUSTOM,
    classes = {AutoConfigurationExcludeFilter.class}
)}
)
public @interface SpringBootApplication {
}
我么看到 @SpringBootApplication 注解主要由 @SpringBootConfiguration、@EnableAutoConfiguration、@ComponentScan 这三个注解组成。接下来我们就逐个看看这三个注解。
二、@SpringBootConfiguration 注解
我们先看看 @SpringBootConfiguration 源码。
@Target({ElementType.TYPE})
@Retention(RetentionPolicy.RUNTIME)
@Documented
@Configuration
@Indexed
public @interface SpringBootConfiguration {
    @AliasFor(
        annotation = Configuration.class
    )
    boolean proxyBeanMethods() default true;
}
我们通过源码可以看到 @SpringBootConfiguration 注解上只标注了 @Configuration 注解,代表这个一个配置类。说明 springboot 的启动类是一个配置类。
三、@ComponentScan 注解
@ComponentScan 注解在 spring 中就已经存在,主要的作用是定义扫描的路径找出需要装配的类注册到 IOC 容器中。@ComponentScan 注解会扫描标识了 @Component 注解的类到 spring 容器中。因为这是 spring 的内容,这里就不多错赘述。
四、@EnableAutoConfiguration 注解
既然 @SpringBootConfiguration 表示启动类是一个配置类,@ComponentScan 扫描自己项目中所写的标识了@Component 注解的类,都没有涉及我们导入 jar 包 class 类的自动装配问题,那么 springboot 的自动装配功能就在 @EnableAutoConfiguration 注解中。我们也可以通过名字翻译为启动自动配置大体知道核心功能就在该注解中,下面是它的源码。
@Target({ElementType.TYPE})
@Retention(RetentionPolicy.RUNTIME)
@Documented
@Inherited
@AutoConfigurationPackage
@Import({AutoConfigurationImportSelector.class})
public @interface EnableAutoConfiguration {
    String ENABLED_OVERRIDE_PROPERTY = "spring.boot.enableautoconfiguration";

    Class<?>[] exclude() default {};

    String[] excludeName() default {};
}
@EnableAutoConfiguration 注解主要又两个部分,一个是 @AutoConfigurationPackage 注解,翻译为自动配置包;一个是 springboot 使用 @Import 注册了一个 AutoConfigurationImportSelector 对象。
我们接下来一个一个看。
1.@AutoConfigurationPackage 注解
@Target({ElementType.TYPE})
@Retention(RetentionPolicy.RUNTIME)
@Documented
@Inherited
@Import({Registrar.class})
public @interface AutoConfigurationPackage {
    String[] basePackages() default {};

    Class<?>[] basePackageClasses() default {};
}
可以看到 @AutoConfigurationPackage 注解往 IOC 容器中注册了一个 bean Registrar。
static class Registrar implements ImportBeanDefinitionRegistrar, DeterminableImports {
        Registrar() {
        }

		// 注册 bean 定义信息
        public void registerBeanDefinitions(AnnotationMetadata metadata, BeanDefinitionRegistry registry) {
            AutoConfigurationPackages.register(registry, (String[])(new AutoConfigurationPackages.PackageImports(metadata)).getPackageNames().toArray(new String[0]));
        }

		// 确定导入的路径
        public Set<Object> determineImports(AnnotationMetadata metadata) {
            return Collections.singleton(new AutoConfigurationPackages.PackageImports(metadata));
        }
    }
我们在方法上打个断点看下:
我们看到了 AutoConfigurationPackages 的 register 方法传参为 启动类的包路径。
我们看下 AutoConfigurationPackages 的 register 方法源码:
public static void register(BeanDefinitionRegistry registry, String... packageNames) {
    if (registry.containsBeanDefinition(BEAN)) {
        AutoConfigurationPackages.BasePackagesBeanDefinition beanDefinition = (AutoConfigurationPackages.BasePackagesBeanDefinition)registry.getBeanDefinition(BEAN);
        beanDefinition.addBasePackages(packageNames);
    } else {
        registry.registerBeanDefinition(BEAN, new AutoConfigurationPackages.BasePackagesBeanDefinition(packageNames));
    }

}
通过源码知道将启动类所在路径添加到了 bean 定义注册对象的基本路径集合中。这里我们知道了为什么 springboot 默认的包扫描路径是启动类的同级类或同级包下面的类了。
@AutoConfigurationPackage 注解说完了,我们接下来看下 AutoConfigurationImportSelector 这个类。
2.AutoConfigurationImportSelector 对象
我们再点开看下源码:
public class AutoConfigurationImportSelector implements DeferredImportSelector, BeanClassLoaderAware, ResourceLoaderAware, BeanFactoryAware, EnvironmentAware, Ordered {
}
AutoConfigurationImportSelector 对象实现了 DeferredImportSelector 接口,而 DeferredImportSelector 接口继承的接口 ImportSelector 中有一个如下的方法:
String[] selectImports(AnnotationMetadata importingClassMetadata);
那么我们看下 AutoConfigurationImportSelector 对象实现的 selectImports 方法:
public String[] selectImports(AnnotationMetadata annotationMetadata) {
    if (!this.isEnabled(annotationMetadata)) {
        return NO_IMPORTS;
    } else {
    	// 该行返回了自动配置对象
        AutoConfigurationImportSelector.AutoConfigurationEntry autoConfigurationEntry = this.getAutoConfigurationEntry(annotationMetadata);
        return StringUtils.toStringArray(autoConfigurationEntry.getConfigurations());
    }
}
selectImports 方法调用了 getAutoConfigurationEntry 方法返回自动配置对象。我们看看 getAutoConfigurationEntry 方法是如何操作的。
protected AutoConfigurationImportSelector.AutoConfigurationEntry getAutoConfigurationEntry(AnnotationMetadata annotationMetadata) {
        if (!this.isEnabled(annotationMetadata)) {
            return EMPTY_ENTRY;
        } else {
        	// 获取注解属性列表
            AnnotationAttributes attributes = this.getAttributes(annotationMetadata);
            // 获取候选配置对象列表
            List<String> configurations = this.getCandidateConfigurations(annotationMetadata, attributes);
            // 移除重复的配置类
            configurations = this.removeDuplicates(configurations);
            // 获取需要排除的配置类
            Set<String> exclusions = this.getExclusions(annotationMetadata, attributes);
            // 检查排除的配置类
            this.checkExcludedClasses(configurations, exclusions);
            // 移除所有需要排除的
            configurations.removeAll(exclusions);
            // 对配置类列表进行过滤
            configurations = this.getConfigurationClassFilter().filter(configurations);
            // 关掉自动配置导入事件
            this.fireAutoConfigurationImportEvents(configurations, exclusions);
            return new AutoConfigurationImportSelector.AutoConfigurationEntry(configurations, exclusions);
        }
    }
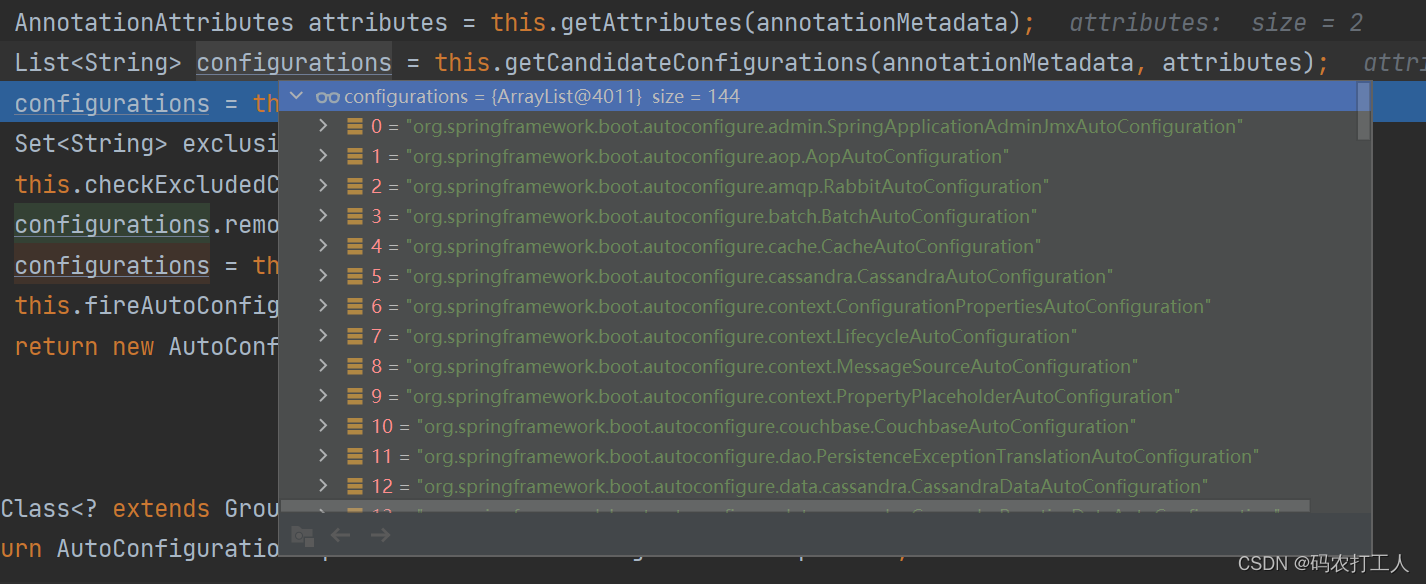
通过注释可以知道获取需要配置的类在 getCandidateConfigurations 方法中,我们打断点看看具体返回的 configurations 包含了什么信息:
通过截图可以看到 configurations 属性包含了一些配置类的全类名,一共有144条。
我们看下是如何获取到这 144 条配置类的全类名的,点击 getCandidateConfigurations 方法进入。
protected List<String> getCandidateConfigurations(AnnotationMetadata metadata, AnnotationAttributes attributes) {
    List<String> configurations = new ArrayList(SpringFactoriesLoader.loadFactoryNames(this.getSpringFactoriesLoaderFactoryClass(), this.getBeanClassLoader()));
    ImportCandidates.load(AutoConfiguration.class, this.getBeanClassLoader()).forEach(configurations::add);
    Assert.notEmpty(configurations, "No auto configuration classes found in META-INF/spring.factories nor in META-INF/spring/org.springframework.boot.autoconfigure.AutoConfiguration.imports. If you are using a custom packaging, make sure that file is correct.");
    return configurations;
}
看方法 configurations 是通过 spring 的工厂加载器加载的名称。我们再点进去看下。
public static List<String> loadFactoryNames(Class<?> factoryType, @Nullable ClassLoader classLoader) {
    ClassLoader classLoaderToUse = classLoader;
    if (classLoader == null) {
        classLoaderToUse = SpringFactoriesLoader.class.getClassLoader();
    }

    String factoryTypeName = factoryType.getName();
    return (List)loadSpringFactories(classLoaderToUse).getOrDefault(factoryTypeName, Collections.emptyList());
}
方法最后的 return 调用了方法 loadSpringFactories 具体执行了加载方法,我们继续。
private static Map<String, List<String>> loadSpringFactories(ClassLoader classLoader) {
        Map<String, List<String>> result = (Map)cache.get(classLoader);
        if (result != null) {
            return result;
        } else {
            HashMap result = new HashMap();

            try {
                Enumeration urls = classLoader.getResources("META-INF/spring.factories");

                while(urls.hasMoreElements()) {
                    URL url = (URL)urls.nextElement();
                    UrlResource resource = new UrlResource(url);
                    Properties properties = PropertiesLoaderUtils.loadProperties(resource);
                    Iterator var6 = properties.entrySet().iterator();

                    while(var6.hasNext()) {
                        Entry<?, ?> entry = (Entry)var6.next();
                        String factoryTypeName = ((String)entry.getKey()).trim();
                        String[] factoryImplementationNames = StringUtils.commaDelimitedListToStringArray((String)entry.getValue());
                        String[] var10 = factoryImplementationNames;
                        int var11 = factoryImplementationNames.length;

                        for(int var12 = 0; var12 < var11; ++var12) {
                            String factoryImplementationName = var10[var12];
                            ((List)result.computeIfAbsent(factoryTypeName, (key) -> {
                                return new ArrayList();
                            })).add(factoryImplementationName.trim());
                        }
                    }
                }

                result.replaceAll((factoryType, implementations) -> {
                    return (List)implementations.stream().distinct().collect(Collectors.collectingAndThen(Collectors.toList(), Collections::unmodifiableList));
                });
                cache.put(classLoader, result);
                return result;
            } catch (IOException var14) {
                throw new IllegalArgumentException("Unable to load factories from location [META-INF/spring.factories]", var14);
            }
        }
    }
方法很长,但是我们只需要了解该方法里面有一行:
Enumeration urls = classLoader.getResources("META-INF/spring.factories");
这回明显的看到,类加载器是从 META-INF 文件夹下的 spring.factories 文件中获取的。

