目录
8.6 列表过渡动画——transition-group标签
1. 数据双向绑定
<div id="app">
    <input type="text" placeholder="请输入" v-model="content" />
    <button @click="btnSubmit">提交</button>
    <ul>
        <li v-for="item,index in list">{{index}}——{{item}}</li>
    </ul>
</div>

<script type="text/javascript">
var app = new Vue({
    el:"#app",
    data:{
        content:"",
        list:["第一个内容","第二个内容"]
    },
    methods:{
        btnSubmit:function(){
            this.list.push(this.content);
            this.content="";
        }
    }

});
</script>
2.MVVM模式
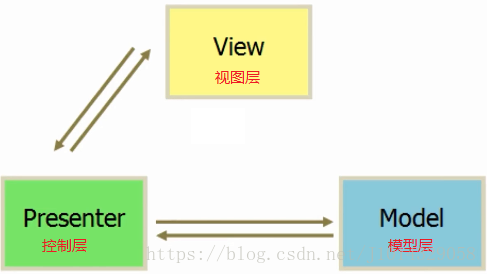
传统模式:MVP模式(即MVC模式)
视图层发送事件到控制器,控制器到模型层操作ajax获取数据并渲染到视图层 或者 在view层操作dom元素。
这个模式中,控制器是非常重要核心的,大量的代码都会放在presenter,Presenter中会有很多dom操作,是面向dom开发。
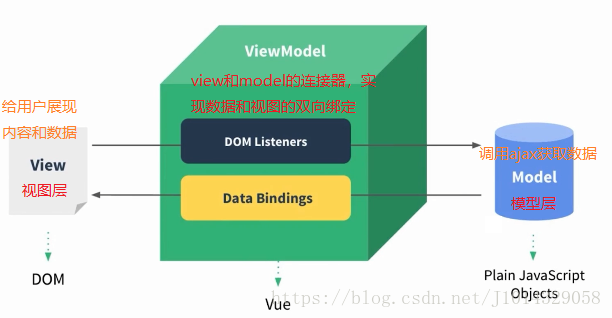
VUE中的MVVM模式:从概念上真正实现了页面与数据的分离。
model:通过ajax获取数据;
view:界面图形和数据;
ViewModel:view和model的连接器,实现了view和model之间的数据双向绑定。通过监听view(或model)的change,对应的修改model(或view)。(vue封装了ViewModel层)
这个模式中,model是重要的核心层,是面向数据开发。
3. 前端组件化
组件化:将页面的一个整体,划分成多个部分组件,每个组件实现不同的功能。方便维护和扩展。
使用组件化的思想,优化第一节的代码:
定义组件时,组件名字驼峰命名,并且首字母大写。在view层使用时,使用小写字母,并使用“-”连接符连接。
例如:定义的名字为:TodoItem,使用时应使用标签<todo-item></todo-item>
全局组件:通过 Vue.component("组件名字",{属性});使用前不需要再次声明;
局部组件:通过 var 组件名字={属性};使用前需要在vue对象中声明:components:{"使用时的名字":"定义时的名字"}
<div id="app">
    <input type="text" placeholder="请输入" v-model="content" />
    <button @click="btnSubmit">提交</button>
    <ul>
        <!-- 组件在使用时,需要将大写字母转为小写并使用连接符-连接 -->
        <todo-item v-bind:content="item" v-for="item,index in list"></todo-item>
    </ul>
</div>
<script type="text/javascript">

//定义全局组件
/*Vue.component("TodoItem",{
    props:["content"],
    template:"<li>{{content}}</li>"
});*/
//定义局部组件,使用前需要在vue对象中进行注册
var TodoItem={
    props:["content"],
    template:"<li>{{content}}</li>"
}
var app = new Vue({
    el:"#app",
    data:{
        content:"",
        list:["第一个内容","第二个内容"]
    },
    components:{
        TodoItem:TodoItem
    },
    methods:{
        btnSubmit:function(){
            if(this.content!=""){
                this.list.push(this.content);
                this.content="";
            }else{
               alert("内容不能为空");
            }
        }
    }
});
</script>
4.父子组件传值
4.1 实例
通过父子组件之间的相互监听,实现父子组件之间的传值;
<div id="app">
    <input type="text" placeholder="请输入" v-model="content" />
    <button @click="btnSubmit">提交</button>
    <ul>
        <!-- 父组件 -->
        <todo-item  v-bind:content="item"
                    :index="index"
                    @delete="itemDelete"
                    v-for="item,index in list"
                    ></todo-item>
    </ul>
</div>
<script type="text/javascript">
//子组件
Vue.component("TodoItem",{
    props:["content","index"],
    template:"<li @click='handlerItemClick'>{{content}}</li>",
    methods:{
        handlerItemClick:function(){
            //点击子组件时,触发delete事件,并且可以传递delete事件参数
            this.$emit("delete",this.index);
        }
    }
});
var app = new Vue({
    el:"#app",
    data:{
        content:"",
        list:["第一个内容","第二个内容"]
    },
    methods:{
        btnSubmit:function(){
            if(this.content!=""){this.list.push(this.content);this.content="";}
        },
        itemDelete:function(index){
            this.list.splice(index,1);
        }
    }
});
4.2 单项数据流
在vue中,父组件向子组件传值,是通过属性(props)传递的;但是子组件不能随意修改父组件传过来的参数(单项数据流)。父——>子。
子组件如果要修改父组件传递过来的参数,需要借助变量实现,通过修改变量的值,实现数据的修改。
<div id="root">
    <counter :count="10" @inc="handleIncrease"></counter>
    <counter :count="100" @inc="handleIncrease"></counter>
    <div>{{total}}</div>
</div>
<script type="text/javascript">
    var counter={
        props:["count"],
        //父组件的传递值在子组件中不能直接修改,可以赋值给另一个变量,将变量绑定到组件中并进行数值修改
        data:function(){
            return{
                number:this.count
            }
        },
        template:'<div @click="handleClick">{{number}}</div>',
        methods:{
            handleClick:function(){
                this.number+=2;
                this.$emit("inc",2);//传递方法和值
            }
        }
    }

    var vm=new Vue({
        el:"#root",
        data:{total:110},
        components:{//声明局部组件
           counter:counter },
        methods:{
            handleIncrease:function(step){
                this.total += step;
            }
        }
    });
</script>
4.3 父组件传值约束
父组件传值给子组件时,子组件对参数进行校验和约束的过程。
4.3.1 数值类型校验:
type: String、Number
4.3.2 必传 校验:
required: true/false
4.3.3 非必传时的默认值:
default: ' default value '
4.4.4 自定义校验:
validator:function(value){ return (value.length>5) }
<div id="root">
    <!-- 将content值传递给子组件。
    注意,如果要传递数字(Number类型),需要在属性前加“:”,即:content="1234";
    如果要传递字符串,则不需要添加“:”,即content="asdfasf" -->
    <child content="safdasf"></child>
</div>
<script type="text/javascript">
Vue.component('child',{
    props:{
        content:{
            type: [Number,String], //接收Number和String。
            required:true,  //参数必填
            validator:function(value){//自定义校验:子组件接收的值长度必须大于5
                return (value.length>5)
            }
        }
    },
    template:'<div>Child</div>'
});
var vm=new Vue({
    el:"#root"
});
</script>
4.4.5 props特性
父组件使用子组件时,通过属性向子组件传值时,并且子组件的props中声明了该参数名(即在子组件的props数组中声明)。父组件传递,子组件接收。
4.4.6 非props特性
父组件传递的参数名,在子组件中的props属性中未定义;即非props特性。生产应用几乎不使用。
非props特性情况下,template在定义组件时使用了该父组件参数名,则会报错。
非props特性情况下,template未使用父组件传递参数的参数名,则父组件的属性会显示在子组件最外层的dom标签的属性中。
4.4 非父子组件间的传值
总线机制/BUS机制/发布订阅模式/观察者模式
<div id="app">
    <!-- 兄弟组件之间传值-->
    <child content="Wang"></child>
    <child content="ZHAO"></child>
</div>
<script type="text/javascript">
Vue.prototype.bus=new Vue() //在vue实例上挂载一个bus
Vue.component('child',{
    props:["content"],
    data:function(){
        return {
            temp:this.content
        }
    },
    template:'<div @click="changeContent">{{temp}}</div>',
    methods:{
        changeContent:function(){
            //传递change事件和参数
            this.bus.$emit("change",this.temp);
        }
    },
    //组件被挂载后执行,监听bus的改变。由于两个组件,因此会被执行两次。
    mounted:function(){
        var that=this;//下方函数中使用this时,其作用域会改变,因此可以复制给that
        this.bus.$on('change',function(msg){
            that.temp=msg;
        })
    }
})
var vm=new Vue({    el:"#app"  });
</script>
4.5 兄弟组件传值
以父组件为介质,进行传值。
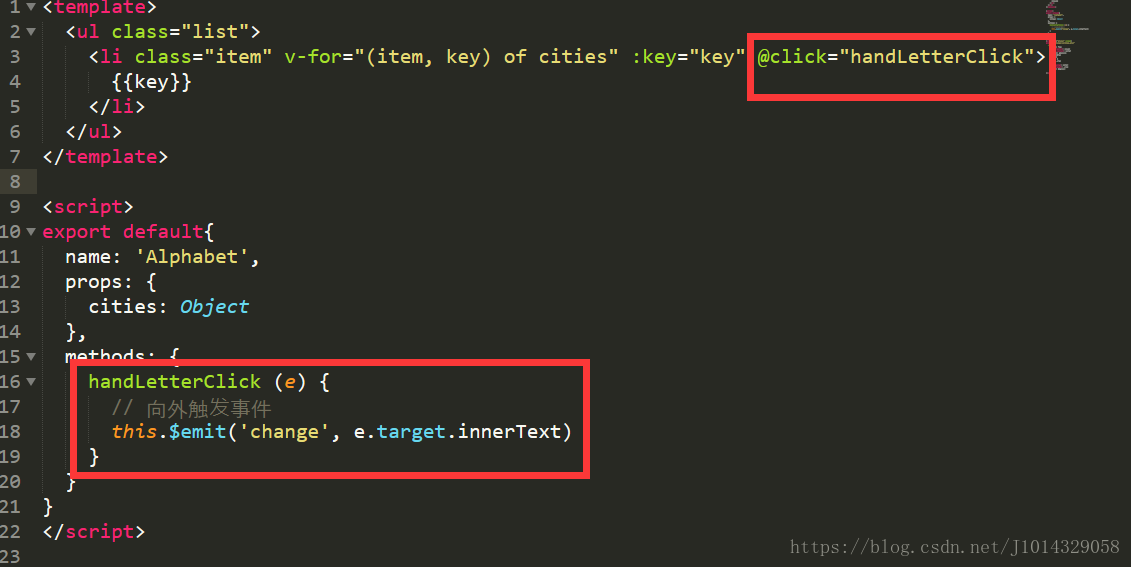
1. 兄组件中,使用 this.$emit()方法,向上发送触发事件(即向父组件发送li标签的点击事件)。
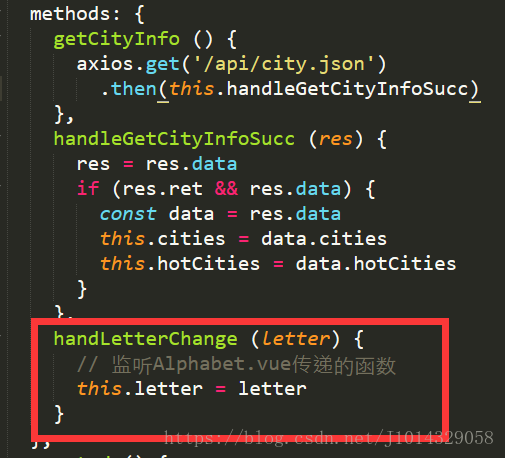
2. 父组件中,监听子组件传递的点击触发事件,获取子组件传递过来的参数。
3. 父组件向另一个子组件传递值
4. 另一个子组件接收父组件传递过来的值

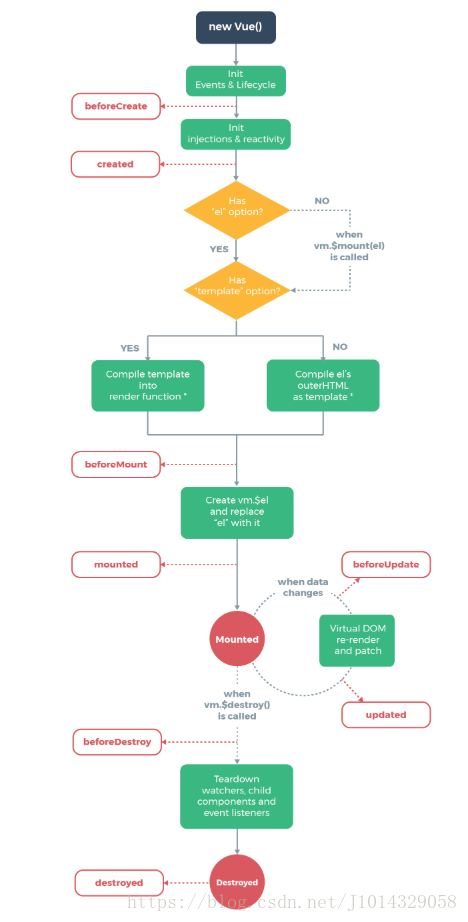
5. 生命周期钩子
<div id="app">
    <div><input type="text" v-model="content" /></div>
    <div>{{content}}</div>
</div>
<script type="text/javascript">
var vm=new Vue({
    el:"#app",
    data:{
        content:"hello world"
    },
    beforeCreate:function(){//实例的事件和生命周期周期初始化完成后执行
        console.info("【声明周期函数】生命周期初始化完成后执行","beforeCreate")
    },
    created:function(){//实例被创建之后执行
        console.info("【声明周期函数】实例创建后执行","created")
        //console.log(this.$el);
    },
    beforeMount:function(){//页面加载之前会执行
        console.info("【声明周期函数】页面加载前执行","beforeMount")
       //console.log(this.$el);
    },
    mounted:function(){//页面加载之后执行
        console.info("【声明周期函数】页面加载后执行","mounted")
        //console.log(this.$el);
    },
    beforeDestroy:function(){//实例对象执行销毁函数后,实例被销毁前执行
        console.info("【声明周期函数】实例被销毁之前执行","beforeDestroy")
    },
    destroyed:function(){//实例对象执行销毁函数后,实例被销毁后执行
        console.info("【声明周期函数】实例被销毁之后执行","destroyed")
    },
    beforeUpdate:function(){//数据发生改变,重新渲染之前执行
        console.info("【声明周期函数】数据改变后重新渲染之前执行","beforeUpdate")
    },
    updated:function(){//数据发生改变,重新渲染完成后执行
        console.info("【声明周期函数】数据改变后重新渲染后执行","updated")
    }
});
</script>
6.简单的模板语法
6.1 v-text,v-html
<div id="app">
    <div>差值表达式:{{name}}</div>
    <div v-text="'类似于差值表达式:'+name"></div>
    <div v-html="'可以渲染html标签:<h3>'+name+'</h3>'"></div>
    <div v-bind:title="name"></div>
</div>
<script type="text/javascript">
var vm=new Vue({
    el:"#app",
    data:{
        name:"Lenovo"
    }
});
</script>
6.2计算属性、方法、侦听器
计算属性拥有缓存机制:当计算所需的变量值不发生改变时,数据重新渲染时不会再次进行计算,而是使用之前计算的结果进行渲染。只有当变量的值改变后,触发数据渲染时,计算属性才会被再次触发。
<div id="app">
    <div>{{fullName}}</div>
    <div>{{age}}</div>
    <div>{{fullName2()}}</div>
    <div>{{fullName3}}</div>
</div>
<script type="text/javascript">
var vm=new Vue({
    el:"#app",
    data:{
        firstName:"Lenovo",
        lastName:"Wang",
        age:22,
        fullName3:"Lenovo Wang"
    },
    computed:{//性能高、简洁
        fullName:function(){//计算属性的缓存机制:若变量值不发生改变,进行数据渲染时不会重新计算。
            console.log("执行计算");
            return this.firstName+" "+this.lastName;
        }
    },
    methods:{
        fullName2:function(){//数据渲染一次,方法执行一次,性能不如计算属性
            console.log("执行方法");
            return this.firstName+" "+this.lastName;
        }
    },
    watch:{
        firstName:function(){//监听firstName变量的改变
            console.log("执行firstName监听");
            this.fullName3=this.firstName+" "+this.lastName;
        },
        lastName:function(){//监听lastName变量的改变
            console.log("执行lastName监听");
            this.fullName3=this.firstName+" "+this.lastName;
        }
    }
});
</script>
6.3 计算属性的setter和getter
<div id="app">
    <div>{{fullName}}</div>
</div>
<script type="text/javascript">
var vm=new Vue({
    el:"#app",
    data:{
        firstName:"Lenovo",
        lastName:"Wang"
    },
    computed:{
        fullName:{
            get:function(){
                return this.firstName+" "+this.lastName
            },
            set:function(value){
                var arr=value.split(" ");//根据空格分割成数组
                this.firstName=arr[0];
                this.lastName=arr[1];
            }
        }
    }
});
</script>
6.4 条件渲染
v-if :隐藏后,页面加载时DOM结点不会被加载出来。(v-if在操作dom时,相同的结点会进行复用:比如input标签,在true时展示出来,在false也会展示出来,此时会进行input组件复用,包括input的值内容。如果不想不用,则赋予input属性key不同的值)key值必须唯一,但是在v-for中,尽量不适用index作为key的值,以便提高性能(并不清楚如何可以提高)。
v-show:隐藏后,DOM结点仍然是被加载出来了,但是被display:none隐藏掉了。(涉及频繁操作DOM时,效率较高)
<div id="app">
    <div v-if="show">{{message}}<input key="true" /></div>
    <div v-else>v-if操作结点时,dom会被增删<input key="false" /></div>
    <div v-show="flag">{{message}}</div>
</div>
<div id="ifelse">
    <div v-if="show=='a'">This is A</div>
    <div v-else-if="show=='b'">This is B</div>
    <div v-else>This is others</div>
</div>
<script type="text/javascript">
var vm=new Vue({
    el:"#app",
    data:{ message:"Lenovo",show:false,flag:true}
});
var vue=new Vue({
    el:"#ifelse",
    data:{show:"a"}
})
</script>
6.5 列表渲染
代码的重点有点偏了……
<div id="app">
    <div v-for="item,index of list" :key="item.id">
        {{index}}:{{item.id}}_{{item.name}}
    </div>
</div>
<script type="text/javascript">
/*js操作数组元素:
 push(content)  数组末增加元素;参数为元素值。
 pop()    数组中的最后一个元素删除;无参。
 shift()  把数组中的第一个元素删除;无参,并返回第一个元素值。
 unshift(content)    在数组的前端添加一个或多个元素。参数为元素值。并返回新数组的长度。
 splice(index,length) 数组修改,返回值为:从index开始删除长度为length个元素的数组(第三个参数为增加的元素)
 slice(start,end)   数组截取,返回从start下标开始选取到end下标的数组。参数可以为负数,-1表示倒数第一个。
 sort   数组排序
 reverse    数组取反*/
var vm=new Vue({
    el:"#app",
    data:{
        list:[{id:1,name:"A"}, {id:2,name:"B"}, {id:3,name:"C"}]
    }
});
</script>
6.6 组件绑定事件
组件在定义时,可以绑定两种组件:原生事件(Vue对象中定义)和自定义事件(组件创建时定义)。
6.6.1 绑定自定义事件
<div id="root">
    <child></child>
</div>
<script type="text/javascript">
Vue.component('child',{
    props:["content"],
    template:'<div @click="handleClick">Child</div>',
    methods:{
        handleClick:function(){
            alert("自定义事件绑定");
        }
    }
});
6.6.2 绑定原生事件—— @click.navive="functionName"
<div id="root">
    <child @click.native="clickChild"></child>
</div>
<script type="text/javascript">
Vue.component('child',{
    props:["content"],
    template:'<div>Child</div>'
});
var vm=new Vue({
    el:"#root",
    methods:{
        clickChild:function(){
            alert("原生事件绑定");
        }
    }
});
</script>
6.6.3 通过this.$emit('click')触发原生事件__很啰嗦啦
<div id="root">
    <child @click="clickChild"></child>
</div>
<script type="text/javascript">
Vue.component('child',{
    props:["content"],
    template:'<div @click="handleClick">Child</div>',
    methods:{
        handleClick:function(){
            this.$emit('click');//组件通过这个触发自定义事件
        }
    }
});
var vm=new Vue({
    el:"#root",
    methods:{
        clickChild:function(){
            alert("原生事件绑定");
        }
    }
});
</script>
7. 插槽slot
使用场景:父组件向子组件传递的不是单纯的字符串或数字,而是dom结构(html标签)。
7.1 单个插槽
<div id="app">
    <child>
        <h3>Lenovo</h3><!-- 父组件通过插槽传递dom结构 -->
    </child>
</div>
<script type="text/javascript">
Vue.component('child',{
    template:'<div><p>Hello</p><slot>默认显示(父组件未传递dom结构时显示默认内容)</slot></div>'
});
var vm=new Vue({el:"#app"});
7.2 具名插槽
注:父组件传递多个dom结构时,子组件的slot标签默认会接收所有的dom,并且发生error。如果要传递多个dom,应使用具名插槽,如下所示。
<div id="app">
    <body-content>
        <div class="header" slot="header">header</div>
        <div class="footer" slot="footer">footer</div>
    </body-content>
</div>
<script type="text/javascript">
Vue.component('body-content',{
    template:   `<div>
                    <slot name='header'><h3>默认值内容</h3></slot>
                    <div class='content'>content</div>
                    <slot name='footer'><h3>默认值内容</h3></slot>
                </div>`
});
var vm=new Vue({
    el:"#app"
});
7.3 作用域插槽
父组件调用子组件时,给子组件传递作用域插槽(template标签包含,并且拥有属性slot-scope,该属性值自定义,用于接收子组件传递过来的数据)。
子组件向父组件传递数据,父组件可以定义数据的显示格式。
<div id="app">
    <child>
        <template slot-scope="props">
            <li>{{props.item}}______{{props}}</li>
        </template>
    </child>
    <child>
        <template slot-scope="props">
            <h4>{{props.item}}______{{props}}</h4>
        </template>
    </child>
</div>
<script type="text/javascript">
Vue.component('child',{
    data:function(){
        return {
            list:[1,2,3,4]
        }
    },

    template:   `<div>
                    <ul>
                        <slot v-for="item of list" :item=item></slot>
                    </ul>
                </div>`
});
var vm=new Vue({
    el:"#app"
});
7.4 动态组件与v-once指令
7.4.1 动态组件component:
可以根据标签component属性 :is 指定的组件名称,显示不同的组件。
<div id="app">
    <component :is="type"></component>
    <!-- 点击按钮更换type的值 -->
    <button @click="handleBtnClick">change</button>
</div>
<script type="text/javascript">
Vue.component('child-one',{
    template: "<div>child-one</div>"
});
Vue.component('child-two',{
    template: "<div>child-two</div>"
});
var vm=new Vue({
    el:"#app",
    data:{
        type:"child-one"
    },
    methods:{
        handleBtnClick:function(){//三元表达式
            this.type=this.type==='child-one'?'child-two':'child-one';
        }
    }
});
</script>
7.4.2 v-once指令
v-once修饰的组件,数据渲染时会被放入内存,并且再次进行数据渲染时,该组件会被认作静态内容不进行数据渲染。即v-once修饰的组件只进行一次数据渲染。可以有效提高静态内容的展示效率。
<div id="app">
   <input v-model="vonce" />
   <div>{{vonce}}</div>
   <div v-once>{{vonce}}</div>
</div>
<script type="text/javascript">
var vm=new Vue({
    el:"#app",
    data:{        vonce:"vonce"    }
});

</script>
8. vue操作动画
从广义上来讲,css3动画可以分为两种:过渡动画和关键帧动画。
8.1 transition过渡动画
过渡动画:从初始状态过渡到结束状态这个过程中所产生的动画。所谓的状态就是指大小、位置、颜色、变形(transform)等等这些属性。css过渡只能定义首和尾两个状态,所以是最简单的一种动画
vue实现过渡动画原理:通过css3中的transition属性,监听css3中opacity属性(用于设置元素的不透明度级别,默认值为1)值的变化。
隐藏状态变成显示状态时:
被transition标签包裹的组件元素,vue会自动分析元素的css样式,然后构建动画的流程。
1. 在动画即将被执行时,会在该元素上添加两个class名称(前缀是自定义的,即v允许自定义):v-enter、v-enter-active;
2. 动画执行完第一帧后,在第二帧时,删掉v-enter,添加v-enter-to;
3.动画执行结束时,会删除v-enter-active和v-enter-to。
【下图中使用的前缀是自定义的fade(<transition name="fade"><div v-if="show">hello vue!</div></transition>)】
显示状态变成隐藏状态时:
4. 在动画即将被执行时,会在该元素上添加两个class名称(前缀是自定义的,即v允许自定义):v-leave、v-leave-active;
5. 动画执行完第一帧后,在第二帧时,删掉v-leave,添加v-leave-to;
6.动画执行结束时,会删除v-leave-active和v-leave-to。
【下图中使用的前缀是自定义的fade(<transition name="fade"><div v-if="show">hello vue!</div></transition>)】
<style type="text/css">
        .fade-enter-active,/*进入动画*/
        .fade-leave-active{/*离开动画*/
            transition: opacity 1s; /*1s内"运行"opacity结束*/
        }
        .fade-enter,/*进入动画*/
        .fade-leave-to/*离开动画*/{
            opacity:0;/*opacity值设置为0,完全透明*/
        }
</style>

<div id="app">
    <button @click="handlerClick">展示</button>
    <transition name="fade">
        <div v-if="show">hello vue!</div>
    </transition>
</div>
<script type="text/javascript">
var vm=new Vue({
    el:"#app",
    data:{
        show:true
    },
    methods:{
        handlerClick:function(){
            this.show=!this.show;
        }
    }
});
</script>
8.2 vue实现关键帧动画
关键帧动画:过渡动画只能定义第一帧和最后一帧这两个关键帧,而关键帧动画则可以定义任意多的关键帧,因而能实现更复杂的动画效果。
使用@keyframes方式的css3动画,实现div放大缩小的效果:
<style type="text/css">
    @keyframes bounce-in{
        0%{ transform:scale(0); }
        50%{    transform:scale(1.5);   }
        100%{   transform:scale(1); }
    }
    .fade-enter-active{
        transform-origin: left center;
        animation: bounce-in 1s; /*正向运行,0%~100%*/
    }
    .fade-leave-active{
        transform-origin: left center;
        animation: bounce-in 1s reverse; /*反向运行,100%~0%*/
    }
</style>
<!-- html代码和js代码同上8.1节所示一致 -->
8.3 操作animate.css库
animate.css官网:https://daneden.github.io/animate.css/
animate.css库是一个有趣的,跨浏览器的css3动画库,库中内置了非常炫酷的css动画样式。animate动画库是关键帧动画。
BootCDN网址: https://www.bootcdn.cn/animate.css/
vue中的transition标签必须自定义的进入和退出的class类名:
<script src="js/vue.js"></script>
<link rel="stylesheet" type="text/css" href="css/animate.css">

<div id="app">
    <button @click="handlerClick">展示</button>
    <!-- transition自定义进入和退出class类名 -->
    <transition enter-active-class="animated rotateInDownLeft" leave-active-class="animated hinge">
        <div v-if="show">hello vue!</div>
    </transition>
</div>
<script type="text/javascript">
var vm=new Vue({
    el:"#app",
    data:{ show:true},
    methods:{
        handlerClick:function(){
            this.show=!this.show;
        }
    }
});
</script>
在transition标签中,添加属性appear和appear-active-class属性,可以实现在组件加载时的动画效果:
<transition
        enter-active-class="animated rotateInDownLeft"
        leave-active-class="animated hinge"
        appear
        appear-active-class="animated swing">
        <div v-if="show">hello vue!</div>
</transition>
通过修改transition的属性,实现不同的样式效果:
- :duration 自定义样式的停留时长(class停留的时间长度,单位:毫秒);也可以分别设置入场和出场动画的时长::duration="{enter:5000,leave:3000}";
- name:自定义过渡样式的类名前缀;
- appear:组件加载时播放动画;
- appear-active-class:组件加载时播放动画的样式类名;
- enter-active-class:组件进入页面时进行的动画,下示代码有两类:animated库的动画,和过渡动画
- leave-active-class:组件退出页面时进行的动画。
- mode属性:in-out(先展示在隐藏)、out-in(先隐藏在展示)。
<transition
    :duration="5000"
    name="fade"
    appear
    enter-active-class="animated swing fade-enter-active"
    leave-active-class="animated shake fade-leave-active"
    appear-active-class="animated swing"
    >
    <div v-if="show">hello vue!</div>
</transition>
8.4 多元素和多组件的交替过渡动画
8.4.1 组件之间交替显示和隐藏时,应用的过渡动画效果。
使用属性mode
<style type="text/css">
    .v-enter,.v-leave-to{opacity: 0;}
    .v-enter-active,.v-leave-active{transition: opacity 1s;}
</style>
<div id="app">
    <button @click="handleClick">toggle</button>
    <transition mode="out-in">
        <div v-if="show" key="enter">Hello World!</div>
        <div v-else key="leave">Brilliant</div>
    </transition>
</div>
<script type="text/javascript">
var vm=new Vue({
    el:"#app",
    data:{show:true},
    methods:{
        handleClick:function(){
            this.show=!this.show
        }
    }
});
8.4.2 多组件出/入场时的过渡动画
<style type="text/css">
    .v-enter,.v-leave-to{opacity: 0;}
    .v-enter-active,.v-leave-active{transition: opacity 1s;}
</style>

<div id="app">
    <button @click="handleClick">toggle</button>
    <transition mode="out-in">
        <component :is="show"></component>
    </transition>
</div>
<script type="text/javascript">
Vue.component('child-one',{
    template:'<div>child-one</div>'
})
Vue.component('child-two',{
     template:'<div>child-two</div>'
})
var vm=new Vue({
    el:"#app",
    data:{  show:'child-one'    },
    methods:{
        handleClick:function(){
            this.show=this.show==='child-one'?'child-two':'child-one';
        }
    }
});
</script>
8.5 操作velocity.js动画
velocity.js官网:http://velocityjs.org/
velocity.js是专为动画而设计的动画库,简单易用,功能强大。
bootCDN网址:https://www.bootcdn.cn/velocity/
transition的钩子:
- @before-enter 元素入场前执行
- @enter 执行过回调函数后,将会执行after-enter的钩子函数。
- @after-enter 元素入场后执行
- @before-leave 元素出场前执行
- @leave
- @after-leave 元素出场后执行
<div id="app">
    <button @click="handlerClick">展示</button>
    <transition name="fade"
        @before-enter="handleBeforeEnter" @enter="handleEnter" @after-enter="handerAgterEnter"
        @before-leave ="handleBeforeLive" @leave ="handleLive" @after-leave ="handerAgterLive">
        <div v-if="show">hello vue!</div>
    </transition>
</div>
<script type="text/javascript">
var vm=new Vue({
    el:"#app",
    data:{
        show:true
    },
    methods:{
        handlerClick:function(){
            this.show=!this.show;
        },
        handleBeforeEnter:function(el){
            el.style.opacity=0;
        },
        handleEnter:function(el,done){
            Velocity(el,{opacity:1},{duration:1000,complete:done})
        },
        handerAgterEnter:function(el){
            console.info("【进场动画】","结束");
        },
        handleBeforeLive:function(el){
            el.style.opacity=1;
        },
        handleLive:function(el,done){
            Velocity(el,{opacity:0},{duration:1000,complete:done})
        },
        handerAgterLive:function(el){
            console.info("【出场动画】","结束");
        }
    }
});
</script>
8.6 列表过渡动画——transition-group标签
原理:transition-group标签会给包含的每一个元素都添加一个transition标签。
<style type="text/css">
    .v-enter,.v-leave-to{opacity: 0;}
    .v-enter-active,.v-leave-active{transition:opacity 1s;}
</style>
<div id="app">
    <button @click="handleClick">ADD</button><button @click="handleClick">DELETE</button>
    <transition-group>
        <div v-for="item,index of list" :key="item.id">{{item.id}}___{{item.title}}</div>
    </transition-group>
</div>
<script type="text/javascript">
var count=0;
var vm=new Vue({
    el:"#app",
    data:{list:[]},
    methods:{
        handleClick:function(){
            this.list.push({
                id:count++,title:"hello world"
            })
        }
    }
});
</script>
8.7 vue中的动画封装
为了实现动画代码的可复用性,我们可以将动画进行封装。
<script src="js/velocity.min.js"></script>

<div id="app">
    <button @click="handleBtnClick">toggle</button>
    <fade :show="show">
        <div>hello world</div>
    </fade>
    <fade :show="show">
        <h3>hello world</h3>
    </fade>
</div>
<script type="text/javascript">
Vue.component('fade',{
    props:["show"],
    template:`
        <transition @before-enter="handleBeforeEnter" @enter="handleEnter"
            @before-leave="handleBeforeLeave" @leave="handleLeave">
            <slot v-if="show"></slot>
        </transition>
    `,
    methods:{
        handleBeforeEnter:function(el){el.style.opacity=0;},
        handleEnter:function(el,done){
            Velocity(el,{opacity:1},{duration:1000,complete:done})
        },
        handleBeforeLeave:function(el){el.style.opacity=1;},
        handleLeave:function(el,done){
            Velocity(el,{opacity:0},{duration:500,complete:done})
        }
    }
})
var vm=new Vue({
    el:"#app",
    data:{show:true},
    methods:{
        handleBtnClick:function(){this.show=!this.show;}
    }
});
</script>
