文章目录
前言
在程序中,如果有大量的 CPU bound 任务,或是有大量的 I/O bound 任务,则可以使用并发编程和异步编程,极大地提高代码的运行速度。
说明:下面的代码使用 Python 3.10 进行演示。用到的一些命令和参数,在其它较低版本的 Python 中可能不支持。
1. 几个相关的术语
在使用并发编程和异步编程时,会经常遇到几个术语,需要先进行一些区分。
1.1 并发 concurrency 和并行 parallelism
Concurrency 是“并发机制”,是指同时有多个任务存在,可能有 1 个或几个任务在运行,也可能全部任务都在运行。
Parallelism 是“并行机制”,是指同时有多个任务存在,并且所有任务都在同时运行。
例如 GPU 中有成千上万个核,GPU 的计算通常都是在这些核中并行计算的 (parallelism),即这些成千上万个核是在同时进行计算。
而在 CPU 中,如果是使用多线程并发(concurrency),通常只有 1 个线程在运行,其它线程处于阻断状态(pending)。
所以从集合的角度来说,并发(concurrency)是包括并行(parallelism)的。
1.2 同步 synchronous 和异步 asynchronous
synchronous 同步,是常见的程序运行方式:即主程序调用子程序之后,主程序停在了调用点,一直等待到子程序结束之后,主程序才会继续运行调用点后续的代码。
synchronous 同步运行程序的方式,也叫序列方式 sequential,因为程序中的各部分代码都是按顺序执行的,一部分代码结束之后,才会运行下一部分代码。
asynchronous 异步,是一种“不等待”的方式:即主程序调用子程序之后,主程序立即执行调用点后续的代码,而不会等待子程序。
如果子程序需要很长时间才能结束,此时使用异步编程的方式,会使得代码的效率大大提高。
在 FastAPI 中有一篇文章,使用了 《和心仪的对象排队买汉堡》 的例子来解释异步和并发等概念。可以参考:→ https://fastapi.tiangolo.com/async/
1.3 I/O bound 和 CPU bound
I/O bound 程序,是指该程序有大量时间都花在 I/O 操作上,I/O 操作是该程序的效率瓶颈。
常见的 I/O 有 2 类,包括网络 network I/O 和文件 file I/O 。network I/O 的发送请求和等待响应时间会很长。而内存和硬盘之间的数据读写操作则属于 file I/O。
CPU bound 程序,是指该程序有大量时间都花在 CPU 的计算上,CPU 计算是该程序的效率瓶颈。有时 CPU bound 也叫做 CPU-intensive。
对图片的处理,以及对音频、视频文件的处理,都属于 CPU bound 程序,它们都要使用 CPU 进行大量的计算。
1.4 进程、线程、协程以及 GIL 的关系图
可以用 3 种执行单元 execution unit 来实现并发,包括:进程 process,线程 thread,协程 coroutine。
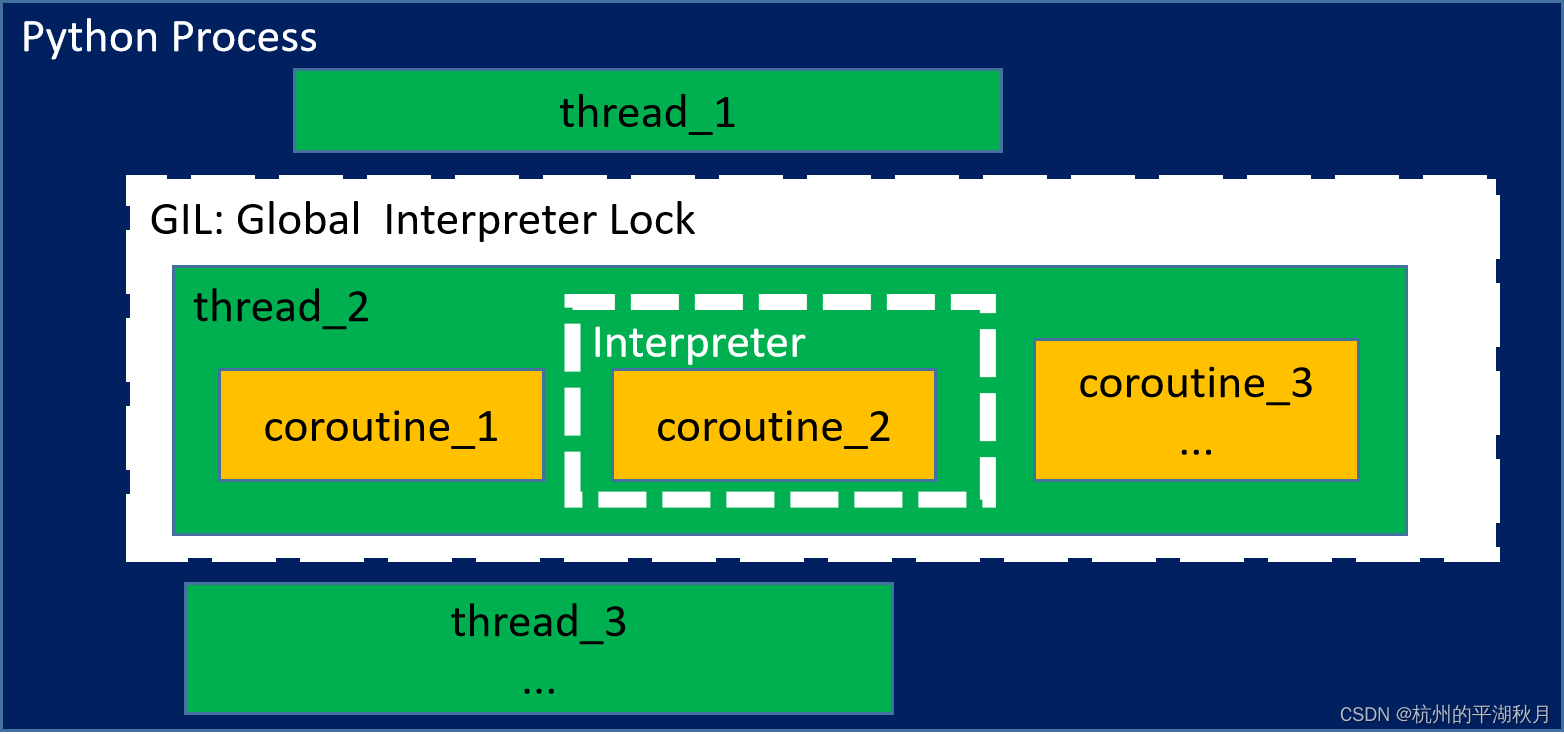
进程 process,线程 thread,协程 coroutine,以及 GIL(Global Interpreter Lock)的相互关系有 4 个要点:
- 每个 Python process 都有一个解释器 interpreter。解释器会解释 Python 代码并将其执行。
- 每个 Python process 中,能够并发多个线程 threads。
- 线程获得了 GIL(Global Interpreter Lock)之后 ,解释器才会运行该线程。每隔 5 ms,解释器会强制释放 GIL,系统重新把 GIL 分配给多个线程中的某个线程,下一个得到 GIL 的线程得以运行。
- 一个线程内,能够并发多个协程 coroutines。但只有被分配了解释器的协程,才能够被运行。也就是在任何时刻,线程内最多只有一个协程在运行。
它们之间的关系图如下:
在上图中,因为线程 thread_2 获得了 GIL(图中以白色框表示),所以 thread_2 得以运行,而另外 2 个线程则处在阻断状态 pending。
而在线程 thread_2 中,并发了多个协程 coroutines。假设此时把解释器分配给了协程 coroutine_2(如图中的白色虚线框),所以此时 coroutine_2 得以运行。
2. 选择合适的并发机制
在不同的任务场景下,需要选择不同的并发机制,才能最大程度地提高程序的效率。
一个简单的选择方法如下:
- 处理 CPU bound 任务,且有多核 CPU 可用时,使用 multiprocessing 多进程并发。
- 在 I/O bound 的任务中,可以使用多线程 threading 或多协程 coroutines。此时是在同一个进程中实现并发。
2.1 如果需要编程者完全控制解释器的分配,则使用 coroutines。
2.2 如果不需要编程者控制解释器的分配,而是由系统自动分配解释器,则使用多线程 threading。
2.3 多协程 coroutines 的速度会比多线程 threading 更快一些。这是因为多线程中,需要不断地对 GIL 进行解锁和锁定操作,并且多线程之间也需要争夺对 GIL 的使用权,这些都会导致多花费时间。
————————————————————————————————————————————————————————
在应用代码 application code 中,需要用到并发程序时,应该尽量使用高层 high level APIs,因为这些高层 APIs 更为简单好用。
在编写一些低层的基础框架时,才会需要用低层的 low level APIs。
在使用多线程和多进程并发时,可以使用高层的 concurrent.futures 模块。而多协程并发,则可以使用 asyncio 模块。下面是针对应用代码,使用这些高层 APIs 进行并发的介绍。
3. 多线程并发模板,threading
使用多线程并发时,可以使用 concurrent.futures 模块,并且用 ThreadPoolExecutor 作为语境管理器 context manager。
3.1 使用 executor.map 方法
使用 executor.map 方法是最简单的操作。如下是一个模板,主要的 4 个步骤是:
- 导入 concurrent.futures 模块。
- 把单个 worker 的任务(即需要并发的任务,由单个线程或单个进程来完成)放入一个函数中。
- 用一个函数 workers_scheduler 来调动所有的 workers。
3.1 创建 ThreadPoolExecutor 的个体 instance,作为 context manager。
3.2 使用 executor.map 方法进行并发,返回一个计算结果的生成器 results。map 方法将对每个任务异步执行 asynchronously。 - 在 for 循环中遍历生成器 results,以 FIFO(先进先出) 的方式返回计算结果。
"""使用 ThreadPoolExecutor 的多线程并发模板。"""
# 1. 导入 concurrent.futures。
from concurrent import futures

# 2. 把单个 worker 的任务(即需要并发的任务)放入一个函数中。
def one_worker_task(param):
    ...

# 3. 用一个函数 workers_scheduler 来调动所有的 workers。
def workers_scheduler(parameters):
    # 3.1 创建 ThreadPoolExecutor 的个体,作为 context manager。
    with futures.ThreadPoolExecutor() as executor:
        # 3.2 使用 executor.map 方法进行并发,返回一个结果生成器。map 方法可以把每个 worker
        # 的任务异步执行 asynchronously。如果有多个任务,map 方法也可能将任务并发执行。
        results = executor.map(one_worker_task, parameters)  # 返回一个 generator。

    # 4. 在 for 循环中遍历生成器 results,以 FIFO(先进先出) 的方式返回计算结果。
    # 即先进入 executor.map 的输入,其计算结果将最先出来。
    for i, result in enumerate(results, 1):
        print(f'\neach result: {i}, {result}')

if __name__ == '__main__':
    workers_scheduler()
3.2 使用 executor.submit 和 futures.as_completed
和 executor.map 相比,executor.submit 是更灵活的用法。比如可以在 executor.submit 中使用不同的函数,或者是在 futures.as_completed 中混合使用线程和进程的 future 对象等。
Futures.as_completed 返回一个 iterator,其中是经过重新排序的 future 对象。排序的方法是按照各个 future 对象完成的时间,先完成的 future 对象排在前面。
使用 executor.submit 的模板如下,操作上的主要差别在第 3 步骤,即调动所有 workers 进行并发的步骤。具体如下:
- 用一个函数 workers_scheduler 来调动所有的 workers。
3.1 使用 ThreadPoolExecutor 的个体,作为 context manager。
3.2 遍历每一个输入,使用 executor.submit 获得一个 concurrent.futures.Future 对象。
3.3 用 futures.as_completed 得到一个 iterator,其中是运行已结束的 future 对象。 先完成的 future 对象排在前面。
遍历这个 iterator,用 future.result 方法,就可以得到单个 worker 的返回结果。
另外,如果想在 future 对象运行结束之后,追加一些操作,可以把这些操作创建为函数,用 future.add_done_callback 即可。
"""使用 ThreadPoolExecutor 的多线程并发模板,用到 Future 对象。"""
# 1. 导入 concurrent.futures。
from concurrent import futures
# 2. 把每个 worker 的任务放入一个函数中。
def one_worker_task(parameters):
    ...
def done_callable(future):  # 可以直接把 future 对象作为参数传递进来。
	...
    print(f'Future object is done: {future}')
# 3. 用一个函数 workers_scheduler 来调动所有的 workers。
def workers_scheduler(param):
    # 3.1 创建 ThreadPoolExecutor 的个体,作为 context manager。
    with futures.ThreadPoolExecutor() as executor:
        to_do: list[futures.Future] = []
        # 3.2 遍历每一个输入,使用 executor.submit 获得一个 future 对象。
        for param in sorted(parameters):
            future = executor.submit(one_worker_task, param)
            to_do.append(future)

        # count 用于从 1 开始计算 futures 的数量,所以下面的 enumerate 设置 start 参数为 1。
        # 3.3 用 futures.as_completed 得到一个 iterator,其中是运行已结束的 future 对象。先完成的 future 对象排在前面。
        # 遍历这个 iterator,用 future.result 方法,就可以得到单个 worker 的返回结果。
        for count, future in enumerate(futures.as_completed(to_do), 1):
            res = future.result()
            ...
            # 如果想在 future 对象运行结束之后,追加一些操作,可以用 add_done_callback。
            future.add_done_callback(done_callable)

if __name__ == '__main__':
    workers_scheduler()
3.3 其它释放 GIL 的情况
上面提到在多线程并发时,每隔 5 ms,Python 的解释器会暂停当前运行的线程,释放 GIL。此外,还有下面几种能够释放 GIL 的操作。
- 所有 Python 标准库程序在发起系统调用 syscall 的同时,也会释放 GIL。这一类发起 syscall 的程序包括 disk I/O 程序, network I/O 程序, 及 time.sleep()。
- NumPy/SciPy 中一些大量使用 CPU 的程序(CPU-intensive functions),能够释放 GIL。
- 还有 zlib 和 bz2 模块的一些压缩/解压缩函数也能够释放 GIL。
3.4 龟兔赛跑
下面用一个龟兔赛跑的例子,来演示多线程 thread 并发。
一共并发 2 个线程,一个线程用来跑乌龟,另一个线程用来跑兔子。
乌龟和兔子的形象用 Unicode 实现。完整的 Unicode 内容可参看下面的官方文档:
https://www.unicode.org/Public/UCD/latest/charts/CodeCharts.pdf
在上面的图片中,会不断切换乌龟和兔子的图片,每次只能显示其中的一个。这是因为只有占用了 GIL 的线程,才能把图片打印出来,并且会把另外一个线程的图片覆盖掉。
而不论是乌龟还是兔子,都可以看到它们在不断地向终点跑去,这就说明并发的 2 个线程都得到了运行。
这个龟兔赛跑的多线程并发代码如下。
"""用一个龟兔赛跑的例子,来展示多线程 thread 并发的使用方法。

并发 2 个线程,一个线程跑乌龟,另一个线程跑兔子。
乌龟和兔子的形象用 Unicode 实现。完整的 Unicode 内容可参看官方文档:
https://www.unicode.org/Public/UCD/latest/charts/CodeCharts.pdf
"""

import time
import unicodedata
from concurrent import futures


def worker(unicode_name, frame_duration, duration_limit):
    """单个并发的 worker,可以使物体持续移动。

    arguments:
        unicode_name:一个字符串,是 Unicode 字符的正式名称,不区分大小写。
        frame_duration:一个浮点数,表示时间。每经过 frame_duration 秒,物体向前移动
            一个位置。
        duration_limit:一个浮点数,表示时间,单位为 s。是 worker 的总运行时间。
    """
    object_position = -1  # 从最右边开始,即 -1 位置。
    duration_start = time.time()
    while True:
        tiles = ['_'] * 20  # 用下划线模拟道路的 20 块地砖 tiles
        # 用 unicodedata 画出物体,并把物体放到正确的位置上。
        tiles[object_position] = unicodedata.lookup(f'{unicode_name}')

        if unicode_name == 'turtle':  # 把乌龟和兔子画在不同的位置,以便于区分。
            frame = f'\r{unicode_name}:\t'  # 注意要先使用 \r,回到最前面。
        else:
            frame = '\r' + '\t' * 6 + f'{unicode_name}:\t'

        frame += ''.join(tiles)  # 形成一帧 frame。
        print(frame, end='')  # 注意使用 end='',使得画面始终保持在同一行。

        time.sleep(frame_duration)
        object_position -= 1  # 物体向前移动一格。
        object_position = max(object_position, -len(tiles))  # 避免索引超出范围。

        duration_stop = time.time()
        duration = duration_stop - duration_start
        if duration > duration_limit:
            break


def main():
    unicode_names = ['turtle', 'rabbit']
    frame_durations = [0.5, 0.7]  # 这个相当于乌龟和兔子各自的速度。
    duration_limits = [10] * 2  # 一共跑 10 s。
    print('Start racing!')
    with futures.ThreadPoolExecutor() as executor:
        executor.map(worker, unicode_names, frame_durations, duration_limits)


if __name__ == '__main__':
    main()
    # 如果需要看单个乌龟的移动,可以注释掉上面一行,只使用下面的代码。
    # worker('turtle', 0.5, 10)
4. 多进程并发模板,multiprocessing
在 concurrent.futures 中,多进程并发的方式和多线程一样,只需要在上面使用 executor.map 和 executor.submit 的 2 个模板中,用 ProcessPoolExecutor 代替 ThreadPoolExecutor 即可。
下面是 Python 官网的例子。
"""Python 官网中,使用 ProcessPoolExecutor 计算素数的例子。加了一点注释和修改。
https://docs.python.org/3/library/concurrent.futures.html#processpoolexecutor-example

"""
import concurrent.futures
import math
import time

PRIMES = [
    112272535095293,
    112582705942171,
    112272535095293,
    115280095190773,
    115797848077099,
    1099726899285419]


def worker(n):
    if n < 2:
        return False
    if n == 2:
        return True
    if n % 2 == 0:
        return False

    isqrt_n = math.isqrt(n)  # isqrt 是平方根的整数部分,相当于 int(math.sqrt(n))。
    for i in range(3, isqrt_n + 1, 2):
        if n % i == 0:
            return False
    return True


def main():
    # 可以修改下面的 max_workers=1,对比不同的进程数量的差别。
    with concurrent.futures.ProcessPoolExecutor(max_workers=None) as executor:
        results = executor.map(worker, PRIMES)  # 并发多个进程。

    for number, prime in zip(PRIMES, results):
        print(f'{number} is prime: {prime}')


if __name__ == '__main__':
    tic = time.perf_counter()
    main()
    toc = time.perf_counter()
    print(f'\nDuration:\t{toc - tic:.2f} seconds.')  # 计时功能。可以比较不同的进程数量并发时,用时的不同。
ProcessPoolExecutor 的参数 signature 如下图。如果不设置进程的数量 max_workers,则默认使用本机所有的处理器 processors。
一般建议一个处理器内只开一个 Python 进程 process,以免多个进程之间对处理器进行争夺,这会导致额外多花时间。
可以使用 os.cpu_count() 查看本机处理器数量,如 AMD 5950X 为 16 核 32 处理器。
mp_context 是一个 context object,用于设置子进程的启动方法(start method),可以通过 get_context 获得,如下图。一般用得不多。
import concurrent.futures
import multiprocessing

ctx = multiprocessing.get_context('forkserver')  # 子进程的启动方法 start method
with concurrent.futures.ProcessPoolExecutor(max_workers=32, mp_context=ctx) as executor:
    ...
4.1 多进程并发中的坑 rabbit hole
在使用多进程并发时,有一个比较隐蔽的坑 → rabbit hole,需要注意,以免掉到坑里。
这个坑的表现是:虽然并发了多个进程,但是程序的速度并没有变快,甚至比单个进程还要慢。
这个问题的原因,由 3 部分组成:
- 在主进程中,函数体之外有一些导入操作和创建全局变量等操作。可以把这些称之为“全局操作”。
- 而每次创建一个子进程,都会把上述这些“全局操作”执行一遍。假设这些“全局操作”耗时为 t,则 n 个子进程会耗时 n * t。
- 如果这些“全局操作”耗时较长,就会使得总共的“全局操作”耗时 n * t 极大,远远超过子进程计算的时间,导致多进程并发后显得非常慢。
一个示例如下,其中部分代码是 Python 官网计算素数的例子。
"""这部分为展示“坑”的代码,每个子进程都会把“全局操作”执行一遍。"""
import concurrent.futures
import math

# 1. 注意下面的 ONE_CONSTANT 和 try-else block,将会被执行 3 遍。
ONE_CONSTANT = 888  # ONE_CONSTANT 仅作为全局变量示例,在程序中没有实际作用。
try:
    PRIMES = [115797848077099, 1099726899285419]
except Exception as exc:
    print(f'Exception raised: \n{exc}')
else:
    print(f'\nPRIMES created:\t{PRIMES!r}')
    print(f'ONE_CONSTANT created:\t{ONE_CONSTANT!r}')


def is_prime(index):
    n = PRIMES[index]  # 2. 注意在每个子进程中,都可以直接使用列表 PRIMES。
    if n < 2:
        return False
    if n == 2:
        return True
    if n % 2 == 0:
        return False
    isqrt_n = math.isqrt(n)  # isqrt 是平方根的整数部分,等于 int(math.sqrt())。
    for i in range(3, isqrt_n + 1, 2):
        if n % i == 0:
            return False
    return True


def main():
    indices = range(len(PRIMES))
    with concurrent.futures.ProcessPoolExecutor() as executor:
        # 3. 下面的 map,虽然没有把 PRIMES 传递给子进程,但是各个子进程其实都
        # 创建了一份 PRIMES。
        results = executor.map(is_prime, indices)
    for number, prime in zip(PRIMES, results):
        print(f'\n{number:_}\t is prime: {prime}')


if __name__ == '__main__':
    print('Start the main:')
    main()
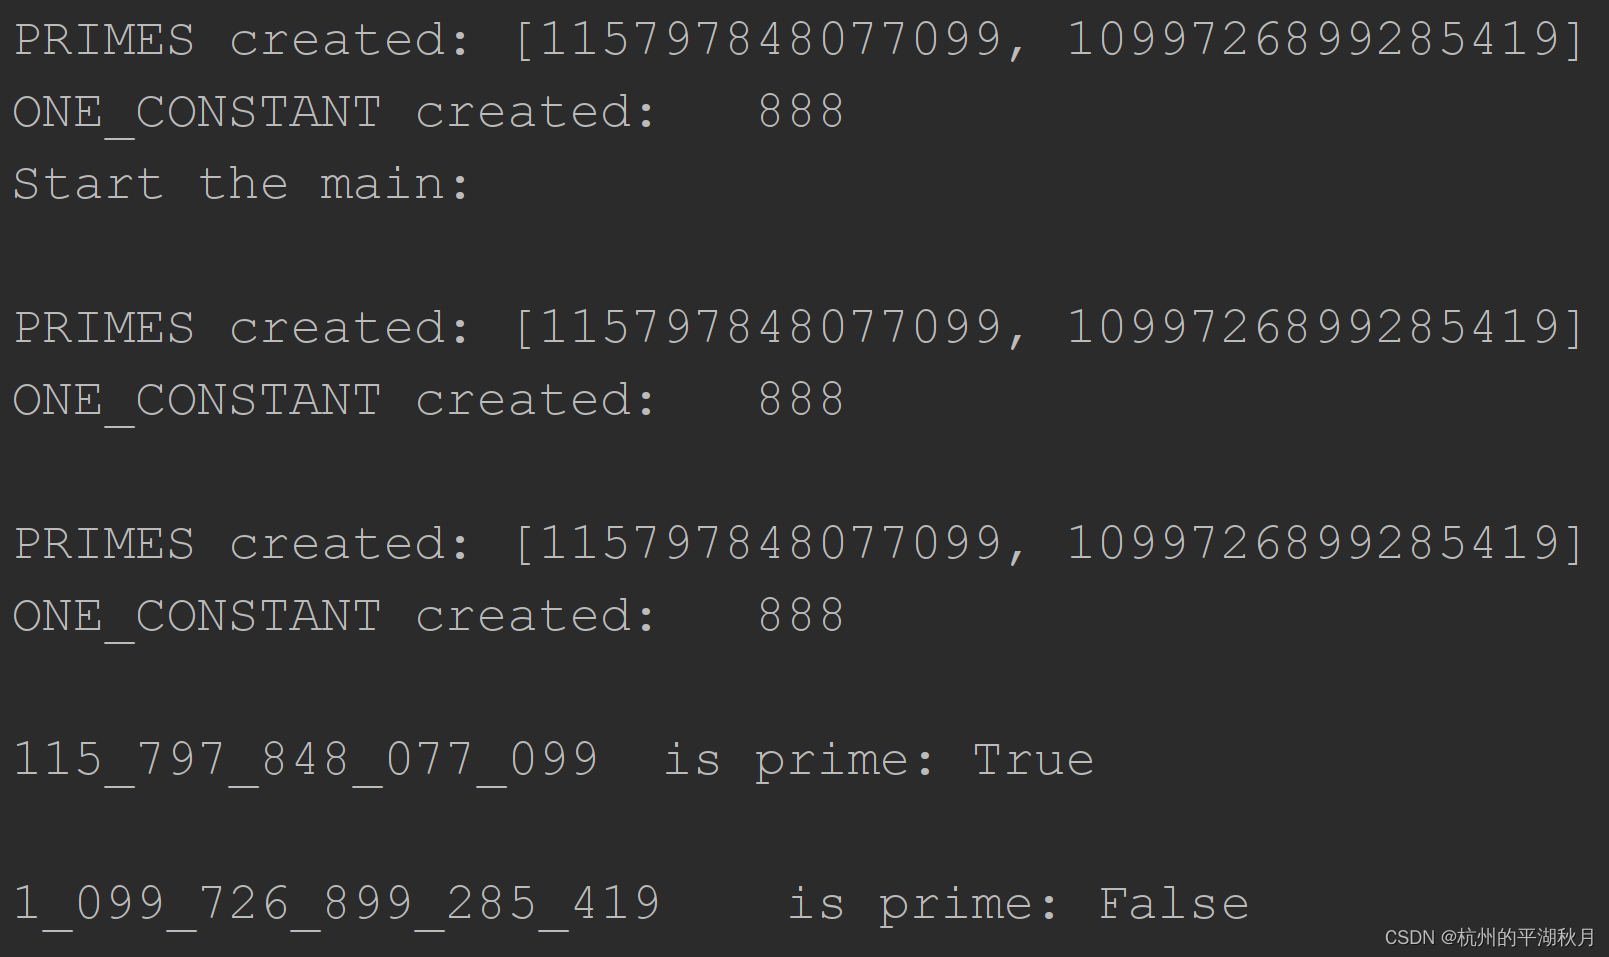
运行结果如下图,注意函数体之外的“全局操作”(包括打印语句 PRIMES created 和 ONE_CONSTANT createed)被执行了 3 次,即主进程执行 1 次,2 个子进程各执行 1 次。
因此,如果创建全局变量这些操作的时间很长,就会使得多进程显得非常慢。
而解决这个问题的办法,就是在主进程中创建一个“准备函数” preparation,把全局操作放到“准备函数”中去。如下代码示例。其中的 3 个关键操作是:
- 把全局操作放到“准备函数” preparation 中。
- 在主进程中执行 1 次 preparation,得到子进程需要的参数。
- 把子进程需要的参数通过 map 函数传递。
"""解决多进程并发变慢的方法:在主进程中创建一个“准备函数” preparation,把全局操作放
到“准备函数”中去。
"""
import concurrent.futures
import math


# 1. 把全局操作放到一个“准备函数” preparation 中,该函数只需要被主进程执行 1 遍。
def preparation():
    ONE_CONSTANT = 888
    try:
        PRIMES = [115797848077099, 1099726899285419]
    except Exception as exc:
        print(f'Exception raised: \n{exc}')
    else:
        print(f'\nPRIMES created:\t{PRIMES!r}')
        print(f'ONE_CONSTANT created:\t{ONE_CONSTANT!r}')
    return PRIMES


def is_prime(n):
    if n < 2:
        return False
    if n == 2:
        return True
    if n % 2 == 0:
        return False
    isqrt_n = math.isqrt(n)
    for i in range(3, isqrt_n + 1, 2):
        if n % i == 0:
            return False
    return True


def main():
    PRIMES = preparation()  # 2. 执行 preparation,得到子进程需要的参数。
    with concurrent.futures.ProcessPoolExecutor() as executor:
        # 3. 修改 map 函数,把子进程需要用到的 PRIMES 参数通过 map 传递进去。
        results = executor.map(is_prime, PRIMES)
    for number, prime in zip(PRIMES, results):
        print(f'\n{number:_}\t is prime: {prime}')


if __name__ == '__main__':
    print('Start the main:')
    main()
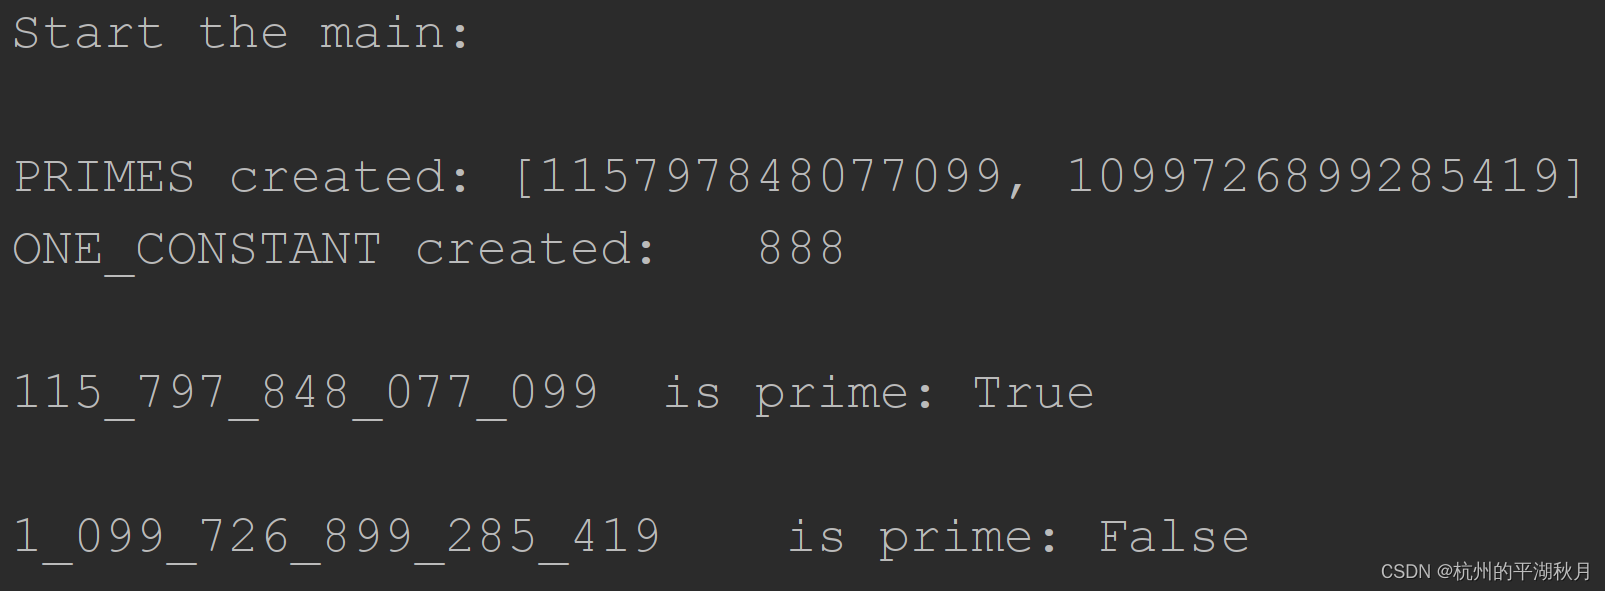
运行结果如下图。注意打印语句 PRIMES created 和 ONE_CONSTANT createed 都只在主进程中执行了一次。
PS: 《Fluent Python》中讲到并发编程时,使用了 rabbit hole 一词,查询后发现,在美国英语中,该词就是 “坑” 的意思。
4.2 使用 queue 的例子
在进行多线程和多进程并发时,Python 官网推荐的用法是优先使用高层 API,即推荐顺序为:
concurrent.futures > threading, multiprocessing > queue > shared state, synchronization。
推荐顺序中,后面几个低层的 API 作用是:
- queue 队列用于在不同的执行单元之间交换 exchange 数据。Python 中有一个单独的 queue 模块,用于线程 thread 之间交换数据;而 multiprocessing.Queue 则用于进程之间交换数据。
- shared state 是用于不同进程 process 之间共享数据,包括 multiprocessing.Value,multiprocessing.Array 和 multiprocessing.Manger。Python 官方建议是尽量避免使用 shared state。
- Synchronization 是同步,主要作用是避免同时有 2 个以上的线程或进程,对同一个对象进行写操作。Synchronization 对象包括 Lock,RLock,Semaphore,Barrier 等。
下面是使用 queue 的例子。可以看出使用 queue 的操作是比较复杂的,需要编程者手工处理,把各个子进程的计算结果和输入正确地对应起来,所以下面的代码中专门加了一个变量 index,用来确定计算结果的顺序。与之对比,高层的 executor.map 则会自动帮我们做好这些步骤。
"""使用 multiprocessing.Queue 在多个进程中交换数据的例子。"""
import multiprocessing
import queue
import time
import typing
from multiprocessing import Process


# 使用 type alias,定义 2 个数据类型 JobQueue 和 ResultQueue。
# 定义数据类型时,必须用 queue.Queue,而不能用 multiprocessing.Queue。
JobQueue = queue.Queue[tuple[int, typing.Any]]
ResultQueue = queue.Queue[tuple[int, typing.Any]]


# 多进程并发时,各个进程之间无法直接交换数据,所以要通过 multiprocessing.Queue 或者
# multiprocessing.SimpleQueue 来实现,而不能象普通程序那样直接使用一个变量来交换数据。
# 每一个子进程都调用下面的 worker 程序,通过把各个子进程的计算结果放到输出队列 ResultQueue
# 中,实现了不同进程之间的数据交换。
def worker(jobs: JobQueue, results: ResultQueue) -> None:
    # 3. 在每个子进程中,把输出结果和输入的索引进行绑定。

    index, number = jobs.get()  # 3.1 从输入队列 jobs 中,获取输入的索引。
    print(f'in worker:\t index, number={index}, {number}')
    # 使用下面的几行延时代码,能够让程序出现 bug。即输入 input_numbers = [25, 28],
    # 输出本来应该也是 [25, 28]。但是延时代码使得输出的顺序反转,变为 [28, 25]。
    delay = 29 - number
    for i in range(delay):
        print(f'number= {number},\tsleep: {i + 1}')
        time.sleep(1)
    # 3.2 把输入的索引 index 放到元祖的第 0 位,输出结果放到第 1 位,捆绑输出到结果队列。
    results.put((index, number))


# 设计一个多进程并发,使得最终的输出结果 output_numbers,和输入 input_numbers 完全相同。
input_numbers = [25, 28]


def main() -> None:
    # 1. 创建输入队列和输出队列。
    jobs = multiprocessing.Queue()
    results = multiprocessing.Queue()
    # 在这个例子中,也可以使用 Queue 的简化版,即 SimpleQueue,用下面 2 行代替上面 2 行。
    # jobs = multiprocessing.SimpleQueue()
    # results = multiprocessing.SimpleQueue()
    # 1.1 遍历每一个输入的值。
    for index, number in enumerate(input_numbers):
        print(f'In main:\t index, number = {index}, {number}')
        # 1.2 把输入放到输入队列 jobs 中,并且给每一个输入值加上一个索引 index。
        jobs.put((index, number))

    # 2. 并发多个子进程。
    sub_processes = []
    for _ in range(len(input_numbers)):
        # 2.1 对每一个子任务创建一个子进程。
        proc = Process(target=worker, args=(jobs, results))
        proc.start()  # 2.2 启动子进程。
        sub_processes.append(proc)  # 2.3 把所有子进程放入列表,进行记录。
    # 2.4 遍历所有子进程,用 join 等待它们完成。
    for sub_process in sub_processes:
        sub_process.join()

    # 4. 把返回的结果队列 ResultQueue 进行排序,得到最终的输出结果。
    temp_output = []
    while not results.empty():  # 4.1 不断从结果队列中取值,直到结果队列为空。
        index, number = results.get()
        temp_output.append([index, number])  # 4.2 形成一个临时的结果列表。
        print(f'In result:\t index, number = {index}, {number}')

    # 4.3 对临时的结果列表 temp_output 进行排序。排序方法是按照输入的索引,从先到后进行
    # 排序。output[0] 是每一个输出元祖的第 0 位,即输入的索引。
    temp_output.sort(key=lambda output: output[0])
    # 4.4 对临时的结果列表 temp_output 进行列表解析,得到最终的输出结果。
    output_numbers = [number for _, number in temp_output]

    print(f'input_numbers:\t{input_numbers}')
    print(f'output_numbers:\t{output_numbers}')


if __name__ == '__main__':
    main()
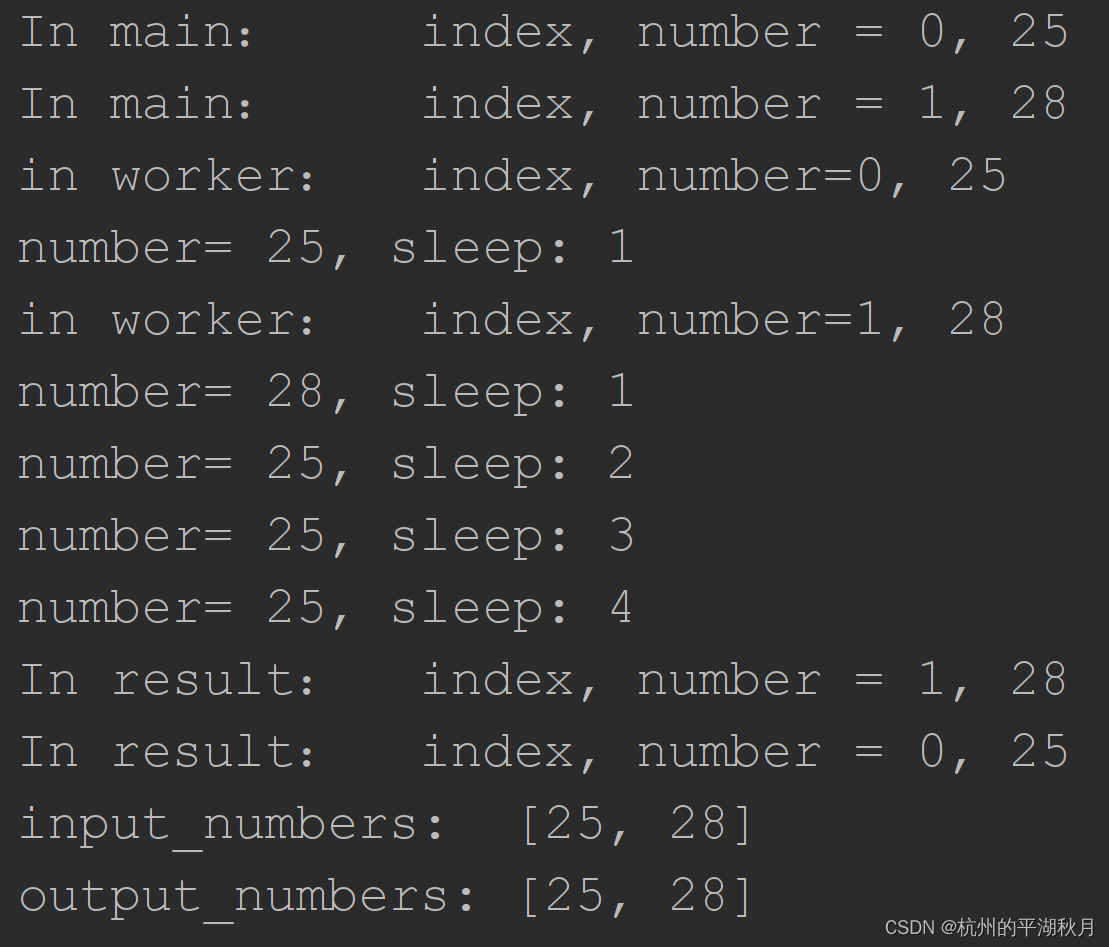
程序的结果如下图。这个简单程序的目标是,让输出和输入 [25, 28] 一样。
可以看到数字 25 的计算时间更长,所以它会在数字 28 之后结束运行。即先输出 28,再输出 25。而且队列 queue 有先进先出 FIFO 的特点,如果不使用 index,输出的结果将出错,变为 [28, 25]。
但是借助 index,还是得到了正确的计算结果。
FYI: 以下关于队列的介绍,可能用得不多,仅供参考。
multiprocessing 多进程模块有 3 种队列,分别是 multiprocessing.Queue, multiprocessing.SimpleQueue 和 multiprocessing.JoinableQueue。
以上 3 种都是“先进先出”的 FIFO 队列,并且是基于标准库的 queue.Queue 创建的。
multiprocessing.SimpleQueue 是 multiprocessing.Queue 的简化版,SimpleQueue 只有 get(), put(), empty() 和 close() 这 4 个方法。简单情况下使用 multiprocessing.SimpleQueue 即可。
此外,multiprocessing.Pipe 也可以用于多进程之间交换数据。
Python 内置的标准库 queue 队列用于多线程,包括 4 种队列:queue.Queue,queue.SimpleQueue,queue.LifoQueue 和 queue.PriorityQueue。
其中 queue.Queue,queue.SimpleQueue 是 FIFO 队列,queue.LifoQueue 是“后进先出”的 LIFO 队列。
queue.PriorityQueue 则是有优先级的队列,优先级高(优先级的数值越小则优先级高)的元素先被取出。用法和上面例子中的索引 index 基本相同:index 越小则优先取出。
5. 协程,coroutines
使用协程时,要经常用到的 4 个概念:
- 用 async def 定义的函数就是协程 coroutine。
- 用 asyncio.run(coro()) 启动的协程 coro 是主协程,也叫做 event loop。一般会在主程序 main 中使用 asyncio.run()。
- 除了主协程 event loop 之外,其它协程必须在一个协程内部运行。可以使用 await coro() 运行一个协程,也可以用 asyncio.create_task(coro()) 并发一个协程。
- Event loop 和子协程都是在同一个线程 thread 中运行的。
使用协程时,通常会用到 Python 内置的 asyncio 模块,asyncio 有 2 个主要作用:1. 并发多个协程。2. 实现异步编程。
5.1 多协程并发的模板
严格来说,多协程并发时,是使用 task 对象进行并发,也就是用 asyncio.create_task 把协程 coroutine 包裹(wrap)为 task。
多协程并发的模板如下,具体 4 个步骤:
- 用 async def 定义子协程 sub-coroutine。
- 把 main 作为主协程 main coroutine(即 event loop),在其中使用 asyncio.create_task 创建并发 task。
- 收集子协程的结果。
- 用 asyncio.run 运行 main 函数,即将其作为 event loop 运行。
"""使用 asyncio 的并发、异步编程模板 template。 """
import asyncio

# 1. 用 async def 定义子协程 sub-coroutine。
async def sub_coro(parameter):
    ...
# 2. 把 main 作为主协程 main coroutine(即 event loop)。
async def main(parameters):
    task_list = []
    for parameter in parameters:
        # 2.1 用 asyncio.create_task,创建并发 task,并记录到“并发计划”中,等待执行。
        one_task = asyncio.create_task(sub_coro(parameter))
        # 2.2 可以用列表把多个并发子协程收集起来。
        task_list.append(one_task)

    # 3. 收集子协程的结果。
    # asyncio.as_completed 的 2 个作用:1. 并发运行输入的 awaitables iterable。
    # 2.返回一个 coroutines iterator,其顺序是按照 coroutines 的完成时间排先后。
    # 而 asyncio.gather,则是等所有子协程完成后再返回结果,其顺序 create_task 时顺序相同。
    for finished_task in asyncio.as_completed(task_list):  # 3.1 开始执行“并发计划”中的 tasks。
        result = await finished_task  # 3.2 对已完成的 task,收集其运行结果。

if __name__ == '__main__':
    # 4. 用 asyncio.run 运行 main 函数,即将主函数作为 event loop,也是 asyncio 模块的常用方法。
    asyncio.run(main(parameters))
PS: 上面的模板中,使用了 “并发计划” 一词。这并不是 Python 的官方说法,而是我为了便于理解协程的并发机制,自己引入的一个说法。
5.2 用 asyncio 进行异步操作
下面用一个简单的例子展示 asyncio 的异步操作。
"""使用 asyncio 进行异步操作的示例。"""
import asyncio


async def foo(n=2):
    print(f'Enter foo.')
    await asyncio.sleep(n)  # 3. 释放解释器。解释器回到 event loop,形成异步操作。
    print(f'Exit foo.')


async def main():
    asyncio.create_task(foo())  # 1. 创建一个 task 对象。
    print('Checkpoint 1.')

    await asyncio.sleep(1)  # 2. 释放解释器,让解释器运行 task 对象,即协程 foo。
    print('Checkpoint 2.')

    await asyncio.sleep(2)
    print('Checkpoint 3.')


if __name__ == '__main__':
    asyncio.run(main())
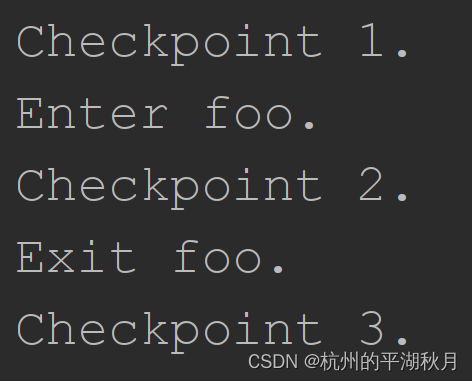
运行结果如下图。注意协程 foo 在开始之后,并没有等待 foo 结束,而是返回了 event loop,执行 event loop 后续的代码。
5.3 asyncio.sleep() 的作用
多协程的一个重要的特点,就是能够对解释器进行完全控制,即编程者可以把解释器分配给某个协程,指定解释器执行该协程(而多线程则是由 OS scheduler 来分配 GIL 给某个线程)。
使用 asyncio.sleep() 函数,可以明显地看出解释器的分配过程。asyncio.sleep() 的特点是:
- asyncio.sleep() 会把解释器在 event loop 和并发的 tasks 之间进行切换。
1.1 在 event loop 中使用 asyncio.sleep(),会把解释器分配给并发的 tasks 使用。
1.2 在第一个 task 中使用 asyncio.sleep(),会把解释器分配给 “并发计划” 中第二个等待运行的 task。以此类推,执行 “并发计划” 上所有并发 tasks。
1.3 “并发计划” 中的所有 tasks 都执行一遍之后,使用 asyncio.sleep(),解释器才会回到 event loop。 - asyncio.sleep(t) 会挂起 suspend 当前 coroutine 并至少保持 t 秒,asyncio.sleep(0) 则表示直接挂起当前协程,让出解释器。
- asyncio.sleep() 只能用于 coroutine 之内,不能用在普通函数中。
另外需要注意和 time.sleep() 的区别。虽然 time.sleep() 会释放 GIL,在线程之间重新分配 GIL,但是 time.sleep() 无法控制一个线程 thread 内部的运行。而并发协程 coroutines 是在同一个线程内,所以 time.sleep() 无法控制解释器在不同协程之间的分配。
对协程 coroutine 来说,time.sleep() 只会使得当前协程阻断 suspend 一段时间。
5.4 多协程并发时,对解释器的分配控制
了解了 asyncio.sleep() 的作用,就可以用来演示手动控制解释器分配。
"""在 asyncio 中手动控制解释器的分配。"""
import asyncio
import time


async def foo():
    print('Enter foo.')
    await asyncio.sleep(0)  # 5. 让出解释器,开始执行“并发计划”上的所有 tasks。
    print('Exit foo.')  # 7. 执行打印语句,foo 结束。


async def bar(n, name):
    print(f'Enter {name}.')  # 6.1 执行 bar_3_seconds 和 bar_1_seconds 的打印。
    await asyncio.sleep(n)  # 6.2 在 bar_1_seconds 中,会把解释器让给 event loop。
    print(f'Exit {name}.')  # 10. 执行 bar_1_seconds 的打印语句。


async def main():
    # 1. 并发下面 2 个 task,记录到“并发计划”,等待执行。
    asyncio.create_task(bar(3, name='bar_3_seconds'))
    asyncio.create_task(bar(1, name='bar_1_seconds'))
    print('Check point 1: after create_tasks.')  # 2. 输出的第一个打印语句。
    time.sleep(3)  # 3. 因为 time.sleep 不会让出解释器,所以此时整个程序阻断 3 s。

    # 4. await 以类似普通函数的形式执行 foo。此时 foo 相当于 event loop 的一部分。
    await foo()
    # 6. 执行“并发计划”上的 2 个并发 tasks。
    print('Check point 2: after foo.')  # 8. 执行打印语句。

    # 9. 下面的 asyncio.sleep 让出解释器,执行“并发计划”上的 1 个并发 task,即执行
    # task_1_seconds。而因为 bar_3_seconds 还没有 sleep 结束,所以不在 “并发计划”上,
    # bar_3_seconds 中的最后一个打印语句将不会被执行。
    await asyncio.sleep(2)

if __name__ == '__main__':
    asyncio.run(main())
    print('Check point 3: after asyncio.run.')  # 11. 执行打印语句。
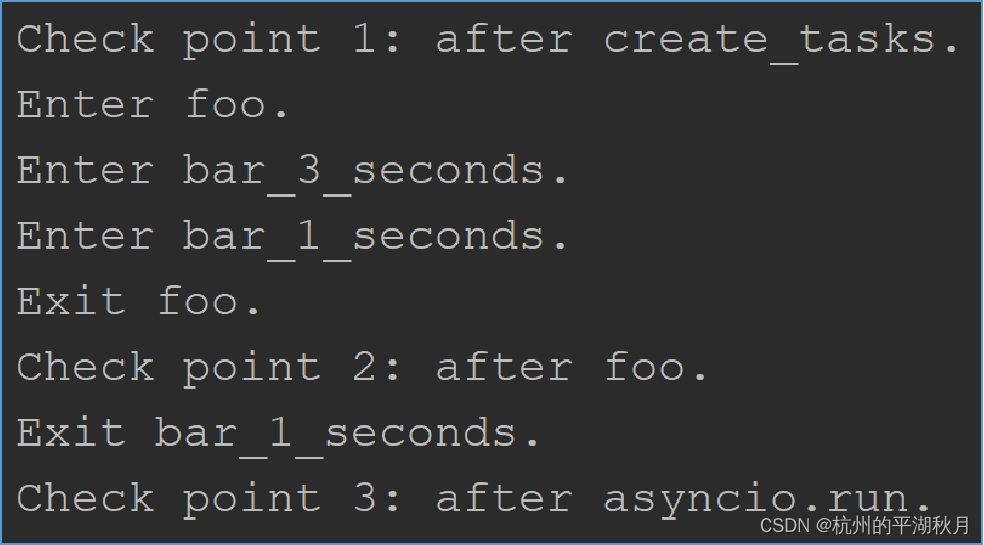
运行结果如下图,解释器分配过程的 3 个要点为:
- create_task() 会把并发 task 放到“并发计划”上,等待执行。
- asyncio.sleep() 会释放解释器。
- 在 event loop 中以 await foo() 的方式执行协程 foo,从效果上来说,会使得 foo 成为 event loop 的一部分。
5.5 一个简单的异步、并发程序流程图
用 asyncio 进行简单的异步、并发编程,其流程图如下,可以帮助理解运行过程。图中有 7 个要点:
- 只有 1 个解释器,如图中紫色部分。
- 异步编程通常有 3 部分参与,主协程 event loop,子协程 sub-coroutine 和 I/O 设备。
- 红色箭头,体现了解释器的分配流向,也就是程序的实际运行过程。
- 解释器在 event loop 和 sub-coroutine 之间切换,并且是由编程者用 await 和 as_completed 等函数控制解释器的分配。
- create_task() 用于创建多个并发任务 tasks,但此时并发任务还未执行,所以用虚线连接子协程。
- asyncio.as_completed() 让 “并发计划” 上的 tasks 开始执行。
- I/O 部分是白色箭头和白色框,因为可以由 DMAC(Direct Memory Access Controller) 控制 I/O 操作,不需要 CPU/解释器参与,所以用虚线表示。
5.6 在网络编程中的例子
异步编程和并发编程大量出现在网络编程中,最好是客户端 client 和服务器端 server 都支持异步操作。此时,客户端可以使用第三方的 httpx 库,服务器端可以使用第三方的 FastAPI。
下面是套用 5.1 节的 asyncio 并发、异步编程模板,使用 httpx 进行下载的例子。
"""套用 asyncio 的并发、异步编程模板 template,用 httpx 进行下载。"""
import asyncio
import httpx
from pathlib import Path

# 1. 子协程中要额外接收 httpx.AsyncClient 和 url 等参数。
async def sub_coro(client: httpx.AsyncClient, url: str,
                   downloaded: Path, parameter) -> bytes:
    # 1.1 使用 await client.get,进行异步方式下载。
    response = await client.get(url, follow_redirects=True)
    ...  # 还可以进行保存等操作。
    return response.content  # 1.2 返回 bytes 或其它格式数据。

# 2. 主协程 main coroutine 中需要设置好异步的 httpx.AsyncClient() 等操作。
async def main():
    # 2.1 设置好下载地址 url 和保存文件夹 downloaded 等。
    downloaded = Path(r'D:\downloaded')
    url = r'http://localhost:8000/flags'  # 下载地址以本机 localhost 为例。
    # 2.2 使用 with httpx.AsyncClient() 作为 context manager,才能支持异步的 client。
    # 共用 client 的好处是提高效率,即只需要建立一次底层的 TCP 连接,每个并发的 task 共用此连接。
    with httpx.AsyncClient() as client:
        task_list = []
        parameters = ...
        for parameter in parameters:
            # 2.3 使用 asyncio.create_task 时,必须把异步的 client 输入给子协程。
            one_task = asyncio.create_task(sub_coro(client, url, downloaded, parameter))
            task_list.append(one_task)
        # 2.4 注意 asyncio.as_completed 部分,也应该在 httpx.AsyncClient() 的范围之内。
        for finished_task in asyncio.as_completed(task_list):
            result = await finished_task

if __name__ == '__main__':
    asyncio.run(main())
6. 主要参考资料
concurrent.futures: https://docs.python.org/3/library/concurrent.futures.html
asyncio: https://docs.python.org/3/library/asyncio.html
threading: https://docs.python.org/3/library/threading.html
multiprocessing: https://docs.python.org/3/library/multiprocessing.html
《Fluent Python》: https://www.oreilly.com/library/view/fluent-python-2nd/9781492056348/
HTTPX: https://www.python-httpx.org/async/
—————————— 补充一点内容 ——————————
PS: Just For Fun
在上面 3.4 部分龟兔赛跑的例子中,乌龟和兔子的图片是分开显示的。如果想要更好玩一点,可以改动一下代码,同时显示它们赛跑的情形。
具体的做法,是在 2 个并发的子线程 thread 中,不要进行打印,而是要把它们的画面帧提取出来;然后在主线程中,将 2 个子线程的画面帧合并为一个画面帧;最后在主线程打印合并后的画面帧即可。效果图如下。
这个同时显示龟兔赛跑的代码如下:
"""用一个龟兔赛跑的例子,来展示多线程 thread 并发的使用方法。
为了同时看到乌龟和兔子的进度,则在 2 个并发的子线程 thread 中,不要进行打印,而是要把它们的
画面帧提取出来;然后在主线程中,将 2 个子线程的画面帧合并为一个画面帧;最后在主线程进行打印
合并后的画面帧即可。

并发 2 个线程,一个线程跑乌龟,另一个线程跑兔子。
乌龟和兔子的形象用 Unicode 实现。完整的 Unicode 内容可参看官方文档:
https://www.unicode.org/Public/UCD/latest/charts/CodeCharts.pdf
"""
import time
import unicodedata
from concurrent import futures


def worker(unicode_name, frame_duration):
    """单个并发的 worker,可以使物体持续移动。注意该函数返回的是生成器。

    arguments:
        unicode_name:一个字符串,是 Unicode 字符的正式名称,不区分大小写。
        frame_duration:一个浮点数,表示时间。每经过 frame_duration 秒,物体向前移动
            一个位置。
    """

    duration_start = time.time()
    object_position = -1  # 从最右边开始,即 -1 位置。

    while True:
        tiles = ['_'] * 20  # 用下划线模拟道路的 20 块地砖 tiles
        # 用 unicodedata 画出物体,并把物体放到正确的位置上。
        tiles[object_position] = unicodedata.lookup(f'{unicode_name}')
        frame = f'{unicode_name}:\t'
        frame += ''.join(tiles)  # 形成一帧 frame。
        yield frame

        duration_stop = time.time()
        duration = duration_stop - duration_start
        if duration > frame_duration:
            object_position -= 1  # 物体向前移动一格。
            object_position = max(object_position, -len(tiles))
            duration_start = time.time()  # 并且重新开始计时。


def draw_objects(gen_1, gen_2, timer=10):
    """把 2 个画面帧进行合并,然后打印显示合并后的画面帧。

    arguments:
        gen_1:一个生成器,会不断输出一个画面帧。
        gen_2:一个生成器,会不断输出一个画面帧。
        timer:一个浮点数,表示时间,单位是 s。控制总共显示 timer 秒的画面。
    """

    tic = time.time()
    print('Start racing!')
    for turtle, rabbit in zip(gen_1, gen_2):
        drawing = f'\r{turtle} \t{rabbit}'
        print(drawing, end='')

        toc = time.time()
        time.sleep(0.05)
        duration = toc - tic
        if duration > timer:
            break


def main():
    unicode_names = ['turtle', 'rabbit']
    frame_durations = [0.5, 0.7]
    with futures.ThreadPoolExecutor() as executor:
        result_gens = executor.map(worker, unicode_names, frame_durations)

    # 因为 result_gens 本身是一个生成器,对其进行遍历之后,会得到 2 个并发程序的生成器,
    # 最终需要把 2 个并发程序的生成器输入给 draw_objects。
    gens = []
    for one_gen in result_gens:
        gens.append(one_gen)
    draw_objects(*gens)


if __name__ == '__main__':
    main()
——————————本文结束——————————
