⭐ 作者简介:码上言
⭐ 代表教程:Spring Boot + vue-element 开发个人博客项目实战教程
⭐专栏内容:零基础学Java、个人博客系统
👦 学习讨论群:530826149
项目部署视频
https://www.bilibili.com/video/BV1sg4y1A7Kv/?vd_source=dc7bf298d3c608d281c16239b3f5167b
文章目录
前言
1、新年展望
不知不觉已经2022年了,今年上半年我们要将博客的文章更新完,我在规划是否出一期Java基础和前端的教程,看后期的时间和大家的需求,大家可以评论区给我留言哦,今年又是奋斗的一年,争取大家都能学到东西,祝大家新年快乐!
由于各种原因停更了一段时间,同时也有粉丝说学到了好多东西,我的能力有限,需要和大家一起来学习,争取把我会的东西加入到项目中去实战,这也是我们一开始做项目的初衷。
好啦,经历了一个多月的开发,我们的项目也初步有了一点样子,还有更重要的博客文章的开发,本章就完成博客的开发,然后就剩下一些小功能的开发,然后博客的后台基础服务就搭建完成了,我们还要搞Vue的后台管理系统,实现前后端分离。
2、修改表字段
原来的表设计在开发中遇到了一些的问题,现在我们先修改一下我们的文章表,同时,我们把文章的标签管理单独搞了一个关联表,因为一篇文章可能会有多个标签,一对多的关系,所以为了方便我们单独管理文章的标签,同时还要多添加一张表。
(1)文章表
DROP TABLE IF EXISTS `person_article`;
CREATE TABLE `person_article` (
    `id`             INT             NOT NULL PRIMARY KEY AUTO_INCREMENT COMMENT '主键',
    `author`         VARCHAR(128)    NOT NULL                            COMMENT '作者',
    `title`          VARCHAR(255)    NOT NULL                            COMMENT '文章标题',
	`user_id`        INT(11)         NOT NULL                            COMMENT '用户id',
	`category_id`    INT(11)         NOT NULL                            COMMENT '分类id',
	`content`        LONGTEXT            NULL                            COMMENT '文章内容',
    `views`          BIGINT          NOT NULL DEFAULT 0                  COMMENT '文章浏览量',
	`total_words`    BIGINT          NOT NULL DEFAULT 0                  COMMENT '文章总字数',
    `commentable_id` INT    		     NULL                            COMMENT '评论id',
	`art_status`     TINYINT    		 NOT NULL DEFAULT 0              COMMENT '发布,默认0, 0-发布, 1-草稿',
	`description`    VARCHAR(255)    NOT NULL                            COMMENT '描述',
	`image_url`      VARCHAR(255)    NOT NULL                            COMMENT '文章logo',
    `create_time`    DATETIME            NULL DEFAULT CURRENT_TIMESTAMP  COMMENT '创建时间',
    `update_time`    DATETIME            NULL DEFAULT CURRENT_TIMESTAMP ON UPDATE CURRENT_TIMESTAMP COMMENT '修改时间'
) ENGINE = InnoDB
  CHARACTER SET = utf8mb4
  COLLATE = utf8mb4_bin
  ROW_FORMAT = Dynamic
  COMMENT '文章管理表';
(2)文章和标签关联表
DROP TABLE IF EXISTS `person_article_tag`;
CREATE TABLE `person_article_tag` (
    `id`          INT             NOT NULL PRIMARY KEY AUTO_INCREMENT     COMMENT '主键',
    `tag_id`	  INT(11)         NOT NULL                                COMMENT '标签id',
    `article_id`  INT(11)         NOT NULL                                COMMENT '文章id'
) ENGINE = InnoDB
  CHARACTER SET = utf8mb4
  COLLATE = utf8mb4_bin
  ROW_FORMAT = Dynamic
  COMMENT '文章和标签关联表';
一、文章功能实现
下面我们开始完成最后的文章的功能开发,想了下文章的功能涉及的东西比较多,要实现的功能也比较多,我打算出两篇文章,第一章先搭建好基础的功能,下一篇进行功能补充。
由于考虑到我们的文章加载速度我们要搞一个内存缓存,也就是说在项目启动的时候就要把数据加载到你本地的缓存中,然后需要哪个文章就去取就可以了,减少对数据库的请求。
1、添加文章实体类
文章的字段比较多,综合了几乎全部的功能,我们先做出个简单的文章功能,然后再慢慢的完善我们的系统。首先还是先写我们的实体类,先写着,到最后可能会有调整。
这里的实体类增了加两个页面展示的,主要给前端展示用,一个是分类名称另一个是标签,我这里设计的文章分类只能一种分类,标签会有多个,所以标签会有多个查出来会是个list数组。
    /**
     * 文章标签(页面展示)
     */
    private List<Tag> tagList;
新建一个实体类:Article.java
package com.blog.personalblog.entity;

import lombok.Data;

import java.time.LocalDateTime;
import java.util.List;

/**
 * @author: SuperMan
 * @create: 2021-12-01
 */
@Data
public class Article {
    /**
     * 文章id
     */
    private Integer id;

    /**
     * 作者
     */
    private String author;

    /**
     * 文章标题
     */
    private String title;

    /**
     * 用户id
     */
    private Integer userId;

    /**
     * 分类id
     */
    private Integer categoryId;

    /**
     * 文章内容
     */
    private String content;

    /**
     * 文章浏览量
     */
    private Long views;

    /**
     * 文章总字数
     */
    private Long totalWords;

    /**
     * 评论id
     */
    private Integer commentableId;

    /**
     * 发布,默认0, 0-发布, 1-草稿
     */
    private Integer artStatus;

    /**
     * 描述
     */
    private String description;

    /**
     * 文章logo
     */
    private String imageUrl;

    /**
     * 创建时间
     */
    private LocalDateTime createTime;

    /**
     * 更新时间
     */
    private LocalDateTime updateTime;

    /**
     * 文章标签(页面展示)
     */
    private List<Tag> tagList;

    /**
     * 分类名称(页面展示)
     */
    private String categoryName;

}
后期可能会对某个字段修改或者添加,先以这些为主。这些东西相信都难不到大家了,随手就来。
因为我们的文章会有很多,我们在查看或修改历史博客的时候一个一个去找,假如有上千篇文章,这查找很浪费时间,所以我们在文章列表的时候增加几个查询的条件,能快速的定位到该博客,相信大家都会有所体验。
例如这种选择框:
我们先写三个查询的条件吧,一个是分类查询、文章标题查询、文章状态查询。当我们在页面上选择查询条件时,前端则会将要查询的字段传给我们,然后我们再去数据库中匹配进行分页查询。我们这里使用对象进行接收条件值,所以我们再添加一个查询的对象。
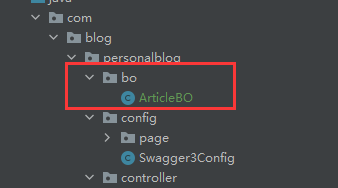
新建一个包为bo(business object 业务对象)
业务对象主要作用是把业务逻辑封装为一个对象。这个对象可以包括一个或多个其它的对象。
然后在bo包中新建一个查询的对象为:ArticleBO.java
这里我把分页的字段也整合到这个查询类里了,取代了PageRequest.java的分页类(其他的功能没变)
package com.blog.personalblog.bo;

import lombok.Data;

/**
 * @author: SuperMan
 * @create: 2021-12-31
 */
@Data
public class ArticleBO {

    /**
     * 分类id
     */
    private Integer categoryId;

    /**
     * 发布,默认0, 0-发布, 1-草稿
     */
    private Integer artStatus;

    /**
     * 文章标题
     */
    private String title;

    /**
     * 页码
     */
    private int pageNum;

    /**
     * 每页的数据条数
     */
    private int pageSize;
}
2、添加文章接口
文章的接口本章就暂时那么多,下一篇再进行补充,还有一些统计的数据接口等。
这里的获取所有的文章的参数就要换成我们新添加的按条件查询的对象类进行传参。
 /**
     * 获取所有的文章(分页)
     * @return
     */
    List<Article> getArticlePage(ArticleBO articleBO);
增加了初始化数据的接口,这个主要是我再文章开头提到的缓存的功能,就是这个接口。
/**
     * 初始化数据
     */
    void init();
新建一个接口类:ArticleService.java
package com.blog.personalblog.service;

import com.blog.personalblog.bo.ArticleBO;
import com.blog.personalblog.entity.Article;

import java.util.List;

/**
 * @author: SuperMan
 * @create: 2021-12-01
 */
public interface ArticleService {

    /**
     * 初始化数据
     */
    void init();

    /**
     * 获取所有的文章(分页)
     * @return
     */
    List<Article> getArticlePage(ArticleBO articleBO);

    /**
     * 新建文章
     * @param article
     * @return
     */
    void saveArticle(Article article);

    /**
     * 修改文章
     * @param article
     * @return
     */
    void updateArticle(Article article);

    /**
     * 删除文章
     * @param articleId
     */
    void deleteArticle(Integer articleId);

    /**
     * 根据文章id查找文章
     * @param articleId
     * @return
     */
    Article findById(Integer articleId);

}
3、添加文章接口实现类
文章的实现类是最重的这一篇,也是我们重点要讲的,需要增加很多的功能,不是以前我们简单的增删改查的功能,要加业务逻辑了,搬好小板凳准备听讲!我先一个一个方法的拆解,然后再放完整的代码,可以先按照拆解的自己组合,然后最后把完整的进行对比和参考。
3.1、Map介绍
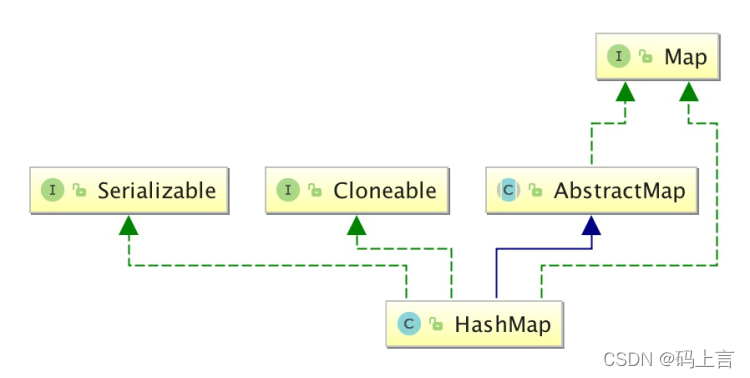
首先new一个接收缓存数据的对象,我们使用Map进行存储,大家基础的时候应该学过集合,集合中有一个Map就是我们这里使用的,有些可能忘记了,我这里先简单的说一下。
一、Map的 key 与 value 类型可以相同也可以不同,可以是字符串(String)类型的 key 和 value,也可以是整型(Integer)的 key 和字符串(String)类型的 value
二、LinkedHashMap的概述和使用
LinkedHashMap的概述: Map 接口的哈希表和链接列表实现,具有可预知的迭代顺序LinkedHashMap的特点: 1、底层的数据结构是链表和哈希表 元素有序 并且唯一
2、元素的有序性由链表数据结构保证 唯一性由 哈希表数据结构保证
3、Map集合的数据结构只和键有关
我们类中定义的Map如下:
/**
     * key:文章id
     * value: 文章对象
     */
    Map<Integer, Article> articleMap = new LinkedHashMap<>();
以上面的Map举例来讲解Map集合的功能:
这个以后做项目会经常用到,大家一定要掌握学会,还是那句,在实战中学习。
1、数据添加
articleMap.put(K key,V value)
//如果键是第一次存储,就直接存储元素,返回null
//如果键不是第一次存在,就用值把以前的值替换掉,返回以前的值
2、数据删除
articleMap.remove(Object key) //根据键删除键值对元素,并把值返回
3、获取数据
(1) map.entrySet()  //返回一个键值对的Set集合
Set<Entry<String,Object>> entry = map.entrySet();
for(Entry<String,Object> value:entry){
	value.getValue();
}

(2) map.keySet() //获取集合中所有键的集合
for(String key:map.keySet()){
	map.get(key);
}
3.2、缓存方法
有了存储数据的集合,然后我们要实现数据的查询,我们在项目启动的时候就把数据放到缓存中,然后在我们用到的时候去缓存里查找,这样就减少了对数据库的查找。
代码相信大家现在都可以看懂了,用了个for循环遍历数据。
    @Override
    @PostConstruct
    public void init() {
        List<Article> articleList = articleMapper.findAll();
        try {
            for(Article article : articleList) {
                articleMap.put(article.getId(), article);
            }
            log.info("文章缓存数据加载完成");
        } catch (Exception e) {
            log.error("文章缓存数据加载失败!", e.getMessage());
        }
    }
大家可以看到,在方法上边多了一个注解 @PostConstruct,下面是这个注解的讲解:
@PostConstruct该注解被用来修饰一个非静态的void()方法。被@PostConstruct修饰的方法会在服务器加载Servlet的时候运行,并且只会被服务器执行一次。@PostConstruct在构造函数之后执行,init()方法之前执行。
然后我们将数据库的所有的数据都查询出来。然后放到List集合中,再进行遍历这个集合,将所有的数据都加入到map的缓存中,我在这里写了一个异常的捕获try/catch,如果插入失败会打印log出来,我们可以在项目启动的日志中查看到。
在我们启动完项目后,查看这个log文件,会看到打印的log
3.3、分页查询方法
这个方法和以前的区别就是传的参数变了而已,这个相信大家可以看懂,最重要的是getArticlePage这个Mapper接口,对数据库的查询,sql语句比较复杂点,考验大家的mysql基本功的时候倒了。
@Override
    public List<Article> getArticlePage(ArticleBO articleBO) {
        int pageNum = articleBO.getPageNum();
        int pageSize = articleBO.getPageSize();
        PageHelper.startPage(pageNum,pageSize);
        List<Article> articleList = articleMapper.getArticlePage(articleBO);
        return articleList;
    }
Mapper中的接口为
/**
     * 分类列表(分页)
     * @param articleBO
     * @return
     */
    List<Article> getArticlePage(@Param("articleBO") ArticleBO articleBO);
可以看出,有加了一个@Param注解
用注解来简化xml配置的时候(比如Mybatis的Mapper.xml中的sql参数引入),@Param注解的作用是给参数命名,参数命名后就能根据名字得到参数值,正确的将参数传入sql语句中(一般通过#{}的方式,${}会有sql注入的问题)。
关于引用中提到的#和$的问题,我们在sql语句中会使用的,这个也是比较常犯的错误,以后会经常使用的。
条件查询列表SQL语句:
<?xml version="1.0" encoding="UTF-8" ?>
<!DOCTYPE mapper
        PUBLIC "-//mybatis.org//DTD Mapper 3.0//EN"
        "http://mybatis.org/dtd/mybatis-3-mapper.dtd">
<mapper namespace="com.blog.personalblog.mapper.ArticleMapper">
    <resultMap id="BaseResultMap" type="com.blog.personalblog.entity.Article">
        <result column="id" jdbcType="INTEGER" property="id"/>
        <result column="author" jdbcType="VARCHAR" property="author"/>
        <result column="title" jdbcType="VARCHAR" property="title"/>
        <result column="user_id" jdbcType="INTEGER" property="userId"/>
        <result column="category_id" jdbcType="INTEGER" property="categoryId"/>
        <result column="content" jdbcType="VARCHAR" property="content"/>
        <result column="views" jdbcType="BIGINT" property="views"/>
        <result column="total_words" jdbcType="BIGINT" property="totalWords"/>
        <result column="commentable_id" jdbcType="INTEGER" property="commentableId"/>
        <result column="art_status" jdbcType="INTEGER" property="artStatus"/>
        <result column="description" jdbcType="VARCHAR" property="description"/>
        <result column="image_url" jdbcType="VARCHAR" property="imageUrl"/>
        <result column="create_time" jdbcType="TIMESTAMP" property="createTime"/>
        <result column="update_time" jdbcType="TIMESTAMP" property="updateTime"/>
        <result column="categoryname" jdbcType="VARCHAR" property="categoryName"></result>
        <collection property="tagList" ofType="com.blog.personalblog.entity.Tag">
            <id column="sid" property="id"/>
            <result column="tag_name" property="tagName"/>
            <result column="create_time" jdbcType="TIMESTAMP" property="createTime"/>
            <result column="update_time" jdbcType="TIMESTAMP" property="updateTime"/>
        </collection>
    </resultMap>

<select id="getArticlePage" resultMap="BaseResultMap" parameterType="com.blog.personalblog.bo.ArticleBO">
        SELECT
        a.*,
        tag.article_id,
        tag.tag_id,
        s.id AS sid,
        u.category_name categoryname,
        s.tag_name
        FROM person_article a
        left join person_category u on a.category_id = u.category_id
        left join person_article_tag tag on a.id = tag.article_id
        left join person_tag s on s.id = tag.tag_id
        <where>
            <if test="articleBO.title != null">
                and a.title like '%${articleBO.title}%'
            </if>
            <if test="articleBO.categoryId != null">
                and a.category_id = #{articleBO.categoryId}
            </if>
            <if test="articleBO.artStatus != null">
                and a.art_status = #{articleBO.artStatus}
            </if>
        </where>
    </select>
大家会注意到上边的xml中resultMap里面嵌套了一个collection,这个就是我们多用于连表查询输出的List数据,我们的文章有多个标签,这里的property的值对应的则是实体类中的List<Tag> tagList。
接下来就是我们的sql语句了,大家看着是不是有点头疼,那么多的sql语句,我们一共查询了四张表,用的是左连接查询,最主要的还是关联表的查询,我们用文章的id去匹配关联表中的字段,然后查找出对应的标签。
  left join person_article_tag tag on a.id = tag.article_id
  left join person_tag s on s.id = tag.tag_id
分类的表我这里只是用来查询分类名字的展示。
left join person_category u on a.category_id = u.category_id
下边的语句则是条件查询,我这里使用了if判断,如果没有任何的参数则全部查出,有一个值不是null则按照该条件去查询,两个条件则按照两个条件去查询,文章的标题这里使用的like进行模糊查询。
			<where>
            <if test="articleBO.title != null">
                and a.title like '%${articleBO.title}%'
            </if>
            <if test="articleBO.categoryId != null">
                and a.category_id = #{articleBO.categoryId}
            </if>
            <if test="articleBO.artStatus != null">
                and a.art_status = #{articleBO.artStatus}
            </if>
        </where>
其他的增删改的接口基本上还和以前一致,但是这个功能还没有写完,在我们添加或者修改文章的时候我们要去维护我们的关联表中的数据信息,我将在下一篇再修改这里的功能。
3.4、缓存的维护
我们在对文章进行添加、修改、删除的时候不能只将数据插入到表中,现在我们加入了缓存管理,在插入表中的同时还要添加进入缓存,前面如何添加和删除缓存在讲map中提到过。例如添加文章:
 @Override
    public void saveArticle(Article article) {
        articleMapper.createArticle(article);
        articleMap.put(article.getId(), article);
    }
3.5、对象查询
这里我再提一下,在我们根据id查找对象的时候,我先去缓存中就查找,如果缓存中没有再去数据库中查找。
拿map的key去查找。
    @Override
    public Article findById(Integer articleId) {
        Article article = articleMap.get(articleId);
        if (article == null) {
            Article art = articleMapper.getById(articleId);
            return art;
        }
        return article;
    }
实现类完整代码:TagServiceImpl.java
package com.blog.personalblog.service.Impl;

import com.blog.personalblog.bo.ArticleBO;
import com.blog.personalblog.entity.Article;
import com.blog.personalblog.mapper.ArticleMapper;
import com.blog.personalblog.service.ArticleService;
import com.github.pagehelper.PageHelper;
import lombok.extern.log4j.Log4j2;
import org.springframework.beans.factory.annotation.Autowired;
import org.springframework.stereotype.Service;

import javax.annotation.PostConstruct;
import java.util.LinkedHashMap;
import java.util.List;
import java.util.Map;

/**
 * @author: SuperMan
 * @create: 2021-12-01
 */
@Log4j2
@Service
public class ArticleServiceImpl implements ArticleService {

    @Autowired
    ArticleMapper articleMapper;

    /**
     * key:文章id
     * value: 文章
     */
    Map<Integer, Article> articleMap = new LinkedHashMap<>();


    @Override
    @PostConstruct
    public void init() {
        List<Article> articleList = articleMapper.findAll();
        try {
            for(Article article : articleList) {
                articleMap.put(article.getId(), article);
            }
            log.info("文章缓存数据加载完成");
        } catch (Exception e) {
            log.error("文章缓存数据加载失败!", e.getMessage());
        }
    }

    @Override
    public List<Article> getArticlePage(ArticleBO articleBO) {
        int pageNum = articleBO.getPageNum();
        int pageSize = articleBO.getPageSize();
        PageHelper.startPage(pageNum,pageSize);
        List<Article> articleList = articleMapper.getArticlePage(articleBO);
        return articleList;
    }

    @Override
    public void saveArticle(Article article) {
        articleMapper.createArticle(article);
        articleMap.put(article.getId(), article);
    }

    @Override
    public void updateArticle(Article article) {
        articleMapper.updateArticle(article);
        articleMap.put(article.getId(), article);
    }

    @Override
    public void deleteArticle(Integer articleId) {
        articleMapper.deleteArticle(articleId);
        articleMap.remove(articleId);
    }

    @Override
    public Article findById(Integer articleId) {
        Article article = articleMap.get(articleId);
        if (article == null) {
            Article art = articleMapper.getById(articleId);
            return art;
        }
        return article;
    }

}
4、数据库查询接口实现
新建ArticleMapper.java接口:
这个没有什么好讲的和以前几乎一样,我就直接展示代码了
package com.blog.personalblog.mapper;

import com.blog.personalblog.bo.ArticleBO;
import com.blog.personalblog.entity.Article;
import org.apache.ibatis.annotations.Param;
import org.springframework.stereotype.Repository;

import java.util.List;

/**
 * @author: SuperMan
 * @create: 2021-12-01
 */
@Repository
public interface ArticleMapper {

    /**
     * 查询所有的文章列表
     * @return
     */
    List<Article> findAll();

    /**
     * 创建文章
     * @param article
     * @return
     */
    int createArticle(Article article);

    /**
     * 修改文章
     * @param article
     * @return
     */
    int updateArticle(Article article);

    /**
     * 分类列表(分页)
     * @param articleBO
     * @return
     */
    List<Article> getArticlePage(@Param("articleBO") ArticleBO articleBO);

    /**
     * 删除文章
     * @param id
     */
    void deleteArticle(Integer id);

    /**
     * 根据id查找分类
     * @param id
     * @return
     */
    Article getById(Integer id);

}
5、编写数据库xml
这个的重点我在实现类中也已经讲过了,其余的都是正常的增删改的sql语句了。
新建一个ArticleMapper.xml文件
<?xml version="1.0" encoding="UTF-8" ?>
<!DOCTYPE mapper
        PUBLIC "-//mybatis.org//DTD Mapper 3.0//EN"
        "http://mybatis.org/dtd/mybatis-3-mapper.dtd">
<mapper namespace="com.blog.personalblog.mapper.ArticleMapper">
    <resultMap id="BaseResultMap" type="com.blog.personalblog.entity.Article">
        <result column="id" jdbcType="INTEGER" property="id"/>
        <result column="author" jdbcType="VARCHAR" property="author"/>
        <result column="title" jdbcType="VARCHAR" property="title"/>
        <result column="user_id" jdbcType="INTEGER" property="userId"/>
        <result column="category_id" jdbcType="INTEGER" property="categoryId"/>
        <result column="content" jdbcType="VARCHAR" property="content"/>
        <result column="views" jdbcType="BIGINT" property="views"/>
        <result column="total_words" jdbcType="BIGINT" property="totalWords"/>
        <result column="commentable_id" jdbcType="INTEGER" property="commentableId"/>
        <result column="art_status" jdbcType="INTEGER" property="artStatus"/>
        <result column="description" jdbcType="VARCHAR" property="description"/>
        <result column="image_url" jdbcType="VARCHAR" property="imageUrl"/>
        <result column="create_time" jdbcType="TIMESTAMP" property="createTime"/>
        <result column="update_time" jdbcType="TIMESTAMP" property="updateTime"/>
        <result column="categoryname" jdbcType="VARCHAR" property="categoryName"></result>
        <collection property="tagList" ofType="com.blog.personalblog.entity.Tag">
            <id column="sid" property="id"/>
            <result column="tag_name" property="tagName"/>
            <result column="create_time" jdbcType="TIMESTAMP" property="createTime"/>
            <result column="update_time" jdbcType="TIMESTAMP" property="updateTime"/>
        </collection>
    </resultMap>

    <sql id="Base_Column_List">
        id, author, title, user_id, category_id, content, views, total_words, commentable_id,
        art_status, description, image_url, create_time, update_time
    </sql>

    <select id="findAll" resultMap="BaseResultMap">
       select
        <include refid="Base_Column_List"/>
       from person_article
    </select>

    <select id="getArticlePage" resultMap="BaseResultMap" parameterType="com.blog.personalblog.bo.ArticleBO">
        SELECT
        a.*,
        tag.article_id,
        tag.tag_id,
        s.id AS sid,
        u.category_name categoryname,
        s.tag_name
        FROM person_article a
        left join person_category u on a.category_id = u.category_id
        left join person_article_tag tag on a.id = tag.article_id
        left join person_tag s on s.id = tag.tag_id
        <where>
            <if test="articleBO.title != null">
                and a.title like '%${articleBO.title}%'
            </if>
            <if test="articleBO.categoryId != null">
                and a.category_id = #{articleBO.categoryId}
            </if>
            <if test="articleBO.artStatus != null">
                and a.art_status = #{articleBO.artStatus}
            </if>
        </where>


    </select>

    <insert id="createArticle" parameterType="com.blog.personalblog.entity.Article" useGeneratedKeys="true" keyProperty="id">
        INSERT INTO person_article
            (author, title, user_id, category_id, content, views, total_words,
             commentable_id, art_status, description, image_url)
        VALUES(#{author}, #{title}, #{userId}, #{categoryId}, #{content}, #{views}, #{totalWords}, #{commentableId},
               #{artStatus}, #{description}, #{imageUrl})
    </insert>

    <update id="updateArticle" parameterType="com.blog.personalblog.entity.Tag">
        update person_article
        <set>
            author = #{author},
            title = #{title},
            user_id = #{userId},
            category_id = #{categoryId},
            views = #{views},
            total_words = #{totalWords},
            commentable_id = #{commentableId},
            art_status = #{artStatus},
            description = #{description},
            image_url = #{imageUrl}
        </set>
        WHERE id = #{id}
    </update>

    <delete id="deleteArticle" parameterType="java.lang.Integer">
        delete from person_article where id = #{id, jdbcType=INTEGER}
    </delete>

    <select id="getById" resultType="com.blog.personalblog.entity.Article">
        select * from person_article
        where id = #{id}
    </select>

</mapper>
6、编写接口层
新建一个文章的接口类:ArticleController.java
package com.blog.personalblog.controller;

import com.blog.personalblog.bo.ArticleBO;
import com.blog.personalblog.config.page.PageRequest;
import com.blog.personalblog.config.page.PageResult;
import com.blog.personalblog.entity.Article;
import com.blog.personalblog.service.ArticleService;
import com.blog.personalblog.util.JsonResult;
import com.blog.personalblog.util.PageUtil;
import com.github.pagehelper.PageInfo;
import io.swagger.annotations.Api;
import io.swagger.annotations.ApiOperation;
import org.springframework.beans.factory.annotation.Autowired;
import org.springframework.web.bind.annotation.*;

import javax.validation.Valid;
import java.util.List;

/**
 * @author: SuperMan
 * @create: 2021-12-01
 */
@Api(tags = "文章管理")
@RestController
@RequestMapping("/article")
public class ArticleController {

    @Autowired
    ArticleService articleService;

    /**
     * 文章列表
     * @param articleBO
     * @return
     */
    @ApiOperation(value = "文章列表")
    @PostMapping("list")
    public JsonResult<Object> listPage(@RequestBody @Valid ArticleBO articleBO) {
        List<Article> articleList = articleService.getArticlePage(articleBO);
        PageInfo pageInfo = new PageInfo(articleList);
        PageRequest pageRequest = new PageRequest();
        pageRequest.setPageNum(articleBO.getPageNum());
        pageRequest.setPageSize(articleBO.getPageSize());
        PageResult pageResult = PageUtil.getPageResult(pageRequest, pageInfo);
        return JsonResult.success(pageResult);
    }

    /**
     * 添加文章
     * @return
     */
    @ApiOperation(value = "添加文章")
    @PostMapping("/create")
    public JsonResult<Object> articleCreate(@RequestBody @Valid Article article) {
        articleService.saveArticle(article);
        return JsonResult.success();
    }

    /**
     * 修改文章
     * @return
     */
    @ApiOperation(value = "修改文章")
    @PostMapping("/update")
    public JsonResult<Object> articleUpdate(@RequestBody @Valid Article article) {
        articleService.updateArticle(article);
        return JsonResult.success();
    }

    /**
     * 删除文章
     * @return
     */
    @ApiOperation(value = "删除文章")
    @DeleteMapping("/delete/{id}")
    public JsonResult<Object> articleDelete(@PathVariable(value = "id") int id) {
        articleService.deleteArticle(id);
        return JsonResult.success();
    }

    /**
     * 根据文章id查找
     * @param id
     * @return
     */
    @ApiOperation(value = "根据文章id查找")
    @PostMapping("/getArticle/{id}")
    public JsonResult<Object> getArticleById(@PathVariable(value = "id") int id) {
        Article article = articleService.findById(id);
        return JsonResult.success(article);
    }


}
以上的功能都是文章基本的东西,后面我们还会修改和添加功能,具体的会在第二篇进行补充和完善。
二、测试
接下来启动我们的项目,我们测试一下我们的接口,先能保证接口都是通的,才能进行下一步的操作。
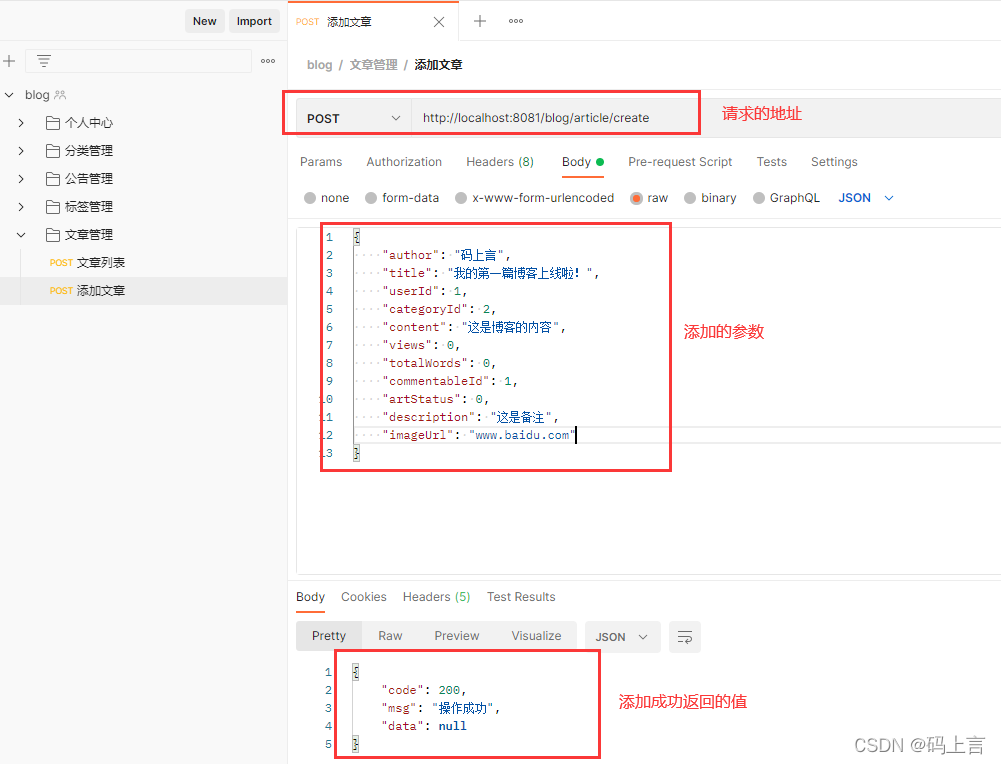
1、添加文章接口测试
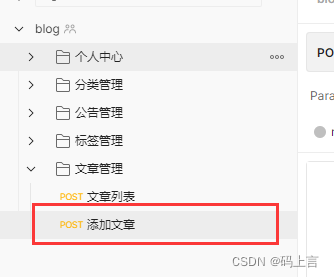
打开PostMan,我们新建一个文章管理的文件夹,当然你也可以选择在Swagger接口中进行测试,我们这里用Postman进行测试。
我们将添加的参数以JSON的格式进行传参。
打开数据库,查看有没有添加成功
2、修改文章接口测试
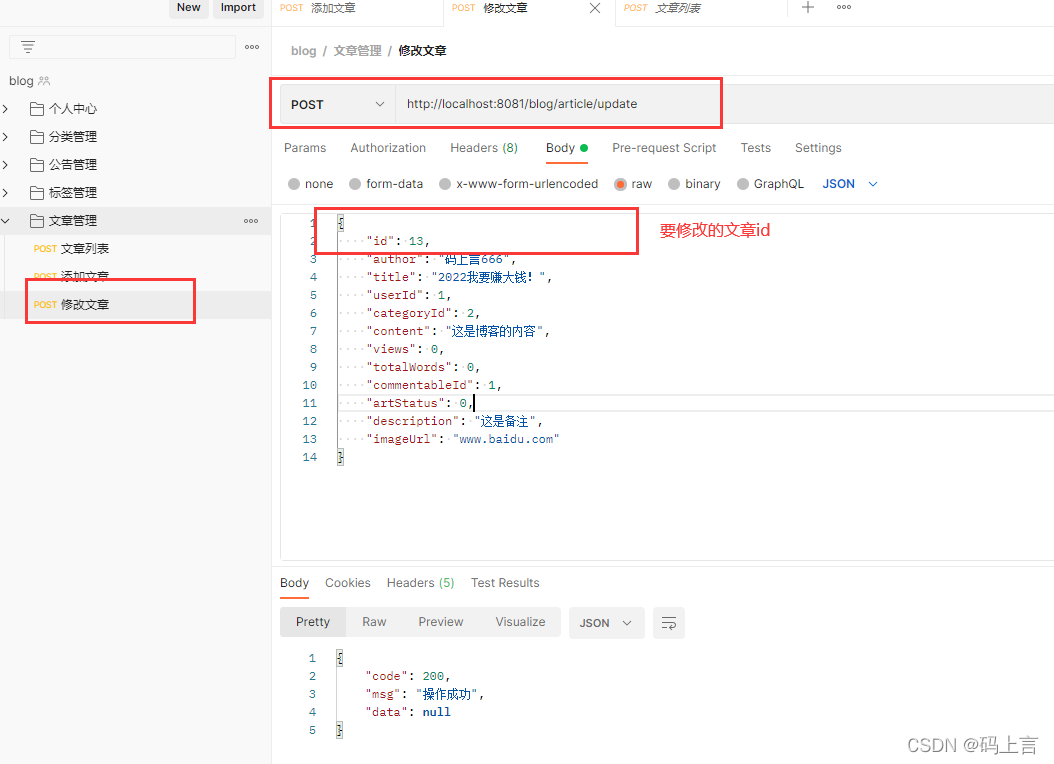
修改接口基本上和添加的参数一致,就是比添加多了一个文章id,我们要修改那一篇文章要告诉后台的服务,才能进行相关的修改。
再新建 一个修改文章的接口。
再看一下数据库有没有修改
3、删除文章接口测试
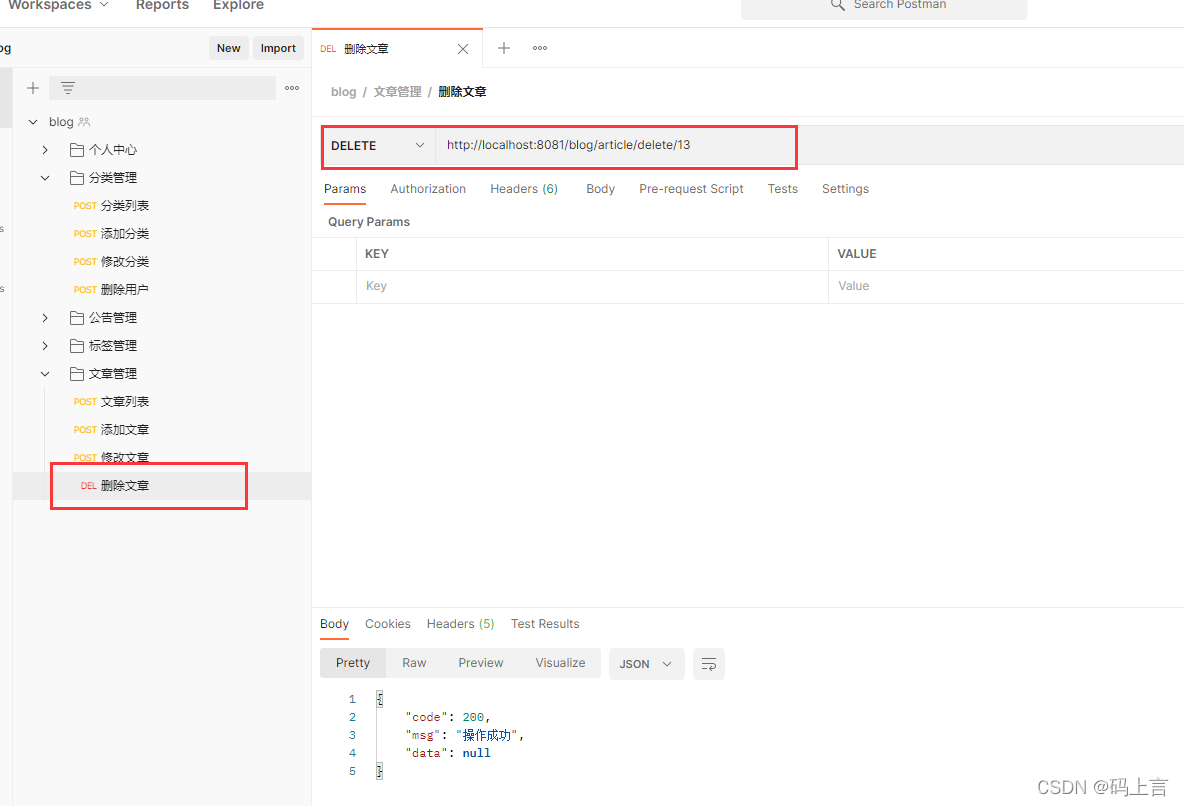
删除的很简单,就是要删除哪一篇文章传入个id就可以了。
我们这里使用@DeleteMapping请求方式
看一下数据库中的数据已经成功的删除了
4、查询接口测试
查询的接口我们会有参数进行查询的,同时还带有分页查询。
这个查询牵连的表比较多,我们要确保分类表和标签表里有值,然后还要在关联表中手动添加一些值,方便我们进行测试。
(1)下面是分类表:
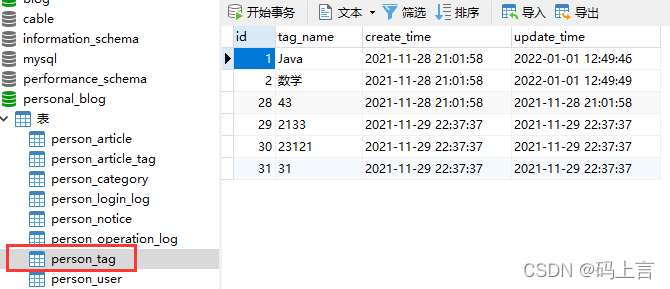
(2)标签表:
(3)文章表:我就以这个为例了,分类设置的为1
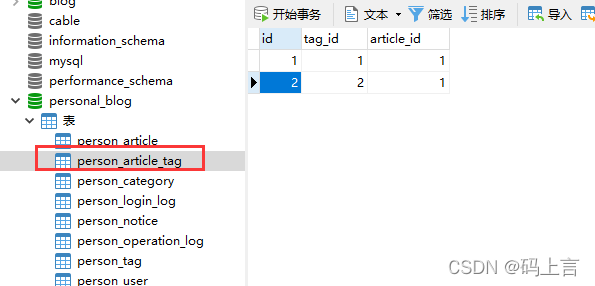
(4)然后看关联表:
大家可以看到关联表中我一共放了两个值,文章id为1的有两个标签,由于我们关联表功能还没和文章连接,我们自己先搞点值测一测接口。这里说明文章有两个标签,就说明我们在查找出来的文章中会有两个标签进行展示。
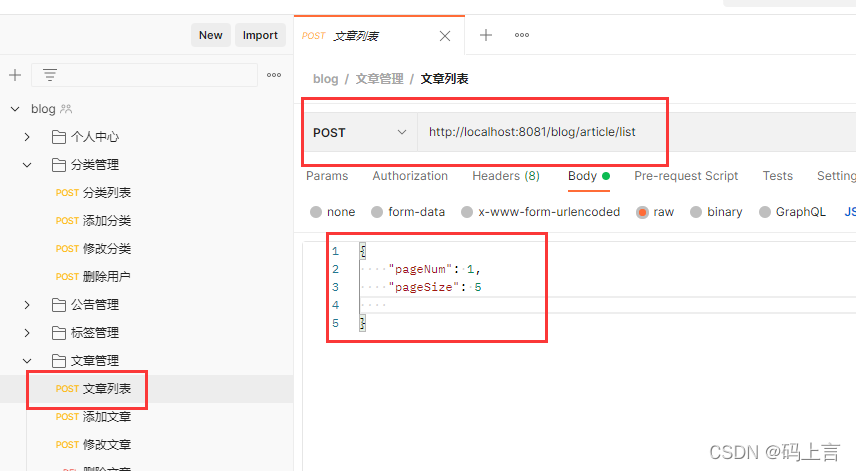
新建一个请求接口:
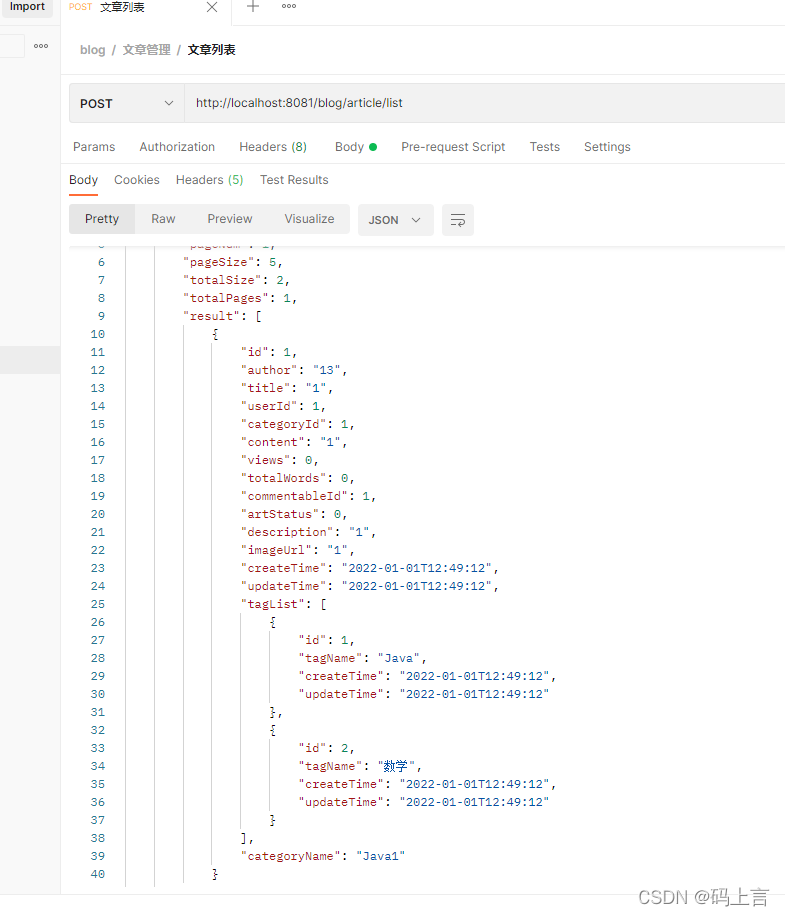
我们先测试以下什么参数都不传,将所有的数据都查询出来。
看下返回的数据,标签确实有两条数据,说明我们写的没有问题。
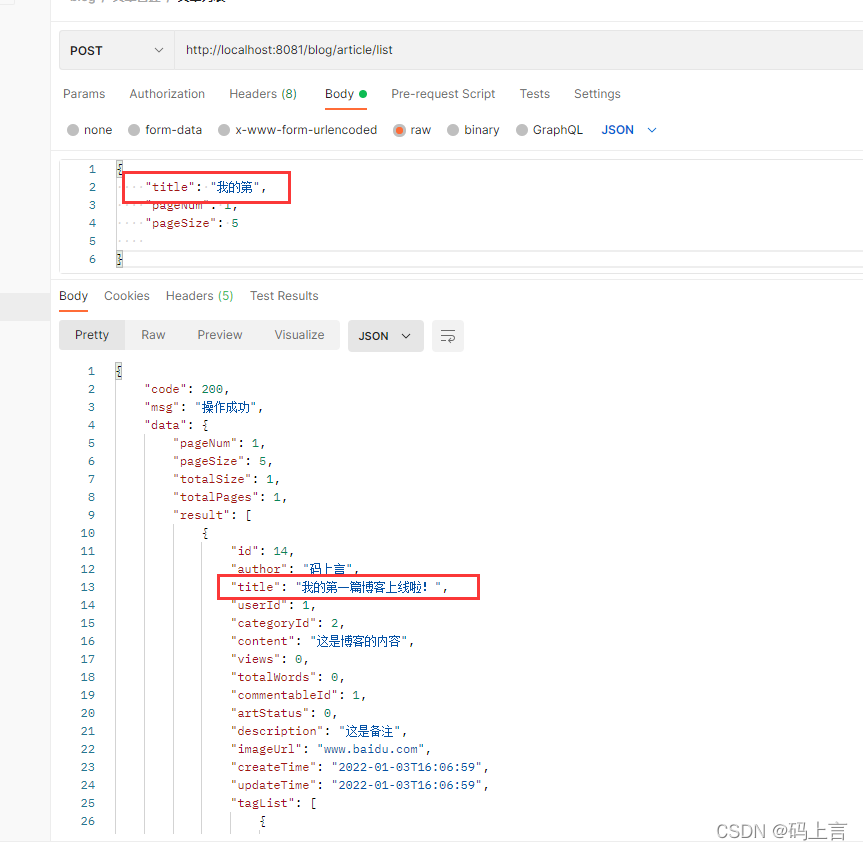
然后下面再多添加几条数据,进行参数的测试。
我们查询title标题的模糊查询,看是否能查出来。
看确实查询出来了,而且只查出来这一条符合条件的,说明我们的条件查询也是对的,还有剩下的两个参数大家自己测一测吧,我就不一一列举了。
好啦!这一篇文章写了很长时间,搞了一个元旦,新的一年大家努力啊!麻烦大家给点个赞吧。
在这里我收集下大家的反馈!
上一篇:Spring Boot + vue-element 开发个人博客项目实战教程(十三、文章标签功能实现)
下一篇:Spring Boot + vue-element 开发个人博客项目实战教程(十五、文章功能实现(下))


