文章目录
过拟合和欠拟合
模型对验证数据的准确性在经过多个阶段的训练后会达到峰值,然后会停滞或开始下降。换句话说,我们的模型会与训练数据过拟合(overfit)。学习如何处理过度拟合是很重要的。虽然通常可以在训练集上获得高精度,但我们真正想要的是开发能够很好地泛化到测试集的模型(或他们以前从未见过的数据)。
过拟合的反面是欠拟合(underfitting)。当测试数据仍有改进空间时,就会出现欠拟合。这种情况的发生有很多原因:如果模型不够强大,过于正则化,或者仅仅是训练时间不够长。这意味着网络没有在训练数据中学习到相关的模式。
防止过拟合的方法:
- 使用更完整的训练数据——数据集应涵盖模型预期处理的所有输入。
- 使用正则化等技术——这些技术限制了模型可以存储的信息的数量和类型。如果一个网络只能记住少量的模式,那么优化过程将迫使它把注意力集中在最突出的模式上,这些模式有更好的泛化机会。
1、配置
import tensorflow as tf
from tensorflow.keras import layers
from tensorflow.keras import regularizers
import tensorflow_docs as tfdocs
import tensorflow_docs.modeling
import tensorflow_docs.plots
from matplotlib import pyplot as plt
import numpy as np
import pathlib
import shutil
import tempfile
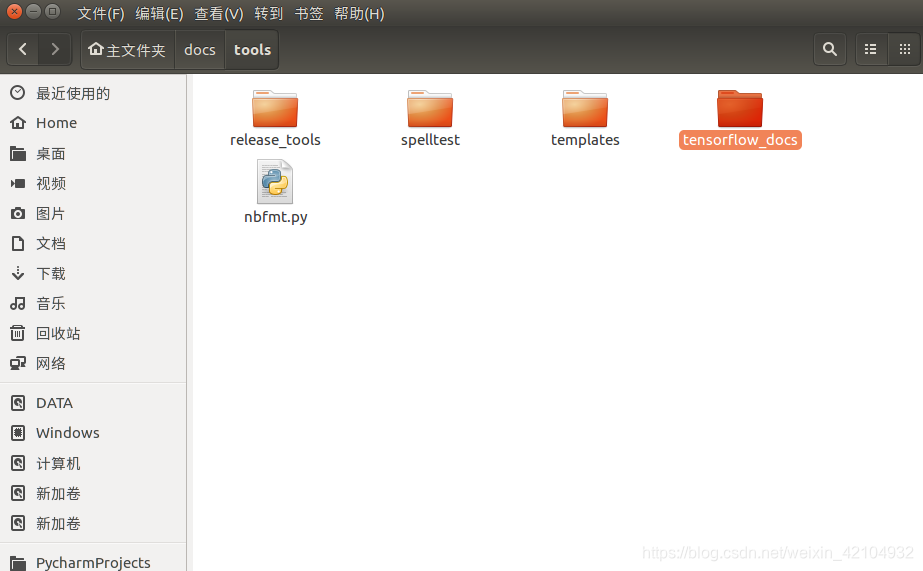
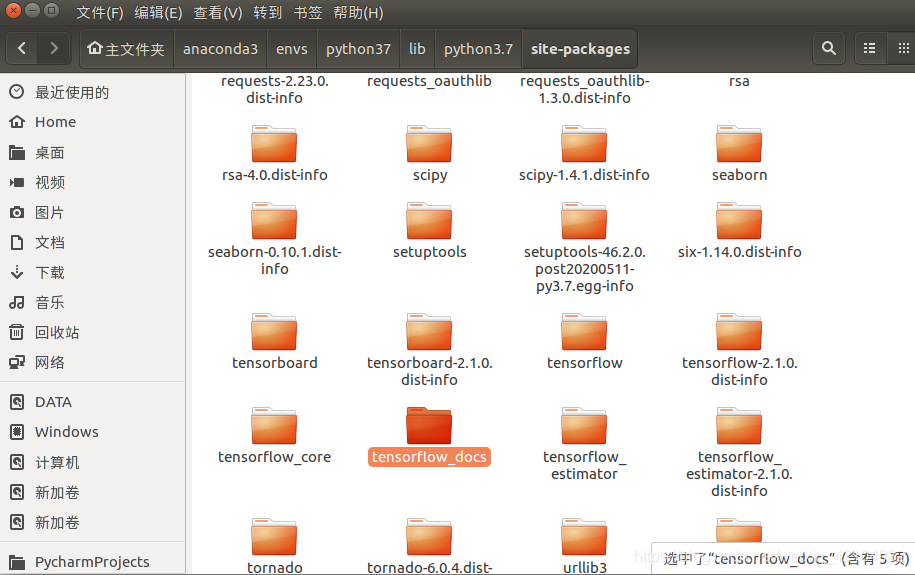
其中需要添加 tensorflow_docs 包:
github上下载 tensorflow documentation
然后把 docs/tools 中的 tensorflow_docs 放入Anaconda对应的环境的site-packages中,如下所示:
安装完后运行代码发现缺少yaml,则需要安装pyyaml包:
conda install -n python37 pyyaml
2、加载 Higgs Dataset
Higgs Dataset 包含11000000示例,每个示例有28个特性和一个二进制类标签。
gz = tf.keras.utils.get_file('HIGGS.csv.gz', 'http://mlphysics.ics.uci.edu/data/higgs/HIGGS.csv.gz')
FEATURES = 28

ds = tf.data.experimental.CsvDataset(gz, [float(), ]*(FEATURES+1), compression_type="GZIP")


def pack_row(*row):
    label = row[0]
    features = tf.stack(row[1:], 1)
    return features, label


packed_ds = ds.batch(10000).map(pack_row).unbatch()

for features, label in packed_ds.batch(1000).take(1):
    print(features[0])
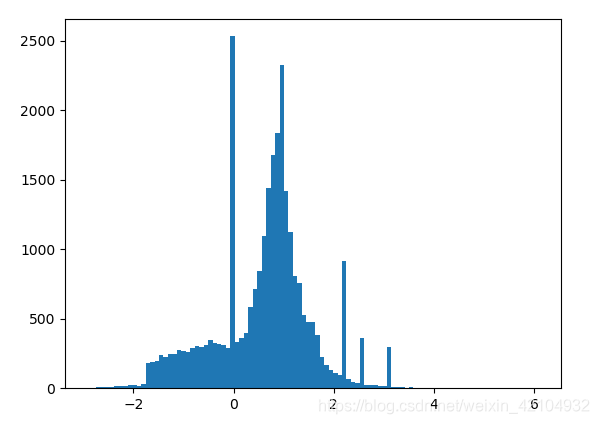
    plt.hist(features.numpy().flatten(), bins=101)
    plt.show()

N_VALIDATION = int(1e3)
N_TRAIN = int(1e4)
BUFFER_SIZE = int(1e4)
BATCH_SIZE = 500
STEPS_PER_EPOCH = N_TRAIN//BATCH_SIZE

validate_ds = packed_ds.take(N_VALIDATION).cache()
train_ds = packed_ds.skip(N_VALIDATION).take(N_TRAIN).cache()
print(train_ds)

validate_ds = validate_ds.batch(BATCH_SIZE)
train_ds = train_ds.shuffle(BUFFER_SIZE).repeat().batch(BATCH_SIZE)
3、训练过程
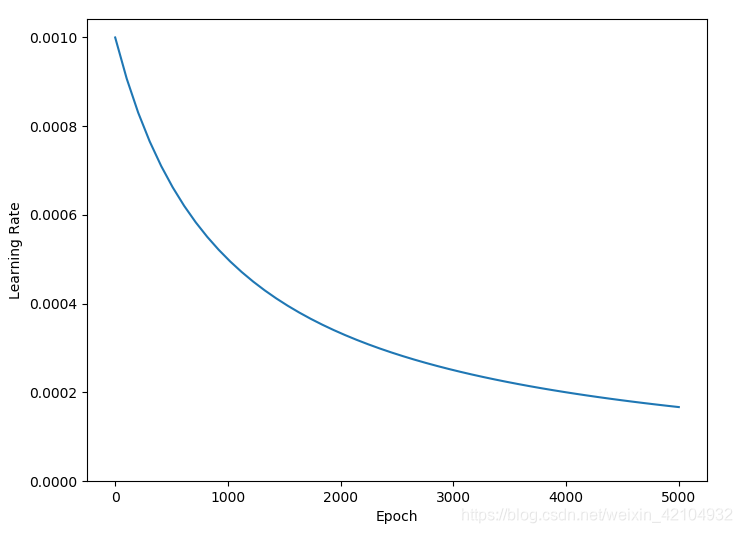
如果在训练过程中逐渐降低学习率,许多模型的训练效果会更好。使用optimizers.schedules随着时间的推移降低学习率:
lr_schedule = tf.keras.optimizers.schedules.InverseTimeDecay(
    0.001,
    decay_steps=STEPS_PER_EPOCH * 1000,
    decay_rate=1,
    staircase=False)


def get_optimizer():
    return tf.keras.optimizers.Adam(lr_schedule)

step = np.linspace(0, 100000)
lr = lr_schedule(step)
plt.figure(figsize=(8, 6))
plt.plot(step / STEPS_PER_EPOCH, lr)
plt.ylim([0, max(plt.ylim())])
plt.xlabel('Epoch')
_ = plt.ylabel('Learning Rate')
plt.show()
上面的代码设置了一个 schedules.InverseTimeDecay ,在1000个阶段将学习率较快地降低到基准率的1/2,在2000个阶段将学习率降低到基准率的1/3,以此类推。
get_callbacks 方法:
- 培训持续时间很短,为了减少日志记录噪音,使用 tfdocs.EpochDots。
- callbacks.EarlyStopping:为了避免很长又不必要的训练时间。
- callbacks.TensorBoard:为训练生成TensorBoard日志。
def get_callbacks(name):
    return [
        tfdocs.modeling.EpochDots(),
        tf.keras.callbacks.EarlyStopping(monitor='val_binary_crossentropy', patience=200),
        tf.keras.callbacks.TensorBoard(logdir / name),
    ]


def compile_and_fit(model, name, optimizer=None, max_epochs=10000):
    if optimizer is None:
        optimizer = get_optimizer()
    model.compile(optimizer=optimizer,
                  loss=tf.keras.losses.BinaryCrossentropy(from_logits=True),
                  metrics=[
                      tf.keras.losses.BinaryCrossentropy(
                          from_logits=True, name='binary_crossentropy'),
                      'accuracy'])

    model.summary()

    history = model.fit(
        train_ds,
        steps_per_epoch=STEPS_PER_EPOCH,
        epochs=max_epochs,
        validation_data=validate_ds,
        callbacks=get_callbacks(name),
        verbose=0)
    return history
4、训练不同大小的模型
Tiny model
# Tiny model
tiny_model = tf.keras.Sequential([
    layers.Dense(16, activation='elu', input_shape=(FEATURES,)),
    layers.Dense(1)
])

size_histories = {}
size_histories['Tiny'] = compile_and_fit(tiny_model, 'sizes/Tiny')

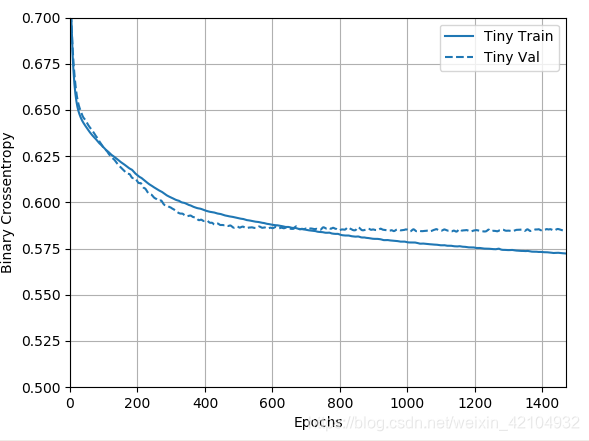
plotter = tfdocs.plots.HistoryPlotter(metric='binary_crossentropy', smoothing_std=10)
plotter.plot(size_histories)
plt.ylim([0.5, 0.7])
plt.show()
Small model
# Small model
small_model = tf.keras.Sequential([
    # `input_shape` is only required here so that `.summary` works.
    layers.Dense(16, activation='elu', input_shape=(FEATURES,)),
    layers.Dense(16, activation='elu'),
    layers.Dense(1)
])
size_histories['Small'] = compile_and_fit(small_model, 'sizes/Small')
Medium model
# Medium model
medium_model = tf.keras.Sequential([
    layers.Dense(64, activation='elu', input_shape=(FEATURES,)),
    layers.Dense(64, activation='elu'),
    layers.Dense(64, activation='elu'),
    layers.Dense(1)
])
size_histories['Medium'] = compile_and_fit(medium_model, "sizes/Medium")
Large model
# Large model
large_model = tf.keras.Sequential([
    layers.Dense(512, activation='elu', input_shape=(FEATURES,)),
    layers.Dense(512, activation='elu'),
    layers.Dense(512, activation='elu'),
    layers.Dense(512, activation='elu'),
    layers.Dense(1)
])
size_histories['large'] = compile_and_fit(large_model, "sizes/large")
绘制训练和验证损失图
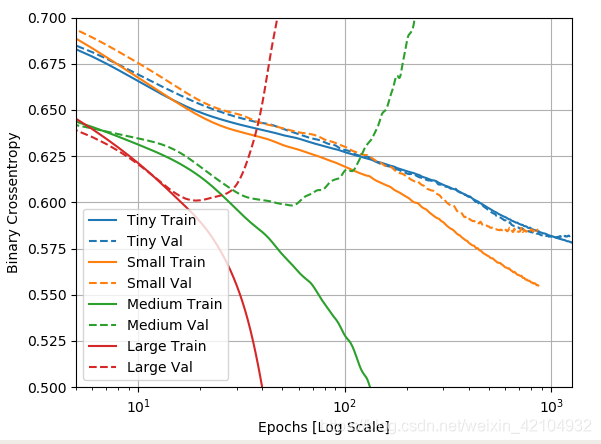
实线表示训练损失,虚线表示验证损失(请记住:验证损失越低表示模型越好)。
plotter.plot(size_histories)
a = plt.xscale('log')
plt.xlim([5, max(plt.xlim())])
plt.ylim([0.5, 0.7])
plt.xlabel("Epochs [Log Scale]")
plt.show()
在本例中,通常只有Tiny模型能够避免完全过拟合,而每个较大的模型都能更快地过度拟合数据。
绘制验证指标并将其与训练指标进行比较:
- 有一点小差别是正常的。
- 如果两个指标都朝着同一个方向发展,那么是好的。
- 如果验证指标开始停滞,而训练指标继续改进,则可能接近过度拟合。
- 如果验证指标朝着错误的方向发展,那么模型显然是过度拟合的。
5、避免过拟合的方法
使用上面的"Tiny" model作为比较的基线。
加权正则化
缓解过度拟合的一种常见方法是通过强制网络权值取小值来限制网络的复杂性,这使得权值的分布更加“规则”。这称为“权重正则化”,它是通过在网络的损失函数中加入与具有较大权重相关联的成本来实现的。这种成本有两种:
- L1正则化,其中增加的成本与权重系数的绝对值成比例(即,与权重的“L1范数”成比例)。
- L2正则化,其中增加的成本与权重系数值的平方成正比(即,与权重的平方“L2范数”成正比)。L2正则化在神经网络中也称为权值衰减。
L1正则化将权重精确地推向零,从而鼓励稀疏模型。L2正则化将惩罚权重参数,而不会使其稀疏,因为对于小权重,惩罚变为零。这也是L2比较常见的一个原因。
在tf.keras中,权重正则化是通过将权重正则化实例作为关键字参数传递给层来添加的。现在让我们添加L2权重正则化。
shutil.rmtree(logdir/'regularizers/Tiny', ignore_errors=True)
shutil.copytree(logdir/'sizes/Tiny', logdir/'regularizers/Tiny')

# Add weight regularization
regularizer_histories = {}
regularizer_histories['Tiny'] = size_histories['Tiny']

l2_model = tf.keras.Sequential([
    layers.Dense(512, activation='elu',
                 kernel_regularizer=regularizers.l2(0.001),
                 input_shape=(FEATURES,)),
    layers.Dense(512, activation='elu',
                 kernel_regularizer=regularizers.l2(0.001)),
    layers.Dense(512, activation='elu',
                 kernel_regularizer=regularizers.l2(0.001)),
    layers.Dense(512, activation='elu',
                 kernel_regularizer=regularizers.l2(0.001)),
    layers.Dense(1)
])

regularizer_histories['l2'] = compile_and_fit(l2_model, "regularizers/l2")

plotter.plot(regularizer_histories)
plt.ylim([0.5, 0.7])
plt.show()
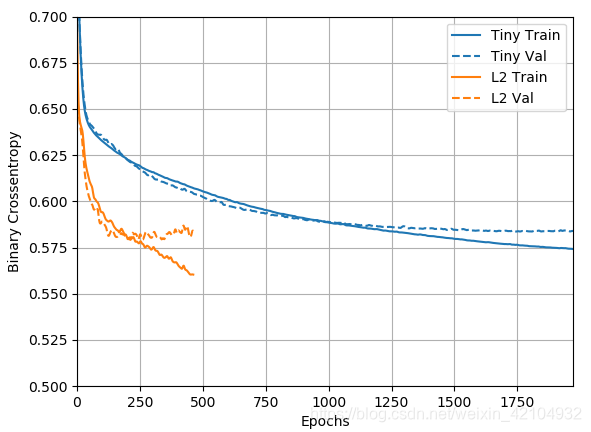
l2(0.001)表示层的权重矩阵中的每个系数将在网络的总损失中增加 0.001 * weight_coefficient_value**2 。
因此,带有L2正则化惩罚的“Large”模型表现得更好,如下图所示:
关于这种正则化有两件重要的事情要注意:
- 如果你正在编写自己的训练循环,那么你需要确保向模型询问其正则化损失。
result = l2_model(features)
regularization_loss=tf.add_n(l2_model.losses)
- 这个实现的工作原理是在模型的损失中加入权重惩罚,然后应用一个标准的优化过程。
Dropout
另一种方法是只对原始损失运行优化器,然后在应用计算步骤时优化器也应用一些权重衰减。在优化器optimizers.FTRL和optimizers.AdamW中可以看到这种“解耦的权重衰减”。
Dropout是最有效和最常用的神经网络正则化技术之一。对于Dropout的直观解释是,由于网络中的各个节点不能依赖其他节点的输出,因此每个节点必须输出自己有用的特征。
应用于层的Dropout包括在训练期间随机“Dropout”(即设置为零)层的许多输出特征。假设一个给定的层通常会在训练期间为给定的输入样本返回一个向量[0.2,0.5,1.3,0.8,1.1];应用Dropout后,这个向量将有几个随机分布的零项,例如[0,0.5,1.3,0,1.1]。
“Dropout rate”是被归零的特征的数,它通常设置在0.2到0.5之间。在测试时,没有单元被Dropout,相反,层的输出值被一个等于Dropout rate的因子缩小,以便平衡比训练时更多的单元处于活动状态的事实。
在tf.keras中,可以通过dropout层在网络中引入dropout,该层应用于之前层的输出。
让我们在我们的网络中添加两个dropout层,看看它们在减少过度拟合方面的表现如何:
# Add dropout
dropout_model = tf.keras.Sequential([
    layers.Dense(512, activation='elu', input_shape=(FEATURES,)),
    layers.Dropout(0.5),
    layers.Dense(512, activation='elu'),
    layers.Dropout(0.5),
    layers.Dense(512, activation='elu'),
    layers.Dropout(0.5),
    layers.Dense(512, activation='elu'),
    layers.Dropout(0.5),
    layers.Dense(1)
])

regularizer_histories['dropout'] = compile_and_fit(dropout_model, "regularizers/dropout")
plotter.plot(regularizer_histories)
plt.ylim([0.5, 0.7])
plt.show()
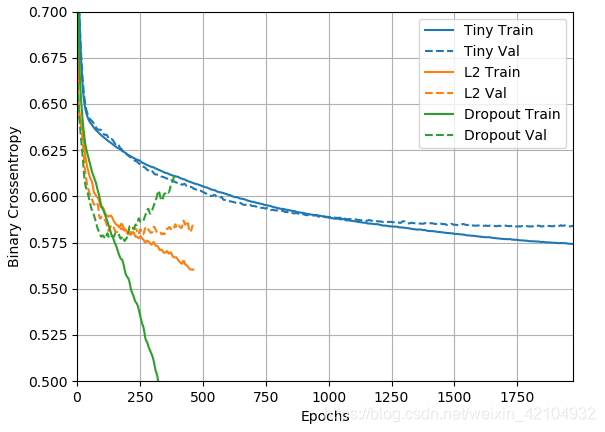
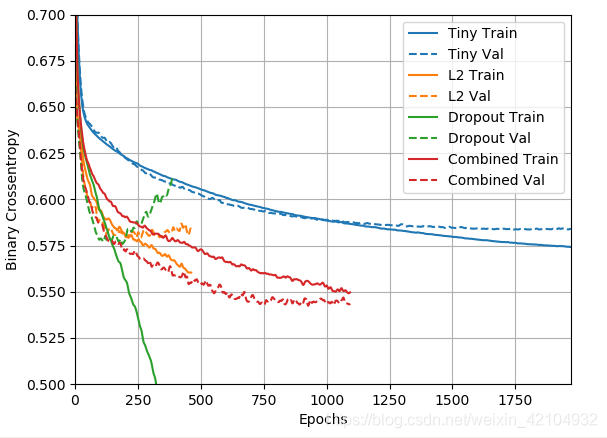
从图中可以清楚地看出,这两种正则化方法都改善了“Large”模型的行为。但这仍然没有超过“Tiny”基线。
L2 + dropout
#Combined L2 + dropout
combined_model = tf.keras.Sequential([
    layers.Dense(512, kernel_regularizer=regularizers.l2(0.0001),
                 activation='elu', input_shape=(FEATURES,)),
    layers.Dropout(0.5),
    layers.Dense(512, kernel_regularizer=regularizers.l2(0.0001),
                 activation='elu'),
    layers.Dropout(0.5),
    layers.Dense(512, kernel_regularizer=regularizers.l2(0.0001),
                 activation='elu'),
    layers.Dropout(0.5),
    layers.Dense(512, kernel_regularizer=regularizers.l2(0.0001),
                 activation='elu'),
    layers.Dropout(0.5),
    layers.Dense(1)
])

regularizer_histories['combined'] = compile_and_fit(combined_model, "regularizers/combined")
plotter.plot(regularizer_histories)
plt.ylim([0.5, 0.7])
plt.show()
可见“L2 + dropout组合”正则化模型比上面的都要好。
6、总结
避免神经网络过度拟合的最常用方法:
- 获取更多训练数据。
- 减少网络大小。
- 增加权重正则化。
- 增加dropout。
另外的两个重要方法是:
- 数据扩充(data-augmentation)
- 批量标准化(batch normalization)
7、参考资料
https://tensorflow.google.cn/tutorials/keras/overfit_and_underfit?hl=zh_cn#setup
https://github.com/tensorflow/docs/blob/master/site/en/tutorials/keras/overfit_and_underfit.ipynb
