Oauth2
什么是Oauth2认证
这是一款第三方认证方案的框架,第三方认证主要是因为出现的需求,A系统需要使用B系统中的部分信息资源,B系统就需要校验A系统请求的合法性
而Aauth2为用户资源的授权提供了一个安全的、开发而且简易的标准,任何第三方都可以使用这个服务,本身框架支持的语言丰富
Oauth协议目前发展到2.0版本,1.0版本过于复杂,2.0版本已得到广泛应用。
参考:https://baike.baidu.com/item/oAuth/7153134?fr=aladdin
Oauth 协议:https://tools.ietf.org/html/rfc6749
Qauth2认证流程
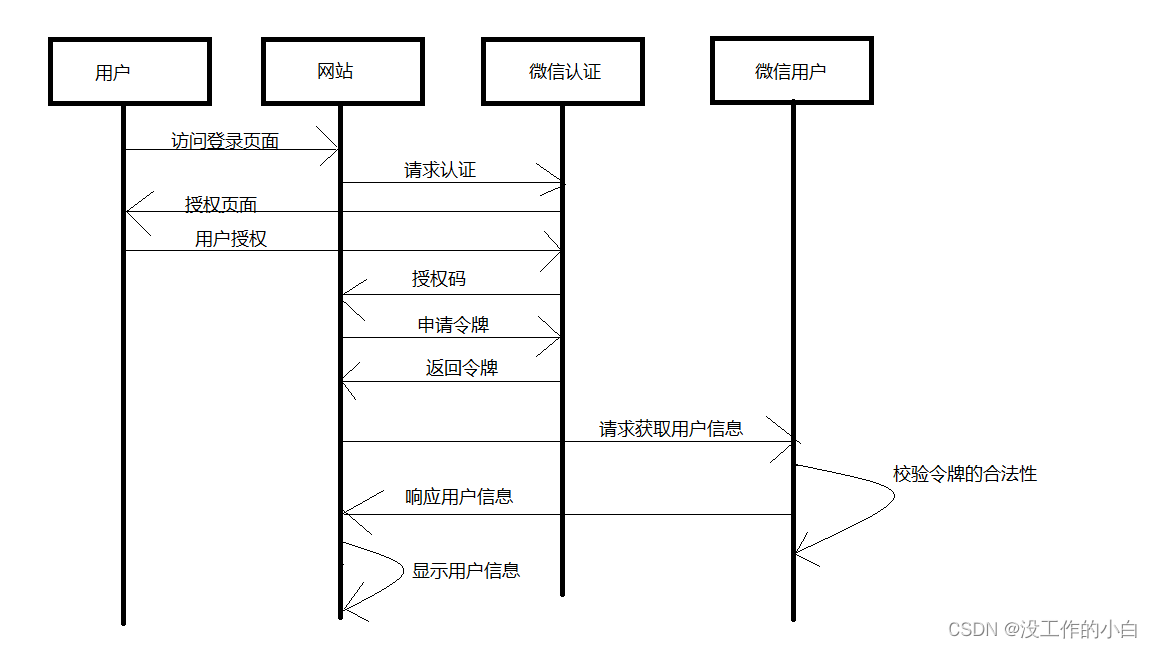
假设一个网站使用微信认证的过程:
1用户进入网站的登录页面,点击微信的图标以微信账号登录系统,网站发送一个请求给到微信认证的服务器
2.网站将需要认证的页面或者其他信息返回给用户确认授权
3:用户使用微信,发送授权确认信息给微信认证服务器
4: 微信认证服务得到授权确认的信息后,返回一个授权码给网站
5:网站得到授权码后,拿授权码去微信认证 申请换区一个令牌
6:微信认证服务器得到请求,返回给网站一个令牌
7:网站得到令牌可以去微信资源服务器获取用户信息
8:微信资源服务器校验令牌合法性,通过后将用户信息返回给网站
9;网站就可以得到用户信息,进行展示或者其他操作
认证流程中的名词
客户端
本身不存储资源,需要通过资源拥有者的授权去请求资源服务器的资源,比如:Android客户端、Web客户端(浏览器端)、微信客户端等
资源拥有者
通常为用户,也可以是应用程序,即该资源的拥有者。
即该资源的拥有者
用来对资源拥有的身份进行认证、对访问资源进行授权。客户端要想访问资源需要通过认证服务器由资源拥有者授权后方可访问
资源服务器
存储资源的服务器,比如,网站用户管理服务器存储了网站用户信息,网站相册服务器存储了用户的相册信息,微信的资源服务存储了微信的用户信息等。客户端最终访问资源服务器获取资源信息
令牌类型
- 授权码 :仅用于授权码授权类型,用于交换获取访问令牌和刷新令牌
- 访问令牌 :用于代表一个用户或服务直接去访问受保护的资源
- 刷新令牌 :用于去授权服务器获取一个刷新访问令牌
- BearerToken :不管谁拿到Token都可以访问资源,类似现金
- Proof of Possession(PoP) Token :可以校验client是否对Token有明确的拥有权
Qauth2优缺点
- 优点:
- 更安全,客户端不接触用户密码,服务器端更易集中保护
- 广泛传播并被持续采用
- 短寿命和封装的token
- 资源服务器和授权服务器解耦
- 集中式授权,简化客户端
- HTTP/JSON友好,易于请求和传递token
- 考虑多种客户端架构场景
- 客户可以具有不同的信任级别
- 缺点:
- 协议框架太宽泛,造成各种实现的兼容性和互操作性差
- 不是一个认证协议,本身并不能告诉你任何用户信息
SpringSecurity整合Qauth2
1:添加依赖
<properties>
	<java.version>11</java.version>
	<spring-cloud.version>Greenwich.SR2</spring-cloud.version>
</properties>

<dependencies>
	<dependency>
		<groupId>org.springframework.cloud</groupId>
		<artifactId>spring-cloud-starter-oauth2</artifactId>
	</dependency>
	<dependency>
		<groupId>org.springframework.cloud</groupId>
		<artifactId>spring-cloud-starter-security</artifactId>
	</dependency>
	<dependency>
		<groupId>org.springframework.boot</groupId>
		<artifactId>spring-boot-starter-web</artifactId>
	</dependency>
	<dependency>
		<groupId>org.springframework.boot</groupId>
		<artifactId>spring-boot-starter-test</artifactId>
		<scope>test</scope>
	</dependency>
</dependencies>

<dependencyManagement>
	<dependencies>
		<dependency>
			<groupId>org.springframework.cloud</groupId>
			<artifactId>spring-cloud-dependencies</artifactId>
			<version>${spring-cloud.version}</version>
			<type>pom</type>
			<scope>import</scope>
		</dependency>
	</dependencies>
</dependencyManagement>

<build>
	<plugins>
		<plugin>
			<groupId>org.springframework.boot</groupId>
			<artifactId>spring-boot-maven-plugin</artifactId>
		</plugin>
	</plugins>
</build>
2:编写实体类
import org.springframework.security.core.GrantedAuthority;
import org.springframework.security.core.userdetails.UserDetails;
import java.util.Collection;
import java.util.List;

public class User implements UserDetails {
	private String username;
	private String password;
	private List<GrantedAuthority> authorities;

	public User(String username, String password, List<GrantedAuthority> authorities) {
		this.username = username;
		this.password = password;
		this.authorities = authorities;
	}
	//省略get  set 方法
}
3:编写service层
@Service
public class UserService implements UserDetailsService {
	@Autowired
	private PasswordEncoder passwordEncoder;

	@Override
	public UserDetails loadUserByUsername(String username) throws UsernameNotFoundException {
		String password = passwordEncoder.encode("123456");
		return new User("admin",password,AuthorityUtils.commaSeparatedStringToAuthorityList("admin"));
	}
}
4:编写controller
@RestController
@RequestMapping("/user")
public class UserController {
	@GetMapping("/getCurrentUser")
	public Object getCurrentUser(Authentication authentication) {
		return authentication.getPrincipal();
	}
}
5:编写SpringSecurity配置类
@Configuration
@EnableWebSecurity
public class SecurityConfig extends WebSecurityConfigurerAdapter {
	@Bean
	public PasswordEncoder passwordEncoder() {
		return new BCryptPasswordEncoder();
	}
	@Override
	public void configure(HttpSecurity http) throws Exception {
		http.csrf()
		.disable()
		.authorizeRequests()
		.antMatchers("/oauth/**", "/login/**", "/logout/**")
		.permitAll()
		.anyRequest()
		.authenticated()
		.and()
		.formLogin()
		.permitAll();
	}
}
6:编写Qauth2配置类
import org.springframework.beans.factory.annotation.Autowired;
import org.springframework.context.annotation.Configuration;
import org.springframework.security.crypto.password.PasswordEncoder;
import org.springframework.security.oauth2.config.annotation.configurers.ClientDe
tailsServiceConfigurer;
import org.springframework.security.oauth2.config.annotation.web.configuration.Au
thorizationServerConfigurerAdapter;
import org.springframework.security.oauth2.config.annotation.web.configuration.En
ableAuthorizationServer;
@Configuration
@EnableAuthorizationServer
public class AuthorizationServerConfig extends AuthorizationServerConfigurerAdapter {
	@Autowired
	private PasswordEncoder passwordEncoder;
	@Override
	public void configure(ClientDetailsServiceConfigurer clients) throws Exception {
		clients.inMemory()
			//配置client_id
			.withClient("admin")
			//配置client-secret
			.secret(passwordEncoder.encode("112233"))
			//配置redirect_uri,用于授权成功后跳转
			.redirectUris("http://www.baidu.com")
			//配置申请的权限范围
			.scopes("all")
			//配置grant_type,表示授权类型
			.authorizedGrantTypes("authorization_code");
	}
}
7:资源服务器配置
@Configuration
@EnableResourceServer
public class ResourceServerConfig extends ResourceServerConfigurerAdapter{
	@Override
	public void configure(HttpSecurity http) throws Exception {
		http.authorizeRequests()
			.anyRequest()
			.authenticated()
			.and()
			.requestMatchers()
			.antMatchers("/user/**");//配置需要保护的资源路径
	}
}
8:开始测试
8.1:访问制定url,登陆用户,获取授权码
http://localhost:8080/oauth/authorize?response_type=code&client_id=admin&redirect_uri
=http://www.baidu.com&scope=all
8.2:登陆成功后,点击同意授权,会跳转Qauth2配置类指定的百度页面上
8.3:获取到授权码
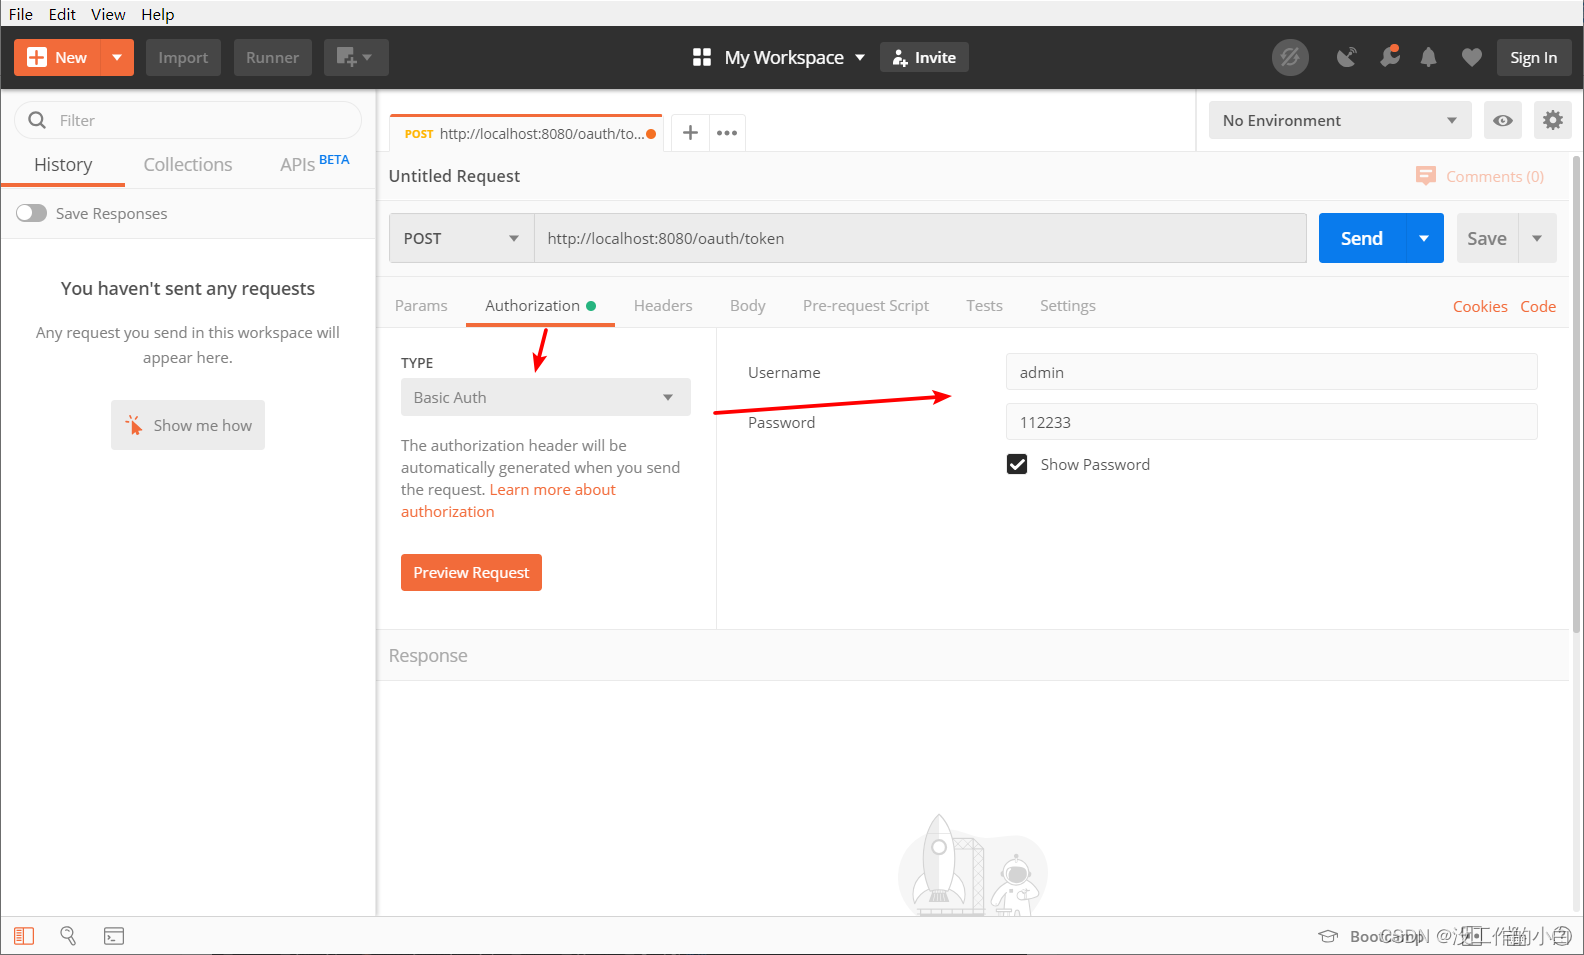
通过postMan测试
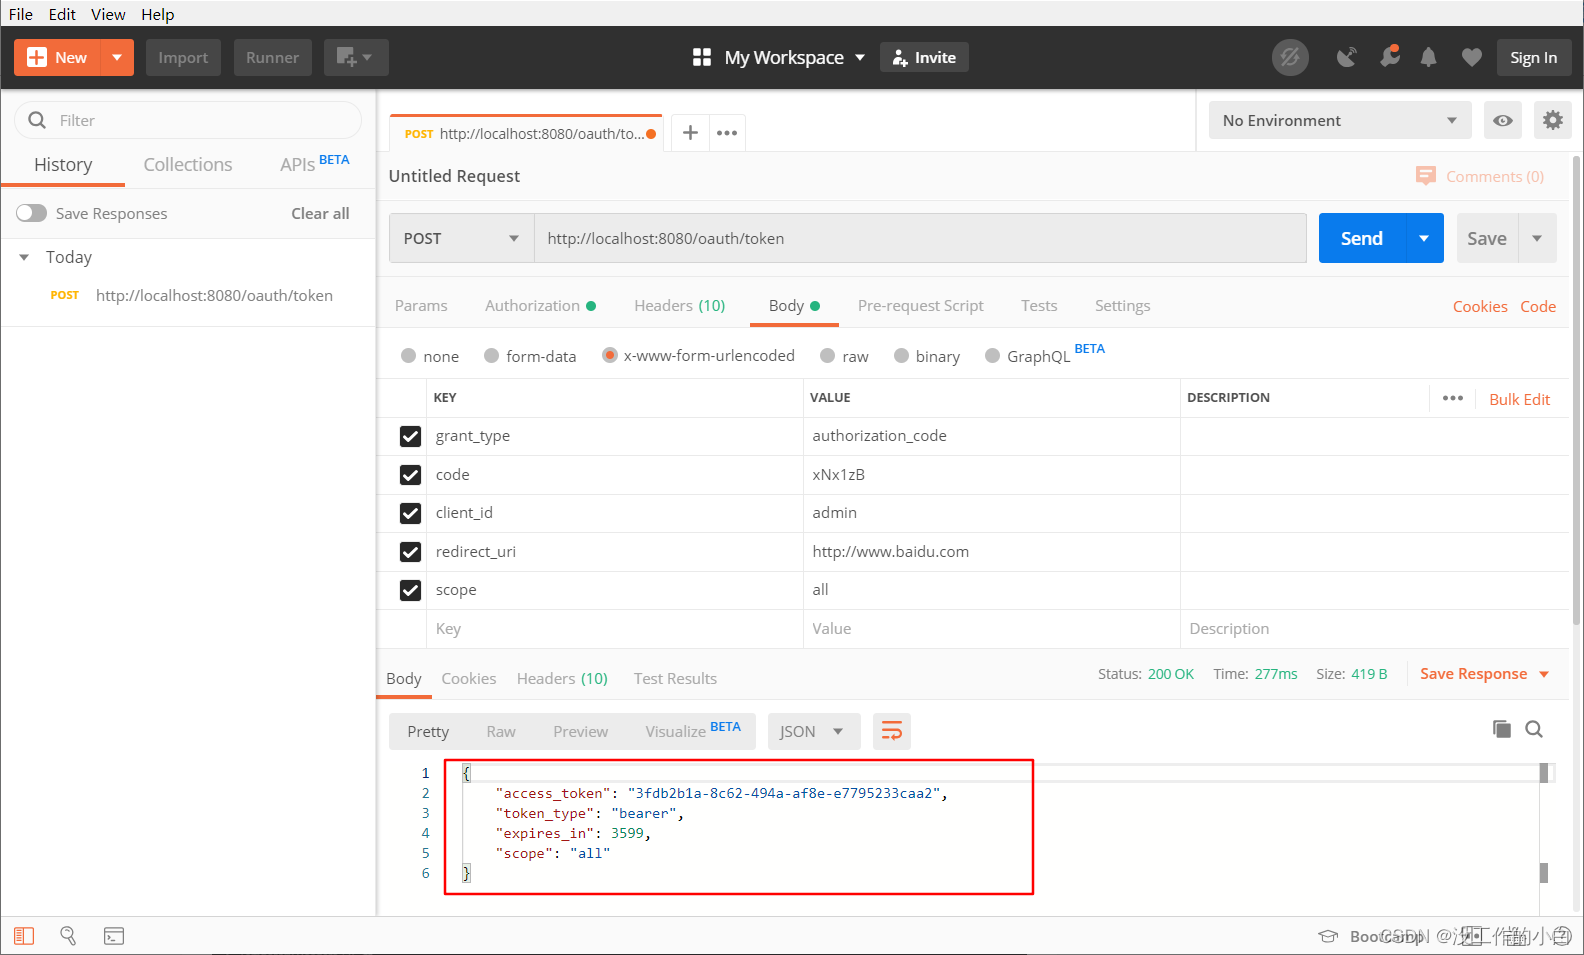
http://localhost:8080/oauth/token
- grant_type :授权类型,填写authorization_code,表示授权码模式
- code :授权码,就是刚刚获取的授权码,注意:授权码只使用一次就无效了,需要重新申请。
- client_id :客户端标识
- redirect_uri :申请授权码时的跳转url,一定和申请授权码时用的redirect_uri一致。
- scope :授权范围
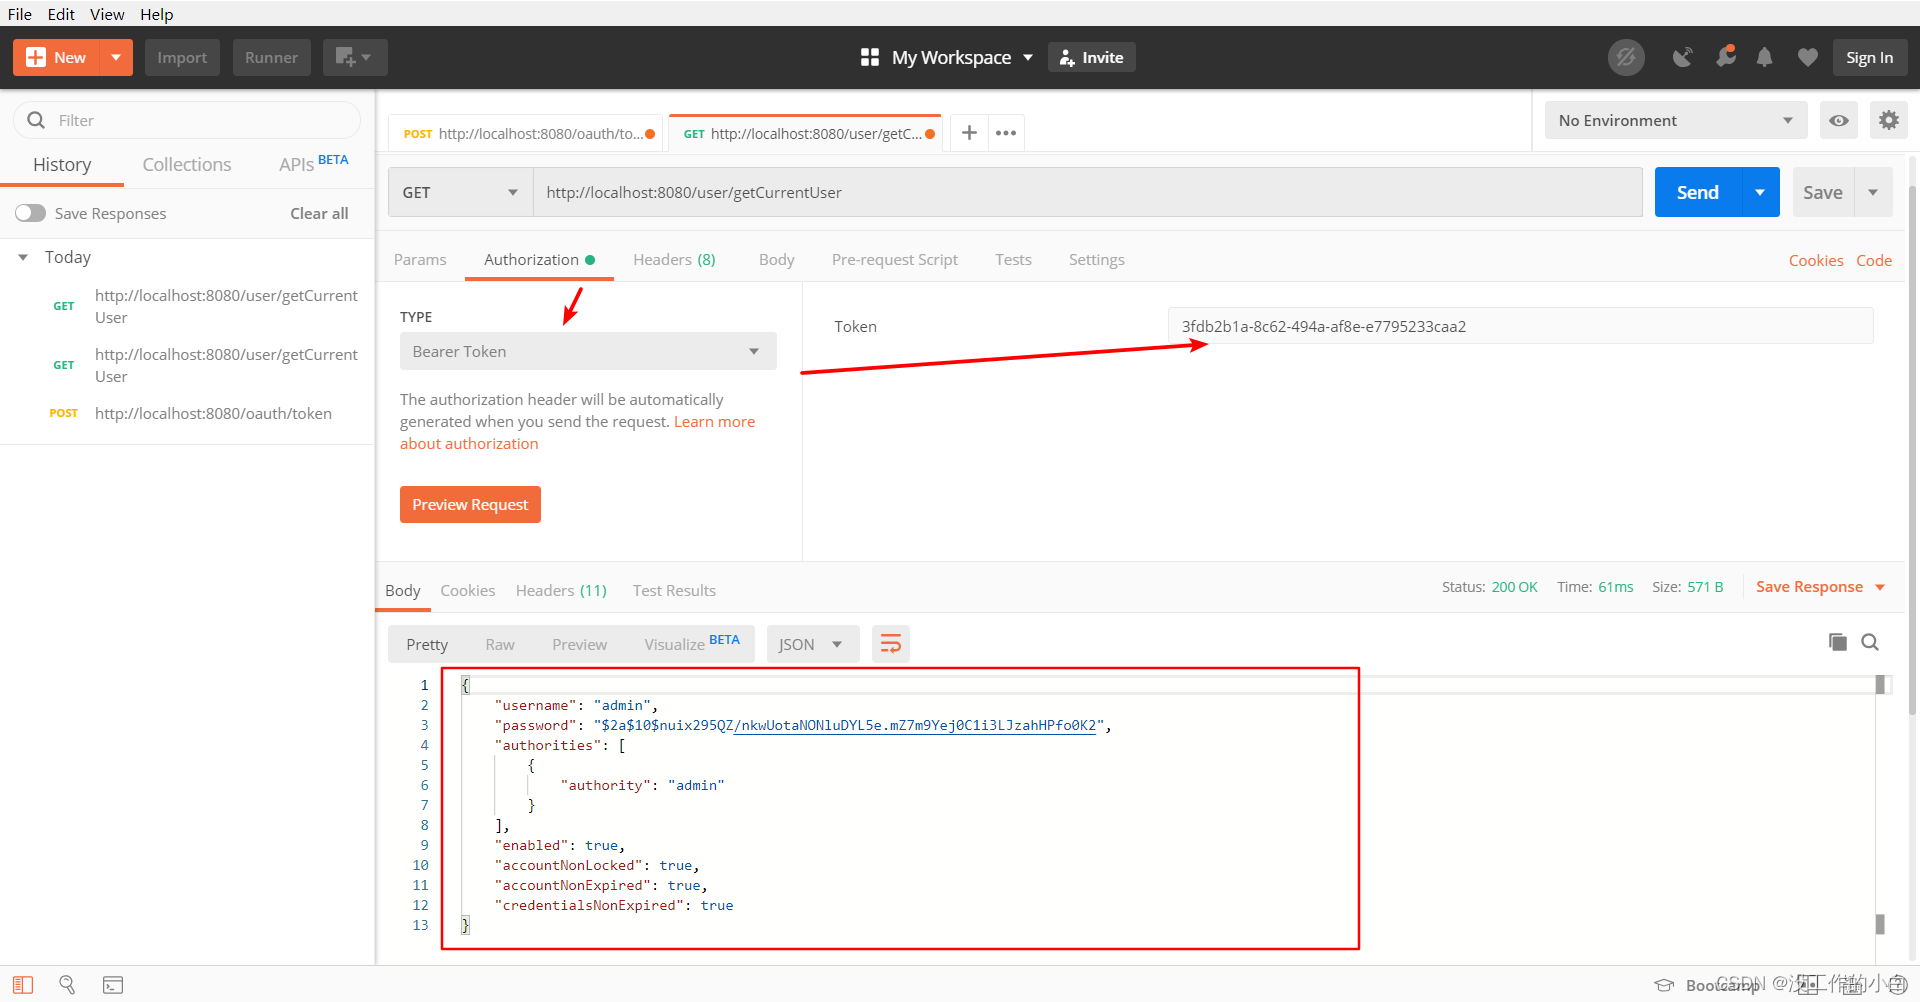
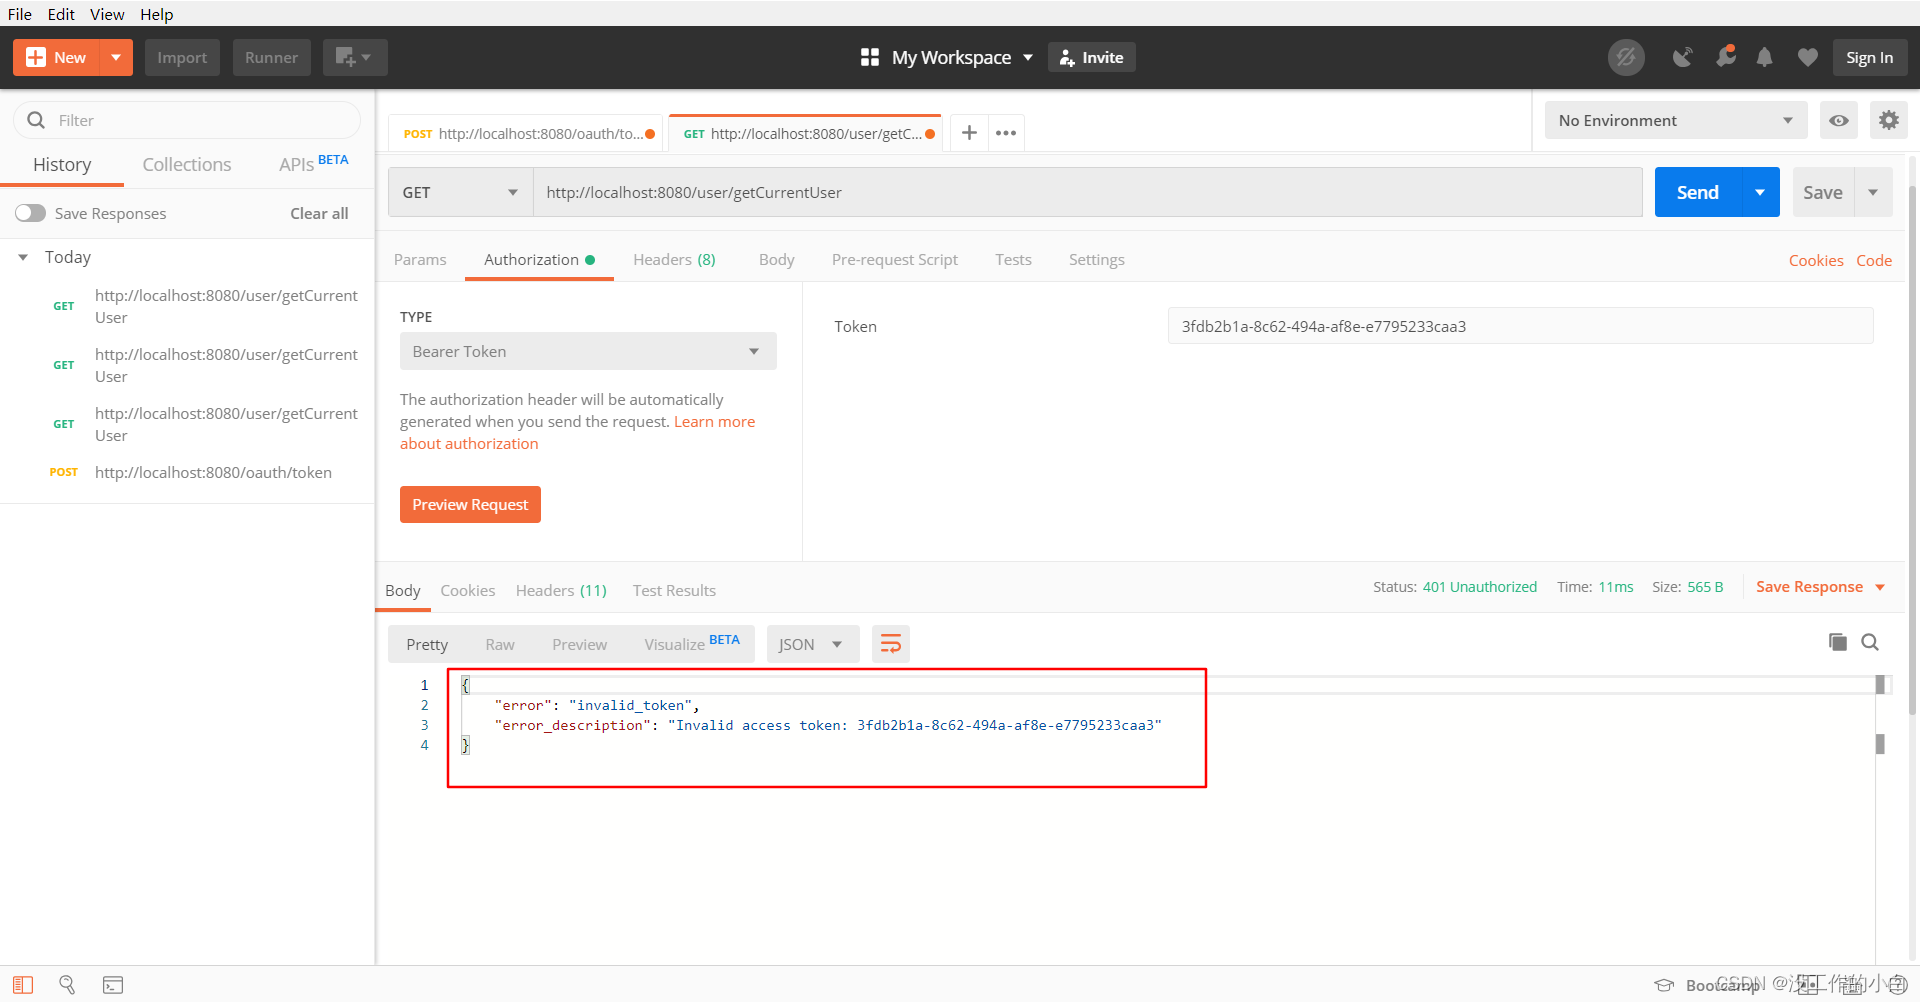
8.4:拿到token去访问
Spring Security Oauth2 密码模式
暂无更新,如有需要,请踢我一脚
