前言:
trimap图在AI抠像中的用途是为了得到精准的alpha图,以便后续的合成。
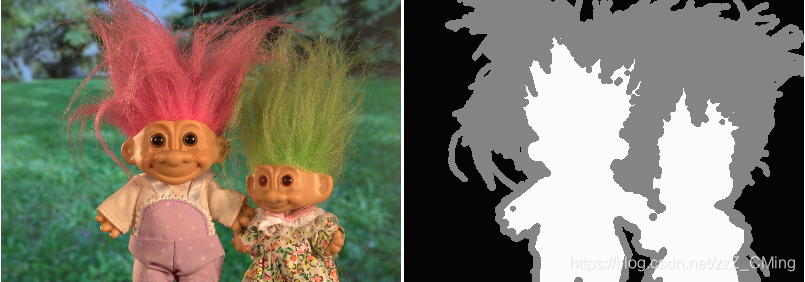
trimap原意是指“三色图”,三色图的意思如下:
- 确定需要的前景区域位置——下右图的白色区域;
- 确定不需要的背景区域位置——下右图的黑色区域;
- 介于需要与不需要的待分割区域位置——下右图的灰色区域;
trimap图大多都是由人工处理得到的,而标记的过程耗时耗力。这里介绍一种基于mask图生成trimap图的方法,时间效率要比手动处理快,但是效果表现有待提高。
–-----------------------------------------------------------------------------—--------------------------------------------
–-----------------------------------------------------------------------------—--------------------------------------------
一、原图得到mask图
mask图在Matting领域中是比较常见的,是用来标记分割物预测区域的图。一般支持图像分割的算法最后的输出都有mask图,所以不论是Fast-RCNN、DeepLab、YOLO都能满足这一步的需求。这里为图简便,代码用的是DeepLab,模型文件也可在网上自行下载。
import os
import tarfile
import numpy as np
from PIL import Image
import cv2, argparse
import tensorflow as tf


class DeepLabModel(object):
	"""Class to load deeplab model and run inference."""
	INPUT_TENSOR_NAME = 'ImageTensor:0'
	OUTPUT_TENSOR_NAME = 'SemanticPredictions:0'
	INPUT_SIZE = 513
	FROZEN_GRAPH_NAME = 'frozen_inference_graph'

	def __init__(self, tarball_path):
		self.graph = tf.Graph()
		graph_def = None

		pb_path = 'Loadding_model/frozen_inference_graph.pb'
		graph_def = tf.GraphDef.FromString(open(pb_path, 'rb').read())

		if graph_def is None:
			raise RuntimeError('Cannot find inference graph in tar archive.')

		with self.graph.as_default():
			tf.import_graph_def(graph_def, name='')

		self.sess = tf.Session(graph=self.graph)

	def run(self, image):
		"""Runs inference on a single image.

		Args:
		  image: A PIL.Image object, raw input image.

		Returns:
		  resized_image: RGB image resized from original input image.
		  seg_map: Segmentation map of `resized_image`.
		"""
		width, height = image.size
		resize_ratio = 1.0 * self.INPUT_SIZE / max(width, height)
		target_size = (int(resize_ratio * width), int(resize_ratio * height))
		resized_image = image.convert('RGB').resize(target_size, Image.ANTIALIAS)

		batch_seg_map = self.sess.run(
			self.OUTPUT_TENSOR_NAME,
			feed_dict={self.INPUT_TENSOR_NAME: [np.asarray(resized_image)]})
		seg_map = batch_seg_map[0]

		return resized_image, seg_map


def create_pascal_label_colormap():
	"""Creates a label colormap used in PASCAL VOC segmentation benchmark.

	Returns:
	A Colormap for visualizing segmentation results.
	"""
	colormap = np.zeros((256, 3), dtype=int)
	ind = np.arange(256, dtype=int)

	for shift in reversed(range(8)):
		for channel in range(3):
		  colormap[:, channel] |= ((ind >> channel) & 1) << shift
		ind >>= 3

	return colormap


def label_to_color_image(label):
	"""Adds color defined by the dataset colormap to the label.

	Args:
	label: A 2D array with integer type, storing the segmentation label.

	Returns:
	result: A 2D array with floating type. The element of the array
	  is the color indexed by the corresponding element in the input label
	  to the PASCAL color map.

	Raises:
	ValueError: If label is not of rank 2 or its value is larger than color
	  map maximum entry.
	"""
	if label.ndim != 2:
		raise ValueError('Expect 2-D input label')

	colormap = create_pascal_label_colormap()

	if np.max(label) >= len(colormap):
		raise ValueError('label value too large.')

	return colormap[label]


# # [1]:设置模型
LABEL_NAMES = np.asarray([
	'background', 'aeroplane', 'bicycle', 'bird', 'boat', 'bottle', 'bus',
	'car', 'cat', 'chair', 'cow', 'diningtable', 'dog', 'horse', 'motorbike',
	'person', 'pottedplant', 'sheep', 'sofa', 'train', 'tv'])

FULL_LABEL_MAP = np.arange(len(LABEL_NAMES)).reshape(len(LABEL_NAMES), 1)
FULL_COLOR_MAP = label_to_color_image(FULL_LABEL_MAP)

# MODEL_NAME = 'xception_coco_voctrainval'  # @param ['mobilenetv2_coco_voctrainaug', 'mobilenetv2_coco_voctrainval', 'xception_coco_voctrainaug', 'xception_coco_voctrainval']
# _DOWNLOAD_URL_PREFIX = 'http://download.tensorflow.org/models/'
# _MODEL_URLS = {
# 	'mobilenetv2_coco_voctrainaug':
# 		'deeplabv3_mnv2_pascal_train_aug_2018_01_29.tar.gz',
# 	'mobilenetv2_coco_voctrainval':
# 		'deeplabv3_mnv2_pascal_trainval_2018_01_29.tar.gz',
# 	'xception_coco_voctrainaug':
# 		'deeplabv3_pascal_train_aug_2018_01_04.tar.gz',
# 	'xception_coco_voctrainval':
# 		'deeplabv3_pascal_trainval_2018_01_04.tar.gz',}
# _TARBALL_NAME = 'deeplab_model.tar.gz'
#
# model_path = os.getcwd() + '/DeepLab_v3_model/'
# download_path = os.path.join(model_path, _TARBALL_NAME)
# if not os.path.exists(download_path):
# 	print('downloading model, this might take a while...')
# 	urllib.request.urlretrieve(_DOWNLOAD_URL_PREFIX + _MODEL_URLS[MODEL_NAME],
# 					   download_path)
# 	print('download completed! loading DeepLab model...')


# # [2]:加载模型
import time
time_1 = time.time()
download_path = 'Loadding_model/frozen_inference_graph.pb'
MODEL = DeepLabModel(download_path)
print('model loaded successfully________!  cost_time=', time.time() - time_1)


# # [3]:预测输出
pic_path =  "input_pic/"
mask_path = "output_mask/"
if not os.path.exists(mask_path):
    os.mkdir(mask_path)

for name_ in os.listdir(pic_path):
	pic_data = Image.open(pic_path + name_)
	res_im, seg = MODEL.run(pic_data)
	seg = cv2.resize(seg.astype(np.uint8), pic_data.size)
	mask_sel = (seg==15).astype(np.float32)
	cv2.imwrite(mask_path + name_, (255*mask_sel).astype(np.uint8))
	print('\nDone: ' + mask_path + name_)
DeepLab可预测的label包含以下20类:
LABEL_NAMES = np.asarray([
	'background', 'aeroplane', 'bicycle', 'bird', 'boat', 'bottle', 'bus',
	'car', 'cat', 'chair', 'cow', 'diningtable', 'dog', 'horse', 'motorbike',
	'person', 'pottedplant', 'sheep', 'sofa', 'train', 'tv'])
博主就以label=person来说明(也就是代码第149行,可以更改seg==n来重新指定预测的类别);
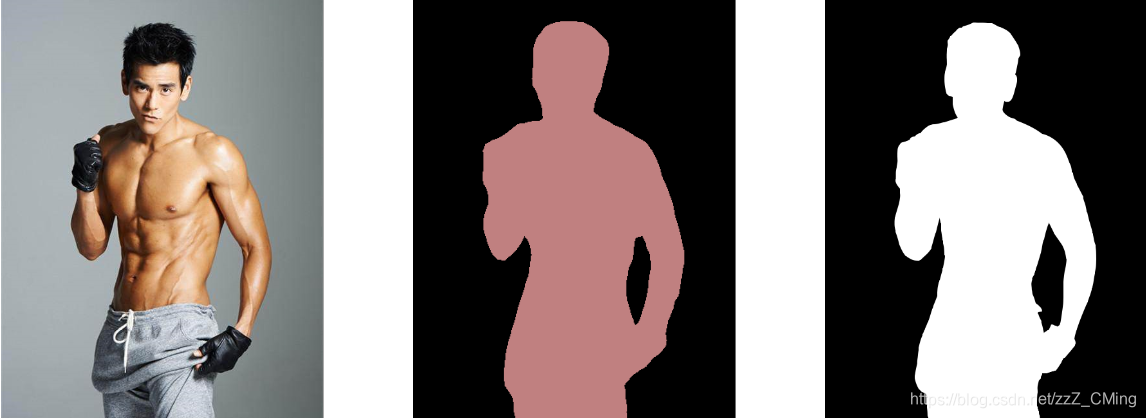
下面三张图分别是:原图、deeplab得到的mask图、转成黑白的mask图。
–-----------------------------------------------------------------------------—--------------------------------------------
–-----------------------------------------------------------------------------—--------------------------------------------
二、mask图经过膨胀侵蚀得到trimap图
膨胀侵蚀的操作在OpenCV里面是比较常见的,这里就不赘述了,直接上代码:
import os
import cv2
import numpy as np


def dilate_and_erode(mask_data, struc="ELLIPSE", size=(10, 10)):
    """
    膨胀侵蚀作用,得到粗略的trimap图
    :param mask_data: 读取的mask图数据
    :param struc: 结构方式
    :param size: 核大小
    :return:
    """
    if struc == "RECT":
        kernel = cv2.getStructuringElement(cv2.MORPH_RECT, size)
    elif struc == "CORSS":
        kernel = cv2.getStructuringElement(cv2.MORPH_CROSS, size)
    else:
        kernel = cv2.getStructuringElement(cv2.MORPH_ELLIPSE, size)

    msk = mask_data / 255

    dilated = cv2.dilate(msk, kernel, iterations=1) * 255
    eroded = cv2.erode(msk, kernel, iterations=1) * 255
    res = dilated.copy()
    res[((dilated == 255) & (eroded == 0))] = 128
    return res


trimap_path = "data_trimap/"
mask_path = "mask.png"
size = 10

if not os.path.exists(trimap_path):
    os.mkdir(trimap_path)

mask_data = cv2.imread(mask_path, 0)
trimap = dilate_and_erode(mask_data, size=(size, size))
cv2.imwrite(trimap_path + mask_path, trimap)
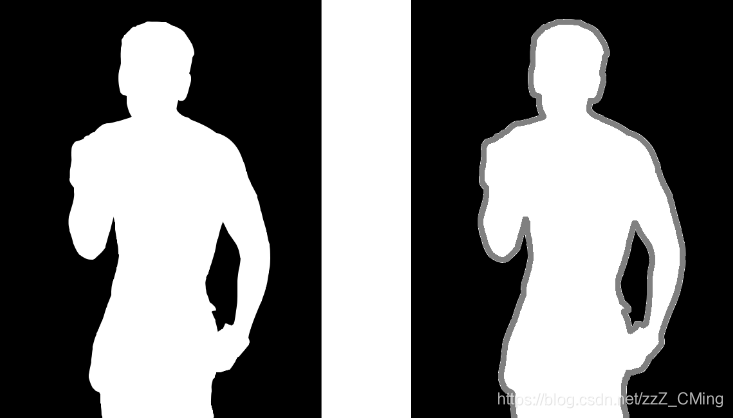
得到结果图如下右图:
虽然右图只比左图在边缘位置多加了一层,但如果trimap图经过传统分割算法(例如贝叶斯、KNN)处理后,边缘处的立体感就会立马感受出来巨大变化。
–-----------------------------------------------------------------------------—--------------------------------------------
–-----------------------------------------------------------------------------—--------------------------------------------
说明:
因为trimap图的用途是为了得到精准的alpha图,下面的篇幅就是拓展内容了,看一下trimap图如何得到alpha图,以及alpha图如何融合到一张背景图,生成一张不存在的假图。
–-----------------------------------------------------------------------------—--------------------------------------------
–-----------------------------------------------------------------------------—--------------------------------------------
三、用KNN算法,从trimap图得到alpha图
从trimap图得到alpha图的方式也有很多,传统的分类算法,新兴的神经网络都能完成,github上也有例子。这里就是找了一篇knn-matting的实现过程,可从trimap图得到alpha图。
'''
borrowed from https://github.com/MarcoForte/knn-matting
'''
import numpy as np
import sklearn.neighbors
import scipy.sparse
import warnings
import cv2
import os
import argparse
import pdb
import time
import matplotlib.pyplot as plt
import scipy.misc


def knn_matte(img, trimap, mylambda=100):
    """
    :param img: 原图
    :param trimap: trimap图
    :param mylambda:
    :return:
    """
    [m, n, c] = img.shape
    img, trimap = img / 255.0, trimap / 255.0
    foreground = (trimap > 0.99).astype(int)
    background = (trimap < 0.01).astype(int)
    all_constraints = foreground + background

    # 0.5s
    print('Finding nearest neighbors')
    a, b = np.unravel_index(np.arange(m * n), (m, n))
    feature_vec = np.append(np.transpose(img.reshape(m * n, c)), [a, b] / np.sqrt(m * m + n * n), axis=0).T
    nbrs = sklearn.neighbors.NearestNeighbors(n_neighbors=10, n_jobs=4).fit(feature_vec)
    knns = nbrs.kneighbors(feature_vec)[1]

    # 0.16s
    # Compute Sparse A
    print('Computing sparse A')
    row_inds = np.repeat(np.arange(m * n), 10)
    col_inds = knns.reshape(m * n * 10)
    vals = 1 - np.linalg.norm(feature_vec[row_inds] - feature_vec[col_inds], axis=1) / (c + 2)
    A = scipy.sparse.coo_matrix((vals, (row_inds, col_inds)), shape=(m * n, m * n))

    # 0.06s
    D_script = scipy.sparse.diags(np.ravel(A.sum(axis=1)))
    L = D_script - A
    D = scipy.sparse.diags(np.ravel(all_constraints[:, :, 0]))
    v = np.ravel(foreground[:, :, 0])
    c = 2 * mylambda * np.transpose(v)
    H = 2 * (L + mylambda * D)

    # 0.9s
    print('Solving linear system for alpha')
    time_2 = time.time()
    warnings.filterwarnings('error')
    alpha = []
    try:
        alpha = np.minimum(np.maximum(scipy.sparse.linalg.spsolve(H, c), 0), 1).reshape(m, n)
    except Warning:
        x = scipy.sparse.linalg.lsqr(H, c)
        alpha = np.minimum(np.maximum(x[0], 0), 1).reshape(m, n)
    print("time_1=", time.time() - time_2)
    return alpha


def main():
    time_1 = time.time()
    img_name = "pic.png"
    trimap_name = "data_trimap/mask.png"
    alpha_name = "alpha.png"

    img = cv2.imread(img_name)
    trimap = cv2.imread(trimap_name)

    alpha = knn_matte(img, trimap)
    cv2.imwrite(alpha_name, alpha * 255)
    print("time_all=", time.time() - time_1)

if __name__ == '__main__':
    main()
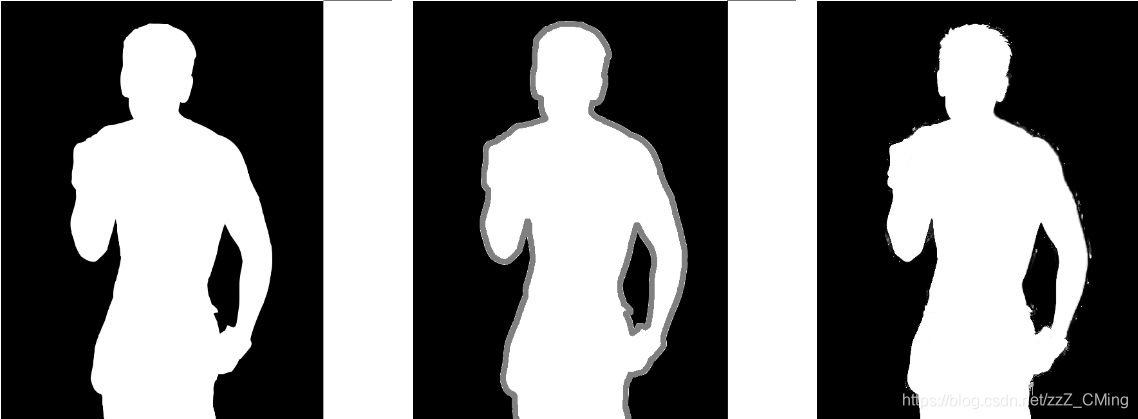
结果如下:依次是deeplab_mask图、trimap图、alpha图
可以看出alpha图比mask图拥有更多的细节。
–-----------------------------------------------------------------------------—--------------------------------------------
–-----------------------------------------------------------------------------—--------------------------------------------
四、alpha图融合背景图:
最后一步呢,就是依照得到的较精准的alpha图,将原图人物融合到一张背景图中去。
import numpy as np
import sklearn.neighbors
import scipy.sparse
import warnings
import cv2
import os
import time


def get_result(pic_data, alpha_data, bg_data, center):
    """
    用alpha图,贴合原图pic与背景图BG,生成贴合后的图
    :param pic_data:原图信息
    :param alpha_data:alpha图信息
    :param bg_data:背景图信息
    :param center:贴合的中心点
    :return:
    """
    h, w, _ = alpha_data.shape
    pic_data = cv2.resize(pic_data, (w, h))
    bg_data_now = bg_data.copy()
    used_index = np.where(alpha_data > 10)
    for n in range(len(used_index[0])):
        j = used_index[1][n]
        i = used_index[0][n]
        bg_data_now[i + center[1]][j + center[0]] = pic_data[i][j]

    return bg_data_now


pic_data = cv2.imread("pic.png")
alpha_data = cv2.imread("alpha.png")
bg_data = cv2.imread("bg_2.png")
center = (300, 45)
bg_data_now = get_result(pic_data, alpha_data, bg_data, center)
cv2.imwrite("out.png", bg_data_now)
原图:
背景图:
最后的融合图:
总结:
可以看到最后的融合图在手臂内侧处出现了少许的不完美,这是由于knn-matting预测的alpha图不精确,如果选用深度学习算法预测出一张完美的alpha图,那么在人物抠像中就有很大的发挥空间了。


