目录
1. Vue 的基本认识
1.1. 官网
- 英文官网: https://vuejs.org/
- 中文官网: https://cn.vuejs.org/
1.2. 介绍描述
- 渐进式 JavaScript 框架
- 作者: 尤雨溪(一位华裔前 Google 工程师)
- 作用: 动态构建用户界面
1.3. Vue 的特点
- 遵循 MVVM 模式
- 编码简洁, 体积小, 运行效率高, 适合移动/PC 端开发
- 它本身只关注 UI, 可以轻松引入 vue 插件或其它第三库开发项目
1.4. 与其它前端 JS 框架的关联
- 借鉴 angular 的模板和数据绑定技术
- 借鉴 react 的组件化和虚拟 DOM 技术
1.5. Vue 扩展插件
- vue-cli: vue 脚手架
- vue-resource(axios): ajax 请求
- vue-router: 路由
- vuex: 状态管理
- vue-lazyload: 图片懒加载
- vue-scroller: 页面滑动相关
- mint-ui: 基于 vue 的 UI 组件库(移动端)
- element-ui: 基于 vue 的 UI 组件库(PC 端)
2 Vue 的基本使用
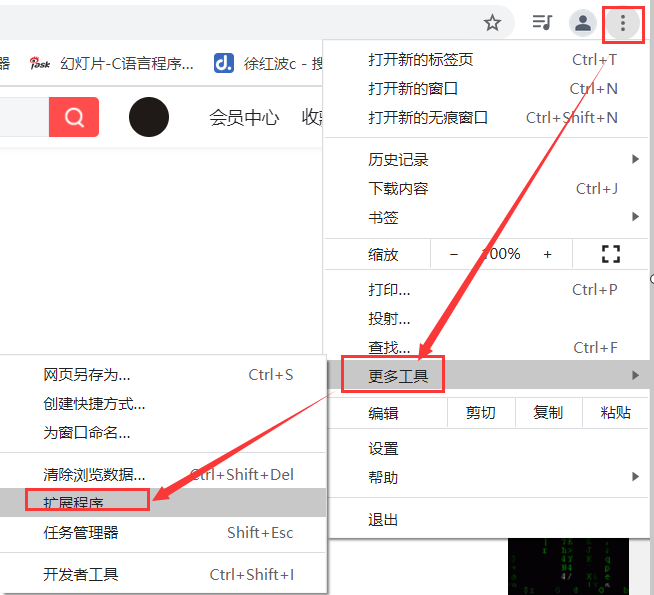
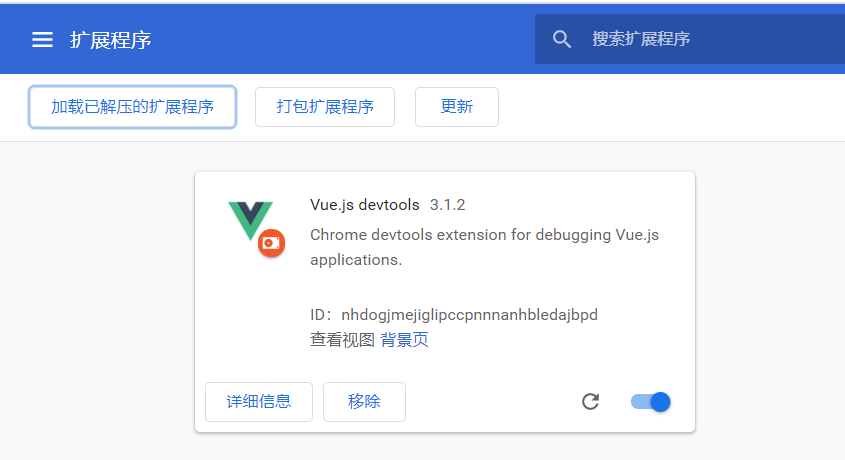
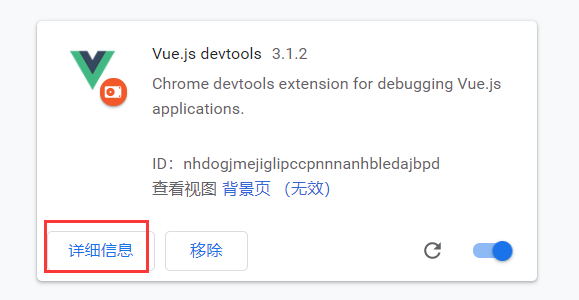
2.1开发者工具调试Vue.js devtools_3.1.2_0
1)Vue.js devtools_3.1.2_0.crx改成rar格式
2)解压
3)谷歌浏览器
4)再次打开浏览器
5)F12
2.2 框架使用方式
-
传统下载导入使用
-
vue-cli安装导入使用
2.3 框架使用
<!DOCTYPE html>
<html>
	<head>
		<meta charset="utf-8" />
		<title></title>
		<script type="text/javascript" src="js/vue.js"></script>
	</head>
	<body>
		<div id="app">{{name}}</div>

		<script type="text/javascript">
//			创建一个Vue实例
			let vue=new Vue({
//				Vue实例对象,将来需要控制界面上的哪个区域
				el:"#app",
//				告诉vue的实例对象,被控制区域的数据是什么
				data:{
					name:"我是vue"
				},
			})
		</script>
	</body>
</html>
2.4 Vue数据单向传递
2.4.1 MVVM模型
M:model 数据模型(保存数据,处理数据业务逻辑)
V:view 视图(展示数据,与用户交互)
VM:View Model 数据模型和视图的桥梁
MVVM设计模式最大的特点就是支持数据的双向传递
数据可以从M --> VM --> V
也可以从 V --> VM --> M
2.4.2 Vue中的MVVM的划分
被控制的区域:
view
Vue实例对象:
view model
实例对象中的data:
model
2.4.3 Vue中数据的单向传递
“数据”交给“Vue实例对象”,Vue实例对象将数据交给“页面”
<!DOCTYPE html>
<html>
	<head>
		<meta charset="utf-8" />
		<title></title>
		<script type="text/javascript" src="js/vue.js"></script>
	</head>
	<body>
		<!--MVVM模型中的view-->
		<div id="app">{{name}}</div>

		<script type="text/javascript">
//			MVVM模型中的view model
			let vue=new Vue({
				el:"#app",
//				MVVM模型中model
				data:{
					name:"我是vue"
				},
			})
		</script>
	</body>
</html>
2.5 Vue数据双向绑定
默认情况下是单向传递的
由于Vue基于MVVM设计模式,所以可以提供双向传递的能力
在< input> < textarea> < select>元素上可以用v-model指令创建双向绑定数据(只有上面三个标签可以使用v-model)
注意:v-model会忽略所有表单元素的 value checked selected特性的初始值,而总是将Vue实例的数据作为数据来源
<!DOCTYPE html>
<html>
	<head>
		<meta charset="utf-8" />
		<title></title>
		<script type="text/javascript" src="js/vue.js"></script>
	</head>
	<body>

		<div id="app">
			<input type="text" v-model="msg"/>
		</div>

		<script type="text/javascript">
			let vue=new Vue({
				el:"#app",
				data:{
					msg:"我是vue"
				}
			})
		</script>
	</body>
</html>
3 常见指令
3.1 什么是指令
指令就是vue内部提供的一些自定义属性
这些属性中封装好了vue内部实现的一些功能
3.2 vue数据绑定的特点
只要数据发生变化,界面就会跟着变化
v-once指令
让界面不要跟着数据变化,只渲染一次
v-cloak指令
数据渲染之后自动显示元素
vue数据绑定过程
- 先将未绑定的数据的界面展示给用户
- 然后再根据模型中的数据和控制的区域生成绑定数据之后的html代码
- 最后在将绑定数据之后的html渲染到界面上
正是在最终的html被生成渲染之前会显示模板内容
所以如果用户网络比较慢或者网络性能比较差,那么用户会看到模板内容
解决:
利用[v-cloak] {display:none}默认先隐藏为渲染的界面,等到生成html渲染后在重新显示
v-text指令
相当于innerText
会覆盖原有内容,且不会解析html
v-html指令
相当于innerHTML
会覆盖原有内容,会解析html
注意:(插值方式:{{}}不会解析HTML,和v-text一样)
v-if指令
条件渲染,取值为true就渲染元素
为false时,不会创建这个元素
取值可以从模型中获取数据
取值可以直接赋值一个表达式
可以配合if-else使用
单分支:
<!DOCTYPE html>
<html>
	<head>
		<meta charset="UTF-8">
		<title></title>
		<script type="text/javascript" src="js/vue.js"></script>
	</head>
	<body>
		<div id="app">
			<p v-if="age>18">成年人</p>
			<p v-else >未成年</p>
		</div>

		<script type="text/javascript">
			let vue=new Vue({
				el:"#app",
				data:{
					age:20
				}
			})
		</script>
	</body>
</html>
多分支:
<!DOCTYPE html>
<html>
	<head>
		<meta charset="UTF-8">
		<title></title>
		<script type="text/javascript" src="js/vue.js"></script>
	</head>
	<body>
		<div id="app">
			<p v-if="type===a">90+</p>
			<p v-else-if="type===b">80+</p>
			<p v-else-if="type===c">70+</p>
			<p v-else="type===d">70以下</p>
		</div>

		<script type="text/javascript">
			let vue=new Vue({
				el:"#app",
				data:{
					type:30
				}
			})
		</script>
	</body>
</html>
注意:v-else不能单独出现;v-if和v-else结合之后其中间的不能插入其他内容
v-show指令
和v-if类似,取值为真时显示
取值可以是条件表达式
取值为假时,还是会创建该元素,只是display: ”none”;
操作的是该元素display属性
注意:频繁操作切换元素的时候用v-show,否则用v-if
v-for指令
相当于JS中的for in循环,可以根据数据多次渲染元素
可以遍历数组、字符、数字、对象
(value,index)
v-for注意点
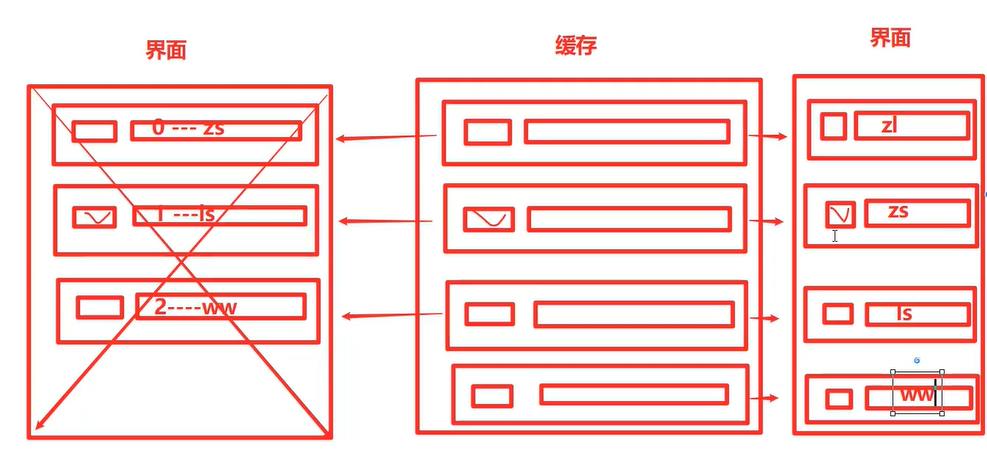
1 就地复用原则
渲染元素的时候会先看缓存中有无需要渲染的元素:
没有——创建放到缓存
有——直接复用
2 Vue中数据发生改变,就会重新渲染
因此在元素之前插入的时候,就会发生异常
解决方法——v-bind绑定一个唯一的key
注意:key不要用index去作为值
数组:
<!DOCTYPE html>
<html>
	<head>
		<meta charset="UTF-8">
		<title></title>
		<script type="text/javascript" src="js/vue.js"></script>
	</head>
	<body>
		<div id="app">

			<ul>
				<li v-for="(value,index) in list">{{index}}---{{value}}</li>
			</ul>
		</div>

		<script type="text/javascript">
			let vue=new Vue({
				el:"#app",
				data:{
					list:["1","2","3","4"]
				}
			})
		</script>
	</body>
</html>
字符串:
<ul>
	<li v-for="(value,index) in 'abcdef'">{{index}}---{{value}}</li>
</ul>
数字:
<ul>
	<li v-for="(value,index) in 7">{{index}}---{{value}}</li>
</ul>
对象
<div id="app">
	<ul>
        <li v-for="(value,key) in obj">{{key}}---{{value}}</li>
    </ul>
</div>

<script type="text/javascript">
	let vue=new Vue({
		el:"#app",
		data:{
			obj:{
				name:"张三",
				age:80
			}
		}
	})
</script>
v-bind指令
专门用于给元素的属性绑定数据(即强制绑定)
格式:
v-bind:属性名称=”绑定的数据”
:属性名称=”绑定的数据”
赋值的数据可以是任意一个合法的JS表达式
<div id="app">
	<input type="text" v-bind:value="name" />
</div>

<script type="text/javascript">
	let vue = new Vue({
		el: "#app",
		data: {
			name: "张三",
		}
	})
</script>
绑定类名class
格式(通过v-bind)
:class=”[‘需要绑定的类名1’, ’需要绑定的类名2’…]”
:class={‘需要绑定的类名1’:true/false,’ 需要绑定的类名2’:true/false},true和false可以是vue实例对象中data中的数据变量
注意点:
_1 不能直接:class=”类名”
_2 第一种方式,[]外面也需要引号,[]内每个类名也需要引号,[]内支持三目运算符==:class=”[isTrue‘类名1’:’’]”==
_3 第二种方式中,key是类名,value是布尔值
4_整个{}可以是Model中的数据
:class=’obj’
data:{
	obj: {
		‘red’:true
		‘bold’:true
	}
}
绑定样式style
和绑定类名一样,v-bind回去Model中查找
样式放到对象里
<div id="app">
	<p :style="[obj1]">1234567</p>
</div>

<script type="text/javascript">
	let vue = new Vue({
		el: "#app",
		data: {
			obj1:{
				"color":'red',
				"font-size":'100px'
			}
		}
	})
</script>
注意:
取值用引号包裹
样式的名称带-时候,需要引号包裹
v-on
专门用于给元素绑定监听事件
格式:
v-on:事件名称=”回调函数名”
@事件名称=”回调函数名”
事件触发后,会去Model的methods中找回调函数
注意点:事件不需要写on
赋值是一个回调函数
<!DOCTYPE html>
<html>
	<head>
		<meta charset="UTF-8">
		<title></title>
		<script type="text/javascript" src="js/vue.js"></script>
	</head>
		<div id="app">
			<button v-on:click="c">按钮</button>
		</div>

		<script type="text/javascript">
			let vue = new Vue({
				el: "#app",
				data: {
				},
				methods:{
					c(){
						alert("来了")
					}
				}
			})
		</script>
	</body>
</html>
v-on事件修饰符
.once
只触发一次回调
.prevent
调用event.preventDefault()
.self
只当事件是从侦听器绑定的元素本身触发时才触发回调
.stop
调用event.stopPropagation()
.capture
添加事件监听器时使用capture模式
v-on注意点
1 绑定回调函数名称的时候,后面可以加() ,也可以不加
  @click = ‘myFn’
  @click = ‘myFn()’
2 可以传递参数
@click = “myFn(‘yjx’,33)” //普通数据

@click = “myFn($event)” //原生事件对象
3 回调函数中使用Model中的data中的数据需要加this.
  let vue = new Vue({
  	data:{
  		msg:’yjx’
  	},
  	methods:{
  		myFn:function(){
  			console.log(this.msg);
      }
    }
  });
v-on按键修饰符
1 什么是按键修饰符?
可以通过按键修饰符监听特定按键触发的事件
2 按键修饰符分类
2.1系统预定义修饰符
2.2 自定义修饰符
@keyup:键盘按下事件
常用:
.enter
.tab
.delete (捕获“删除”和“退格”键)
.esc
.space
.up
.down
.left
.right
自定义按键修饰符别名(通过keyCodes):
Vue.config.keyCodes.f1 = 112
说明:Vue.config.keyCodes.自定义名称= 原来按键对应的keyCodes值
本来是:
<input type=’text’ @keyup.112=”myFn”>
加入上述红色字体那一句之后就可以:
<input type=’text’ @keyup.f1=”myFn”>
自定义指令
自定义全局指令directive
在Vue中除了可以使用内置的指令外,还可以自定义指令
自定义全局指令语法
directive方法接受两个参数:
第一个参数:指令的名称
第二个参数:对象

Vue.directive(‘自定义指令名称’,{
 	声明周期名称:function(el){
 		指令业务逻辑代码
    }
  })
注意:自定义指令 定义时候的名称不需要写”v-”使用时再写
指令可以在不同的声明周期阶段执行
属性
含义
inserted
绑定指令的元素被添加到父元素上的时候执行
bind
指令被绑定到元素上的时候执行 ,inserted是元素渲染到dom上之后的
<!DOCTYPE html>
<html>
	<head>
		<meta charset="UTF-8">
		<title></title>
		<script type="text/javascript" src="js/vue.js"></script>
	</head>
		<div id="app">
			<p v-color>我是段落哦</p>
		</div>

		<script type="text/javascript">


			Vue.directive("color",{
				bind:function(e){
					e.style.color="red";
				}
			})
			let vue = new Vue({
				el: "#app",
				data: {

				},
				methods:{

				}
			})
		</script>
	</body>
</html>


<!DOCTYPE html>
<html>
	<head>
		<meta charset="UTF-8">
		<title></title>
		<script type="text/javascript" src="js/vue.js"></script>
	</head>
		<div id="app">
			<input type="text" v-focus />
		</div>

		<script type="text/javascript">

			Vue.directive("focus",{
				inserted:function(e){
					e.focus();
				}
			})
			let vue = new Vue({
				el: "#app",
				data: {

				},
				methods:{

				}
			})
		</script>
	</body>
</html>
自定义指令传参directive
<!DOCTYPE html>
<html>
	<head>
		<meta charset="UTF-8">
		<title></title>
		<script type="text/javascript" src="js/vue.js"></script>
	</head>
		<div id="app">
			<p v-color="'blue'">我是段落哦</p>
		</div>

		<script type="text/javascript">

			Vue.directive("color",{
				bind:function(el,obj){
					el.style.color=obj.value;
				}
			});
			let vue = new Vue({
				el: "#app",
				data: {
				}
			})
		</script>
	</body>
</html>
参数可以是Model的data中的数据,就不需要引号括起来了,因为是变量了。
自定义局部指令directives
自定义全局指令的特点:任何一个Vue实例控制的区域中都可以使用
自定义局部指令的特点:只能在自定义的那个Vue实例中使用
如何定义一个局部指令:给创建Vue实例传递的对象添加
<!DOCTYPE html>
<html>
	<head>
		<meta charset="UTF-8">
		<title></title>
		<script type="text/javascript" src="js/vue.js"></script>
	</head>
		<div id="app">
			<p v-color="'blue'">我是段落哦</p>
		</div>

		<script type="text/javascript">

			Vue.directive("color",{
				bind:function(el,obj){
					el.style.color=obj.value;
				}
			});
			let vue = new Vue({
				el: "#app",
				data: {

				},
				methods:{

				},
				directives:{
					"color":{
						bind:function(el,obj){
							el.style.color=obj.value;
						}
					}
				}
			})
		</script>
	</body>
</html>
4 计算属性
1 插值语法特点
可以在{{}}中编写合法的JS表达式
2 在插值语法中编写JS表达式的缺点
没有代码提示
语句过于复杂不利于维护
3 如何解决
对于复杂逻辑,应当使用计算属性
4.1 定义计算属性
computed:{ }
<!DOCTYPE html>
<html>
	<head>
		<meta charset="UTF-8">
		<title></title>
		<script type="text/javascript" src="js/vue.js"></script>
	</head>
	<div id="app">
		<p >{{message}}</p>
	</div>

	<script type="text/javascript">
		Vue.directive("color", {
			bind: function(el, obj) {
				el.style.color = obj.value;
			}
		});
		let vue = new Vue({
			el: "#app",
			data: {
				message: 'Hello'
			},
			computed: {
				// 计算属性的 getter
				reversedMessage: function() {
					// `this` 指向 vm 实例
					return this.message.split('').reverse().join('')
				}
			}
		})
	</script>
	</body>

</html>
注意点:定义的时候是通过一个函数返回数据,使用的时候不能加括号。因为其实属性,不是方法
4.2 计算属性和函数的区别
函数
计算属性
每次调用都会执行
只要返回的结果没发生变化,就只会执行一次
数据经常发生变化的时候使用该函数
由于会将返回的结果进行缓存,如果返回的数据不经常发生变化,使用计算属性的性能比使用函数高
5 过滤器
5.1 自定义全局过滤器
1 什么是过滤器?
和函数和计算属性一样是用来处理数据的
但一般用于格式化插入的文本数据
2 如何自定义全局过滤器?
Vue.filter(“过滤器名称”, ”过滤器处理函数”);
默认情况下处理数据的函数接收一个参数(要处理的数据)
3 如何使用全局过滤器?
{{ msg | 过滤器名称}}
:value = “msg | 过滤器名称”
Vue会把数据交给指定的过滤器处理之后再返回
4 注意点
只能在插值语法和v-bind中使用
过滤器可以连续使用
<!DOCTYPE html>
<html>

	<head>
		<meta charset="UTF-8">
		<title></title>
		<script type="text/javascript" src="js/vue.js"></script>
	</head>
	<div id="app">
		<p>{{message | ff}}</p>
	</div>

	<script type="text/javascript">
		Vue.filter("ff", function(value) {
			value=value.replace(/学院/g,"大学");
			return value;
		});
		let vue = new Vue({
			el: "#app",
			data: {
				message: "保定学院,石家庄学院,邯郸学院"
			},
		})
	</script>
	</body>

</html>
5.2 定义局部过滤器
1 自定义全局过滤器的特点:任何一个Vue控制的区域都可以使用
2 自定义局部过滤器的特点:只能在自定义的那个Vue实例中使用
3 如何自定义一个局部指令
<!DOCTYPE html>
<html>

	<head>
		<meta charset="UTF-8">
		<title></title>
		<script type="text/javascript" src="js/vue.js"></script>
	</head>
	<div id="app">
		<p>{{message | ff}}</p>
	</div>

	<script type="text/javascript">
		let vue = new Vue({
			el: "#app",
			data: {
				message: "保定学院,石家庄学院,邯郸学院"
			},
			filters: {
				"ff": function(value) {
					value = value.replace(/学院/g, "大学");
					return value;
				}
			}
		})
	</script>
	</body>

</html>
应用场景:格式化时间
<!DOCTYPE html>
<html>
	<head>
		<meta charset="UTF-8">
		<title></title>
		<script type="text/javascript" src="js/vue.js"></script>
	</head>
	<div id="app">
		<p>{{time|dateFormat("yyyy-MM-dd")}}</p>
	</div>

	<script type="text/javascript">
		Vue.filter("dateFormat",function(value,fmStr){
//			console.log(value)
			let datea = new Date(value);
			let year = datea.getFullYear();
			let month = datea.getMonth()+1+"";
			let day = datea.getDate()+"";
			let hour = datea.getHours()+"";
			let minute = datea.getMinutes()+"";
			let second = datea.getSeconds()+"";
			if(fmStr&&fmStr==="yyyy-MM-dd"){
				return `${year}-${month.padStart(2,"0")}-${day.padStart(2,"0")}`;
			}
			return `${year}-${month.padStart(2,"0")}-${day.padStart(2,"0")} ${hour .padStart(2,"0")}:${minute .padStart(2,"0")}:${second .padStart(2,"0")}`;

		});

		let vue = new Vue({
			el: "#app",
			data: {
				time: Date.now()
			}
		})
	</script>
	</body>

</html>
过滤器调用的时候可以传递参数
6 过渡动画
6.1 如何给Vue控制的元素添加过渡动画
-
将需要执行动画的元素放到transition组件中
-
当transition组件中的元素显示时会自动查找,v-enter v-enter-active v-enter-to类
当transition组件中的元素隐藏时会自动查找,v-leave v-leave-active v-leave-to类
-
只需要在v-enter v-leave-to中指定动画开始的状态,在v-enter-active和v-leave-active中指定动画执行的状态,即可完成过渡
注意点:
1 给哪个元素添加,就将该元素放到transition组件中
2 一个transition组件只能放一个元素;多少个元素需要添加动画就需要创建多少个transition包起来
3 想让元素一进到网页就有过渡效果,需要给其的transition组件添加属性appear
4 指定不同元素不同过渡效果的时候,可以给元素的transition组件添加不同的name
<!DOCTYPE html>
<html>
	<head>
		<meta charset="UTF-8">
		<title></title>
		<script type="text/javascript" src="js/vue.js"></script>
		<style type="text/css">
			.box{
				width: 300px;
				height: 300px;
				background: red;
				margin-bottom: 20px;
			}
			.one-enter{
				opacity: 0;
			}
			.one-enter-to{
				opacity: 1;
			}
			.one-entre-active{
				transition: all 5s;
			}
			.two-entre{
				opacity: 0;
			}
			.two-enter-to{
				opacity: 1;

			}
			.two-entre-active{
				transition: all 5s;
			}
		</style>
	</head>
	<body>
		<div id="app">
			<button @click="toggle">按钮</button>
			<transition appear name="one">
				<div class="box" v-show="isShow"></div>
			</transition>
			<transition appear name="two">
				<div class="box" v-show="isShow"></div>
			</transition>
		</div>

		<script type="text/javascript">
			let vue = new Vue({
				el: "#app",
				data: {
					isShow:false
				},
				methods:{
					toggle(){
						this.isShow=!this.isShow
					}
				}
			})
		</script>
	</body>
</html>
6.2 过渡动画结合钩子函数
<transition
  v-on:before-enter="beforeEnter"
  v-on:enter="enter"
  v-on:after-enter="afterEnter"
  v-on:enter-cancelled="enterCancelled"

  v-on:before-leave="beforeLeave"
  v-on:leave="leave"
  v-on:after-leave="afterLeave"
  v-on:leave-cancelled="leaveCancelled"
>


</transition>
-
如果不想让transition组件去找类名(v-enter那些)只需要给其添加v-bind:css=”false”就可以了(一般使用了钩子函数就得加)
-
如果是通过JS钩子函数实现过渡动画,则必须在动画执行过程的回调函数上写 el.offsetWidth / el.offsetHeight
-
动画执行完毕之后一定要调用done 不然后续的afterEnter钩子函数不会被执行
-
如果想让元素一进来就有动画,最好在enter中延迟一下再调用done方法
<head>
	<meta charset="UTF-8">
	<title></title>
	<script type="text/javascript" src="js/vue.js"></script>
	<style type="text/css">
		.box{
			width: 300px;
			height: 300px;
			background: red;
		}
	</style>
</head>

<body>
	<div id="app">
		<button @click="toggle">按钮</button>
		<!--如果不想让transition组件去找类名(v-enter那些)
		只需要给其添加v-bind:css=”false”就可以了(一般使用了钩子函数就得加)-->
		<transition v-bind:css="false" appea
					v-on:before-enter="beforeEnter"
					v-on:enter="enter"
					v-on:after-enter="afterEnter">

			<div class="box" v-show="isShow"></div>
		</transition>

	</div>

	<script type="text/javascript">
		let vue = new Vue({
			el: "#app",
			data: {
				isShow: true
			},
			methods: {
				toggle() {
					this.isShow = !this.isShow
				},
				beforeEnter(el){
					el.style.opacity="0";
				},
				enter(el,done){
// 如果是通过JS钩子函数实现过渡动画,
// 则必须在动画执行过程的回调函数上写 el.offsetWidth / el.offsetHeight
el.offsetHeight;
el.style.transition=“all 3s”
//动画执行完毕之后一定要调用done 不然后续的afterEnter钩子函数不会被执行
// done();
// 如果想让元素一进来就有动画,最好在enter中延迟一下再调用done方法
setTimeout(function(){
done();
},0);
},
afterEnter(el){
el.style.opacity=“1”;
el.style.marginLeft=“300px”;
}
}
})
6.3 Velocity实现动画
Velocity是一个动画第三方库
-
导相关包
-
使用Velocity
-
在enter钩子函数中写入
Velocity(el,{/*css样式*/},时间);
done();
6.4 Animate自定义实现动画
导包
<link href="https://cdn.jsdelivr.net/npm/[email protected]" rel="stylesheet" type="text/css">
网址:https://animate.style/
<!DOCTYPE html>
<html>
	<head>
		<meta charset="UTF-8">
		<title></title>
		<script type="text/javascript" src="js/vue.js"></script>
		<link href="https://cdn.jsdelivr.net/npm/[email protected]" rel="stylesheet" type="text/css">
	</head>
	<body>
		<div id="app">
			<button @click="show = !show">
				Toggle render
			  </button>
			  <transition name="custom-classes-transition"
				enter-active-class="animated tada"
				leave-active-class="animated bounceOutRight"
			  >
				<p v-if="show">hello</p>
			  </transition>
		</div>

		<script type="text/javascript">

			let vue = new Vue({
				el: "#app",
				data: {
					show:true
				}
			})
		</script>
	</body>
</html>
绑定个动画执行中类名==:enter-active-class=”animated 动画效果名”==
6.5 列表动画
<transition-group>

</transition-group>


<!DOCTYPE html>
<html lang="en">

	<head>
		<meta charset="UTF-8">
		<title></title>
		<script src="js/vue.js"></script>
		<style>
			li {
				border: 1px dashed #999;
				margin: 5px;
				line-height: 35px;
				padding-left: 5px;
				font-size: 12px;
				width: 100%;
			}

			li:hover {
				background-color: hotpink;
				transition: all 0.8s ease;
			}

			.v-enter,
			.v-leave-to {
				opacity: 0;
				transform: translateY(80px);
			}

			.v-enter-active,
			.v-leave-active {
				transition: all 0.6s ease;
			}
			/* 下面的 .v-move 和 .v-leave-active 配合使用,能够实现列表后续的元素,渐渐地漂上来的效果 */

			.v-move {
				transition: all 0.6s ease;
			}

			.v-leave-active {
				position: absolute;
			}
		</style>
	</head>

	<body>
		<div id="app">

			<div>
				<label>
        Id:
        <input type="text" v-model="id">
      </label>

				<label>
        Name:
        <input type="text" v-model="name">
      </label>
				<!-- 添加数据  -->
				<input type="button" value="添加" @click="add">
			</div>

			<!-- <ul> -->
			<!-- 在实现列表过渡的时候,如果需要过渡的元素,是通过 v-for 循环渲染出来的,不能使用 transition 包裹,需要使用 transitionGroup -->
			<!-- 如果要为 v-for 循环创建的元素设置动画,必须为每一个 元素 设置 :key 属性 -->
			<!-- 给 ransition-group 添加 appear 属性,实现页面刚展示出来时候,入场时候的效果 -->
			<!-- 通过 为 transition-group 元素,设置 tag 属性,指定 transition-group 渲染为指定的元素,如果不指定 tag 属性,默认,渲染为 span 标签 -->
			<transition-group appear tag="ul">
				<li v-for="(item, i) in list" :key="item.id" @click="del(i)">
					{{item.id}} --- {{item.name}}
				</li>
			</transition-group>
			<!-- </ul> -->

		</div>

		<script>
			var vm = new Vue({
				el: '#app',
				data: {
					id: '',
					name: '',
					list: [{
							id: 1,
							name: '赵高'
						},
						{
							id: 2,
							name: '秦桧'
						},
						{
							id: 3,
							name: '严嵩'
						},
						{
							id: 4,
							name: '魏忠贤'
						}
					]
				},
				methods: {
					add() {
						this.list.push({
							id: this.id,
							name: this.name
						})
						this.id = this.name = ''
					},
					del(i) {
						this.list.splice(i, 1)
					}
				}
			});
		</script>
	</body>

</html>
注意点:
-
默认情况下transition-group会把所有执行动画的元素放到一个span中,因此代码的结构是ul>span>li
-
如何解决:指定tag属性为ul
-
新添加的元素注意保证key不一样,才能执行规定好的动画
-
专门在Mode中创建一个属性id作为key的值,每次修改数据顺带修改该id
7 组件
7.1 自定义全局组件
Vue两大核心:
1 数据驱动界面改变
2 组件化
- 网页中,每个大的界面拆分成多个小界面,每个小界面对应一个组件其拆分过程就是组件化
组件化优点:
简化Vue实例的代码
提高复用性
创建全局组件(三步)
1 创建组件构造器
let Profile = Vue.extend({
			template: `
					<div>
				  		<img src=”images/fm.jpg”>
						<p>我是描述信息</p>
					</div>
					`
		});
2 注册已经创建好的组件
Vue.component(id,[definition]);
id:指定注册组件的名称
definition:已经创建好的组件构造器
Vue.component(“news”,Profile);
3 使用注册好的组件
<div id="app">
	<news></news>
</div>
注意:
创建组件指定组件模板的时候,模板只能有一个根元素(一般是div)
<!DOCTYPE html>
<html>

	<head>
		<meta charset="UTF-8">
		<title></title>
		<script type="text/javascript" src="js/vue.js"></script>
	</head>
	<div id="app">
		<news></news>

	</div>

	<script type="text/javascript">
		//		创建组件构造器
		let Profile = Vue.extend({
			template: `
					<div>
				  		<img src="img/fm.png"/>
						<p>我是描述信息</p>
					</div>
					`
		});

//		注册已经创建好的组件
		Vue.component("news",Profile);

		let vue = new Vue({
			el: "#app",
			data: {

			},
			methods: {

			},
			computed: {

			}
		})
	</script>
	</body>

</html>
全局组件简写
格式:
Vue.component(id,{/*....*/});

id:组件别名

{/*....*/}:模板构造函数


Vue.component("news", {
	template: `
			<div>
				  <img src="img/fm.png"/>
				  <p>我是描述信息</p>
			</div>			`
});
缺点是:字符串模板没有提示
<!DOCTYPE html>
<html>

	<head>
		<meta charset="UTF-8">
		<title></title>
		<script type="text/javascript" src="js/vue.js"></script>
	</head>
	<div id="app">
		<news></news>

	</div>

	<script type="text/javascript">

		Vue.component("news", {
			template: `
					<div>
				  		<img src="img/fm.png"/>
						<p>我是描述信息</p>
					</div>
					`
		});

		let vue = new Vue({
			el: "#app",
			data: {

			},
			methods: {

			},
			computed: {

			}
		})
	</script>
	</body>

</html>
更专业的写法(Vue提供了template标签)
推荐使用
<!DOCTYPE html>
<html>

	<head>
		<meta charset="UTF-8">
		<title></title>
		<script type="text/javascript" src="js/vue.js"></script>
	</head>
	<div id="app">
		<news></news>
	</div>

	<template id="info">
		<div >
			<img src="img/fm.png"/>
			<p>我是描述信息</p>
		</div>
	</template>

	<script type="text/javascript">

		Vue.component("news", {
			template: "#info"
		});

		let vue = new Vue({
			el: "#app",
			data: {

			},
			methods: {

			},
			computed: {

			}
		})
	</script>
	</body>

</html>
7.2 自定义局部组件
全局组件和局部组件的区别:
前者在任何一个Vue实例控制的区域中都可以使用
后者只能在自定义的那个Vue实例控制的区域中使用
自定义一个局部组件
vue实例中新增components:{}
在{}中通过key/value形式注册组件
<!DOCTYPE html>
<html>

	<head>
		<meta charset="UTF-8">
		<title></title>
		<script type="text/javascript" src="js/vue.js"></script>
	</head>
	<div id="app">

	</div>

	<script type="text/javascript">

		let vue = new Vue({
			el: "#app",
			data: {

			},
			components:{

			}
		})
	</script>
	</body>

</html>


<!DOCTYPE html>
<html>

	<head>
		<meta charset="UTF-8">
		<title></title>
		<script type="text/javascript" src="js/vue.js"></script>
	</head>

<body>
	<div id="app">
		<news></news>
	</div>

	<template id="info">
		<div >
			<img src="img/fm.png"/>
			<p>我是描述信息</p>
		</div>
	</template>

	<script type="text/javascript">

		let vue = new Vue({
			el: "#app",
			data: {

			},
			components:{
				"news":{
					template: "#info"
				}
			}
		})
	</script>
	</body>

</html>
7.3 组件中的data和methods
在自定义组件中不能像vue实例中一样直接使用data
而是必须通过返回函数的方式来使用data
注意点:
-
自定义组件中可以使用data,但是data必须赋值一个函数,然后通过函数返回值定义数据
-
组件中的data如果不是通过函数返回的,那么多个组件就会共用一份数据,就会导致数据混乱
-
如果组件中的data是通过函数返回的,则每创建一个新的组件,都会调用一次该方法,将这个方法返回的数据和当前创建的组件绑定在一起,这样就有效的避免了数据混乱。
<head>
	<meta charset="UTF-8">
	<title></title>
	<script type="text/javascript" src="js/vue.js"></script>
</head>
7.4 组件切换
可以通过v-if来切换 因为组件的本质就是一个自定义元素
<!DOCTYPE html>
<html>

	<head>
		<meta charset="UTF-8">
		<title></title>
		<script type="text/javascript" src="js/vue.js"></script>
	</head>

<body>
	<div id="app">
		<button @click="toggle">切换</button>
		<home v-if="isShow"></home>
		<photo v-else></photo>
	</div>

	<template id="home">
		<div >
			<p >我是首页</p>
		</div>
	</template>

	<template id="photo">
		<div >
			<img src="img/fm.png" />
		</div>
	</template>

	<script type="text/javascript">

		Vue.component("home", {
			template: "#home",
		});

		Vue.component("photo", {
			template: "#photo",
		});

		let vue = new Vue({
			el: "#app",
			data: {
				isShow:true
			},
			methods:{
				toggle(){
					this.isShow=!this.isShow
				}
			}
		})
	</script>
	</body>

</html>
7.5 动态组件
更专业的切换组件的办法:动态组件
语法:
<component v-bind:is="需要显示组件名称"></component>
component被称为动态组件,也就是可以指定显示谁
名称是固定的就需要加引号
名称是Model中的数据就可以不加引号
<!DOCTYPE html>
<html>

	<head>
		<meta charset="UTF-8">
		<title></title>
		<script type="text/javascript" src="js/vue.js"></script>
	</head>

<body>
	<div id="app">
		<button @click="toggle">切换</button>
		<component v-bind:is="name"></component>
	</div>

	<template id="home">
		<div >
			<p >我是首页</p>
		</div>
	</template>

	<template id="photo">
		<div >
			<img src="img/fm.png" />
		</div>
	</template>

	<script type="text/javascript">

		Vue.component("home", {
			template: "#home",
		});

		Vue.component("photo", {
			template: "#photo",
		});

		let vue = new Vue({
			el: "#app",
			data: {
				isShow:true,
				name:"home"
			},
			methods:{
				toggle(){
					this.isShow=!this.isShow;
					this.name=this.name==="home"?"photo":"home";
				}
			}
		})
	</script>
	</body>

</html>
为什么有v-if切换了还需要component?
因为component可以配合keep-alive来保存被隐藏组件之前的状态
如何使用?——包起来
<div id="app">
	<button @click="toggle">切换</button>
	<keep-alive>
		<component v-bind:is="name"></component>
	</keep-alive>

</div>
7.6 组件动画
和过去给元素添加组件是一样的
单个——transition
多个——transition-group
注意点:默认进入动画和离开动画是同时执行的,如果想一个做完再做另一个需要制定动画模式
过渡模式:
in-out
out-in
<!DOCTYPE html>
<html>

	<head>
		<meta charset="UTF-8">
		<title></title>
		<script type="text/javascript" src="js/vue.js"></script>
		<style type="text/css">
			.v-enter{
				opacity: 0;
				margin-left: 500px;
			}
			.v-enter-to{
				opacity: 1;
			}
			.v-entre-active{
				transition: all 3s;
			}
			.v-leave{
				opacity: 1;
			}
			.v-leave-to{
				opacity: 2;
			}
			.v-leave-active{
				transition: all 3s;
				margin-left: 500px;
			}
		</style>
	</head>

<body>
	<div id="app">
		<button @click="toggle">切换</button>
		<transition mode="out-in">
			<component v-bind:is="name"></component>
		</transition>

	</div>

	<template id="home">
		<div >
			<p >我是首页</p>
		</div>
	</template>

	<template id="photo">
		<div >
			<img src="img/fm.png" />
		</div>
	</template>

	<script type="text/javascript">

		Vue.component("home", {
			template: "#home",
		});

		Vue.component("photo", {
			template: "#photo",
		});

		let vue = new Vue({
			el: "#app",
			data: {
				isShow:true,
				name:"home"
			},
			methods:{
				toggle(){
					this.isShow=!this.isShow;
					this.name=this.name==="home"?"photo":"home";
				}
			}
		})
	</script>
	</body>

</html>
7.7 父子组件
什么是父子组件?
在一个组件中又定义了其他组件,就是父子组件
其实局部组件就是最简单的父子组件,因为可以吧Vue实例看做是一个大组件
在Vue实例中定义了局部组件,就相当于在大组件里面定义了小组件,所以局部组件就是最简单的父子组件
如何定义其他的父子组件
自定义组件(父)中使用components定义子组件
全局情况:
<!DOCTYPE html>
<html>

	<head>
		<meta charset="UTF-8">
		<title></title>
		<script type="text/javascript" src="js/vue.js"></script>
	</head>

<body>
	<div id="app">
		<father></father>
	</div>

	<template id="father">
		<div >
			<p>我是father</p>
			<son></son>
		</div>
	</template>

	<template id="son">
		<div >
			<p>我是son</p>
		</div>
	</template>

	<script type="text/javascript">
		Vue.component("father",{
			template:"#father",
			components:{
				"son":{
					template:"#son"
				}
			}
		});

		let vue = new Vue({
			el: "#app",
			data: {
			}
		})
	</script>
	</body>

</html>
局部情况
<!DOCTYPE html>
<html>

	<head>
		<meta charset="UTF-8">
		<title></title>
		<script type="text/javascript" src="js/vue.js"></script>
	</head>

	<body>
		<div id="app">
			<father></father>
		</div>

		<template id="father">
			<div>
				<p>我是father</p>
				<son></son>
			</div>
		</template>

		<template id="son">
			<div>
				<p>我是son</p>
			</div>
		</template>

		<script type="text/javascript">
			let vue = new Vue({
				el: "#app",
				data: {},
				components: {
					"father": {
						template: "#father",
						components: {
							"son": {
								template: "#son"
							}
						}
					}
				}
			})
		</script>
	</body>

</html>
父子组件数据传递
Vue中默认情况下子组件是不能访问父组件的数据的
因此为了让子组件可以访问父组件的数据,必须通过父组件传递
如何传递?
1 在父组件中通过v-bind传递数据
格式:v-bind:自定义接收名称= “要传递的数据”
2 在子组件中通过props接收数据
格式:props:[“自定义接收名称”]
传递名称和接收名称保持一致
<!DOCTYPE html>
<html>

	<head>
		<meta charset="UTF-8">
		<title></title>
		<script type="text/javascript" src="js/vue.js"></script>
	</head>

<body>
	<div id="app">
		<father></father>
	</div>

	<template id="father">
		<div >
			<!--组件是可以使用自己的数据的-->
			<p>{{name}}</p>
			<p>{{age}}</p>
			<son :parentname="name" :parentage="age"></son>
		</div>
	</template>

	<template id="son">
		<div >
			<p>我是son</p>
			<p>{{parentname}}</p>
			<p>{{parentage}}</p>
		</div>
	</template>

	<script type="text/javascript">
		Vue.component("father",{
			template:"#father",
			data:function(){
				return{
					name:"aaa",
					age:18
				}
			},
			components:{
				"son":{
					template:"#son",
					props:["parentname","parentage"]
				}
			}
		});

		let vue = new Vue({
			el: "#app",
			data: {
			}
		})
	</script>
	</body>

</html>
父子组件方法传递
Vue中默认情况下子组件是不能访问父组件的方法的
因此为了让子组件可以访问父组件的数据,必须通过父组件传递
如何传递?
1 父组件中通过v-on传递方法
格式: v-on:自定义接收名称=”要传递的方法”
2 在子组件中自定义一个方法
3 在自定义方法中通过this.$eimt(‘自定义接收名称’) 触发传递过来的方法
<!DOCTYPE html>
<html>

	<head>
		<meta charset="UTF-8">
		<title></title>
		<script type="text/javascript" src="js/vue.js"></script>
	</head>

<body>
	<div id="app">
		<father></father>
	</div>

	<template id="father">
		<div >
			<button @click="say">按钮</button>
			<son @parentsay="say"></son>
		</div>
	</template>

	<template id="son">
		<div >
			<button @click="sonFn">按钮</button>
		</div>
	</template>

	<script type="text/javascript">
		Vue.component("father",{
			template:"#father",
			methods:{
				say(){
					alert("aaa")
				}
			},
			data:function(){
				return{
					name:"aaa",
					age:18
				}
			},
			components:{
				"son":{
					template:"#son",
//					props:["parentsay"]
					methods:{
						sonFn(){
							this.$emit("parentsay")
						}
					}
				}
			}
		});

		let vue = new Vue({
			el: "#app",
			data: {
			}
		})
	</script>
	</body>

</html>
注意点:
- 和传递数据不用,如果传递的是方法,那么在子组件中不需要接受
- 如果传递的是方法,那么需要在子组件中自定义一个方法
- 如果传递的是方法,那么在子组件中直接使用自定义的方法即可
- 如果传递的是方法,那么需要在子组件中自定义方法中通过
父子组件传递数据之子传父
利用子组件调用父组件方法的时候传递参数
子组件自定义方法中
this.$emit(‘自定义接收名称’, [参数1],[参数2]…)
<!DOCTYPE html>
<html>

	<head>
		<meta charset="UTF-8">
		<title></title>
		<script type="text/javascript" src="js/vue.js"></script>
	</head>

<body>
	<div id="app">
		<father></father>
	</div>

	<template id="father">
		<div >
			<button @click="say">按钮</button>
			<son @parentsay="say"></son>
		</div>
	</template>

	<template id="son">
		<div >
			<button @click="sonFn">按钮</button>
		</div>
	</template>

	<script type="text/javascript">
		Vue.component("father",{
			template:"#father",
			methods:{
				say(data){
					alert(data)
				}
			},
			components:{
				"son":{
					template:"#son",
//					props:["parentsay"]
					methods:{
						sonFn(){
							this.$emit("parentsay","zhangsan")
						}
					}
				}
			}
		});

		let vue = new Vue({
			el: "#app",
			data: {
			}
		})
	</script>
	</body>

</html>
7.8 组件命名注意点
- 注册组件的时候用了”驼峰命名”,使用的时候就需要转成短横线
- 传递参数的时候用了”驼峰命名”,使用的时候就需要转成短横线
- 传递方法的时候不能用”驼峰命名”,只能用短横线
7.9 多级传递
儿子使用爷爷的数据和方法,都必须一层一层往下传递
<!DOCTYPE html>
<html>

	<head>
		<meta charset="UTF-8">
		<title></title>
		<script type="text/javascript" src="js/vue.js"></script>
	</head>

<body>
	<div id="app">
		<grandfather></grandfather>
	</div>

	<template id="grandfather">
		<div >
			<p>{{name}}</p>
			<button @click="say">爷爷</button>
			<father :gfname="name" @gfsay="say"></father>
		</div>
	</template>

	<template id="father">
		<div >
			<p>{{gfname}}</p>
			<button @click="fatherFn">爸爸</button>
			<son :fname="gfname" @fsay="fatherFn"></son>
		</div>
	</template>

	<template id="son">
		<div >
			<p>{{fname}}</p>
			<button @click="sonFn">儿子</button>
		</div>
	</template>

	<script type="text/javascript">
		Vue.component("grandfather",{
			template:"#grandfather",
			data:function() {
				return{
					name:"zhangsan"
				}
			},
			methods:{
				say(){
					alert("aaaa")
				}
			},
			components:{
				"father":{
					template:"#father",
					props:["gfname"],
					methods:{
						fatherFn(){
							this.$emit("gfsay")
						}
					},
					components:{
						"son":{
							template:"#son",
							props:["fname"],
							methods:{
								sonFn(){
									this.$emit("fsay")
								}
							}
						}
					}
				}
			}
		});

		let vue = new Vue({
			el: "#app",
			data: {
			}
		})
	</script>
	</body>

</html>
7.10 插槽
7.10.1 匿名插槽
为了可以做到可以给子组件动态添加内容,必须使用插槽slot
<!DOCTYPE html>
<html>

	<head>
		<meta charset="UTF-8">
		<title></title>
		<script type="text/javascript" src="js/vue.js"></script>
	</head>

<body>
	<div id="app">
		<father></father>
	</div>

	<template id="father">
		<div >
			<son>
				<div id="">我是追加的内容1</div>
				<div id="">我是追加的内容2</div>
			</son>
		</div>
	</template>

	<template id="son">
		<div >
			<div >我是头部</div>
			<slot>我是默认数据</slot>
			<div >我是低部</div>
		</div>
	</template>

	<script type="text/javascript">
		Vue.component("father",{
			template:"#father",
			components:{
				"son":{
					template:"#son",
				}
			}
		});

		let vue = new Vue({
			el: "#app",
			data: {
			}
		})
	</script>
	</body>

</html>
注意点:
-
插槽可以使用默认数据,当使用者没有用插槽的时候,就会让默认数据显示;如果使用者填坑了,那默认数据就无效
-
插槽是可以指定名称的,默认没有指定名称的时候是匿名插槽
匿名插槽特点:
有多个匿名插槽的时候,填充内容就会被复制多份
开发中推荐只写一个匿名插槽
7.10.2 具名插槽
为了不让填充的数据被拷贝多份,就需要具名插槽
使用:
通过给插槽的name属性给定名称
在使用的时候通过slot=”name”方式,指定当前的内容用于替换哪一个插槽
注意点:
如果没有指定要替换哪个插槽中的内容,则具名插槽不会被替换
slot属性在Vue2.6中已经废弃,Vue2.6之后使用v-slot代替slot属性。
<!DOCTYPE html>
<html>

	<head>
		<meta charset="UTF-8">
		<title></title>
		<script type="text/javascript" src="js/vue.js"></script>
	</head>

<body>
	<div id="app">
		<father></father>
	</div>

	<template id="father">
		<div >
			<son>
				<div slot="one">我是追加的内容1</div>
				<div slot="one">我是追加的内容2</div>
				<div slot="two">我是追加的内容3</div>
				<div slot="two">我是追加的内容4</div>
			</son>
		</div>
	</template>

	<template id="son">
		<div >
			<div >我是头部</div>
			<slot name="one">我是默认数据1</slot>
			<slot name="two">我是默认数据2</slot>
			<div >我是低部</div>
		</div>
	</template>

	<script type="text/javascript">
		Vue.component("father",{
			template:"#father",
			components:{
				"son":{
					template:"#son",
				}
			}
		});

		let vue = new Vue({
			el: "#app",
			data: {
			}
		})
	</script>
	</body>

</html>
7.10.3 v-slot指令
它是为具名插槽和作用域插槽引入的一个新的统一的语法,取代了slot和slot-scope
1 v-slot只能用在template标签上
2 可以用==#==代替v-slot
<!DOCTYPE html>
<html>

	<head>
		<meta charset="UTF-8">
		<title></title>
		<script type="text/javascript" src="js/vue.js"></script>
	</head>

<body>
	<div id="app">
		<father></father>
	</div>

	<template id="father">
		<div >
			<son>
				<template v-slot:one>
					<div >我是默认数据1<div>
					<div >我是默认数据2</div>
				</template>
			</son>
		</div>
	</template>

	<template id="son">
		<div >
			<div >我是头部</div>
			<slot name="one">我是默认数据1</slot>
			<div >我是低部</div>
		</div>
	</template>

	<script type="text/javascript">
		Vue.component("father",{
			template:"#father",
			components:{
				"son":{
					template:"#son",
				}
			}
		});

		let vue = new Vue({
			el: "#app",
			data: {
			}
		})
	</script>
	</body>

</html>
7.10.4 作用域插槽
需求:
原来是:子组件的slot插槽的默认内容可以使用子组件data中的数据
现在要:父组件填坑的内容也能使用子组件data中的数据(默认是不可以的)
解决方案:定义子组件的插槽的时候,通过v-bind将数据暴露出去
<!DOCTYPE html>
<html>

	<head>
		<meta charset="UTF-8">
		<title></title>
		<script type="text/javascript" src="js/vue.js"></script>
	</head>

<body>
	<div id="app">
		<father></father>
	</div>

	<template id="father">
		<div >
			<son>
				<!--slot-scope="abc"接受子组件插槽暴露的数据-->
				<template slot-scope="abc">
					<div id="">我是填充的内容{{abc.names}}</div>
				</template>
			</son>
		</div>
	</template>

	<template id="son">
		<div >
			<div >我是头部{{names}}</div>
			<slot v-bind:names="names">我是默认数据1{{names}}</slot>
			<div >我是低部</div>
		</div>
	</template>

	<script type="text/javascript">
		Vue.component("father",{
			template:"#father",
			components:{
				"son":{
					template:"#son",
					data:function(){
						return{
							names:["l","k"]
						}
					}
				}
			}
		});

	</script>
	</body>

</html>
作用域插槽应用场景:
子组件提供数据,父组件决定如何渲染
注意:Vue2.6之后 slot-scope就用v-slot来替代了
匿名插槽时:v-slot:default=”abc”
简写:#default=”abc”
7.11 组件渲染方式
方式一:先定义注册组件,然后在vue实例当做标签来使用
<!DOCTYPE html>
<html>

	<head>
		<meta charset="UTF-8">
		<title></title>
		<script type="text/javascript" src="js/vue.js"></script>
	</head>

	<body>
		<div id="app">
			<one ></one>
		</div>

		<template id="one">
			<div >
				<p>我是组件</p>
			</div>
		</template>

		<script type="text/javascript">
			Vue.component("one",{template:"#one"})

			let vue = new Vue({
				el: "#app"
			})
		</script>
	</body>

</html>
方式二:先定义注册组件,然后通过vue实例的render方法来渲染
<div id="app">
	无内容
</div>


let vue = new Vue({
	el: "#app",
	render:function(createElement){
		let html=createElement("one");
		return html
	}
})


<!DOCTYPE html>
<html>

	<head>
		<meta charset="UTF-8">
		<title></title>
		<script type="text/javascript" src="js/vue.js"></script>
	</head>

	<body>
		<div id="app">
		</div>

		<template id="one">
			<div >
				<p>我是组件</p>
			</div>
		</template>

		<script type="text/javascript">
			Vue.component("one",{template:"#one"})

			let vue = new Vue({
				el: "#app",
				render:function(createElement){
					let html=createElement("one");
					return html
				}
			})
		</script>
	</body>

</html>
两种方式的区别:
方式1不会覆盖vue实例控制区域
方式2会覆盖vue实例控制区域
8 Vuex
Vuex是Vue配套的 公共数据管理工具,可以将共享的数据保存到vuex中,方便整个程序中的任何组件都可以获取和修改vuex中保存的公共数据
案例:儿子数据与父亲数据同步
<!DOCTYPE html>
<html>

	<head>
		<meta charset="UTF-8">
		<title></title>
		<script type="text/javascript" src="js/vue.js"></script>
	</head>

<body>
	<div id="app">
		<father></father>
	</div>

	<template id="father">
		<div id="">
			<son @parentchange="change"></son>
			<son2 :parentnum="num"></son2>
		</div>
	</template>

	<template id="son">
		<div >
			<button @click="add">增加</button>
			<button @click="sub">减少</button>
			<input type="text" :value="count" />
		</div>
	</template>

	<template id="son2">
		<div >
			<p>{{parentnum}}</p>
		</div>
	</template>

	<script type="text/javascript">
		Vue.component("father",{
			template:"#father",
			data:function(){
				return{
					num:0
				}
			},
			methods:{
				change(newCount){
					this.num=newCount;
				}
			},
			components:{
				"son":{
					template:"#son",
					data:function(){
						return{
							count:0
						}
					},
					methods:{
						add(){
							this.count=this.count+1;
							this.$emit("parentchange",this.count)
						},
						sub(){
							this.count=this.count-1;
							this.$emit("parentchange",this.count)
						}
					}
				},
				"son2":{
					template:"#son2",
					props:["parentnum"]
				}
			}
		});

		let vue = new Vue({
			el: "#app",
			data: {
			}
		})
	</script>
	</body>

</html>
8.1 使用步骤
-
导入vuex前必须导入在vue之后
-
创建Vuex对象
const store = new Vuex.Store({
// state相当于data,保存共享数据
state: {
count: 0
},
mutations: {
increment(state) {
state.count++
}
}
}) -
使用(注意格式$this.store.state.数据)
-
在祖先組件中添加store的key保存vuex對象
<head>
	<meta charset="UTF-8">
	<title></title>
	<script type="text/javascript" src="js/vuex.js"></script>
	<script type="text/javascript" src="js/vue.js"></script>
</head>

<body>
	<div id="app">
		<grandfather></grandfather>
	</div>

	<template id="grandfather">
		<div>
			<p>{{this.$store.state.msg}}</p>
		</div>
	</template>

	<template id="father">
		<div>
			<p>{{this.$store.state.msg}}</p>
		</div>
	</template>

	<template id="son">
		<div>
			<p>{{this.$store.state.msg}}</p>
		</div>
	</template>

	<script type="text/javascript">

		const store = new Vuex.Store({
			state: {
				msg:"aaa"
			}
		});

		Vue.component("grandfather", {
			template: "#grandfather",
// 在祖先組件中添加store的key保存vuex對象
store:store,
components: {
“father”: {
template: “#father”,
components: {
“son”: {
template: “#son”,} } } } }); </script> </body> -
mutations保存了修改共享数据的方法
-
注意:
在Vuex中不推荐直接修改共享的数据
因为如果组件都修改了这个共享数据,若数据发生错误,就很难去调试是哪个组件导致的
-
调用mutations中的方法:this.$state.commit(“方法名”);
<head>
	<meta charset="UTF-8">
	<title></title>
	<script type="text/javascript" src="js/vue.js"></script>
	<script type="text/javascript" src="js/vuex.js"></script>
</head>

<body>
	<div id="app">
		<father></father>
	</div>

	<template id="father">
		<div id="">
			<son ></son>
			<son2></son2>
		</div>
	</template>

	<template id="son">
		<div>
			<button @click="add">增加</button>
			<button @click="sub">减少</button>
			<input type="text" :value="this.$store.state.count " />
		</div>
	</template>

	<template id="son2">
		<div>
			<button @click="add">增加</button>
			<button @click="sub">减少</button>
			<input type="text" :value="this.$store.state.count " />
		</div>
	</template>

	<script type="text/javascript">
		const store = new Vuex.Store({
			state: {
				count: 0
			},
			mutations: {
				mAdd(state) {
					state.count = state.count + 1;
				},
				mSub(state) {
					state.count = state.count - 1;
				}
			}
		})

		Vue.component("father", {
			template: "#father",
			store: store,
			components: {
				"son": {
					template: "#son",
					methods: {
						add() {
							this.$store.commit("mAdd")
						},
						sub() {
							this.$store.commit("mSub")
						}
					}
				},
				"son2": {
					template: "#son2",
					methods: {
						add() {
							this.$store.commit("mAdd")
						},
						sub() {
							this.$store.commit("mSub")
						}
					}
				}
			}
		});

		let vue = new Vue({
			el: "#app",
			data: {}
		})
	</script>
</body>
8.2 getters 计算属性
this.$store.getters.计算属性名
<head>
	<meta charset="UTF-8">
	<title></title>
	<script type="text/javascript" src="js/vue.js"></script>
	<script type="text/javascript" src="js/vuex.js"></script>
</head>

<body>
	<div id="app">
		<father></father>
	</div>

	<template id="father">
		<div id="">
			{{this.$store.getters.format}}
		</div>
	</template>

	<template id="son">
		<div>

		</div>
	</template>

	<template id="son2">
		<div>
		</div>
	</template>

	<script type="text/javascript">
		const store = new Vuex.Store({
			state: {
				msg: "aaaa"
			},
			getters: {
				format(state) {
					return state.msg + "sss"
				}
			}
		})

		Vue.component("father", {
			template: "#father",
			store: store,
			components: {
				"son": {
					template: "#son"
				},
				"son2": {
					template: "#son2"
				}
			}
		});

		let vue = new Vue({
			el: "#app",
			data: {}
		})
	</script>
</body>


<!DOCTYPE html>
<html>

	<head>
		<meta charset="UTF-8">
		<title></title>
		<script type="text/javascript" src="js/vue.js"></script>
		<script type="text/javascript" src="js/vuex.js"></script>
	</head>

	<body>
		<div id="app">
			<father></father>
		</div>

		<template id="father">
			<div id="">
				{{this.$store.getters.format}}
			</div>
		</template>

		<template id="son">
			<div>

			</div>
		</template>

		<template id="son2">
			<div>
			</div>
		</template>

		<script type="text/javascript">
			const store = new Vuex.Store({
				state: {
					msg: "aaaa"
				},
				getters: {
					format(state) {
						return state.msg + "sss"
					}
				}
			})

			Vue.component("father", {
				template: "#father",
				store: store,
				components: {
					"son": {
						template: "#son"
					},
					"son2": {
						template: "#son2"
					}
				}
			});

			let vue = new Vue({
				el: "#app",
				data: {}
			})
		</script>
	</body>

</html>
8.3 Router切换组件
和v-if、v-show一样,Vue Router是用来切换组件的显示的
v-if/v-show是标记来切换(true/false)
Vue Router是用哈希来切换(#/xxx)
比v-if/v-show强大的是Vue Router不仅能切换组件的显示,还能在切换的时候传递参数
使用方式:
-
导入Vue Router(在vue.js之后)
-
定义组件
	<template id="one">
		<div class="onepage">
			<p>第一个界面</p>
		</div>
	</template>
let vue = new Vue({
el: “#app”,
components: {
one: one
}
}) -
定义路由规则
数组中的每一个对象就是一条规则
即匹配到哪一个hash,显示哪一个组件
const two = {
    template: "#two"
}
const routes = [{
    path: '/one',
    component: one
},
{
    path: '/two',
    component: two
}
]
-
根据路由规则创建路由对象
const router = new VueRouter({
routes // (缩写) 相当于 routes: routes
}) -
将路径对象挂在到Vue实例中
let vue = new Vue({
el: “#app”,
router:router,
components: {
one: one,
two: two
}
}) -
修改URL哈希值
-
通过< router-view>渲染匹配的组件(出口)
完整代码
<!DOCTYPE html>
<html>

	<head>
		<meta charset="UTF-8">
		<title></title>
		<script type="text/javascript" src="js/vuex.js"></script>
		<script type="text/javascript" src="js/vue.js"></script>
		<script type="text/javascript" src="js/vue-router.js"></script>

	</head>

	<body>
		<div id="app">
			<a href="#/one">切换到第一个页面</a>
			<a href="#/two">切换到第二个页面</a>
			<router-view></router-view>
		</div>

		<template id="one">
			<div class="onepage">
				<p>第一个界面</p>
			</div>
		</template>

		<template id="two">
			<div class="twopage">
				<p>第二个界面</p>
			</div>
		</template>

		<script type="text/javascript">
			const one = {
				template: "#one"
			};

			const two = {
				template: "#two"
			};

			const routes = [{
					path: '/one',
					component: one
				},
				{
					path: '/two',
					component: two
				}
			];

			const router = new VueRouter({
				routes
			})

			let vue = new Vue({
				el: "#app",
				router:router,
				components: {
					one: one,
					two: two
				}
			})
		</script>
	</body>

</html>
router-link
上面用a标签可以设置URL的hash,但是不够专业
vue router中提供了一个专门用于设置hash的标签router-link
通过 to 属性指定目标地址,默认渲染成带有正确链接的 <a> 标签,可以通过配置 tag 属性生成别的标签.
<div id="app">
	<router-link to="/one">切换到第一个页面</router-link>
	<router-link to="/two">切换到第二个页面</router-link>
	<router-view></router-view>
</div>
给router-link定义渲染成什么(指定tag属性)
<div id="app">
	<router-link to="/one" tag="button">切换到第一个页面</router-link>
	<router-link to="/two" tag="button">切换到第二个页面</router-link>
	<router-view></router-view>
</div>
如何指定路由的激活状态?
-
重写css属性router-link-active
-
通过linkActiveClass(是路由实例对象中的属性)
nj-active是一个类名
const router = new VueRouter({
	routes,
	linkActiveClass:"nj-actove"
})


<style type="text/css">
	.nj-actove{
		background: red;
	}
</style>
如何指定默认的hash?路由重定向redirect
在定义路由规则的时候写
const routes = [{
        path: '/',
        redirect: '/one'
	},
	{
        path: '/one',
        component: one
    },
	{
        path: '/two',
        component: two
	}
];


<!DOCTYPE html>
<html>

	<head>
		<meta charset="UTF-8">
		<title></title>
		<script type="text/javascript" src="js/vuex.js"></script>
		<script type="text/javascript" src="js/vue.js"></script>
		<script type="text/javascript" src="js/vue-router.js"></script>
		<style type="text/css">
			/*.router-link-active{
				background: red;
			}*/

			.nj-actove {
				background: red;
			}
		</style>
	</head>

	<body>
		<div id="app">
			<router-link to="/one" tag="button">切换到第一个页面</router-link>
			<router-link to="/two" tag="button">切换到第二个页面</router-link>
			<router-view></router-view>
		</div>

		<template id="one">
			<div class="onepage">
				<p>第一个界面</p>
			</div>
		</template>

		<template id="two">
			<div class="twopage">
				<p>第二个界面</p>
			</div>
		</template>

		<script type="text/javascript">
			const one = {
				template: "#one"
			};

			const two = {
				template: "#two"
			};

			const routes = [{
					path: '/',
					redirect: '/one'
				},
				{
					path: '/one',
					component: one
				},
				{
					path: '/two',
					component: two
				}
			];

			const router = new VueRouter({
				routes,
				linkActiveClass: "nj-actove"
			})

			let vue = new Vue({
				el: "#app",
				router: router,
				components: {
					one: one,
					two: two
				}
			})
		</script>
	</body>

</html>
传递参数
只要将Vue Router实例对象挂在到Vue实例对象上,就可以通过vue.$route拿到路由对象
只要能拿到路由对象,就可以通过路由对象拿到传递的参数
传递参数的两种方式
-
通过URL参数参数==(key=value&key=value),通过this.$route.query.key==获取
切换到第一个页面 切换到第二个页面const one = {
template: “#one”,
created:function(){
console.log(this. r o u t e ) ; c o n s o l e . l o g ( t h i s . route); console.log(this. route);console.log(this.route.query.name);
console.log(this.$route.query.age);
}
}; -
通过占位符传递==(路由规则中/:key/:key,路径中/value/value),通过this.$route.params.key==获取
切换到第一个页面 切换到第二个页面const routes = [{
path: ‘/’,
redirect: ‘/one’
},
{
path: ‘/one’,
component: one
},
{
path: ‘/two/:name/:age’,
component: two
}
];const two = {
template: “#two”,
created: function() {
console.log(this. r o u t e ) ; c o n s o l e . l o g ( t h i s . route); console.log(this. route);console.log(this.route.params.name);
console.log(this.$route.params.age);
}
};<head> <meta charset="UTF-8"> <title></title> <script type="text/javascript" src="js/vuex.js"></script> <script type="text/javascript" src="js/vue.js"></script> <script type="text/javascript" src="js/vue-router.js"></script> <style type="text/css"> .nj-actove { background: red; } </style> </head> <body> <div id="app"> <router-link to="/one?name=zhangsan&age=33" tag="button">切换到第一个页面</router-link> <router-link to="/two/lisi/30" tag="button">切换到第二个页面</router-link> <router-view></router-view> </div> <template id="one"> <div class="onepage"> <p>第一个界面</p> </div> </template> <template id="two"> <div class="twopage"> <p>第二个界面</p> </div> </template> <script type="text/javascript"> const one = { template: "#one", created: function() { console.log(this.$route); console.log(this.$route.query.name); console.log(this.$route.query.age); } }; const two = { template: "#two", created: function() { console.log(this.$route); console.log(this.$route.params.name); console.log(this.$route.params.age); } }; const routes = [{ path: '/', redirect: '/one' }, { path: '/one', component: one }, { path: '/two/:name/:age', component: two } ]; const router = new VueRouter({ routes, linkActiveClass: "nj-actove" }) let vue = new Vue({ el: "#app", router: router, components: { one: one, two: two } }) </script> </body>
嵌套路由
嵌套路由(子路由),就是在被切换的组件中又切换其他子组件
如:在one界面中也有两个按钮,通过两个按钮进一步切换one中的内容
1 子路由的hash要指定下一级路由和二级路由
<template id="one">
	<div class="onepage">
		<p>第一个界面</p>
		<router-link to="/one/onesub1" tag="button">切换到第一个自界面</router-link>
		<router-link to="/one/onesub2" tag="button">切换到第二个自界面</router-link>
		<router-view></router-view>
	</div>
</template>


const onesub1 = {
		template: "#onesub1"
	};
const onesub2 = {
	template: "#onesub2"
};
2 路由规则也得写一下
2.1 以下方式定义,onesub1/onesub2出来之后会完全覆盖one
const routes = [{
        path: '/one',
        component: one
	},{
        path: '/one/onesub1',
        component: onesub1
    },{
        path: '/one/onesub2',
        component: onesub2
    },
    {
        path: '/two/:name/:age',
        component: two
    }
];
2.2在一级路由中通过children来配置子路由
const routes = [{
        path: '/one',
        component: one,
        children: [{
				// 当 /user/:id/profile 匹配成功,
				// UserProfile 会被渲染在 User 的 <router-view> 中
				path: 'onesub1',
				component: onesub1
			},
			{
				// 当 /user/:id/posts 匹配成功
				// UserPosts 会被渲染在 User 的 <router-view> 中
				path: 'onesub2',
				component: onesub2
			}
		]
	},{
        path: '/one/onesub1',
        component: onesub1
    },{
        path: '/one/onesub2',
        component: onesub2
    },
    {
        path: '/two/:name/:age',
        component: two
    }
];


<!DOCTYPE html>
<html>

	<head>
		<meta charset="UTF-8">
		<title></title>
		<script type="text/javascript" src="js/vuex.js"></script>
		<script type="text/javascript" src="js/vue.js"></script>
		<script type="text/javascript" src="js/vue-router.js"></script>
		<style type="text/css">
			.nj-actove {
				background: red;
			}
		</style>
	</head>

	<body>
		<div id="app">
			<router-link to="/one?name=zhangsan&age=33" tag="button">切换到第一个页面</router-link>
			<router-link to="/two/lisi/30" tag="button">切换到第二个页面</router-link>
			<router-view></router-view>
		</div>

		<template id="one">
			<div class="onepage">
				<p>第一个界面</p>
				<router-link to="/one/onesub1" tag="button">切换到第一个自界面</router-link>
				<router-link to="/one/onesub2" tag="button">切换到第二个自界面</router-link>
				<router-view></router-view>
			</div>
		</template>

		<template id="onesub1">
			<div class="onesub1page">
				<p>第一个界面子介面1</p>
			</div>
		</template>

		<template id="onesub2">
			<div class="onesub2page">
				<p>第一个界面子介面2</p>
			</div>
		</template>

		<template id="two">
			<div class="twopage">
				<p>第二个界面</p>
			</div>
		</template>

		<script type="text/javascript">
			const onesub1 = {
				template: "#onesub1"
			};

			const onesub2 = {
				template: "#onesub2"
			};

			const one = {
				template: "#one",
				components: {
					onesub1: onesub1,
					onesub2: onesub2
				}
			};

			const two = {
				template: "#two"
			};

			const routes = [{
					path: '/one',
					component: one,
					children: [{
							// 当 /user/:id/profile 匹配成功,
							// UserProfile 会被渲染在 User 的 <router-view> 中
							path: 'onesub1',
							component: onesub1
						},
						{
							// 当 /user/:id/posts 匹配成功
							// UserPosts 会被渲染在 User 的 <router-view> 中
							path: 'onesub2',
							component: onesub2
						}
					]
				}, {
					path: '/one/onesub1',
					component: onesub1
				}, {
					path: '/one/onesub2',
					component: onesub2
				},
				{
					path: '/two/:name/:age',
					component: two
				}
			];

			const router = new VueRouter({
				routes
			})

			let vue = new Vue({
				el: "#app",
				router: router,
				components: {
					one: one,
					two: two
				}
			})
		</script>
	</body>

</html>
命名视图
命名视图和具名插槽 相似,都是让不同的出口显示不同的内容
命名视图就是当路由地址被匹配的时候同时制定多个出口,并且每个出口中显示的内容不同
<div id="app">
	<router-view name="name1"></router-view>
	<router-view name="name2"></router-view>
</div>


const routes = [{
	path: '/',
    components:{
        name1:one,
        name2:two
    }
	}
];


<!DOCTYPE html>
<html>

	<head>
		<meta charset="UTF-8">
		<title></title>
		<script type="text/javascript" src="js/vuex.js"></script>
		<script type="text/javascript" src="js/vue.js"></script>
		<script type="text/javascript" src="js/vue-router.js"></script>
	</head>

	<body>
		<div id="app">
			<router-view name="name1"></router-view>
			<router-view name="name2"></router-view>
		</div>

		<template id="one">
			<div class="onepage">
				<p>第一个界面</p>
			</div>
		</template>

		<template id="two">
			<div class="twopage">
				<p>第二个界面</p>
			</div>
		</template>

		<script type="text/javascript">


			const one = {
				template: "#one",
			};

			const two = {
				template: "#two"
			};

			const routes = [{
					path: '/',
					components:{
						name1:one,
						name2:two
					}
				}
			];

			const router = new VueRouter({
				routes
			})

			let vue = new Vue({
				el: "#app",
				router: router,
				components: {
					one: one,
					two: two
				}
			})
		</script>
	</body>

</html>
watch属性
-
watch属性是专门用于监听数据变化的,只要数据发生了变化,就会自动调用对应数据的回调方法
-
watch属性不仅仅能够监听数据的变化,还能够监听路由地址的变化,在企业开发中可以通过watch来判断当前页面是从哪个界面跳转过来的
-
watch是写在vue实例对象中的
-
监听路由的变化(监听vue实例对象中的”$route.path”)
作用:判断从哪个界面跳到哪个界面
let vue = new Vue({
	el: "#app",
	router: router,
	watch:{
        num1:function(newValue,oldValue){
        	this.res=parseInt(this.num1)+parseInt(this.num2)
		},
    	num2:function(newValue,oldValue){
    		this.res=parseInt(this.num1)+parseInt(this.num2)
   		 },
		"$route.path":function(newValue,oldValue){
   	 		console.log(newValue,oldValue);
   		 }
	},
    data:{
        num1:0,
        num2:0,
        res:0
    },
    components: {
        one: one,
        two: two
    }
})
<head> <meta charset="UTF-8"> <title></title> <script type="text/javascript" src="js/vuex.js"></script> <script type="text/javascript" src="js/vue.js"></script> <script type="text/javascript" src="js/vue-router.js"></script> </head> <body> <div id="app"> <input type="text" v-model="num1"/> <span >+</span> <input type="text" v-model="num2" /> <span >=</span> <input type="text" disabled v-model="res"/> </div> <template id="one"> <div class="onepage"> <p>第一个界面</p> </div> </template> <template id="two"> <div class="twopage"> <p>第二个界面</p> </div> </template> <script type="text/javascript"> const one = { template: "#one", }; const two = { template: "#two" }; const routes = [{ path: '/', components:{ name1:one, name2:two } } ]; const router = new VueRouter({ routes }) let vue = new Vue({ el: "#app", router: router, watch:{ num1:function(newValue,oldValue){// console.log(this.num1)
// console.log(newValue,oldValue);
this.res=parseInt(this.num1)+parseInt(this.num2)
},
num2:function(newValue,oldValue){
// console.log(this.num1)
// console.log(newValue,oldValue);
this.res=parseInt(this.num1)+parseInt(this.num2)
},
“$route.path”:function(newValue,oldValue){
console.log(newValue,oldValue);
}
},
data:{
num1:0,
num2:0,
res:0
},
components: {
one: one,
two: two
}
})
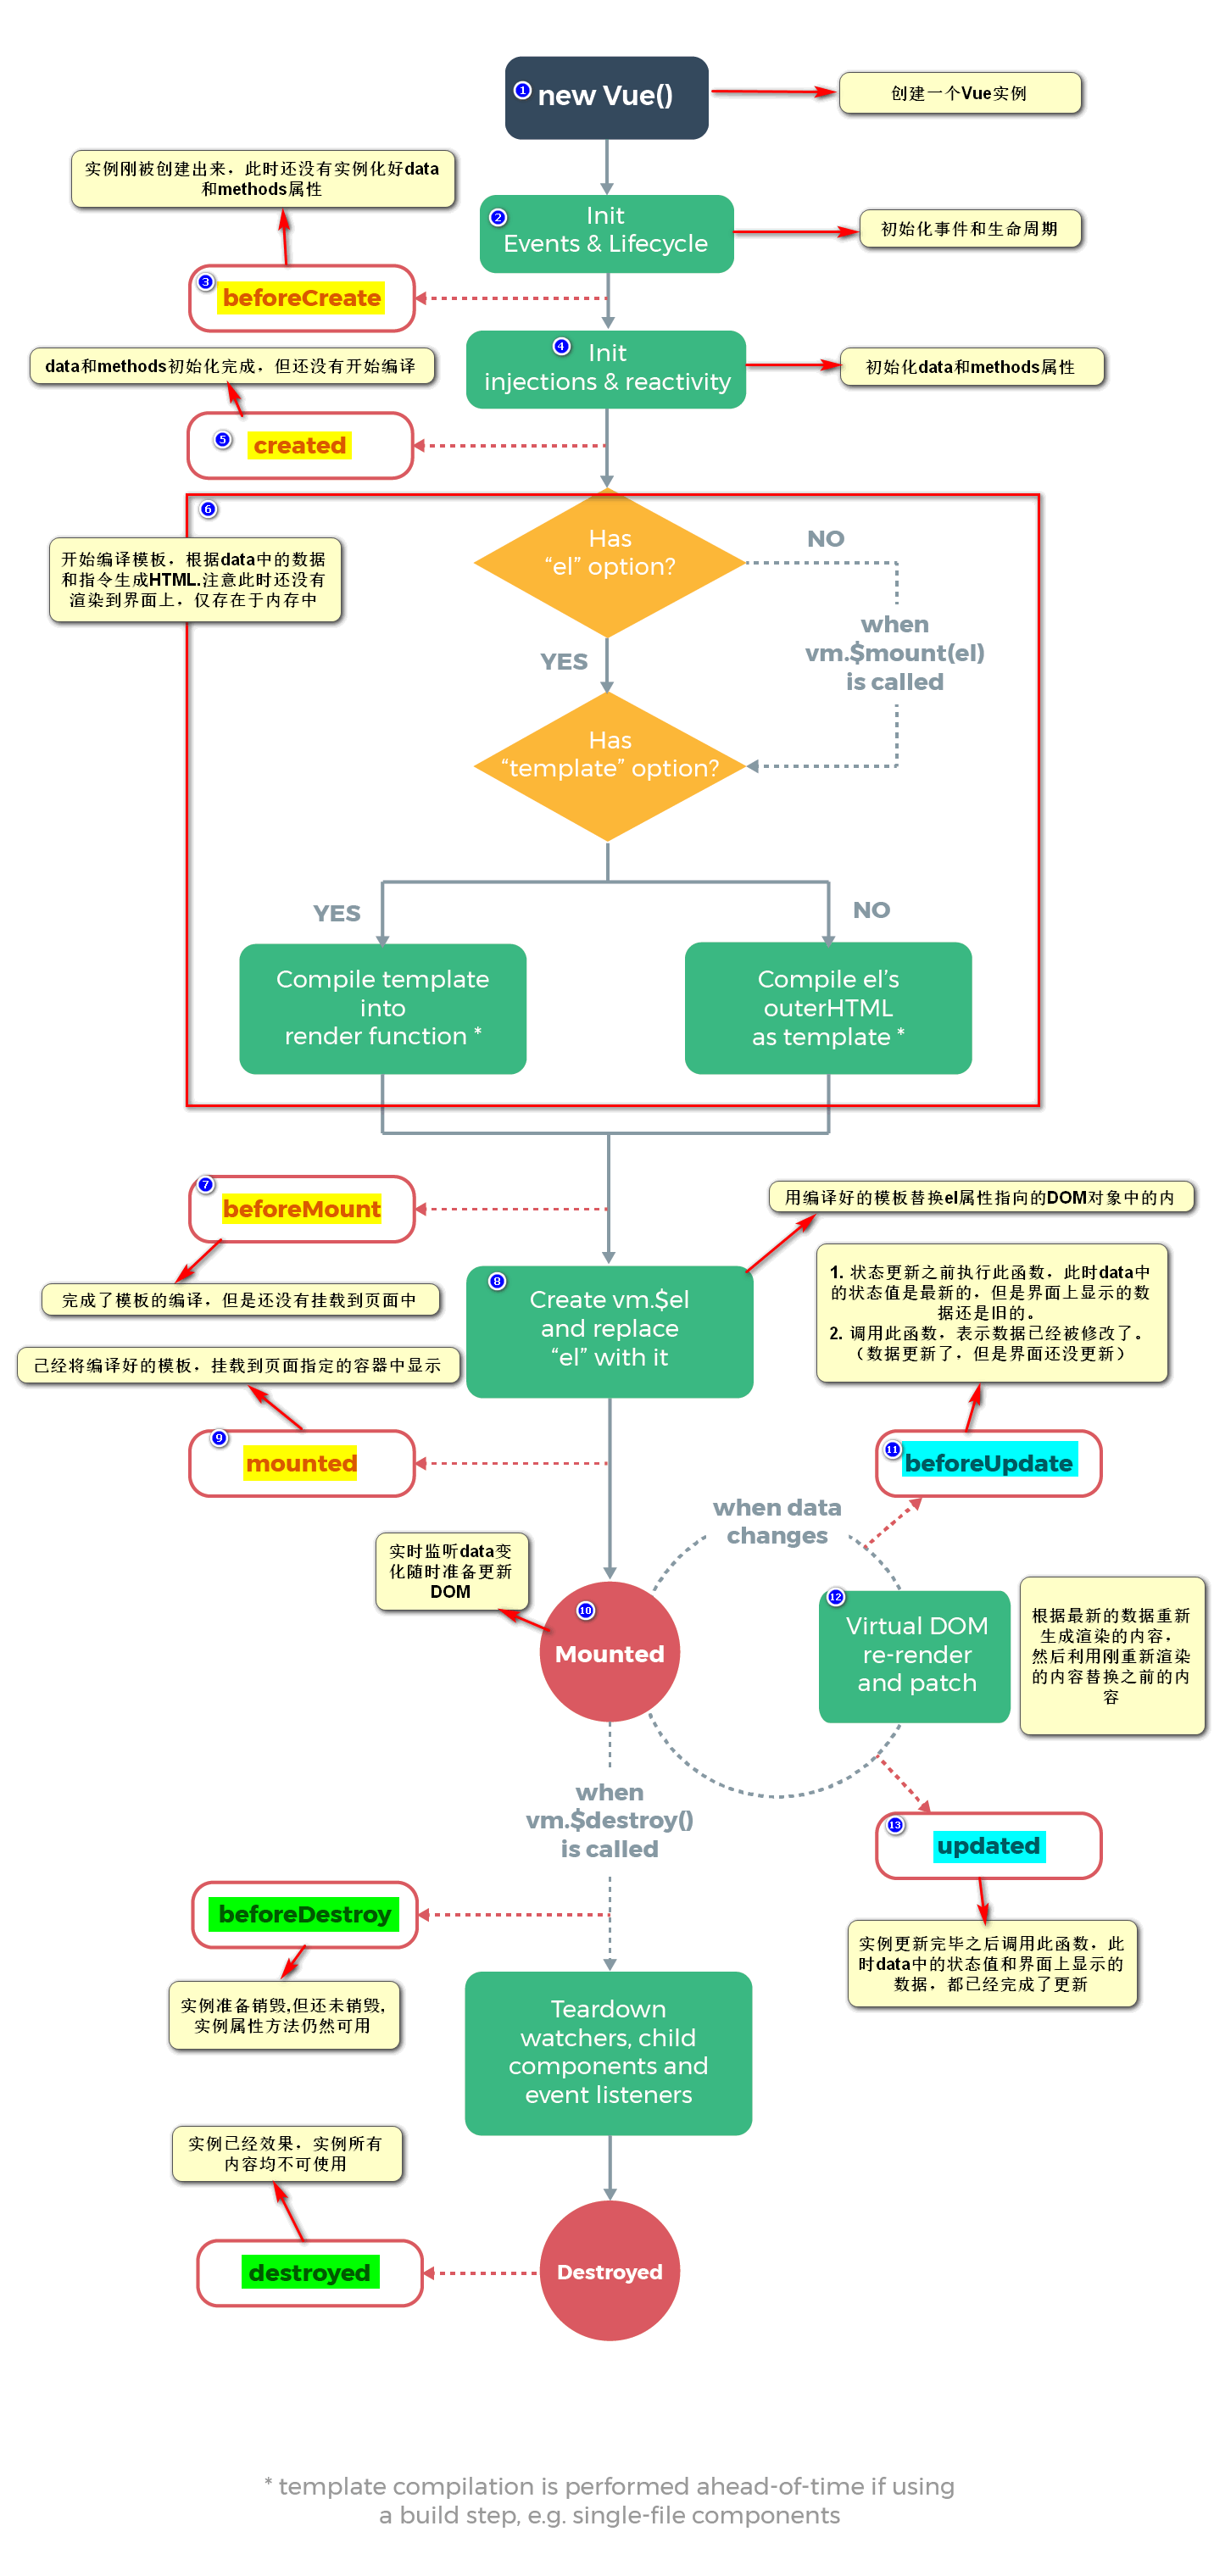
9 Vue生命周期方法
9.1 什么是生命周期方法?
和webpack生命周期方法一样,都是在从生到死的特定阶段调用的方法
生命周期钩子 = 生命周期函数 = 生命周期事件
9.2 Vue生命周期方法分类
1)创建期间的生命周期方法:
beforeCreate
仅仅表示vue实例刚刚被创建出来,此时还没有初始化好vue实例中的数据和方法,所以此时不能访问到vue实例中的data和methods
created
在调用created的时候,是最早能访问到vue实例中的data和methods的时候
beforeMount
在调用beforeMount的时候,仅仅只完成了模板的编译,但是还没有将模板渲染到界面上
mounted
在调用mounted的时候,模板的渲染已经完成,此时可以拿到渲染的内容
2)运行期间的生命周期方法
beforeUpdate
vue实例对象中的data中的数据发生变化时触发(实时监听)。因此调用beforeUpdate的时候就表示data中的数据被修改了。(数据更新了,但是界面还没更新)
updated
调用updated的时候表示数据被修改了,且最新的数据也在界面上重新渲染完毕。
3)销毁期间的生命周期方法
beforeDestroy
在调用beforeDestroy,表示当前组件即将被销毁。若组件不会被销毁,则改生命周期不会调用。该生命周期函数是最后能访问到组件中的data和methods中数据的函数。
destroyed
在调用beforeDestroy,表示当前组件已经被完全销毁了。若组件不会被销毁,则改生命周期不会调用。此时已经操作不到组件中的数据和方法了
<!DOCTYPE html>
<html>

	<head>
		<meta charset="UTF-8">
		<title></title>
		<script type="text/javascript" src="js/vue.js"></script>
	</head>

	<body>
		<div id="app">

		</div>

		<script type="text/javascript">

			let vue = new Vue({
				beforeCreate:function(){

				},
				created:function(){

				},
				beforeMount:function(){

				},
				mounted:function(){

				},
				beforeUpdate::function(){

				},
				updated:function(){

				},
				beforeDestroy:function(){

				},
				destroyed:function(){

				},
				el: "#app",
			})
		</script>
	</body>

</html>
10 特殊特性
10.1 vue特殊特性
vue特点:数据驱动界面更新,无需操作DOM来更新界面
vue不推荐直接操作DOM,但企业开发中有时候需要拿到DOM,并操作DOM,此时救可以通过ref来获取
10.2 ref使用
在需要获取的元素上添加ref属性
在使用的地方通过this.$refs.xxx获取
<!DOCTYPE html>
<html>

	<head>
		<meta charset="UTF-8">
		<title></title>
		<script type="text/javascript" src="js/vue.js"></script>
	</head>

	<body>
		<div id="app">
			<button @click="myFn">按钮</button>
			<p ref='mypp'>我是原生的dom</p>
			<one id="myOne" ref='myOne'></one>
		</div>

		<template id="one">
			<div >
				<p>我是组件</p>
			</div>
		</template>

		<script type="text/javascript">
			Vue.component("one",{template:"#one"})

			let vue = new Vue({
				el: "#app",
				methods:{
					myFn(){
						console.log(this.$refs);
						console.log(this.$refs.mypp);
						console.log(this.$refs.myOne);
					}
				}
			})
		</script>
	</body>

</html>
注意点:
如果是通过原生的js来获取元素,无论是原生的js或者是自定义的组件,拿到的都是原生的元素,且vue官方不推荐这么获取
this.$refs默认是一个空对象,用它获得的原生元素还是原生元素,组件就还是组件,就可以进一步拿到组件中的数据和方法
11 Vue-CLI
11.1基本使用
CLI:Command Line Interface
Vue-CLI是vue官方提供的脚手架工具,默认已经为我们搭建好了一套利用webpack管理vue的项目结构
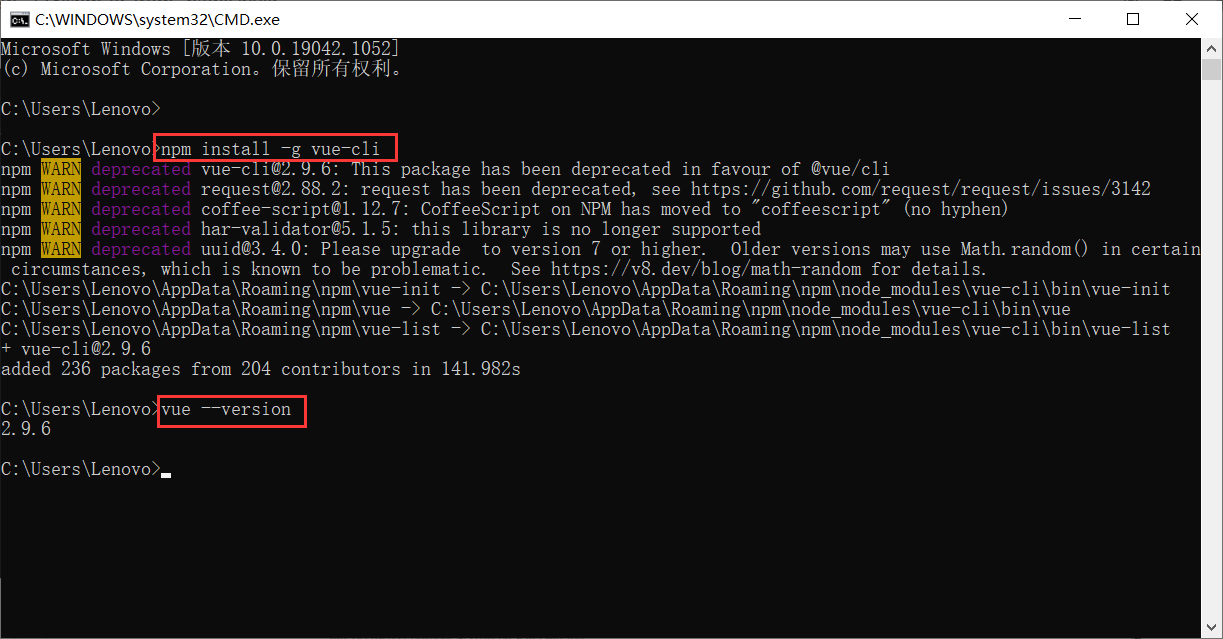
11.2 安装和使用Vue-cli
将外网转内网
npm install -g cnpm --registry=https://registry.npm.taobao.org
查看版本号
cnpm -v
安装指定的@vue/cli版本
cnpm install -g @vue/[email protected]
检查是否安装成功:vue --version
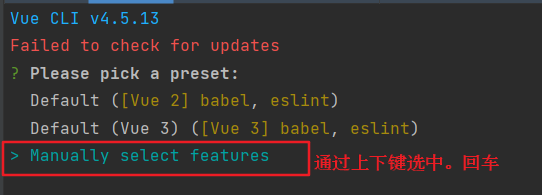
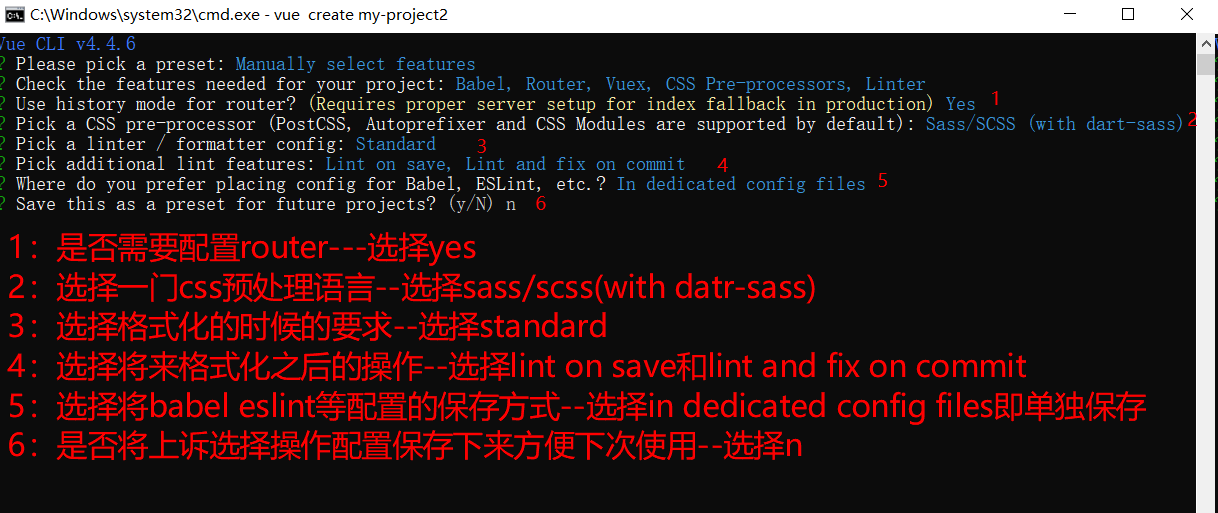
通过脚手架创建项目:vue create project-name
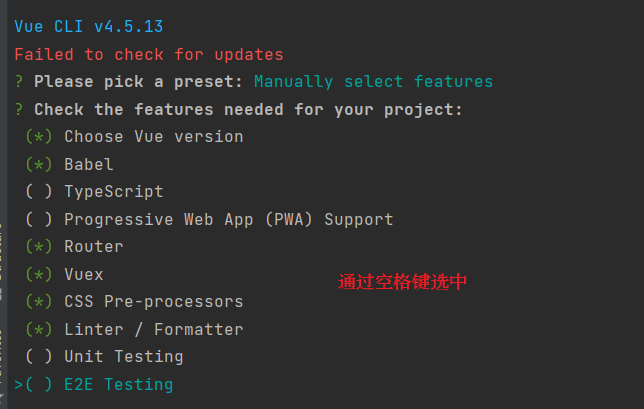
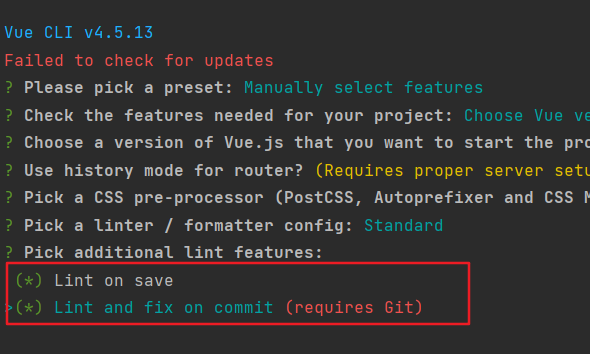
手动配置
- Babel:转码器,可以将ES6代码转为ES5代码,可兼容不支持ES6的浏览器。
- TypeScript:是JavaScript的超集(.ts文件),包含并扩展了 JavaScript 的语法。需要被编译输出为 JavaScript在浏览器运行。
- Progressive Web App (PWA) Support:渐进式Web应用程序
- Router :vue-router(vue路由)
- Vuex :vuex(vue的状态管理模式)
- CSS Pre-processors :CSS 预处理器(如:less、sass)
- Linter / Formatter:代码风格检查和格式化(如:ESlint)
- Unit Testing :单元测试(unit tests)
- E2E Testing :e2e(end to end) 测试
11.3 项目结构
vue-cli2.x中生成的项目结果可以看到build和config文件夹,它们存储了webpack相关的配置
vue-cli3.x以后生成的项目结构就没有build和config文件夹了,因为为了化繁为简,让初学者不用关心webpack只管如何使用vue
node_modules文件夹:
存储了依赖的相关的包
public文件夹:
任何放在public文件夹的静态资源都会被简单地复制而不经过webpack,需要通过绝对路径来引用它们
一般用于存储一些永远不会改变的静态资源,或者webpack不支持的第三方库
src文件夹:
代码文件夹
assets:存储项目中自己的一些静态文件(图片/字体等)
components:存储项目中自定义的组件(小组件,公共组件)
views:存储项目中的自定义组件(大组件,页面级组件,公共组 件)
router:存储VueRouter相关文件
store:存储Vuex相关文件
App.vue:根组件
main.js:项目的入口
运行
cd my-project2
npm run serve
打包
cd my-project2
npm run build (vue-cli2.x)
就会生成一个dist文件夹 东西都放在里面
卸载
cnpm uninstall @vue/cli -g
